How to Enable Offline Files in Windows 10
Q: How to enable offline files in Windows 10?
"Hello friends, I often need to travel for business purposes. Hence, I lose access to some of my important files whenever I am not connected to the internet. I know that Windows 10 users can enable offline files. How can I enable offline files? Is there any solution other than Sync Center?"
If you work in a corporate environment, it is obvious to share files and other resources on servers to make work easier. It is easy to access the files while on a corporate network. So, what happens when you go offline and still want to continue working? It is easy.
Offline file feature in portable devices running Windows 10, 8, 7 professional, enterprise, and Ultimate edition enables you to continue working even if you don’t have a network connection. It caches all the files and folders that you share online temporarily on your portable device. Read on to know more.
Part 1: Overview of Offline Files
Accessing working files is essential for efficient working. That is why they are available in an office or corporate server for workers to access them when working. When online, files access is as fast as your network or server connection, and that is easy and fast. The problem comes when there is no network or slow connections.
Offline feature in Window 7/8/10, enable you to access the online files offline by retrieving them from the offline file folder using your local access speed.
When you allow offline files in window 10, the useful sync feature works with Sync center to sync all offline files between the device you are using and the corporate servers. That way, you can be able to access a copy of the files and folders available in your work network.
Part 2: Why Do You Need to Enable Offline Files in Windows 10?
The following are the two main reasons why you need to enable offline files in Windows 10:
1. To Access Network Files or Folders From Anywhere at Any Time
The offline feature makes online files accessible for you to work, view, and make any change offline from any location without minding about your network connection speed or availability.
2. To Sync Offline Files Between Your Computer and Network Drive
Do you want to make connections between your portable device and the corporate server? You must sync files with offline files folders or sync center. To do that, you must enable and activate the offline file feature. It keeps offline files in accord with your device and corporate server for you to access files easily from anywhere anytime.
Part 3: How to Enable Offline Files in Window 10
So, what must you do to enable the useful feature in your device? It involves a few easy steps. First, learn how to create a shared file in Window10 then use the sharable file to save the online files and folders.
Do you want to access the online files offline always? What do you do? For this, you have to map the network drive to your device and then turn on the offline file in Windows 10. It’s that simple. Here are the steps to take.
Step 1: Sync network Drive to local Drive
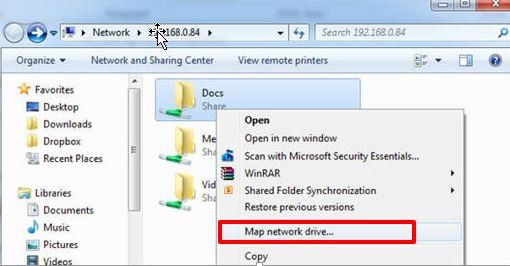
To access the folder on the network drive, you press 'Win+R' to activate the run window. While here, type 'two backslashes and IP address' or 'hostname'. Once you do this, you connect o your Network Drive, and you see the shared folders.
1. Once you locate the shared folders, right-click on them. After that, select "Map network drive" from the menu.
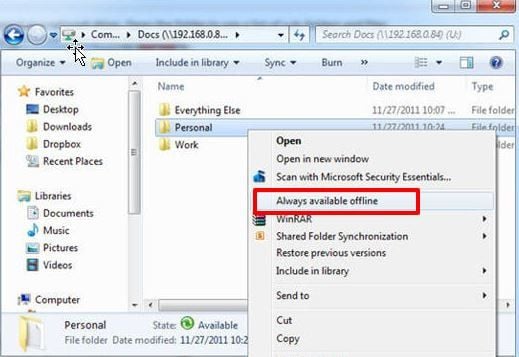
2. Make the online folders to be always available offline. How do you do that? By going to the offline files feature and right-clicking on it to select "always available offline" from the menu.
3. Finally, make sure the files are available online. Wait for a notification informing you that your files will be available online. After you see the message, disconnect from the corporate network to see the online files offline.
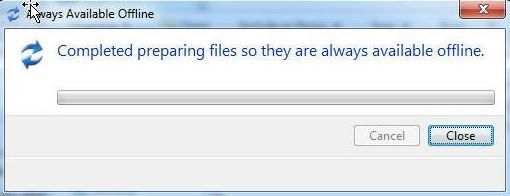
Note that you get a list of many folders that your device has already cache in the mapping network. You need to know that you can only access the files that are only available offline.
Step 2: Turn on offline in Window 10
How do you turn on offline files in window 10? You can use one of the following methods:
Method 1: Configure offline files in Window 10 by Sync center
It is making a connection between your portable device and the network server. The sync center sync files and makes them available offline even when you don’t have network connections. Follow the following steps to sync:
- Go to the control panel and switch its view to "large icon" or "small icon" to find the sync center. Once you find it, open it.
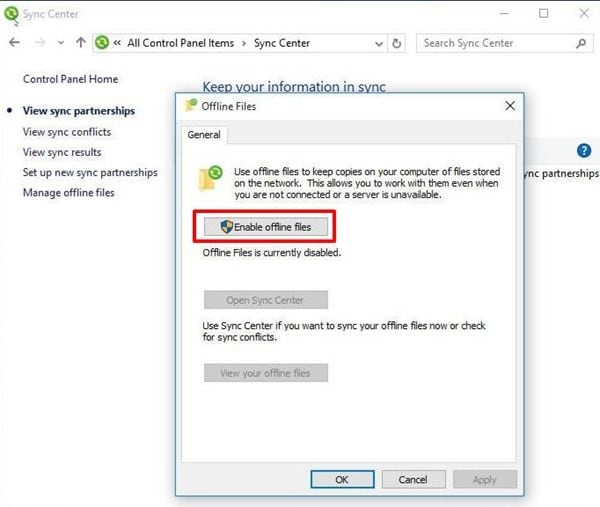
- At the left panel, click on "manage offline files" to see the offline files window.
- Click on "Enable offline files" to enable offline files and activate the folders. Make sure you restart your computer to save offline folders in your device. You also have an option of disabling offline files while here.
Method 2: Enable offline files in Windows 10 using Group Policy
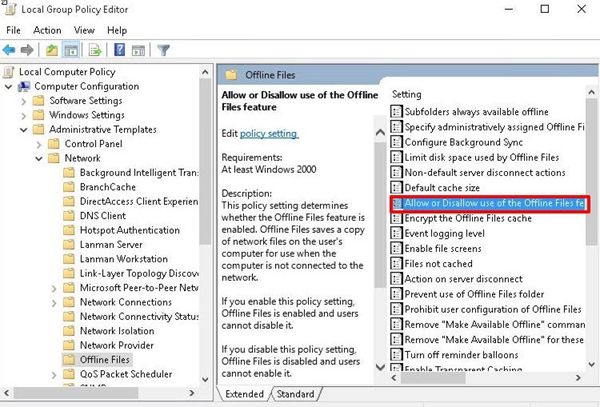
The person in charge of corporate network sharing can enable the offline feature on behalf of the people on the network by configuring a group policy setting. The following are the steps to follow:
- On the search box, type "group policy" and select "group policy editor" on the start menu.
- Open computer configuration> administration templates> network> offline files then find and double click on "allow or disallow the use of offline files" feature. Choose "enabled" then "apply" and "OK."
- Exist local group policy and go to the Sync center to see if offline files are enabled.
Method 3: Enable Offline in Window 10 using Registry
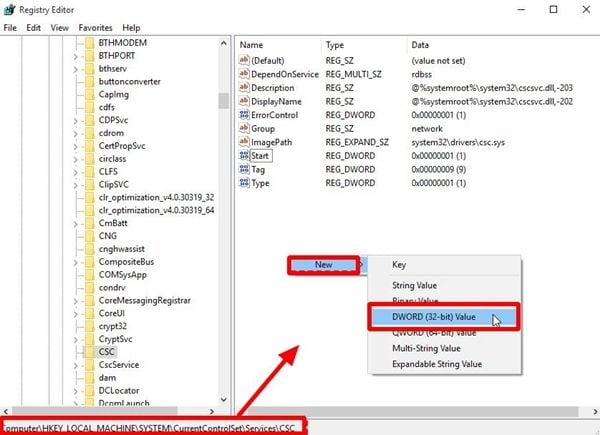
Do you know the registry stores all the setting files of windows and the applications? You can also enable or disable offline files from the place using the following steps:
- On the search box, type registry, select and open it. Right-click on the blank and select new and DWORD (32bit) value. Name it as Start and value to 1.
HKEY._LOCAL._MACHINE/SYSTEM/CurrentControlSet/Services/SCS
- Next, go to the key below and set the start value to 2.
HKEY._LOCAL._MACHINE/SYSTEM/CurrentControlSet/Service/CscService
- Restart your computer to effect the changes.
Part 4: How to Sync Offline Files in Window 10
For you to successfully sync offline files in Windows 10, you can use 3 methods. You can do it manually, automatically, or use the software. The following are the steps to follow in each method:
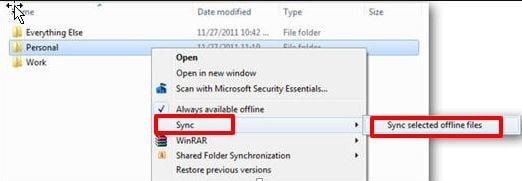
Method 1: Sync offline files manually
Step 1: go to file explore> this PC> network locations and select mapped network drive in the advanced setting.
Step 2: Right-click on folders with offline files and then click on "Sync" and after that "sync selected offline files."
Method 2: Sync files automatically with the sync center
Step 1: Go to the search box and type Sync center to find and select the sync center.
Step 2: Next, click the "view sync partnership" link on the left side. After that, double click on the mapped network drive.
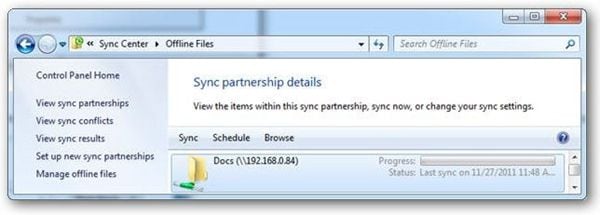
Step 3: Lastly, choose the folders you want to sync regularly. Click on the Schedule button and follow the prompt to finish.
Method 3: Sync files automatically with AOMEI Backupper
It is indeed true that the offline files folder and sync center helps you access and sync files manually and automatically, but what happens if some of the files do not sync due to various reasons? That is where the AOMEI Backupper comes in. How does it help?
The easy to use file sync software helps you sync files to a network drive, internal hard drive, and external storage devices like USB drive, One Drive, and any other storage. What is fantastic is that the AOMEI Backupper Standard is free and has many features you can use.
Now, if you want to get the best of the software, you can upgrade to advanced edition AOMEI Bcakupper Professional or get the AOMEI Bcakupper server if you are using the server-based OS. The following are the steps to follow to sync offline files in Windows 10:
Step 1: Download the Software
Download, install and launch the AOMEI Backupper standard on your PC.
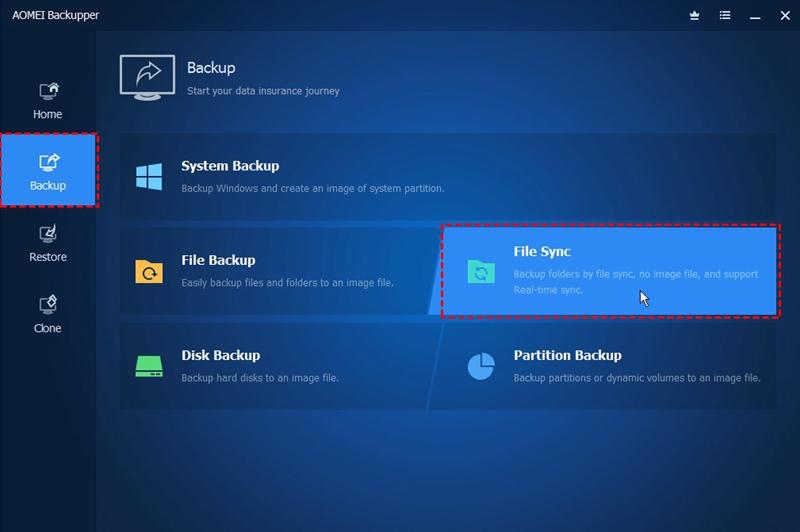
Step 2: Choose File Sync Option
Here you should go to the "backup" section. There you can pick the "File Sync" option.
Step 3: Adding a Folder
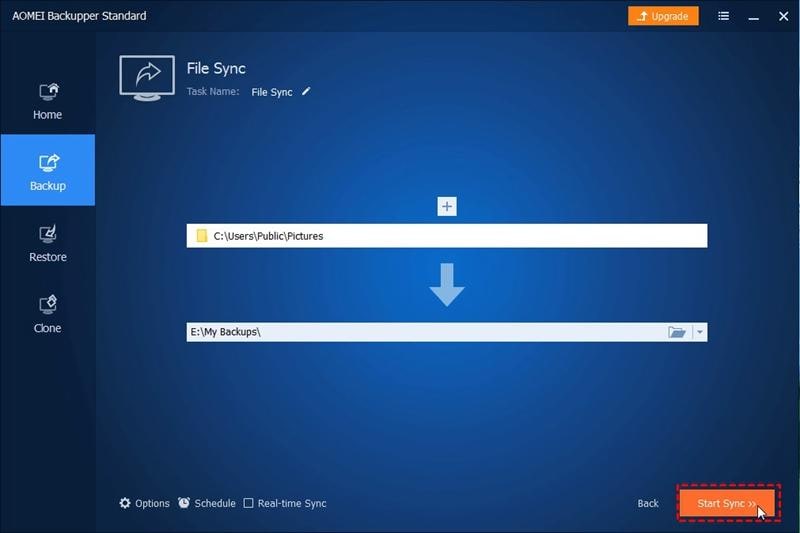
Go and click on the "add folder" option. Go to "share/NAS" to get the files that you want to sync. Choose the destination path of the files you choose.

Step 4: Scheduling the Sync Task
Select a "Schedule" option to set the sync date or time for your files.
Step 5: Starting the Sync Task
Now, at this stage, you need to click on the "start sync" button.
Step 6: Finishing the Task
Wait for some time and the sync process will complete. After that, click on the "Finish" button.

AOMEI Backupper enables you to sync files at a specific time and date. In case of any changes, the software can monitor and sync to the destination path automatically make it easier for you to sync and access files offline.
Conclusion
To access online shared files offline, you have first to enable the offline files to feature in Windows 7/8/10 by either using a registry, using group policy, or a sync center, once you do that. You can choose a method to use to sync the files between your device and the network drive.
Although you can sync manually or automatically, using AOMEI Backupper Professional enables you to sync files between your device and network drive and in other devices such as cloud storage and flash drives. The software makes sync easy, fast, and gives you sync options and schedule facility.
Data Backup Services
- Computer Backup
- Hard Drive Backup
- Mac Backup
- Cloud Backup


 ChatGPT
 Perplexity
 Google AI Mode
 Grok
Grok


Amy Dennis
staff Editor