How to Fix WD Sync Not Working Error
I discovered that WD Sync stopped working some months ago and have tried all sorts of things to get it working again, but it still won't sync anything.
When I right-click on the WD Sync icon it says "WDMyCloud is up to date" - but no files are syncing.
I'm running Windows 10. I'm using the latest WD Sync (1.3.5949). I'm on the same network as my MyCloud. I can connect to my MyCloud device via the network and view the files on there without any problem. I can save files to my MyCloud and there is 890GB space available. My MyCloud has the latest firmware - WDMyCloud v04.05.00-315: Core F/W.
Things I have tried:
Paused syncing in WD Sync. Then resumed syncing. It did a recount of the files it needed to sync (2575) but then didn't sync any. A notification appeared saying that is couldn't sync a file. I paused and resumed again, and it gave the same notification for a different file. Nothing else synced.
Quit WD Sync and restarted. Didn't work. Still said 2575 files pending.
Deleted a folder pair, and re-created it. Didn't work.
I removed the device and re-added it. Still didn't work.
Deleted WD Sync off my PC. Then reinstalled it from scratch. I set up just one local folder to sync (in addition to the standard "My Cloud" folder), and still nothing syncs. It now says, "WDMyCloud is up to date" but nothing syncs across.
I removed the device again. Then I went through the steps to add the device and I logged into my MyCloud account in WD Sync, instead of just using the local network discovery. But this didn't change anything - it still doesn't sync. Still says "WDMyCloud is up to date". Quit WD Sync (the new installation) and restarted. Still didn't work.
Please let me know what else I can do to get WD Sync working again?
Thanks
Josh
Being unable to perform the sync task is quite problematic. In case you cannot sync your data after you made changes, you may lose the new data incorporated. Any virus or malware attack, system crash, or physical disaster can deprive you of the new version of your data. Hence, synchronization is mandatory. If you want to sync data between your internal/external drive and cloud storage, you usually use WD sync. You go to the WD cloud login and activate the cloud for sync function. But what if your device ends up showing WD sync not working? This article is going to explain all about this situation.
Before discussing the possible solutions to fix WD sync not working, let's see what WD sync is? WD stands for western digital. Hence, WD sync is a utility that is used to sync the data/file between a hard drive and cloud storage on the network. My Cloud Device present on your network is the secondary storage location while your internal/external hard drive act as the primary one. Meant to only work for cloud storage, this software is compatible with Windows 10/8.1/8/7. But sometimes, this western digital hard drive software fails to work and you confront an error saying WD sync not working. This article is going to explain all about the possible reasons for this error and solutions to resolve WD sync not working. Here are the topics that would be discussed in detail.
Part 1: What Are Common Issues of WD Sync Not Working?
Every technical error has some background reasons, so this WD sync not working error. As WD sync works on network i.e. My Cloud NAS device may confront certain issues. As it is working in a network, probably the network issue may end up showing the WD sync error on the device. Here are the reasons:
- WD Sync is unable to sync from the NAS to the client. Internet connection, corrupted file/folder, or virus or malware attacks can be possible reasons in which the data is not synced from NAS to the client.
- WD Sync displays "No Storage Devices Found" or "My Cloud Not Seen". It may be due to a faulty connection between a hard drive and cloud storage. It can also occur due to login issues of the cloud device. Make sure you have a sound internet connection as NAS works on the network.
Hence, these are the two common reasons to show WD sync not working. In the next section, you would get some practical solutions to fix the error and to run a smooth sync function.
Keywords:
WD sync
WD cloud login
WD sync not working
Part 2: How to Fix WD Sync Not Working in Windows?
For the above two common reasons, here are some built-in quick fixes that may resolve WD sync not working. Apply the solution for respective reasons and you can use the WD sync utility easily.
1. WD Sync is unable to sync from the NAS to the client.
If you see that WD is unable to sync from the NAS to the client, the underlying cause can be the disabled cloud. Your cloud access may be disabled. All you need to do is to enable your cloud to use the WD sync effectively. Here are the steps.
Step 1: Start the process with logging in to the My Cloud.
Step 2: In the main menu, select the option of settings.
Step 3: In the settings window, scroll down and switch on the cloud service. Click ok to continue.
This issue could be caused by disabled Cloud Access. Follow the steps below to fix it:

In case, your cloud service is active, yet it is showing not connected status, then turn off the cloud service followed by immediately turning it on. It will fix the error i.e. WD sync not working. Still, if the error is not fixed, try to reboot the My Cloud device.
2. WD Sync displays "No Storage Devices Found" or "My Cloud Not Seen".
The second cause of WD sync not working is no storage device found or my cloud not seen error message.
1- This is probably due to a faulty network connection. To resolve it, here are the steps:
Step 1: For the network-based issues, turn off the router with immediate turning it on.
Step 2: Now if you are in sound network connection, turn off the cloud service and then turn it on. The error would be resolved.
2- In case, this error is due to the use of an outdated cloud, then you have to download the new cloud firmware updates. You can do it via email address.
Step 1: Log in to My Cloud.
Step 2: In the user's menu, select the user, and enter your email address. Click update to continue.
3- This error message may be due to port filtering or blocking. For this, you need to contact the network administrator to check if your router is blocking or filtering the incoming or outgoing traffic between 9000 and 9999.
4- To eradicate the error, you can run an anti-virus. Else you can contact the WD support.
Part 3: Choose Alternatives to WD Sync
If the WD sync fails to work properly and you are done with fixing the error i.e. WD sync not working time and again, then here are two of the best alternatives.
1. AOMEI Backupper
A third party software solution is always a savior. In this context, the AOMEI backupper standard is the recommendation. It is a top-notch software that helps the users with its ultimate file sync options. The software provides a wide range of functionality to sync files between drives and NAS storage. How? Here are the steps:
Step 1: Download the software and then run an appropriate install mechanism on your device.
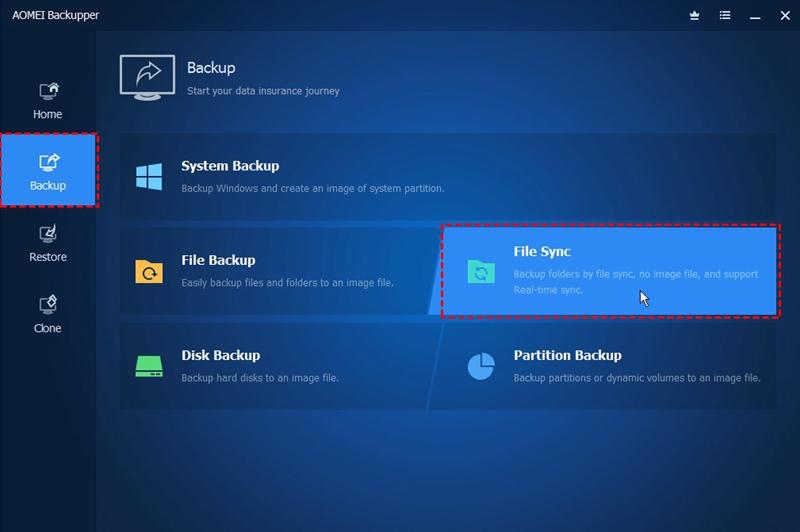
Step 2: Launch the software and in the main interface, select the option of backup followed by selecting file sync.

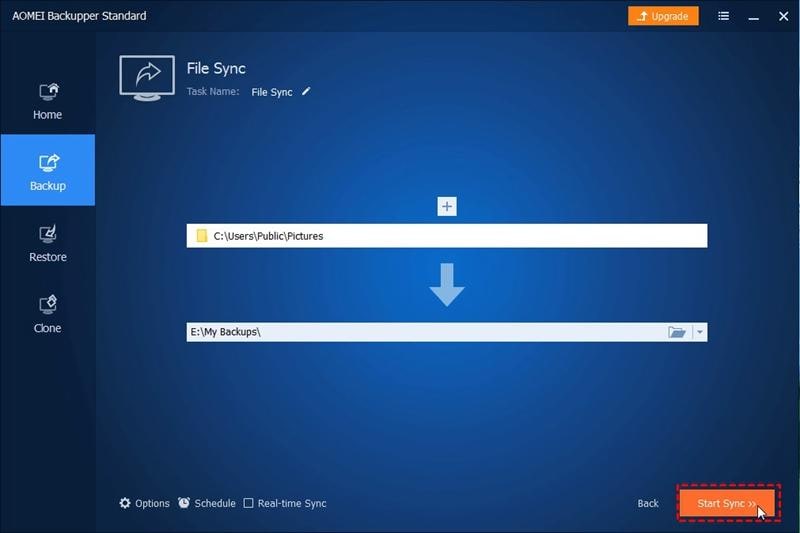
Step 3: In the file sync window, click on add folder to add the file/folder targeted to be synced.

Step 4: Now in the next step, add the destination drive (in this case the cloud storage) for saving the synced data. Select share/NAS.
Step 5: A pop-up window will appear. It is the network local management window. Select the add network location and type the IP address. Click ok to proceed.
Step 6: Select the desired NAS folder and click ok to continue.
Step 7: Once you are done with selecting the source file and destination location, click start sync to complete the action.

Once the process is completed, the data would be synced and saved. The software allows you to go for the scheduled sync functions. You can do it either daily, weekly, or every month. Moreover, it also allows you for a real-time sync mechanism.
3. Sync Center
Apart from the third party software solution, windows provide a built-in utility to perform sync function. Sync center is the utility that can act as a perfect alternative for WD sync. It allows to sync files and also manages offline files saved on NAS. How to use this utility? Here are the steps to follow:
Step 1: Launch the sync center. For this, in the control panel click on sync center.
Step 2: In the window of sync center, select manage offline files and click on enable offline files to proceed.

Step 3: Next step is to create a shared folder. In the settings menu, select the option of network and internet followed by selecting sharing options.
Step 4: A pop-up window will appear. Here select Turn on network discovery, Turn on file and printer sharing, Turn off password protected sharing. Lastly, click save changes to proceed.
Step 5: Now click the targeted shared folder and in the drop-down menu, select properties.
Step 6: In the next window, select sharing followed by selecting share to proceed.
Step 7: Now add guest and change the permissions. Click share to continue. Nextly click done to complete the action.
Step 8: In the properties option, select the advanced sharing and mark share this folder. Click ok to continue.
Step 9: Now open the command prompt and type ipconfig to fetch the IPv4 address.
Step 10: Now open the run command prompt and type the fetched IP address. Now mark the always available offline option and open the sync center to view files.

Once you are done with all steps mentioned above, you are done with syncing the files.
Hence, synchronization is always a mandatory task as you create backups for your data. The synced data denotes the updated data that you have made changes to. WD sync is the software that helps to sync the data between hard div and NAS storage devices (in this case the MY Cloud Device on your network). In case, if the WD sync fails to work due to any network error or connection problems, you can always fix them with built-in fix mechanisms. In this article, two of the built-in fix routes are mentioned against two common reasons. Moreover, the alternative to WD sync is also recommended. AOMEI backupper standard is the third party software solution whereas Sync Center is the built-in utility powered by windows that can be used as the best alternatives for WD sync.
Data Backup Services
- Computer Backup
- Hard Drive Backup
- Mac Backup
- Cloud Backup


Amy Dennis
staff Editor