Fixed Sync Is Not Available for Your Account
One of the main features of Windows is to be able to sync settings such as themes, Internet Explorer or Edge settings, passwords, language preferences, among others. To have access to this benefit, you only need to have a Microsoft account; if you do not have one, creating it will just take a few minutes. Sometimes syncing might stop, and Windows may throw you sync is not available for your account. This problem can be due to several circumstances, which you will know in this post, and, besides, you will review several solutions to fix this problem.
Part 1: Methods to Sync Is Not Available for Your Account
Q: Yesterday, I could not sync my new pictures. I received a message in Windows that said: sync is not available for your account. What should I do to fix this problem?
Syncing settings in Windows is a process that brings many benefits to users of this operating system. If you have more than one device that works with Windows, you can save yourself from configuring them one by one, and, through your account, you can use the settings of your preference in each device. This feature is an advantage for users who will save a lot of time by manually setting preferences.
As in any computing process, the sync in Windows is not exempt from errors, and one of them is sync is not available for your account. This problem can be cumbersome and uncomfortable and may have different origins. Although it may sound severe, this issue happens more than you think; also, every problem has a solution so you can keep calm.
Part 2: Why Is Sync Not Available for Your Account?
There are various reasons why this unforeseen event may arise, which can have different sources. Next, I will mention the most common ones:
- The file system is corrupted: If your computer has a virus or malware, your hard drive is not working right, or there was a power outage, these factors may corrupt the file system. Although it sounds exaggerated, a corrupted file can be enough to alter and affect any process in the operating system, so, for this reason, Windows sync can become hampered and even stopped.
- Azure doesn’t allow syncing: Azure is an online computing service to manage applications and services. Being from Microsoft, you can use it with the same account with which you synchronize Windows, which is usually an advantage. However, sometimes it can be a factor that prevents the syncing of your Windows configuration, so you should not rule out that the problem arises from Azure if you are using it.
- The Registry policy doesn’t allow syncing: Registry Policy can be a factor that affects syncing. Sometimes, the configuration of this tool is changed, and this alteration can be problematic. If you made changes to the Registry Policy or installed an application of dubious origin, surely this is the reason why the problem with your synchronization has occurred.
- Microsoft account is not verified: Even though you have created your Microsoft account, this may not be enough for you to make use of all its features (such as syncing your Windows settings). To do this, you will need to verify your account, in this way, Microsoft will confirm that this account belongs to you and that you are not another person who wants to access your data without your consent. This task will take you less than one minute, and doing it is very easy.
- The account is not correct: Sometimes, users make mistakes that they do not realize. Logging into your account can become a habit, but checking that you logged in is not as common as you might think. Check that you have indeed logged in; since the last time you tried, you could have made a mistake and mistyped your email or password.
Part 3: How to Fix the Issue That Sync Is Not Available for Your Account?
There are a few methods that can help you solve this problem. Below I will explain six of them. Keep in mind that if after trying any of them, you cannot solve the problem, it is normal. Sometimes there is more than one problem that prevents you from using your Microsoft account to synchronize your data; therefore, I advise you to be patient and try the methods, one by one, until you solve the problem.
Method 1. Remove Work or School Account
Microsoft accounts for work or study purposes are incompatible with Windows sync tools. Try disconnecting these accounts from your operating system.
Step 1: Go to Settings menu
The first thing you will need to do is open the Settings menu. There are several ways to open the settings menu in Windows 10. In this case, you can go to the Windows menu and type Settings. In the list of search results, you will see the shortcut to Settings, click on it.
Step 2: Open the Accounts section
In the Windows Settings menu, you will see several options from where you can change the system settings. Click on the Accounts option.
Step 3: Disconnect Work or school accounts
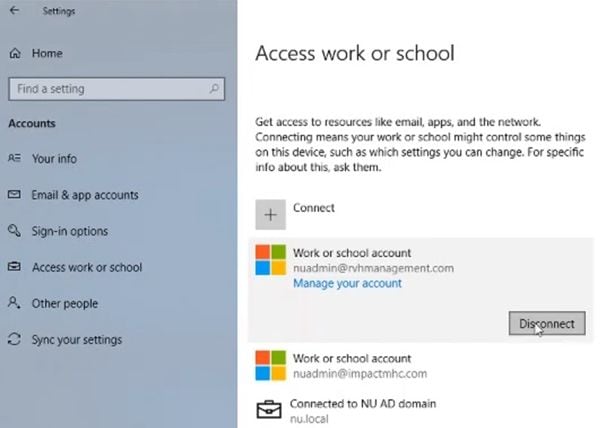
Into the Accounts section, click on the Access work or school option in the list on the left side of the window. Here you can find the Work or school accounts connected to your operating system. Select each of them and click the Disconnect button.
Method 2. Verify Microsoft Account
Remember that for security reasons, before synchronizing your account information, it is necessary to verify your identity through the information you provided to Microsoft when you created your account. Here is how to do it, in case you have not already.
Step 1: Go to Settings menu
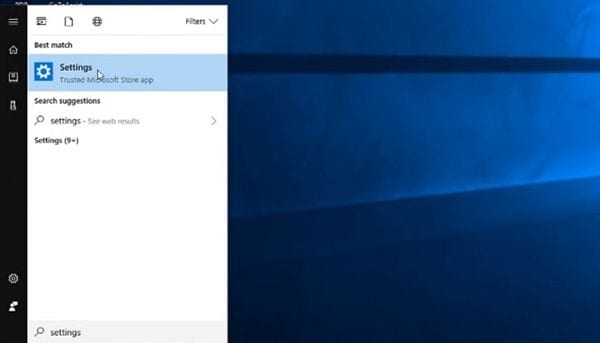
In the same way, as in method 1, the first thing you should do is go to the Settings menu. Remember that you can access this menu by typing Settings and clicking on its shortcut from the Windows search results.
Step 2: Enter to Accounts section
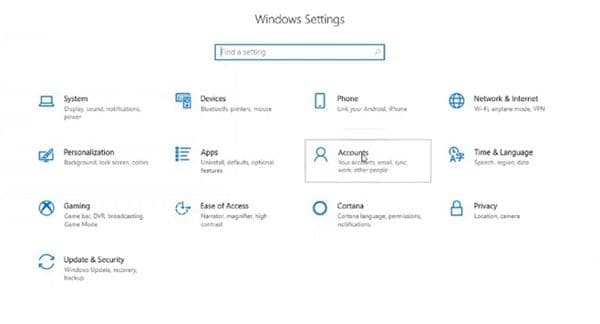
Once you have opened the Settings menu, click on the Accounts option.
Step 3: Click on Verify
Now you must click on the Your info option that is on the left side of the window. Then all the information regarding the profile of the user you are using will be displayed. In this section, you must make sure that it is your account, and then you must click on Verify.
Method 3. Modify the Registry Editor
As I mentioned earlier, the synchronization tools in Windows 10 can fail when there are errors or discrepancies in the operating system registries; however, you can fix this problem.
Step 1: Open Registry Editor

To open the Registry editor, you must go to the Windows search menu and type Regedit. Next, you must click on its shortcut.
Step 2: Edit the NoConnectedUser file
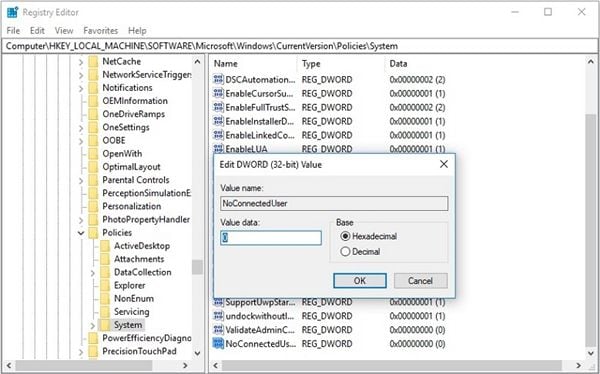
Once you have opened the Windows registry editor you should go to the following path: HKEY_LOCAL_MACHINE\SOFTWARE\Microsoft\Windows\CurrentVersion\Policies\System
Remember that to open a folder in the registry editor you must click on the button next to the Folder icon. Once you have reached the System folder, you should open the NoConnectedUser file and change the Value data to 0. When you have finished, do not forget to reboot your computer.
Method 4. Enable Sync from Azure Active Directory
If you use the Microsoft Azure tool to manage your synchronization processes, everything may be due to a wrong configuration that is denying the synchronization permissions with other devices. Below I will show you how to fix this.
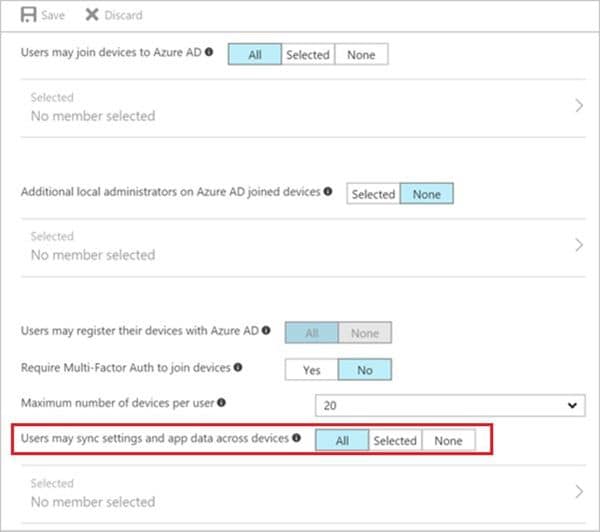
Login in your Azure AD account, then go to Azure Active Directory and click on Device Settings. In the right section, change the User may sync settings and app data across devices value to All.
Method 5. Reinstall the Operating System
If the previous methods did not solve the problem, the most practical solution is to reinstall Windows from scratch.
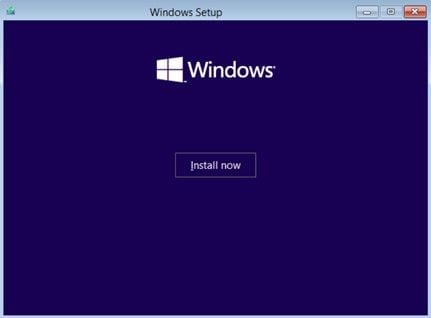
Remember to back up your information before since, for this process to be efficient, it will be necessary to format the device, thus eliminating any possible malware or corrupted files in the system.
Method 6: Use a professional synchronization software
If the previous methods did not solve the problem or if you simply prefer to save time, you can use professional data synchronization and backup software. I recommend AOMEI Backupper. This software will allow you to synchronize all kinds of information with just a couple of clicks. I will show you how to use it below.
Step 1: Choose a synchronization method
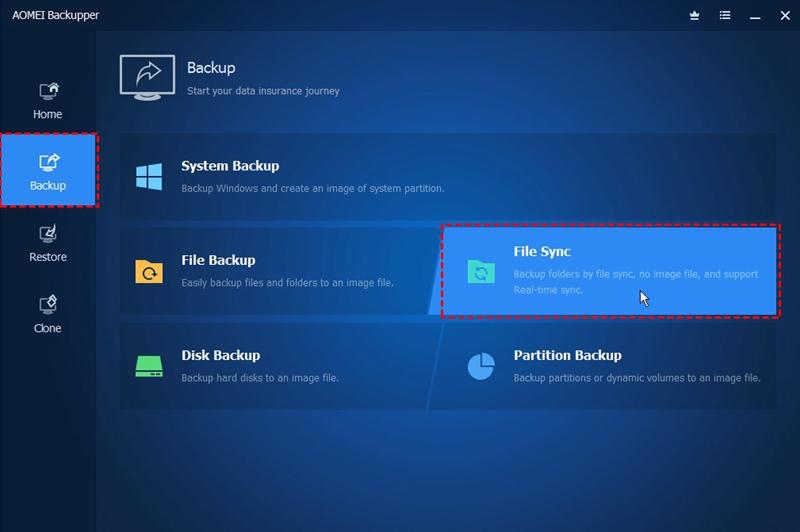
Once you have opened the software, click on the Sync section, located on the left side of the window. There you will see the different synchronization methods that this software can perform. Read the descriptions of each of the methods carefully and select the one that suits you best.
Step 2: Set up the Synchronization preferences

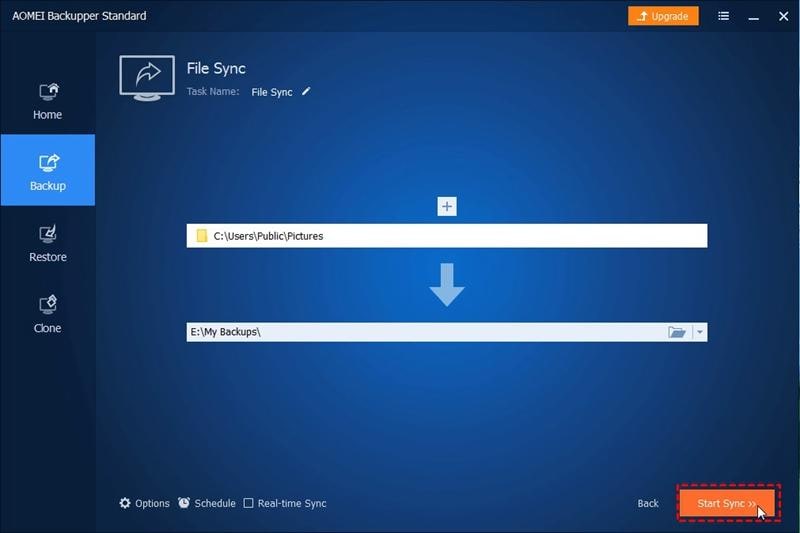
Once you have selected any of the sync methods, you will see a window like this. Here you must click on the + Add Folder button and use the file explorer to select the folder you want to synchronize with other devices. Now in the bar below, you must click on the drop-down menu button to select a network location as the target location.
Step 3: Start sync
Conclusion
Several reasons can cause the error: Sync Not Available for Your Account. But as you may have noticed, in most situations, this problem is easy to solve. However, if you want to forget about this type of problem forever, you can use a professional synchronization software such as AOMEI Backupper; since with this software, you can perform any synchronization process easier.
Data Backup Services
- Computer Backup
- Hard Drive Backup
- Mac Backup
- Cloud Backup


 ChatGPT
 Perplexity
 Google AI Mode
 Grok
Grok


Amy Dennis
staff Editor