How to Run Real Time Sync for Folders in Windows
Q: How to run real-time sync for folders in Windows?
"Hi guys, I can sync my files and folders to cloud storage. However, I have recently heard a new term, which is real-time sync for folders in Windows. Can you explain what real-time sync means and how to do it?"
Users have various freeware programs they use to sync folders, but the problem with some is that they don’t sync in real-time. If you have a folder on your computer and you want to sync it to other locations, this should not be a challenge. You can synchronize it with an external storage device, such as a USB flash disk, to another PC, or even with a NAS. The latter means a network-attached storage device.
What does real-time folder sync mean? It simply means you do not have to wait for scheduled syncing or having to do it manually. You will learn about real-time syncing and a reliable freeware program to use in this case.
Part 1: Overview of Real-Time Sync
What does real-time file synchronization or simply file sync mean? It means that you have a folder saved in different locations and it is always the same in these locations. If a change is done in the first location, it is replicated in the second one. Whether you edit, delete, or replace the file, this will be synced.
File syncing saves you time when you want your files to be updated in different locations. No more copy-pasting and deleting files manually.
When you opt for the real-time option, your file sync task will be scheduled. The content will be synchronized as soon as it happens. With this, manually syncing files should not be an option as changes take place in real-time. It is amazing how it speeds up the syncing process particularly in Windows.
Every time real-time sync detects changes in a folder, it automatically syncs it. The folders are monitored as required.
Part 2: Why You Need Real-Time Sync for Folders?
For all your documents, you should ensure that you perform regular backups, and doing it in real-time is better. Automatic synchronization of folders should be configured to make sure this happens. This will be of significant help in the case, there is a loss of original documents.
When is real-time sync important? Below are the scenarios where you will need to use real-time sync.
1. To back up important data in another folder
Once the change has occurred in the monitored folders, real-time sync copies the changes almost immediately. The delay is very minimal unlike when you have to do it manually. With this, you can be assured that a copy will be backed up and you can access it in case one device crashes.
The advantage of this is that it is error-free, convenient, and faster. The convenience is unlike when you opt for a copy-pasting option. Rather than using the manual technique, you should opt for real-time folder sync to external hard drives, for home backups, or updating portable data via flash disk.
2. To keep the backup version up-to-date
The main purpose of real-time syncing is to make sure that the same data is shared between locations. While ensuring that a copy of the file is backed up, you will not have to worry about having identical files in the same location. It prevents this while syncing the data automatically. As a user, you are assured of data consistency.
3. To share working files in time
Another advantage is that you can easily collaborate with other people. Whether you want to sync folders to a cloud or network drive, you can do so in real-time. When you need to collaborate with other people, you just share the URL with them. That is all that is needed.
4. It is convenient to transfer files and edit them
Whether you need to transfer files from desktops to tablets or laptops, real-time syncing is convenient. Most people use it to transfer the files they use regularly. Syncing allows you to access them when needed without wasting time. Looking for data from different devices is time-consuming and reduces productivity. Real-time syncing will improve productivity and save time.
Part 3: How to Make Real-Time Sync Work?
The real-time sync windows app is user-friendly and useful. It is useful in the sense that, when you select a drive or folder to back up your file, it will take up the task. If there is a modification in a file it monitors, it backs up a copy of that. In addition to this, you can opt to set up a regular and automatic synchronization.
Your outlook, documents, pictures, and music will be synced and backed up between servers, computers, and the FTP site. It is important to learn how to setup auto-syncing and below are simple instructions.
Step 1: Add a new task
You have control over your tasks. Besides creating and deleting them, you can also analyze, rename, and sync them. The list of tasks in a PC plus their specifications is memorized. If you need to create a new task, proceed to the task panel and choose "New."
Step 2: Select the sync method
There is a list of sync methods. Once you have created a new sync task, you should choose one of the listed methods.
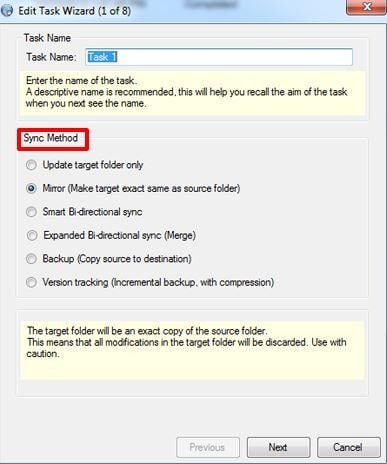
Step 3: Select source folders
You probably prefer backing up or syncing several source folders in a single task! Real-time sync allows you to do this. The first thing is to check on the "Source Connection" panel and choose the "Add" button. Browse the folders and select the folders you want to sync. Click "OK."
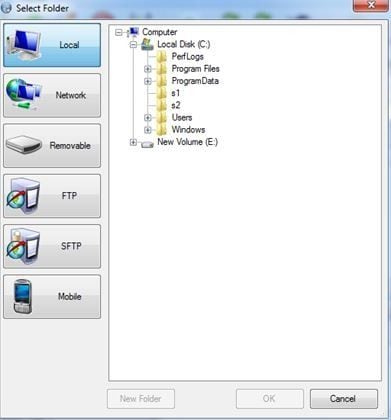
Step 4: Select the target folder
You should choose your target folder. This is where you need to sync the files.
Step 5: Real-Time Sync your files
For your files to be synced automatically in real-time mode, you should choose the "Sync Task" and the "Real-Time" button. If you wish to analyze your files and sync them manually, you can opt to choose the "Run" button.
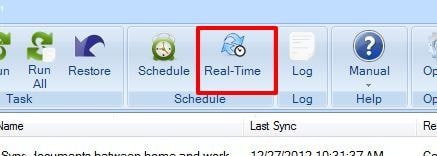
Step 6: Sync your files
A new tab opens up when you click on the "Real-Time" button. This is where you get to see the actions of folders and files in the real-time sync process.
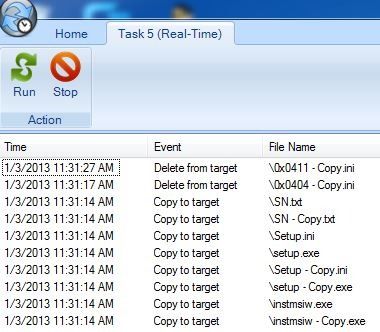
To conveniently undertake real-time synchronization of folders, it is recommended you use reliable software. Below is the most appropriate tool.
Part 4: How to Run Real-Time Sync for Folders with AOMEI Backupper?
To perform a Windows 10 time-sync, AOMEI Backupper Professional is the best tool. It also works on Windows 8/7, syncing and backing up files. It allows users to sync files to shared folders, cloud drives, local folders, and NAS devices. This is made possible by its "File Sync" feature.
Whether you prefer the file sync task to run weekly, daily, or monthly, you can use the "Schedule" feature to set it up. In addition to this, you can use the "Event Triggers" feature to run the file sync task based on special events. This will happen in real-time.
Below is how to perform real-time sync Windows via AOMEI Backupper.
Step 1: Get the Software
The first thing is to install is the AOMEI Backupper and then launching it.
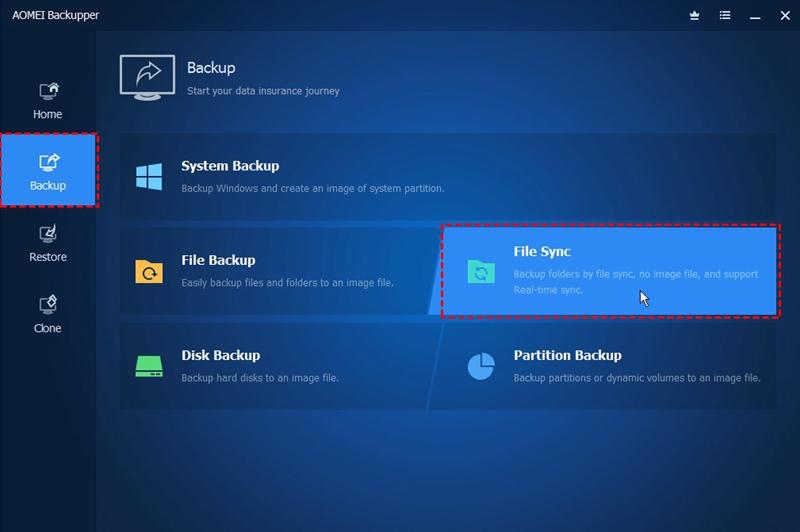
Step 2: Choose File Sync
Click the "Backup" option on the main interface. Once this is done, select "File Sync."
Step 3: Add Folder to Sync
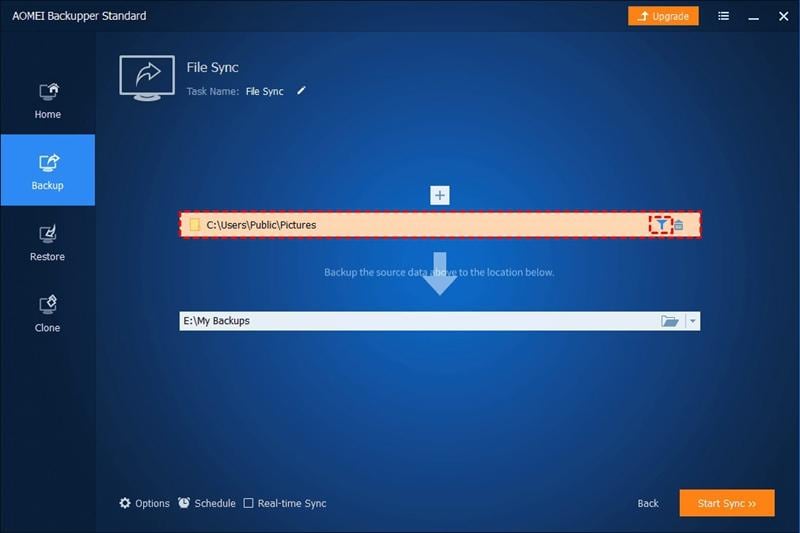
Although naming the task is optional, it is important if you are to differentiate it from other tasks easily. To select the folder that you need to sync, select "Add Folder."

Step 4: Adding/Removing Extra Folders
This step applies if you wish to remove or add some specific files from the sync task. On the selected folder column, you will see a funnel-shaped button. This is the "Filter Settings" and by clicking on it, you will set up this option. To add folders to the sync task, click on the + icon.
Step 5: Select the Destination Location
Here you need to choose where to store the folder. Thus, select the destination location
Step 6: Sync in Real-time
At the bottom of the window, select "Real-time Sync." A window pops up and at this point, there are two options. You can opt to either sync deletion or not. Go on and click "OK."
Step 7: Start Syncing
For it to sync for the first time, you should select "Start Sync." This will not be necessary the next time as the syncing will be automatic.
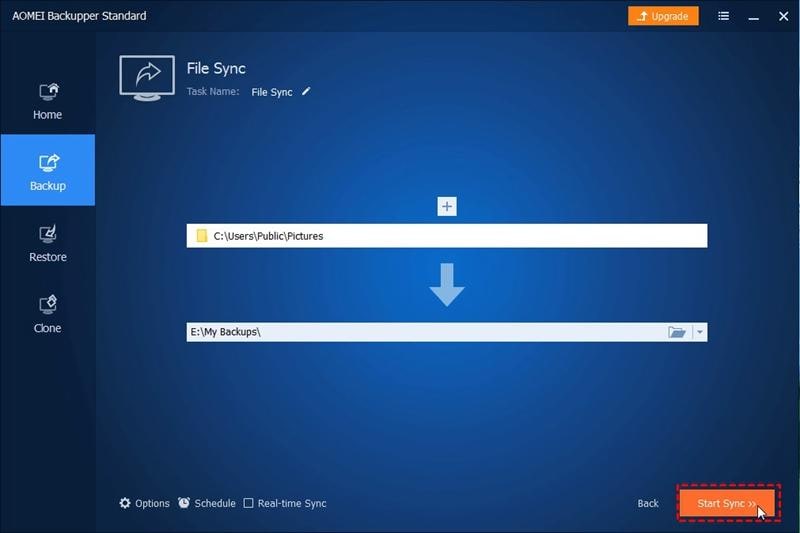
By completing Step 7, you will no longer need to drag and drop files whenever there is a modification. You can automatically sync them in real-time using AOMEI Backupper.
Conclusion
Users manage their files using different devices, folders, and partitions. This makes it even more important to keep these files synced. A real-time syncing tool ensures that files can be shared, transferred, and are backed up in real-time. AOMEI Backupper Professional is a file sync software that makes this easy.
Using the software real-time sync windows 10/8/7 is easy and data is backed up hassle-free. Once you have this tool, there will be no need to copy and paste your data just to protect it. A few clicks will be all you need. This will be useful if you prefer not to use cloud storage services.
Data Backup Services
- Computer Backup
- Hard Drive Backup
- Mac Backup
- Cloud Backup


 ChatGPT
 Perplexity
 Google AI Mode
 Grok
Grok


Amy Dennis
staff Editor