How to Sync Files to External Hard Drive in Windows 10
I have a laptop with about 400GB of files - pictures, docs, project files, etc.
I wish to copy these files to an external hard drive which is 1TB in size. However, I want the copy to be such that if I make any changes to my files on the laptop, these changes are synced to the external HDD. If I add or remove or move files, the same needs to be reflected on the external HDD
As a first solution, I tried using file history. Unfortunately, the second time it started syncing, all the files were being duplicated meaning my storage used went up from 400GB to 800GB. That was a big waste of time and it wouldn't have worked the third time I connect my external HDD
So, I'm looking for solutions similar to the way OneDrive works. Any changes are reflected. File not changed stay the same. Newer versions should replace the old version, not add a new copy.
Any help?
Thank you
You made changes and saved that file on the external drive. What’s a big deal? But syncing for all the new changes made to the same file and then saving the new version is the real task. This process is called file synchronization where new changes are automatically saved to the files. This works when the file is saved on the drive (internal). In case, the file is saved on an external drive, taking windows 10 in reference, you need a backup and sync software for windows 10. This backup sync software windows will track all the new changes and automatically save on the connected external drive. This article will explain all the possible ways to proceed with this process.
As mentioned above, the process of saving newly made changes to a document is termed as file synchronization. The technique assures that new changes are successfully saved in the file/document. Mostly file sync works for a file or documents saved at more than one location. If you make any change in the file or document in the primary location, the file sync will process the same changes in the secondary location. This process of synchronization is either two-way or one-way. Two-way deals with all as mentioned above while the one-way synchronization is all about file mirroring, replication, and backup.
For a file to be saved on both the internal and external drive, the question that arises here is, how you can process the changes made on a file saved in the internal drive to the same file saved on an external hard drive? For this, you need third-party software support. This article is going to explain about backup sync software windows along with a recommendation of top-notch backup software. Here are some topics that would be discussed in detail.
Part 1: What’s File Sync?
Being a type of backup with slightly different from the regular function, file sync cannot be used for directly copying the files. It is rather used to keep the files in an up-to-date-versions. Sync, as the name implies, means synchronization. It helps to keep the files/folders at multiple locations and keep them updated. As per the above-mentioned case, file sync for windows 10 to be saved on an external hard drive, it is possible. All you need is a third party software solution i.e. backup and sync software for windows 10.
Part 2: Why Need to Auto Sync to External Hard Drive?
A file saved on two locations, on your device, and on an external hard drive, changes made on the one saved on the device should be catered to that saved on the external drive to keep an updated version on both locations. Apart from upgradation, keeping data safe from data loss is another reason why you need to auto-sync to the external hard drive. Here are some of the other reasons that would further explain why this sync process is necessary.
- To avoid data loss. The foremost is always to protect data. Syncing data on an external drive means you already have the latest copy of data available. Any loss of data on the device would not harm your data saved on the external drive.
- The traditional copy-and-paste pattern is time-consuming progress. This method can also be hindered due to personal errors while copying the data from one location and pasting it to another.
- Some special folders cannot be copied correctly. Some folders carry file formats that cannot be copied easily. They can only be sync transferred.
- To keep data safe no matter which location you choose. In the end, data safety is what matters.
Part 3: How to Use Sync Center to Sync Folders in Windows 10?
For windows 10 auto backup to the external hard drive, there is a built-in utility that keeps the data updated. This windows built-in sync tool i.e. sync center performs the same function as any software do. It syncs the files between the device and offline files, the one saved on folders of network servers. These offline files are just a clone for the actual copies saved on the network of devices. There are three possible ways in which the sync center works.
Move 1: Create a Shared Folder
Sync centers can access the shared files and folders on the network. Any change made in the file, even offline, it would be reflected, when your device gets back into connection. Here are the steps to follow.
Step 1: In the main menu, select the option of settings followed by selecting a network and internet setting. Click sharing options to continue.
Step 2: Check the tabs of a turn on network discovery, turn on file and printer sharing and turn off password protected sharing.
Step 3: Save all the changes.
Step 4: Now select the files you want to sync. Right-click the file and select the option of properties followed by selecting share.
Step 5: Select the guest to share the file and check the read/write permissions.
Step 6: Once the file is sharing, select the option of advanced properties in the properties menu and tick the tab of share this folder.
Step 7: A command prompt will paper and write a command i.e. ipconfig. It will help you to get the IPv4 address.

Move 2: Enable Offline Files in Windows 10
As the sync center can access the shared folders, it can also save changes to files offline. Here are the steps on how to enable offline files in Windows 10.
Step 1: In the main menu, select the option of the control panel, and in the next menu, select the option of sync center.
Step 2: Choose the option to manage offline files.
Step 3: Now click the option of enabling offline files. Click ok to continue.

Move 3: Sync Folders Windows 10
For the sync center to sync folder on windows 10, here are the steps to follow:
Step 1: Press Win+R simultaneously to run a command prompt. In the command prompt, write the IP address.
Step 2: In the new pop up window, open the shared folder.
Step 3: Now select the files that are targeted to be synced, and set the preferences to always available offline.

Step 4: Now check in the sync center, if you can view them offline files/folders.

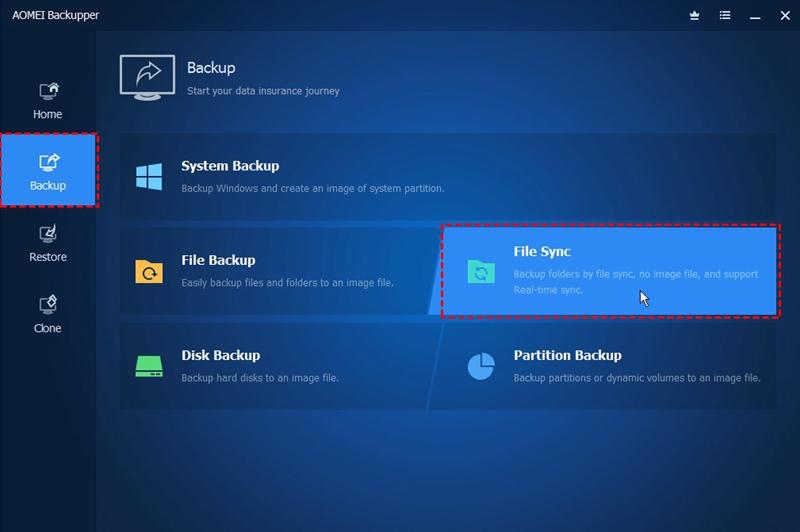
Part 4: How to Sync Files to External Hard Drive with AOMEI Backupper?
Another way to sync the files is by using third-party backup software. AOMEI more backup standard is a top-notch backup software in this regime. It facilitates you with a remarkable file sync feature. It helps to synchronize the files/folders between drives and even on different disk drives. There are daily, weekly, and monthly sync modes for windows 10 and 7. Here are the steps to follow to use the software for syncing files to the external hard drive in windows 10.
Step 1: Start the process with downloading ad then installing the software on the device.
Step 2: Launch the software on the device and in the main menu, select the option of Backup followed by selecting file sync from another menu.
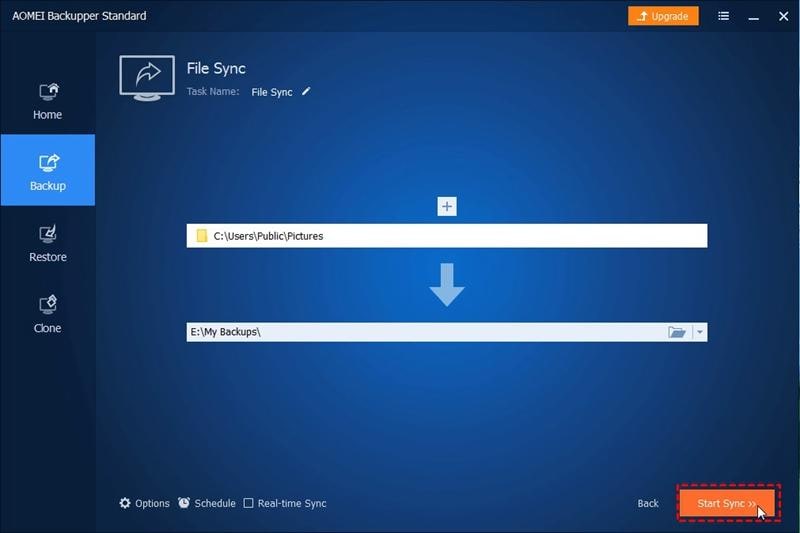
Step 3: Now select the option of add folder (folder name). All the linked files and subfolders would be synced automatically in the process.

Step 4: After selecting the folder, the next step is to select the destination drive.
Step 5: Set the schedule settings according to the requirement and click start sync to continue.
Part 5: Features of AOMEI Backupper
Comparing with other sync software, AOMEI File Sync is the best choice. How? Here are the features that make it a top-notch software to use.
1- Powerful one-way sync function:
AOMEI supports one-way synchronization i.e. all files can be synced between folders. You can schedule the sync process.
2- It supports schedule sync:
Scheduling is the next powerful feature. AOMEI provides daily, weekly and monthly modes for planning a sync function. At the set date, the software will run automatic sync.
3- It can synchronize folders to cloud storage drive indirectly:
AOMEI facilitates sync directly with the files and folders saved on cloud storage.
4- Network sync:
AOMEI File Sync is not only restricted to synchronize a folder to a local disk or removable device, but it can also do this to devices within LAN, and NAS. It is good for sharing files with other devices on the network.
5- Email notification:
You will get an email notification whether the process of file sync is completed or failed.
Hence, file synchronization is an important task with which you can keep the files updated. Apart from the fact that files are saved in different locations, the file sync feature helps to save all the changes even offline. This article explained all the reasons why we need file sync and how it can be done to avoid data loss. Two of the viable methods are enlisted. One is the Windows built-in utility i.e. the sync center. It can sync the files and folders with a three-move approach. The second method is to use third-party software. AOMEI back upper standard is top-notch in this regime.
Data Backup Services
- Computer Backup
- Hard Drive Backup
- Mac Backup
- Cloud Backup


Amy Dennis
staff Editor