How to Do Automatic Backup in Windows 7?
I want to do Windows 7 backup, but hate to always backup all data in Windows 7 manually. So I wonder how to automatically backup files to an external hard drive in Windows 7. Many thanks!
Data backup is of prime importance for every computer user. It can mean the difference between losing all of your data and preserving your precious data in the event of a hard drive failure. Scheduling automatic backup in Windows 7 can further help you in ensuring that your important files get backed up frequently even if you forget to back them up yourself. Forgetting to schedule a backup or not creating one altogether would result in a huge amount of data loss. To avoid precious data being lost, read on and learn how to backup Windows 7 files computers automatically.
Benefits of Automatic Backup in Windows 7
Windows 7 is a reliable operating system and is quite capable of remaining operable for years without encountering any issues. The hard drive installed on it, however, isn’t nearly as reliable. Even the best hard drives have a limited period and are bound to fail after their life expectancy ends. You can lose all the data and files that you have stored on your hard drive when such a thing happens. Moreover, you will forego all of the programs that you installed on your PC too and would have to reinstall them all over again. By backing up Windows 7, you can avoid this scenario. It won’t save your hard drive but will ensure that you can restore all your data, files, and programs to your new hard drive without great effort.
To get back data that you have lost from a crashed hard drive, you can make use of a data recovery tool. However, do remember that not all data recovery tools can do the job easily and perfectly. You need to make use of a reliable and safe data recovery software program for this purpose. Recoverit Data Recovery is the only tool that fits this criterion and can be trusted for retrieving lost files from the failed hard drive.
However, the next question comes to you - How Do I Set up Automatic Backup in Windows 7?
PC backup software for Microsoft Windows 7 offers you the chance to backup data manually and also to perform an automatic backup of Windows 7. There is a scheduling option available that can help you back up files and folders automatically. You can decide the frequency, the date, and the time at which the backup has to take place and the Windows 7 backup tool will do the rest. The backup will be run automatically at your chosen dates and time as frequently as you have chosen. There are several benefits of scheduling an automatic backup in Windows 7.
- Backups are made even if you forget to perform the backup yourself.
- You get the most recent versions of your files backed up and don’t lose any data if your hard drive fails.
- Scheduling an automatic backup in Windows 7 is much more convenient and cost-effective than doing it manually.
How to Do Automatic Backup in Windows 7 with UBackit Data Backup?
1. Smart Windows 7 Backup Manager: Wondershare UBackit
Wondershare UBackit backup software is a qualified Windows 7 PC backup tool, which enables you to make a backup of all kinds of files, such as images, audios, videos, documents, application folders, and so forth. Besides, you are allowed to schedule your Windows 7 data backup on an automatic basis. Apart from scheduling daily, weekly, or monthly auto backup, you can use backup filter to increase the backup speed. Moreover, if your data gets lost, unfortunately, it offers you a data retrieval function so that you can get them back easily and quickly.
- Allows you to take automatic, full, and incremental backup.
- Smart backup management.
- Customized file filter and file search.
- Supports Windows 10/8.1/8/7.
2. How to Do Automatic Backup in Windows 7
With Wondershare UBackit, you can backup Windows 7 computer files to the external hard drive and set up an automatic backup for your data. Here are the simple but detailed steps on how to do an automatic backup to the external hard drive in Windows 7.
This article takes file backup mode and talks about how to do an automatic backup in Windows 7.
Step 1 Launch Wondershare UBackit
You need to download and install Wondershare UBackit in advance, then launch the app on your computer. Then click the Create New option from the main screen followed by File Backup.

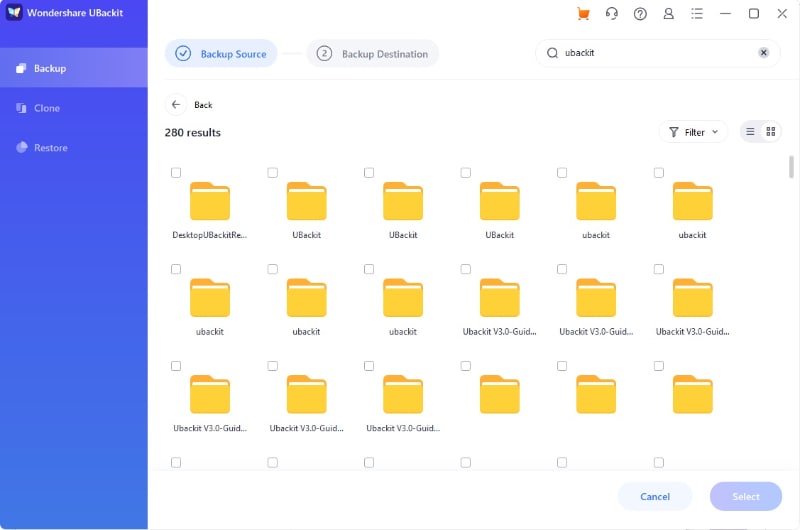
Step 2 Select Files/Folders from Hard Drive
Here you need to select the files or folders you want to backup in Windows 7. Then, click Select to continue.
Step 3 Choose Backup Destination
After that, select the disk where you want to save the backup. It could be the external hard drive, or the local disk. Then click Select to get Windows 7 backup started.

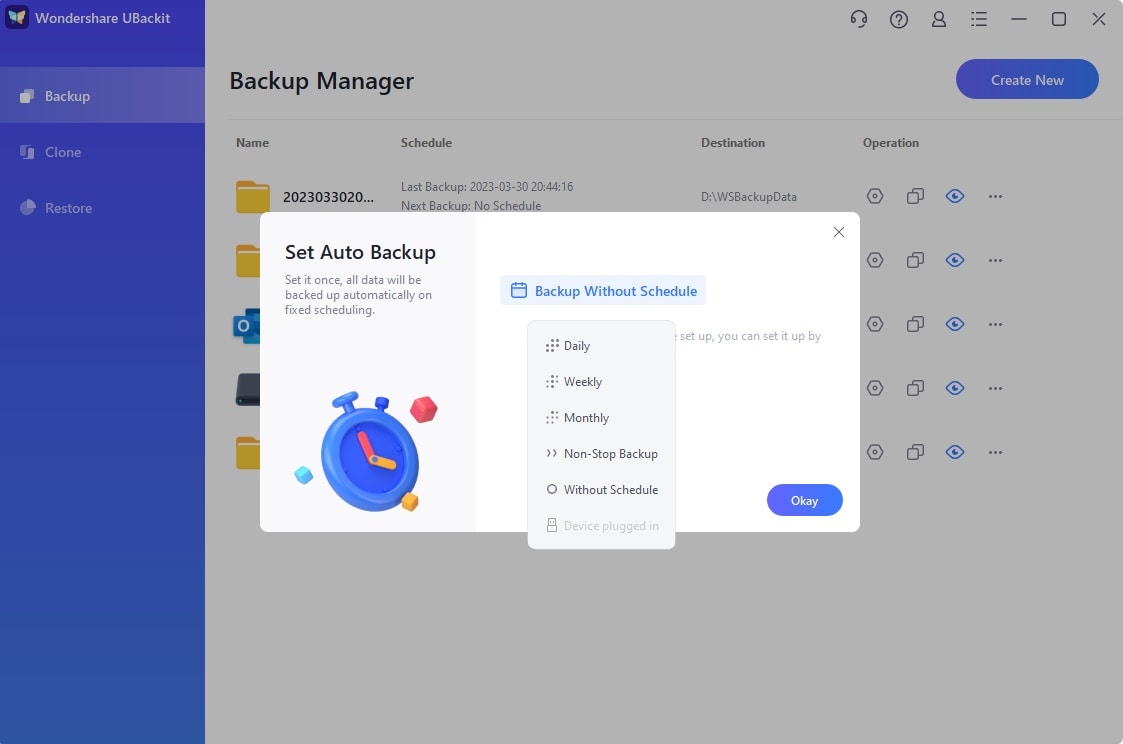
Step 4 Set Automatic Backup
It will take a few seconds or minutes to complete the backup, which depends on the size and volume of the backup files. Once it completes, you can find the Schedule option at the bottom of the backup folder. Click on it, and set scheduled backup task as daily, weekly, monthly or real-time according to your need. Then UBackit will start automatic backup in Windows 7 next time.
How to Automatically Backup and Restore in Windows 7 with Backup and Restore Center?
Although Windows Vista has made some excellent developments to its backup tool, it has a major flaw in it. It doesn't allow you to choose the folders that you want to be backed up. Fortunately, Windows 7 improves upon the mistakes made by Windows Vista and lets you schedule your backups using a built-in feature by the name of Backup and Restore. The Backup and Restore Center offers quite a few additional features to you. The following are the steps that you need to follow for setting up an automatic backup in Windows 7.
1 Launch Backup and Restore
Search for the Backup and Restore tool by entering the words "Backup and Restore" in the search box that appears after clicking on the Start button. Launch this tool by clicking on the Backup and Restore program which will appear in the results of the search. Click the "Set up backup" option which can be found on the window’s right side to set up a new backup if you don’t have any previous backups.
2 Select a backup location
The location for saving the backup files is the next question that you will have to answer. You can save the files backup to a connected external hard drive. And USB device, DVD, or CD is also allowed. Click the "Next" button after selecting the location of your choice.
3 Choose files to backup
The marquee feature of the Backup and Restore tool of Windows 7 is the option to include folders in the backup lineup which you want to back up. You can utilize this feature by clicking the option "Let me choose" and then pressing the "Next" button.
4 Choose specific files
The default setting of the Backup and Restore tool in Windows 7 is to include all libraries of the registered users of the PC. Specific folders can be included by using the "Computer" section and finding the location they are stored on the hard drive. To do this, you simply have to check the box present in front of a folder you want to add to the backup and any subfolders it has will also be included in the backup. Another option available to you in the backup tool of Windows 7 is to include a system image.
5 Create a schedule for auto backup
After selecting the folders to be included in the backup, click the "Next" button. A summary screen providing you details of what folders will become a part of the backup will appear in front of you. A schedule for automatic backup Windows 7 will be created for you. It is up to you to keep this schedule in which case. You should click the button labeled "Save settings and run backup" or click the "Change schedule" button to create one of your own.
6 Set a Windows 7 auto backup
A window will appear in which you will have to determine the frequency of the backup. The options available to you are monthly, weekly, or daily. In addition to the frequency, you will have to pick the time and day for the backup too. If you are happy with manual backups, uncheck the option "Run backup on a schedule". Click "OK" after making your respective choices to start the backup process.
Conclusion
There is an in-built Backup and Restore tool available in Windows 7 that can be used for backing up Windows 7. However, as you can see, the auto backup for PC data with this native Windows 7 backup tool is much more complicated than backing up data using Wondershare UBackit. The best PC backup software can help you keep making auto copies of Windows 7 files to an external hard disk on a daily, weekly, and monthly basis without any hassle. It frees you from cumbersome job - backing up a mountain of data manually, and prevents data from getting lost permanently.
Data Backup Services
- Computer Backup
- Hard Drive Backup
- Mac Backup
- Cloud Backup


Amy Dennis
staff Editor