3 Methods to Fix Corrupted Recycle Bin in Windows 10/8/7
When you delete files from your Windows PC, most of them move to Recycle Bin. It's like a second chance for you to recover the deleted files if you need them again. But when you get a 'Recycle Bin corrupted' error on your system, you can neither empty the recycle bin nor restore the files to your hard disk.

If you are in a dilemma why your recycle bin is not working and what to do, here is a perfect guide for you. This post will guide you with the methods to fix the corrupted Recycle Bin error message.
Part 1: What Causes Recycle Bin to Corrupt on Windows 10?
Here are the possible reasons for the error message 'recycle bin is corrupted in Windows 10':
a) Corrupted DLL File
DLL (dynamic link library file) is a format that holds multiple codes and procedures for the Windows programs. It shares data and resources, thereby allowing multiple applications to access the contents of one file simultaneously. If one of the DLL files of the recycle bin gets corrupted, it could corrupt the entire bin too.
b) Unexpected Shutdown
Unexpected shut down of your system may also impact open files. It can even lead to widespread corruption.
c) $Recycle.bin Folder Error
The recycle bin on the desktop is the shortcut to $Recycle.bin Folder. It is the actual recycle bin. Errors within it can also be the cause of the recycle bin corrupted error message.
Part 2: 3 Methods to Fix the Corrupted Recycle Bin in Windows 10/8/7/XP?
The great part of the Windows Recycle bin is that if you delete any important file accidentally, one-click will recover it immediately.
Sadly, there has been a buzz of 'recycle bin corrupted' error message in windows. Here are the three best ways to fix 'recycle bin corrupted Windows 7, 8, and 10'.
Method 1: Reset Recycle Bin via Command Prompt
Fixing corrupted recycle bin using Command Prompt is a simple process. It scans and repairs Recycle Bin if you follow the steps carefully.
Step 1: Open Command Prompt
If you are using Windows 10, open the command prompt by right-clicking the 'Start' menu. Then, choose Command Prompt (admin).
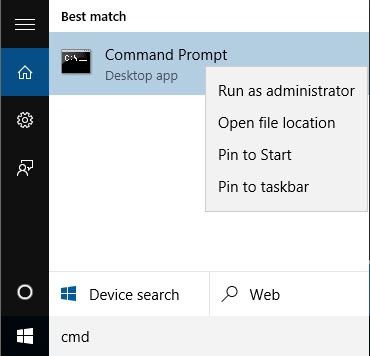
Step 2: Type the command 'rd /s /q C:\$Recycle.bin' in the command prompt and press the enter key.
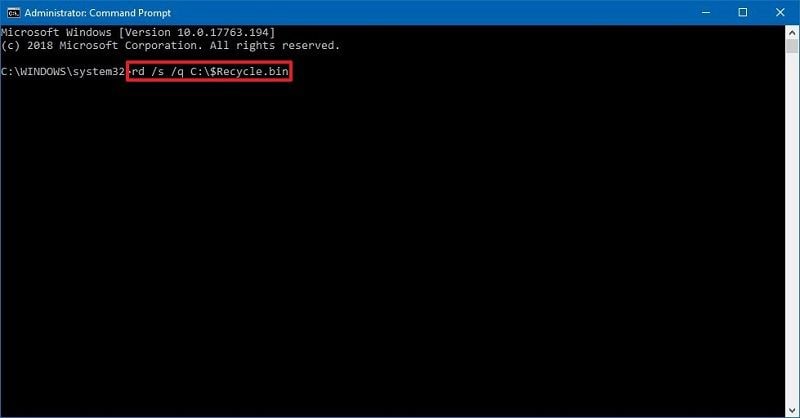
Step 3: Now type Command 'rd /s /q D:\$Recycle.bin' and press the enter key. You need to use command for every drive in your computer separately.
It is because each partition on Windows consists of a separate Recycle Bin folder and corrupted in can cause problems. Thus, it's best to repair them one by one.
Method 2: Repair Your Corrupted Recycle Bin in the Windows Explorer
Another method to fix the 'recycle bin on d is corrupted windows 10' error is the use of Windows Explorer. It involves user permissions and reconfiguring Recycle Bin from scratch.
Furthermore, this method may delete your important files and folders in the recycle bin.
That is why make sure you back up your data before performing these steps.
$Recycle.bin is your recycle bin folder and is invisible by default. Therefore, you need to unhide it before using this technique.
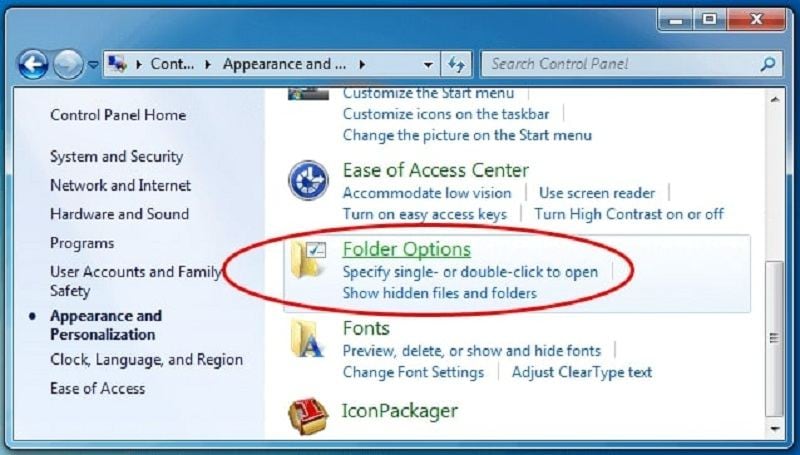
Step 1: Click the start button, then look for the Control Panel using the Windows search bar.
Step 2: Now choose Appearance and Personalization.
Step 3: Choose 'Folder Options' and pick the 'View tab' from the window.
Step 4: Go to Advanced Settings and choose 'Show hidden files and folders'. Now uncheck 'Hide protected operating system files'. Apply to confirm this change and then click on the 'OK' button.
Note: Deleting Recycle Bin will not affect the performance of your system. It is because Windows will make a new folder $Recycle.bin automatically.
Method 3: Delete and Reinstall Recycle Bin
Step 1: Open My Computer < system partition C. Now start hunting $Recycle.bin folder.
Step 2: Right-click it and delete the folder permanently.
Step 3: On the Delete File window, choose "Do this for all current items" and hit 'Yes'.
Step 4: Finally, restart your system and wait for it to load up.
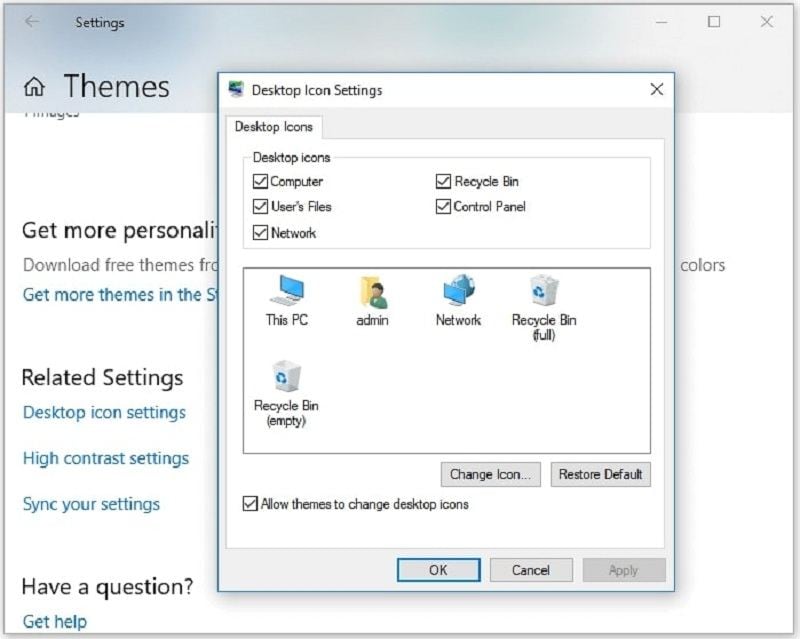
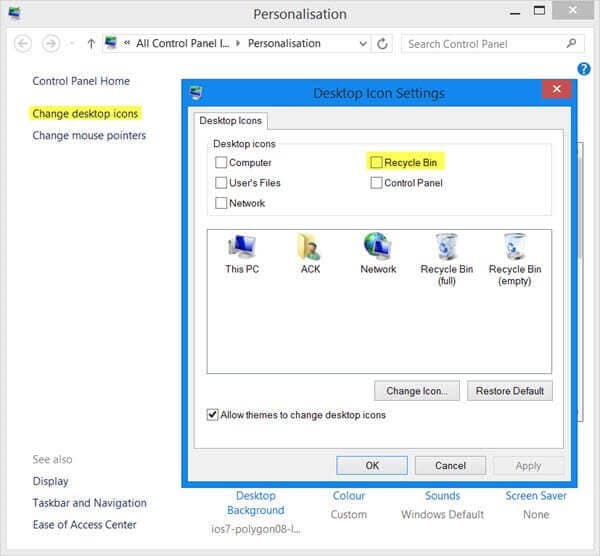
Step 5: Go to the desktop and right-click and then choose 'personalize'.
Step 6: Now go to 'themes' and then click on 'desktop icon' settings.
Step 7: Check Recycle Bin and hit 'Apply > OK'.
Part 3: How to Recover Your Files from Corrupted Recycle Bin in Windows 10/8/7?
Every time you delete anything from your computer, it will go to Recycle Bin. These files can come from partitions, external devices, and internal hard drives. In case you are getting a message 'recycle bin on d is corrupted', use the right data recovery tool.
Recoverit Data Recovery tool is counted as one of the excellent tools to recover files from recycle bin. It allows you to recover the lost and deleted files from your corrupted Recycle Bin in a few minutes.
Video Tutorial on How to Recover Deleted Files from Recycle Bin after Emptied on Windows 10/8/7?
Click on the 'Advanced Recovery' option if you want to recover lost or deleted files. Here are the steps that will guide you on how to use the Recoverit tool.
Step 1: Select a Location
Download and launch the Recoverit tool on your computer. Now choose to "Recycle bin" as your target location and click on scan to begin scanning on the selected location.

Step 2: Scan the Location
There are two scan modes to scan and retrieve files from Recycle Bin –all-around scan and deep scan.
a) All-Round Scan
It will typically take several minutes to complete scanning. In some cases, it will take a few hours if there are plenty of files of large size.
b) Deep Scan
A deep scan mode will perform in-depth scanning and hunt for more lost files from the recycle bin. If you find your lost files, you can even pause or stop the scanning process at any time.

Step 3: Preview and Save
Recoverit tool allows you to preview the files before proceeding to the recovery step.
The bonus point is that you can get a preview of almost every type of file – videos, audio, images, documents, Outlook mails, etc. It will confirm if the files are what you need.

After that, choose the files that you wish to retrieve and then hit the 'recover' button. You can pick a destination to save all your retrieved files. But make sure you do not save the recovered data on a similar location as it can overwrite your files.
The Bottom Line:
Fixing corrupted recycle bin in Windows 10, 7, 8, and XP is not tough. If you're not comfortable using Command Prompt, third-party tools like Recoverit can help diagnose and fix Recycle Bin errors—especially if you’re trying to recover lost data from a corrupted bin.
Rescue & Fix Files
- Recover Document Files
- Repair Document Files
- Recover & Repair More
- Clear & Delete File


 ChatGPT
 Perplexity
 Google AI Mode
 Grok
Grok


Amy Dennis
staff Editor