


 TL;DR:
You can safely identify and remove duplicate files using Microsoft PC Manager or PowerShell SHA-256 hashes on Windows 11/10, and the built-in Photos Duplicates utility or Finder Smart Folders on Mac.
● Microsoft PC Manager provides automated detection for Windows 10 build 19042.0 and later, while a PowerShell Get-FileHash command is required to prove exact byte-for-byte content matches instead of relying on identical file names.
● Mac users must manually verify document candidates grouped by Finder Smart Folders, but can automatically consolidate identical media using the Merge function located in the Photos app Utilities section.
● Restrict cleanup to personal directories to avoid deleting necessary system files, and move items to the Recycle Bin or Trash first because deleting files within OneDrive or iCloud Drive synchronizes the removal across all connected devices.
Ask AI for a summary
 ChatGPT
 Perplexity
 Gemini
 Claude
 Grok
Grok
Duplicate files can waste storage and make folders harder to manage, but the safest cleanup starts by proving which files are truly identical. A matching name alone is not enough: two files called report.pdf can contain different versions, while two exact copies can have different names. On Windows 11/10, you can use Microsoft PC Manager, File Explorer, or a PowerShell hash report. On Mac, Finder can narrow candidates, while Photos has a built-in Duplicates collection for photos and videos.
⚡Quick Fix: Remove Duplicate Files Without Deleting the Wrong Copy
● Windows 11/10: Microsoft PC Manager is a free Microsoft utility that can identify duplicate files; File Explorer is useful for manual review, and PowerShell SHA-256 hashes can confirm exact content matches.
● Mac: Finder Smart Folders help group likely duplicates, but they do not prove byte-for-byte identity. For photo and video libraries, use Photos > Utilities > Duplicates.
● Before deleting: Compare path, size, date, preview, and content. Move files to Recycle Bin or Trash first instead of permanently deleting them.
● Cloud warning: A deletion inside OneDrive or iCloud Drive can sync to other devices. Check the cloud recycle or Recently Deleted area before using recovery software.
In This Article
Part 1. What Counts as a Duplicate File?
Before deleting anything, first distinguish true duplicates from files that only look similar. This helps you choose the right detection method and reduces the risk of removing a unique version by mistake.
Exact Duplicates vs. Same-Name and Similar Files
An exact duplicate is another file with the same content. The filename, folder, or modification date can be different. Microsoft documents that the PowerShell Get-FileHash command can be used to determine whether two files have exactly the same contents; SHA-256 is the default algorithm.
| What You See | Is It Proof of an Exact Duplicate? | What to Check |
| Same filename | No | Compare file size, location, preview, and content. |
| Names such as file.pdf and file (1).pdf | No | Often a repeated download, but confirm the contents before deleting. |
| Same size and same date | No | Strong clue, not definitive proof. |
| Same SHA-256 hash | Yes, for practical duplicate checking | Still choose which path or copy you want to keep. |
| Two photos that look almost the same | No | They may be edits, bursts, crops, or different-resolution versions. |
This distinction matters because an older draft, exported photo, or renamed project file may look redundant while still containing unique information. Recoverit's guide to duplicate-looking images in recovery results also explains why thumbnails, edited copies, cached versions, and different file records should not automatically be treated as exact duplicates.
Safe Checks Before You Delete Anything
- Start with personal folders: Downloads, Desktop, Documents, Pictures, Movies, and project folders are safer cleanup targets than operating-system or application folders.
- Keep one confirmed copy: Before removing a group of duplicates, identify the copy you intend to keep and confirm that it opens normally.
- Prefer reversible deletion: Use Recycle Bin on Windows or Trash on Mac first. Empty them only after you verify that nothing important is missing.
- Check sync status: OneDrive and iCloud Drive can propagate file deletions to other devices.
- Back up irreplaceable data: If the cleanup includes work files, family photos, or archives with no second copy, create and verify a backup first.
Part 2. How to Delete Duplicate Files on Windows 11/10
Windows does not provide one universal File Explorer button that finds every duplicate file. A practical free workflow is to use Microsoft PC Manager for automated identification, File Explorer for obvious copies, or PowerShell hashes when you need exact content verification.
Method 1. Use Microsoft PC Manager for Free
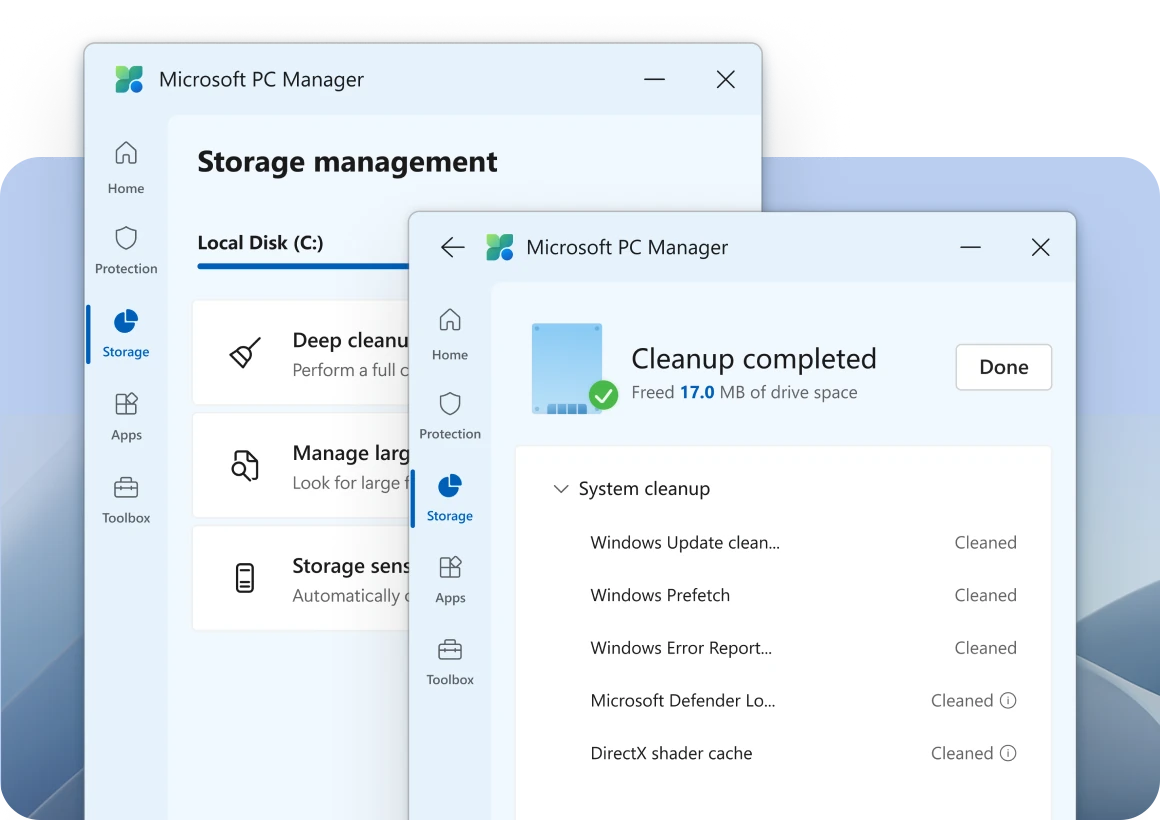
Microsoft PC Manager is free and currently supports Windows 10 build 19042.0 and later and Windows 11. Microsoft's service documentation states that its Space Management feature can identify large files, downloaded files, and duplicate files.
Step 1. Install PC Manager From Microsoft
Download Microsoft PC Manager from its official website or Microsoft Store. Avoid third-party installers for a system-cleanup utility.
Step 2. Open Storage Management
Launch PC Manager and choose Storage. The current official Microsoft interface shows Storage management alongside cleanup and large-file tools.
Step 3. Open the Duplicate Files Tool
In versions and regions where the entry is available, choose Duplicate files under Storage and start the scan. If your build does not show the duplicate-file entry, use File Explorer or the PowerShell method below instead of assuming the feature exists on every PC Manager build.
Step 4. Review Every Group Before Removing Copies
Check the file paths, sizes, names, and file types. Keep the copy stored in the location you actually use, and do not bulk-select Windows or application files merely because the tool groups them together.
Step 5. Delete Only the Copies You Have Confirmed
After cleanup, open several retained files and make sure your important folders still contain the expected originals before permanently clearing any recycle or recovery area.
Best for: Users searching for a free duplicate file remover for PC who prefer a Microsoft utility over a third-party cleanup suite.
Method 2. Find Duplicate Candidates in File Explorer
File Explorer is useful when duplicates are concentrated in a known folder such as Downloads or Pictures. Microsoft also recommends Details view and sorting when reviewing storage-heavy personal files, but sorting by name or size only finds candidates; it does not prove that file contents are identical.
Step 1. Press Windows + E and open the folder you want to clean.
Step 2. Choose View > Details so you can compare Name, Date modified, Type, and Size.
Step 3. Sort by Name to group repeated-download names such as photo.jpg and photo (1).jpg, or sort by Size to place files with matching sizes near one another.

Step 4. Open or preview both files. If they are documents, check whether one is a newer revision. If they are photos or videos, compare resolution, duration, and visible content as well as size.
Step 5. Select only confirmed redundant copies and press Delete so they go to Recycle Bin. Do not use Shift + Delete during the first cleanup pass.
If your problem is specifically duplicate photos rather than mixed file types, use the narrower Recoverit guide to find and remove duplicate photos in Windows 10/11.
Method 3. Confirm Exact Duplicates With PowerShell SHA-256
For folders containing many renamed copies, hashes are more reliable than filenames. The following PowerShell command creates a report of files that share the same SHA-256 hash. It does not delete anything.
Step 1. Open Windows PowerShell or Terminal.
Step 2. Replace the sample Downloads path with the folder you want to check, then run:
Get-ChildItem "C:\Users\YourName\Downloads" -File -Recurse -ErrorAction SilentlyContinue |
Get-FileHash -Algorithm SHA256 |
Group-Object Hash |
Where-Object { $_.Count -gt 1 } |
ForEach-Object { $_.Group | Select-Object Hash, Path }
Step 3. Review each repeated hash group. Files in the same group have matching content hashes, but you still need to decide which location and filename should remain.
Step 4. Delete unwanted copies through File Explorer so the first deletion remains reversible.
Note: Do not turn the command into an automatic bulk-delete script unless you have a tested backup and understand every path being removed. A reporting command is safer because it separates detection from deletion.
Part 3. How to Delete Duplicate Files on Mac
macOS has a built-in duplicate workflow for photos and videos, but Finder does not automatically certify every regular file as an exact duplicate. For documents, downloads, archives, and mixed folders, use Finder to narrow candidates and verify them before moving anything to Trash.
Method 1. Narrow Duplicate Candidates With Finder Smart Folders
Apple's current Smart Folder guidance confirms that Finder can create automatically updating lists based on criteria such as file type, date, or other characteristics.
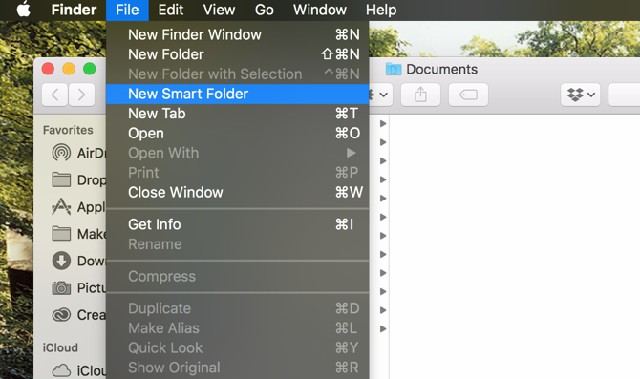
Step 1. Open Finder and choose File > New Smart Folder.
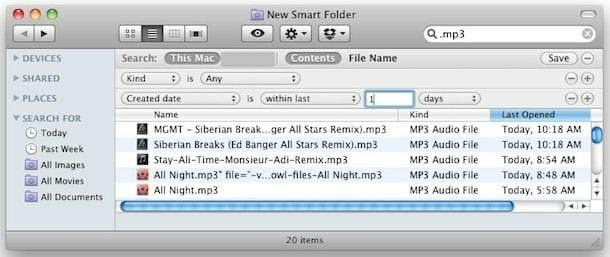
Step 2. Add search criteria for the type of file you want to review. You can limit the results to documents, images, music, video, or another category.
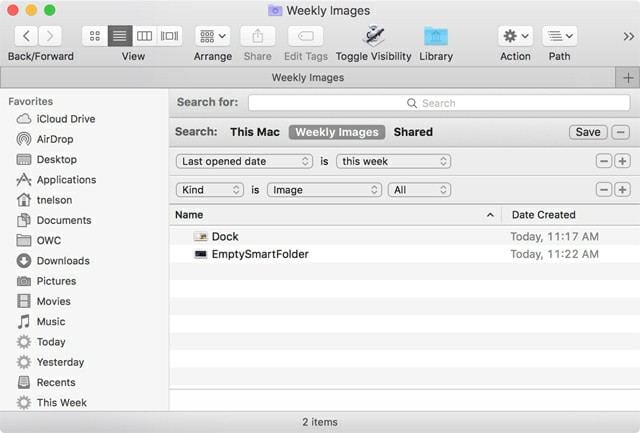
Step 3. Switch to a list view and sort candidates by Name, Size, or Date. Use Quick Look to compare the contents before deciding that one copy is redundant.
Step 4. Move only confirmed extra copies to Trash. Finder Smart Folders are a discovery tool, not a byte-for-byte duplicate detector, so a matching name or size should not be your only test.
For broader Mac storage cleanup outside this duplicate-file intent, see the separate Recoverit guide to free up disk space on Mac.
Method 2. Merge Duplicate Photos and Videos in Photos
For a Mac Photos library, use Apple's built-in Duplicates collection instead of manually deleting files inside the Photos Library package. Apple's current Photos User Guide states that duplicates appear automatically under Utilities after Photos analyzes the library.
Step 1. Open the Photos app.
Step 2. In the sidebar, open Utilities > Duplicates. If Duplicates has not appeared yet, Photos may still be analyzing the library.
Step 3. Select the duplicate items you want to consolidate and click Merge [number] Items.
Step 4. Confirm the merge. Apple states that one original remains and the removed duplicates go to Recently Deleted, where they can be recovered for 30 days.
See Apple's current Photos duplicate-removal instructions for version-specific details.
Part 4. Free Duplicate File Removers for PC and Mac
If manual review is too slow, a duplicate-file utility can scan larger folder sets. The safer choice is a tool that separates detection from deletion, shows full file paths, lets you preview groups, and avoids permanent removal by default. The options below are presented by current availability and documented platform support, not as a ranking.
| Tool | Platform | Cost Model | Useful When | Important Limitation |
| Microsoft PC Manager | Windows 10 build 19042+ and Windows 11 | Free | You want an official Microsoft utility that includes duplicate-file identification in storage management. | Feature visibility can vary by current build or region; always review selections before deletion. |
| AllDup | Windows 7/8/10/11 and Windows Server | Freeware | You want detailed duplicate-search controls on Windows. | Its many matching options require careful configuration; keep system folders out of broad cleanup scans. |
| dupeGuru | Windows, macOS, Linux | Open source | You prefer a cross-platform desktop duplicate finder. | The project notes ongoing maintenance needs, particularly for macOS packaging, so verify compatibility with your current system before relying on it. |
| Duplicate File Finder Remover | Mac | Free with in-app purchases | You want an App Store utility that scans disks, folders, or a Photos library and lets you review duplicates. | Some advanced functions are paid; review what the free tier can remove before starting a large cleanup. |
Do not choose a program only because it promises to delete thousands of files in one click. The most important safety feature is your ability to inspect what will be removed and keep at least one known-good copy of every duplicate group.
Part 5. Avoid Duplicate-File Cleanup Mistakes
Finding duplicate candidates is only half the job; the more important step is deciding what is actually safe to remove. The checks below help prevent cleanup from affecting system files, synced folders, project assets, or backups.
Do Not Treat System Files as Cleanup Targets
A duplicate-finder result can contain files that look redundant but are intentionally stored in separate application or system locations. Limit routine cleanup to personal data unless you know exactly why an operating-system or application file exists.
- Windows: Avoid bulk deletion inside Windows, Program Files, Program Files (x86), ProgramData, and application installation folders.
- Mac: Avoid manually removing files from System, Library, application bundles, or the internal Photos Library package merely because names match.
- Project folders: Old versions, autosaves, proxies, exports, and cache files can look duplicated while serving different roles.
- Backups: A second copy on a separate backup drive is not clutter if it is your protection against disk failure or accidental deletion.
Be Careful With OneDrive and iCloud Drive
Cloud-synced folders change the meaning of "delete from this PC or Mac." Microsoft states that deleted OneDrive files can go to the OneDrive recycle bin, and Apple states that deleting a Desktop or Documents file stored in iCloud Drive on one device deletes it from other devices signed in to the same Apple Account.
| Location | What a Delete Can Affect | Safer First Check |
| Local unsynced folder | The local copy | Use Recycle Bin or Trash and verify the kept copy before emptying it. |
| OneDrive-synced folder | The OneDrive item and synchronized locations | Check Microsoft's OneDrive deletion guidance and OneDrive Recycle Bin. |
| iCloud Drive Desktop or Documents | Other devices signed in to the same Apple Account | Apple says deleted files can be found in Recently Deleted for 30 days; review iCloud Desktop and Documents behavior. |
| Backup drive | Your backup history or redundancy | Do not deduplicate a backup set manually unless the backup system explicitly supports it. |
Part 6. What If You Delete the Wrong File?
Even with careful review, you may occasionally remove the wrong copy. The safest recovery path depends on whether the file is still in Recycle Bin, Trash, cloud recovery, or a backup, or whether it has already been permanently deleted.
Check Recycle Bin, Trash, and Cloud Recovery First
If you realize that the retained "duplicate" was actually the wrong version, use the least destructive recovery path first:
- Windows Recycle Bin: If the file was deleted normally and the bin has not been emptied, restore it from Recycle Bin.
- Mac Trash: If the file is still in Trash, use Put Back or move it to the correct folder.
- OneDrive: Check the OneDrive Recycle Bin before scanning a local disk.
- iCloud Drive or Photos: Check Recently Deleted while the item is still within Apple's recovery window.
- Backup: Restore the exact version from File History, Time Machine, or another verified backup if available.
If one of these methods works, there is no reason to run a data-recovery scan.
Recover a Permanently Deleted File With Recoverit
If the file is no longer in Recycle Bin, Trash, cloud recovery, or a backup, stop writing new data to the source drive. New downloads, app installations, exports, and copied files can overwrite deleted data. Wondershare Recoverit can scan a storage device that is still detectable by the operating system, but no software can guarantee recovery after the original data has been overwritten.
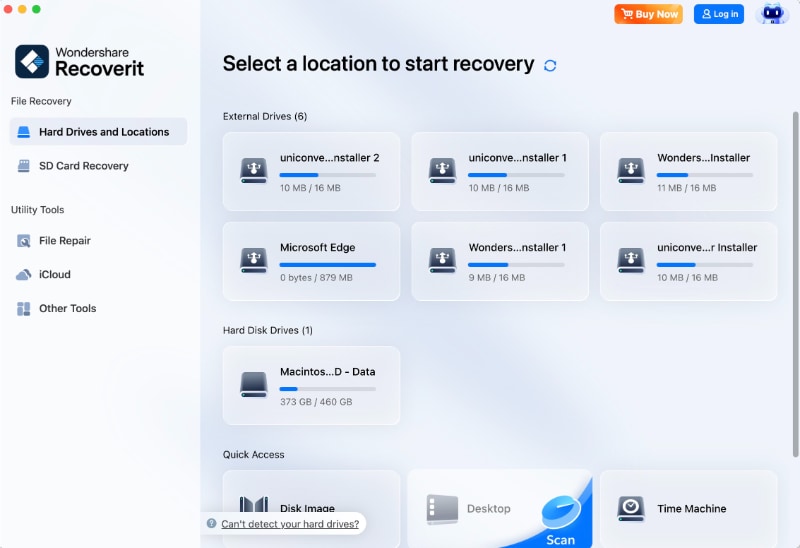
Step 1. Select the Location Where the File Was Deleted
On Windows, choose the affected drive, Desktop, Recycle Bin, or other relevant location from Hard Drives and Locations.

On Mac, select the affected drive or choose a specific folder under Quick Access if you know the original path.
Step 2. Scan the Source Location
Start the scan. Use file-type, time, size, and filename filters to narrow the results. You can stop when the needed file appears.

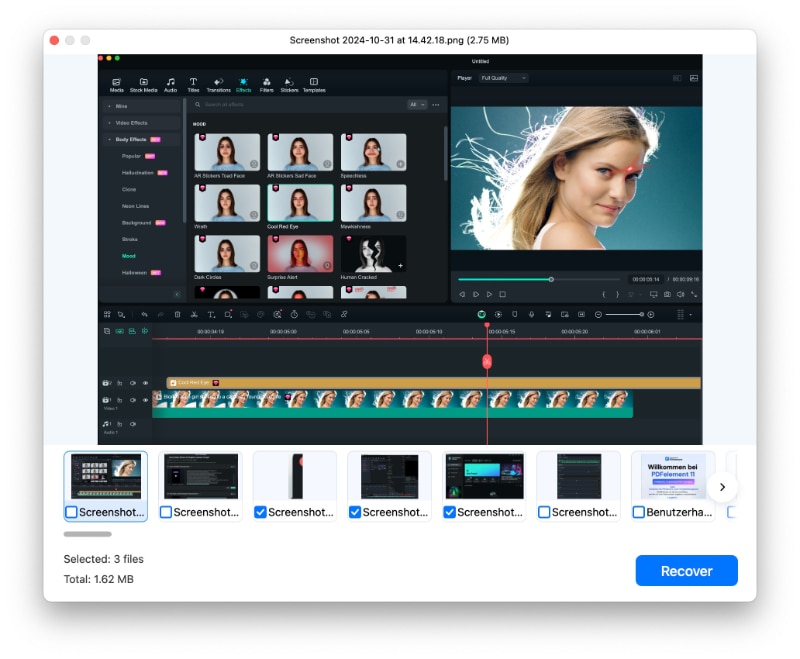
Step 3. Preview the Candidate Before Recovery
Preview the file when supported and compare its name, size, path, and content so you do not restore another unwanted copy.
Step 4. Recover to a Different Healthy Drive
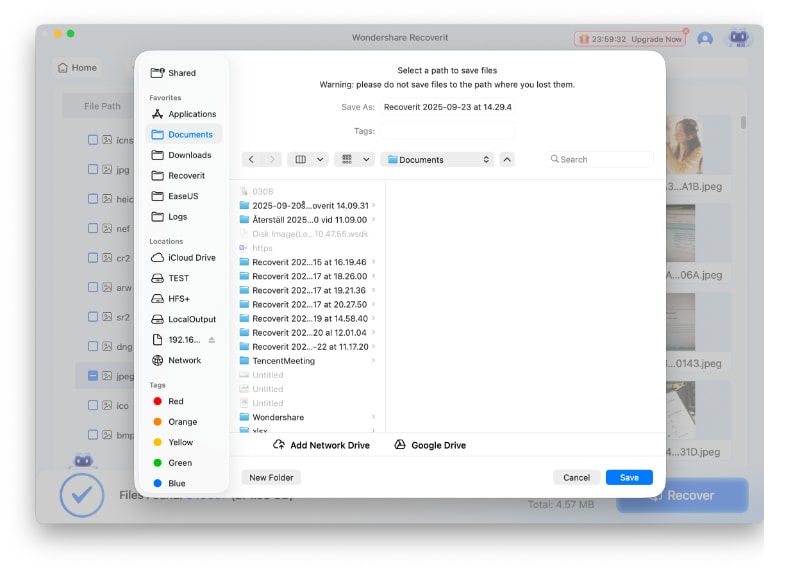
Click Recover and choose a destination on a different physical drive when possible. Do not write the recovered file back to the source you are still trying to recover from.
For the current interface and platform-specific workflow, see the official Recoverit Windows guide or Recoverit Mac guide.
Recovery limit: If a drive repeatedly disconnects, makes unusual noises, smells burnt, has liquid damage, or is not detected reliably, stop repeated software scans and use a professional data-recovery service instead.
Recover a Permanently Deleted File With Recoverit
 Security Verified. Over 7,302,189 people have downloaded it.
Conclusion
The safest way to delete duplicate files is to separate finding from deleting. On Windows 11/10, Microsoft PC Manager offers a current free duplicate-file option, File Explorer helps with obvious repeated downloads, and SHA-256 hashes can confirm exact content matches. On Mac, Finder Smart Folders narrow likely copies, while Photos provides a built-in Duplicates workflow for photos and videos. Whichever method you choose, review the kept copy, protect cloud-synced data, and use reversible deletion before permanently clearing anything.
FAQ
-
Does Windows 11 have a built-in duplicate file remover?
File Explorer does not have a universal automatic duplicate-file button. Microsoft PC Manager is a free Microsoft utility for Windows 10 build 19042+ and Windows 11, and Microsoft's current service documentation says its Space Management feature can identify duplicate files. -
How can I delete duplicate files on Windows 10 for free?
Use Microsoft PC Manager if its Duplicate files feature is available on your current build, use File Explorer to review obvious repeated copies, or generate a SHA-256 duplicate report with PowerShell. Review every group before deleting anything. -
How do I remove duplicate files on Mac without third-party software?
Use Finder Smart Folders to narrow files by type and other criteria, then sort and preview candidates manually. For photos and videos in the Photos library, use Utilities > Duplicates and merge confirmed duplicates. -
Can Finder automatically detect exact duplicate files?
No. Finder Smart Folders can collect files that match criteria, but matching name, size, kind, or date does not prove that two files contain exactly the same data. Review the contents or use a content-hash or duplicate-scanning tool when exact matching matters. -
Does deleting duplicate files make a PC or Mac faster?
The direct benefit is freeing storage and reducing file clutter. A nearly full startup disk can contribute to performance and update problems, so reclaiming space may help in that situation, but deleting duplicates does not guarantee a faster computer. -
Is it safe to delete duplicate files in Windows or system folders?
Do not bulk-delete files from operating-system or application folders just because a duplicate finder flags them. Separate copies can be required by Windows, macOS, applications, installers, or backup systems. Focus routine cleanup on personal files you can identify and verify. -
What should I do if I deleted the wrong duplicate file?
Check Recycle Bin or Trash first, then OneDrive or iCloud recovery and your backups. If the file was permanently deleted and no backup exists, minimize new writes to the source drive and consider a recovery scan, saving any recovered file to a different healthy drive.


