How to Backup SD Card to Google Photos
To back up media from an Android SD card to Google Photos or Google Drive when automatic app syncing fails, manually upload the files directly from your mobile device or use AOMEI Backupper Standard on a Windows PC.
● On Android devices like the Galaxy S8, bypass SD card auto-sync failures by selecting the target media in your file explorer and sharing it to Google Drive, or by tapping the plus icon in the Google Drive app to manually upload from the SD card path.
● On Windows, connect the SD card via a USB card reader and use AOMEI Backupper Standard to execute a Basic Sync or File Backup, selecting the cloud drive option to route the files to Google Drive.
Ask AI for a summary
I have an SD card in my Galaxy S8 and changed the camera settings to save to the SD. So on the card, I have a DCIM, which in turn has a Camera folder inside.
Backup and sync are enabled within the Google Photos app, yet nothing from the Camera folder on my SD card is backed up.
When I look at Device Folders in the settings, I see the DCIM folder is set to sync...however; I suspect this is the DCIM on the device internal memory?
How do I ensure that the app will sync and backup photos from the SD card folder DCIM>Camera. I've tried the usual restarts, cache clears and forces stops etc., nothing works.
Every external or internal storage device that carries data needs a backup. These backups act as restore points that can be used to rehabilitate the computer to last working condition in case of system crash or corruption. The backups help secure data from data loss consequences like viruses or malware attacks on drives or system files, physical damage to drives or devices, etc. The same goes for the SD cards. They also need back up i.e., SD card backup. SD cards usually contain media files i.e., music, videos, photos, etc. The only place where one can store the backup of the SD card is Google photos. This article will explain the procedure of how to backup SD card to google photos.
When the task is to backup SD card, one can always rely on google photos to act as a reliable option to secure the media files. In case of system crash or corruption, these media files are in a safe zone without any hazard of data loss. Google photos come in the form of an application for the devices that help create backups for all the media files i.e., saved in the device's memory or the external storage media. Other ways for SD card backup may include compatible transfer tools. Using the google photos application is the safest option. Select the option of backup and sync in the app and then select the target folder for which you need to create a backup, click ok, and a backup in google photos would be created. This article is all about the two significant ways for creating SD card backup to google photos. Here are the topics that would be discussed in detail.
Part 1: How to Back Up SD Card to Google Photos on Android
Creating an SD card backup is as essential as creating a disk image. It protects that data stored on cad against data loss consequences. As mentioned above, the reliable destination for storing the SD card backup is google photos. In this section, two ways are explained: you can transfer the media i.e., create a backup of SD card on google drive.
Method 1: Upload photos to Google Drive from Android using Photo Gallery
Step 1: In the main menu of your device, select the option of file explorer, and in the file explorer window, choose the option of photos.
Step 2: In the window of photos, select all the files you want to create a backup.
Step 3: Right-click the selected media files, and in the drop-down, select the option of send.
Step 4: Choose google drive as the destination folder. Click ok to complete the action.
The same steps go for transferring the entire album. Select the target album and click send and then select google drive as the destination drive. Click ok and complete album would be backed up in google drive.
Method 2: Backup everything on SD card to Google Drive with Google Drive app
Apart from using the photo gallery of your device, you can directly sue the google drive application. This application allows you to create a backup for multiple media i.e., images, audios, videos, Word/Excel/PPT/PDF documents, etc. Here are the steps to follow:
Step 1: Make sure that your device is in a sound network connection. Now launch the google drive application and log in to your google drive account.
Step 2: In the main menu, the lower right corner of google drive, and click on the plus icon. In the new window, select the option of upload.

Step 3: In the next window, select the option of 'open from' for choosing the path and folder for which you want to create a backup. Click done to continue.

Once the process of creating backup completes, automatically all the targeted media would be stored in google drive application i.e., in the cloud.
Part 2: How to Back Up SD Card to Google Drive on Windows
Apart from using the inbuilt tools or applications, using a third party application software is always a reliable option. In this context, using AOMEI backupper is the best choice. It is one of the best file sync software that carries a user-friendly interface. It will notify via email notifications once the process of backup and sync is completed. You can create the backups or sync the data on a daily, weekly, or monthly basis by using this software. Here are the steps to follow:
Step 1: Make sure that the target SD card is in an appropriate connection with the device. Use a card reader and connect the card with the device via USB cable.
Step 2: Download and then install the AOMEI backupper standard on your device. Once it is successfully installed, launch the software.
Step 3: In the main menu of software, select the option of sync followed by choosing the option of basic sync. If you want to add extra security to your data, choose the option of file backup.
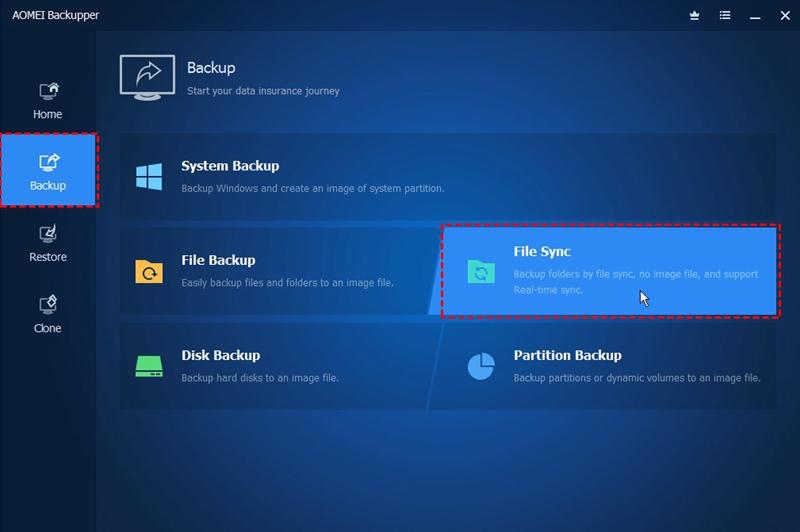
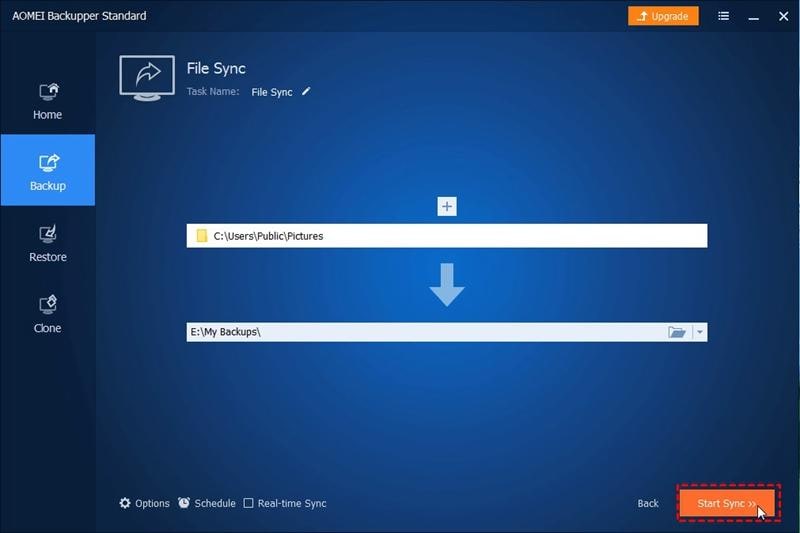
Step 4: Now add the folder for selecting the target media files from the SD card.

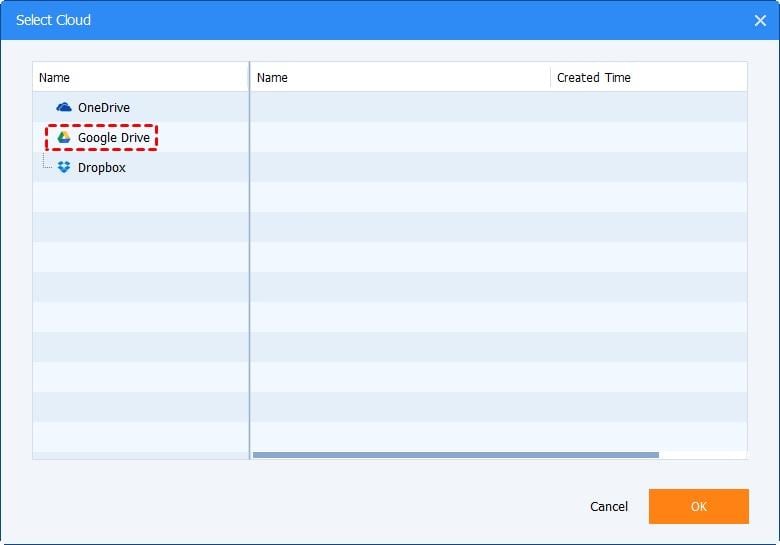
Step 5: In the next window, feed the destination drive. In this case, select the option of cloud drive in the drop-down menu. Select google drive and click ok to complete the action.
Step 6: Click start sync to continue.
Once the sync or backup process is complete, the files/folders or media stored on the SD card would automatically be saved as a backup in google drive or precisely google photos.
Hence, creating a data backup is essential. Be it an internal or external storage media, a backup or file sync is necessary. These backups or synchronization act as the latest restore points for the device. In case of any system crash or failure, they can rehabilitate your device to the previous working condition. In this context, you won't lose your copy of the data. Creating an SD card backup follows the same regime. This article explained all about the significance of creating SD card backup and how to backup SD card to google photos. Two essential stepwise procedures are discussed in detail i.e., how to back up the SD card to google photos on android and how to back up the SD card to google drive on windows. Creating a backup of SD card on android can be done via the device gallery or google drive account, whereas, for windows, one can use a third party application. AOMEI backupper standard is the most reliable software solution to create SD card backup to google drive on windows.
Data Backup Services
- Computer Backup
- Hard Drive Backup
- Mac Backup
- Cloud Backup


 ChatGPT
 Perplexity
 Gemini
 Claude
 Grok
Grok


Amy Dennis
staff Editor