

 TL;DR:
To successfully duplicate an SD card containing a bootable operating system or hidden app data, use a sector-by-sector cloning tool like Wondershare UBackit or Win32DiskImager instead of a standard file-level copy-and-paste.
● Wondershare UBackit provides automatic capacity validation for whole-card cloning, while the free, open-source Win32DiskImager is optimal for Raspberry Pi workflows but lacks overwrite warnings and capacity checks.
● Ensure the destination drive has an equal or larger capacity than the source card, use a powered USB 3.0 reader to prevent mid-write corruption, and format new destination cards larger than 64 GB to exFAT or 64 GB and smaller to FAT32.
● If the source SD card is failing, unmountable, or displaying as RAW, extract the files using data recovery software like Wondershare Recoverit before attempting to clone to avoid transferring bad storage blocks.
Ask AI for a summary
 ChatGPT
 Perplexity
 Gemini
 Claude
 Grok
Grok
Quick answer: Connect the source and destination SD cards to a card reader, open Wondershare UBackit, click Clone > Start, select the SD card as the source, pick a destination drive with equal or larger capacity, confirm the wipe warning, and wait for the success message. Cloning preserves hidden partitions and the bootloader that copy-and-paste skips.
A common mistake is treating cloning like copying files. A user on r/RG351 asked whether copy-and-paste was enough to duplicate a card; it is not. Copying visible files leaves out hidden system partitions, app configurations, encryption keys, and the boot sector, so the new card often fails to boot or loses app data. Cloning copies every byte, including the bytes Windows does not show.
The guide below covers what cloning actually does, what to prepare, a five-step Windows walkthrough with screenshots, free alternatives, how to verify the result, common failures, and what to do when the card fails before you can clone it.
Clone an SD Card With Wondershare UBackit
 Security Verified. Over 7,302,189 people have downloaded it.
In This Article
Part 1. What Is SD Card Cloning and Why It Matters
Cloning an SD card creates an exact copy of the entire card, including the file system, hidden partitions, and boot sector. It is the only reliable way to move a card between devices when the card stores an operating system, app data, or encryption keys.
Clone vs Copy vs Image
These three operations look similar but produce very different results. Choosing the wrong one is the most common reason a “cloned” card fails to boot.
| Operation | What is copied | Bootable result | Typical tool |
| Clone (disk-level) | Every sector of the source, including hidden partitions and the boot sector | Yes | Wondershare UBackit, AOMEI Cloner, EaseUS Partition Master |
| Image (file-level capture) | A compressed .img file you restore later; two steps: read to file, then write the file to a card | Yes after the second step | Win32DiskImager, Raspberry Pi Imager, balenaEtcher |
| Copy (file-level) | Visible files only; hidden directories, app caches, and encryption keys are skipped | No | Windows Explorer, robocopy |
Copy-and-paste is fine for a folder of photos but wrong for a card that holds an operating system or app data. Cloning preserves the full disk layout; copying does not.
When You Should Clone an SD Card
Cloning is the right tool when the card contains anything beyond plain files:
- A bootable operating system: Raspberry Pi OS, RetroPie, 351ELEC, Batocera, or Windows To Go on a card.
- Mobile app data and encryption keys: An Android userdata partition or a Nintendo Switch emuMMC that binds to the original card.
- A camera’s proprietary folder structure: Sony ARW, Canon CR3 sidecar files, or drone DCIM folders with telemetry.
- A smart-home hub’s persistent state: Home Assistant, Pi-hole, or an MQTT broker whose config lives on the card.
Cloning also covers the scenario people search for without naming it: “I want to keep using this card, but it is failing and I lost data last week.” A clone taken while the card still mostly works is the cheapest insurance against the sudden death of NAND flash.
What Happens to Data When an SD Card Fails
SD cards use NAND flash memory with a finite number of program/erase cycles per cell. According to the SD Association SD Specifications, consumer cards have no public write-cycle counter, so wear is invisible until cells stop retaining data. A card can become read-only or unmountable without warning, which is why a current clone matters more than a perfect backup schedule.
If the card is already failing, clone it first, then recover onto the clone. Cloning a dying card directly can copy bad blocks into the destination; recovering first produces a cleaner source. Part 7 covers this order in detail.
Part 2. What to Prepare Before Cloning an SD Card
Skipping preparation is the leading cause of failed clones reported on SanDisk’s community forum and Raspberry Pi forums. Run through every item:
- Capacity rule. The destination must hold everything on the source. A 64 GB card with 38 GB used needs a 64 GB or larger destination. To shrink to a smaller card, use a tool with an Intelligent Clone or used-sectors-only mode.
- Use a real card reader. Built-in laptop readers handle 32 GB cards but can choke on 128 GB UHS-II cards. A USB 3.0 reader with a UHS-I chipset is the single biggest speed upgrade. Most modern readers install as “Realtek USB 3.0 Card Reader” with in-box Windows drivers.
- Format the destination first. If the destination is brand new, right-click it in Windows Explorer and choose Format. Use exFAT for cards larger than 64 GB and FAT32 for 64 GB or smaller. New cards often ship with an unrecognized partition layout.
- Back up the destination. Cloning wipes the destination. Move anything you want to keep off the destination card before you start.
- Close disk-heavy apps. OneDrive, Dropbox, antivirus real-time scans, and photo catalog writes can stall reads. Close them before cloning.
- Use a powered USB port. Unpowered hubs can brown out mid-sector and corrupt the destination card.
Details on closing background apps and managing disks are in Microsoft’s Windows 11 guidance.
Part 3. How to Clone an SD Card in Windows
Two methods follow. Method 1 uses Wondershare UBackit and is the easiest for most users because it validates capacities and preserves hidden partitions automatically. Method 2 uses the free open-source Win32DiskImager and is a good choice for Raspberry-Pi-style image workflows.
Method 1. Clone an SD Card With Wondershare UBackit
Wondershare UBackit is a backup and cloning tool that preserves hidden partitions on the first try and costs nothing for the 30-day free trial, which fully unlocks the Clone module. Its steps are also representative of AOMEI Cloner and EaseUS Partition Master, so the workflow transfers if you prefer another tool.
Step 1. Download and install Wondershare UBackit from the official product page. Connect the source SD card and the destination drive (another SD card in a second reader, an external SSD, or a USB HDD) and wait for Windows to assign drive letters. Open UBackit and click Clone in the left sidebar, then click Start.
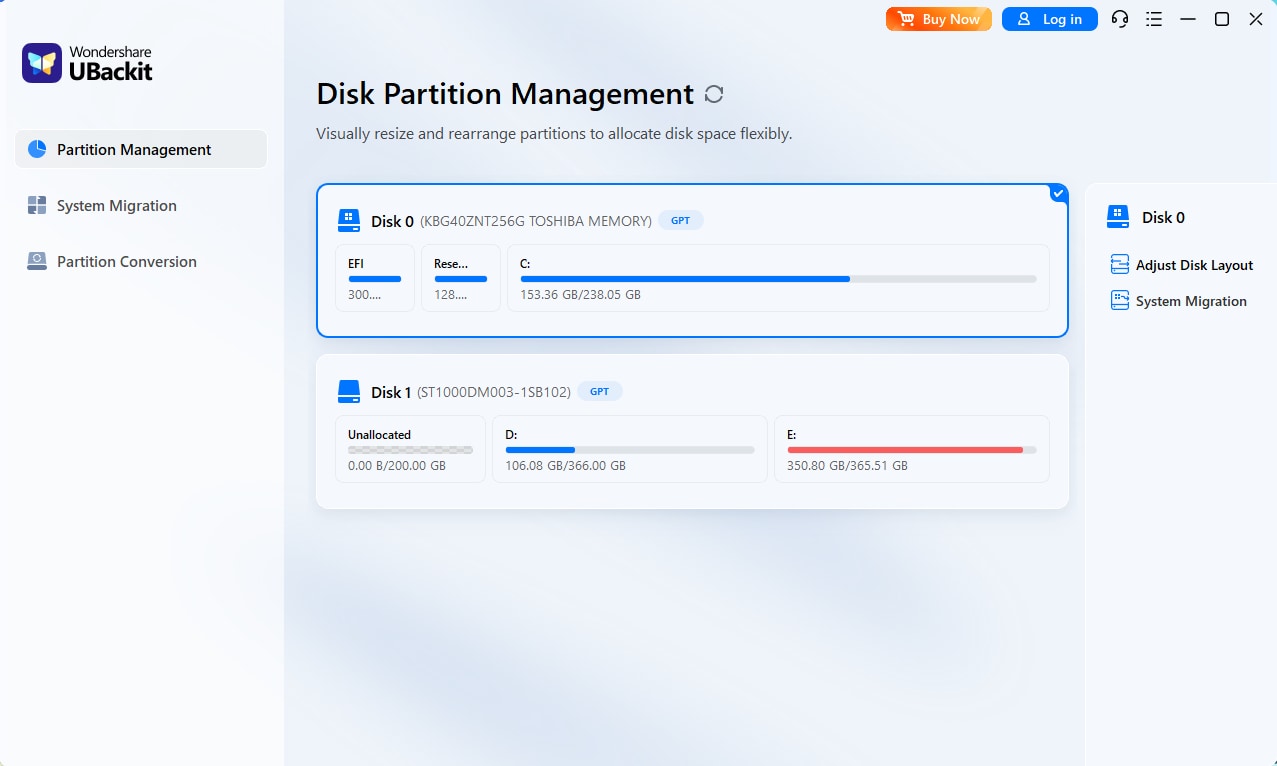
Step 2. UBackit lists every connected drive grouped by physical hardware, for example SanDisk SD8SBAT128G1122, (119.24 GB) with one partition beneath it. Click the radio button next to your SD Card Reader entry, then click Next.
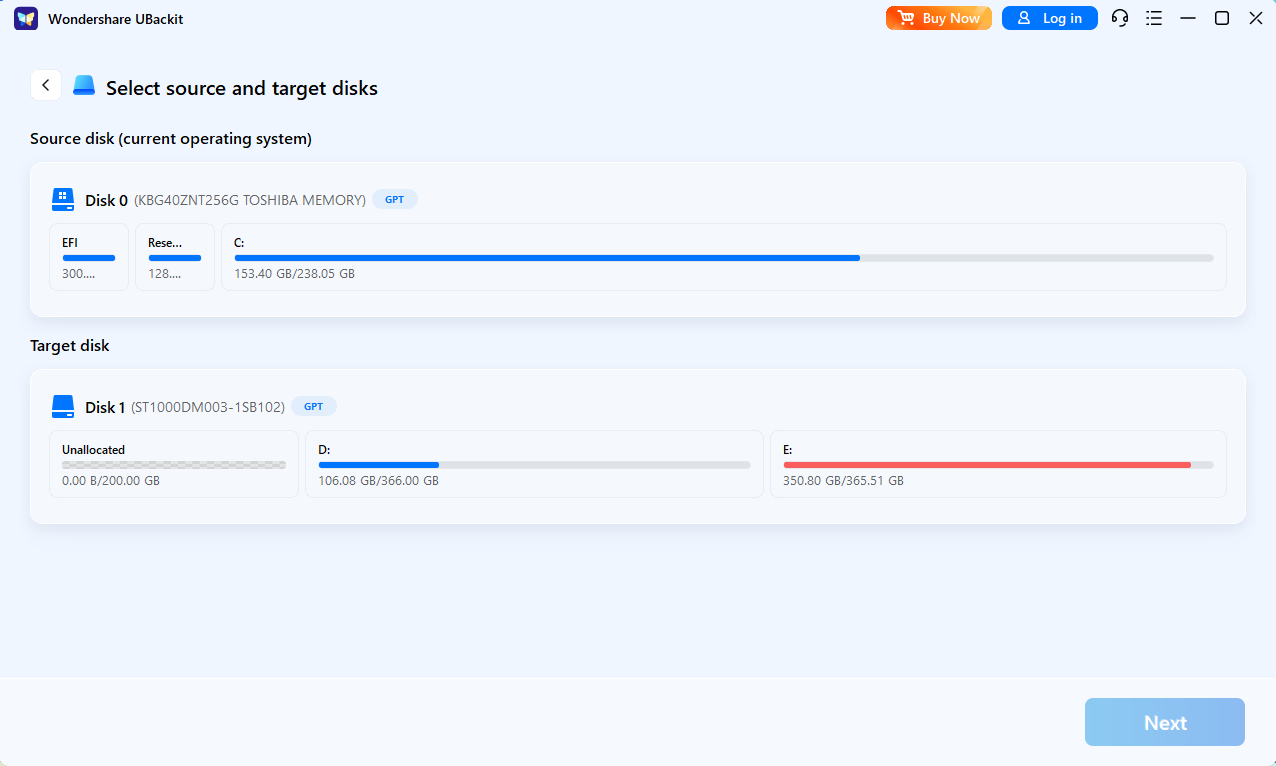
Step 3. In the destination picker, drives smaller than the source are flagged with red text reading “Storage is not enough.” Select your target drive and click the blue Clone button at the bottom right.
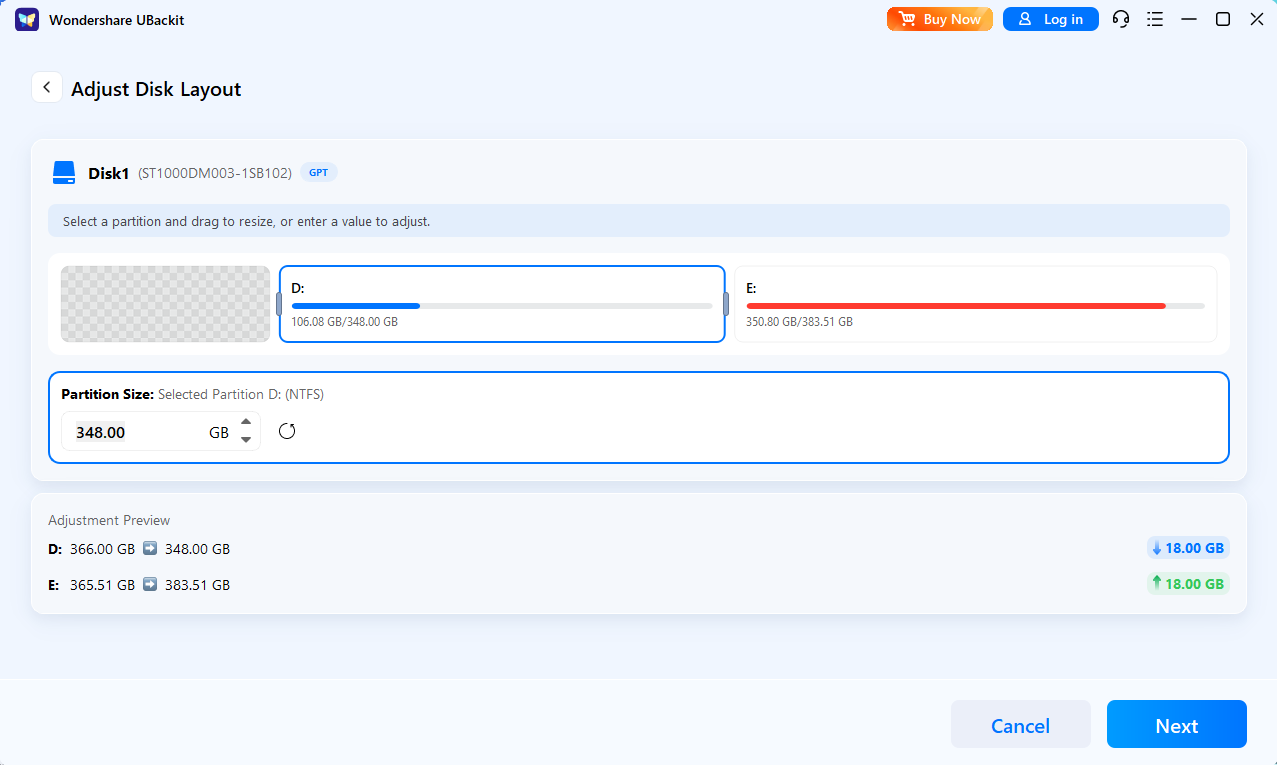
Step 4. A confirmation dialog appears: “Are you sure to start cloning? Warning: Once cloned, all data on the selected Destination (E: 391.0 GB) will be wiped out.” Read the drive letter and make sure it is the destination, not the source you intended to clone. Click Continue only if the letter matches.
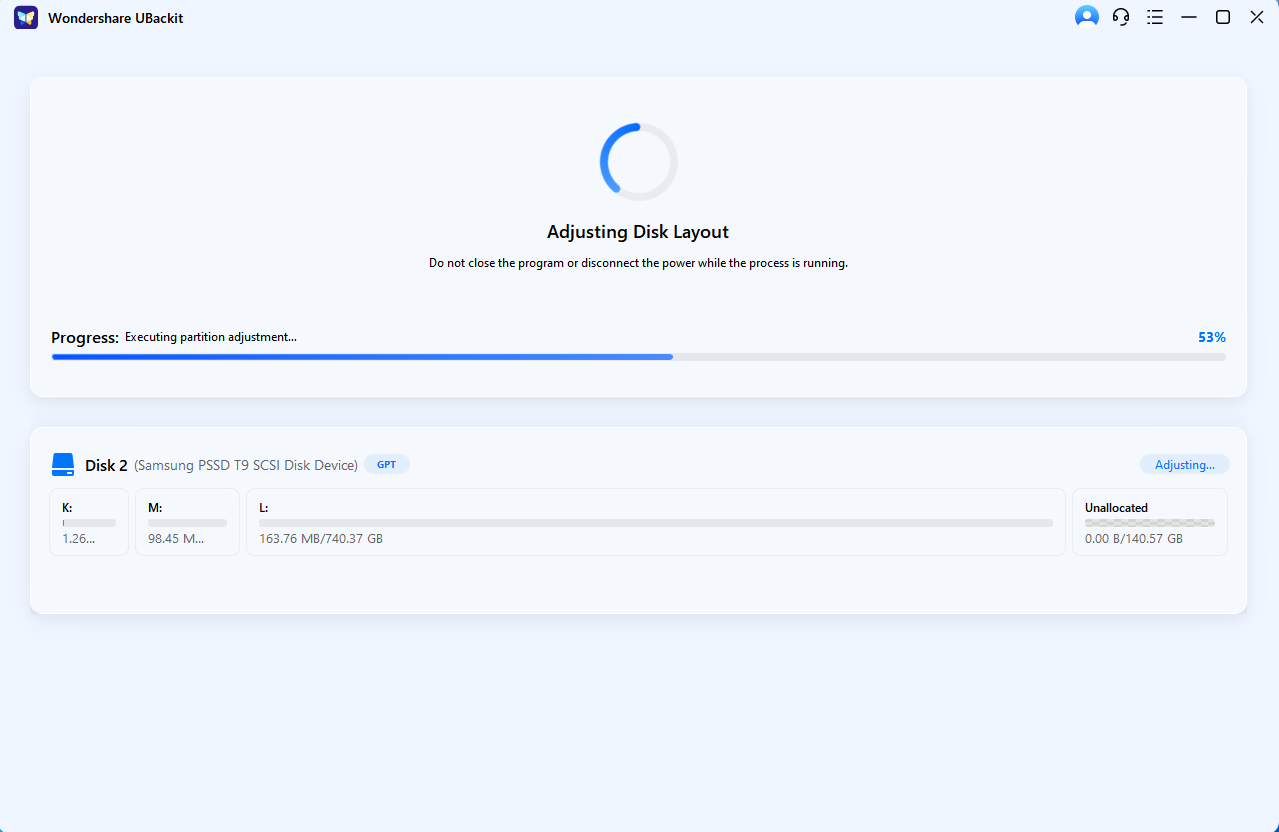
Step 5. Wait for the progress bar to finish. Do not disconnect either card. When UBackit shows “Cloned successfully! You can continue to use UBackit for other data protection now,” click Okay and safely eject both cards.
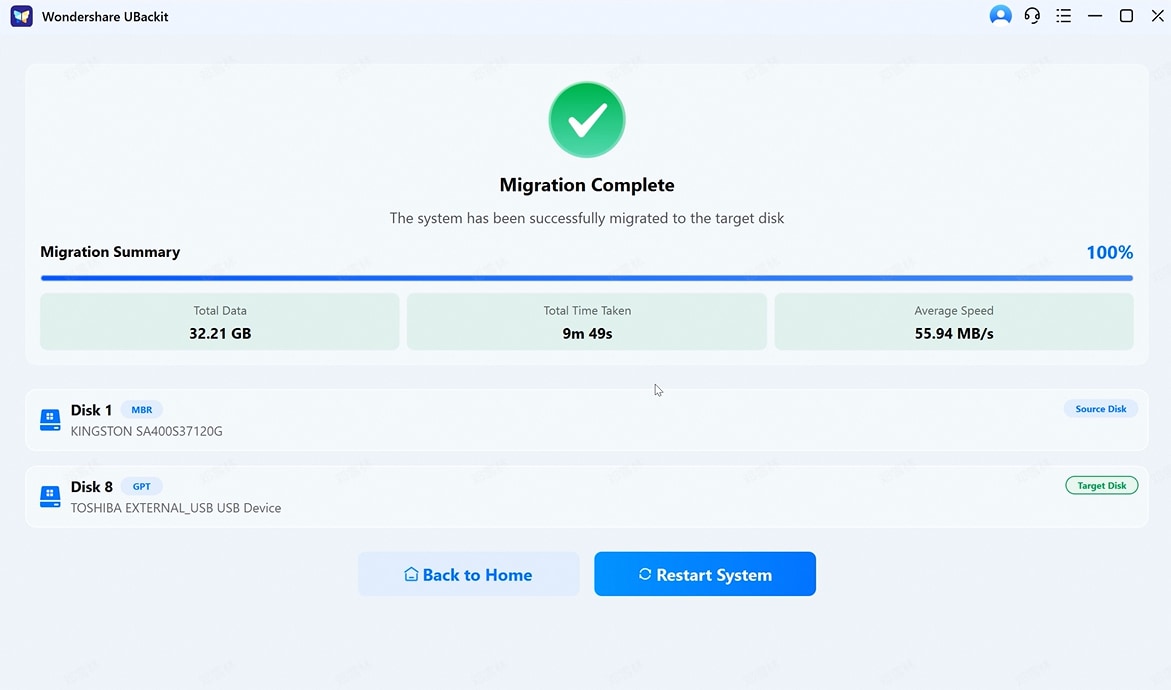
Limitation: UBackit clones a disk to a destination of equal or larger capacity by default. If you need to shrink a large card into a smaller one, use the Intelligent Clone option or Method 2 with the used-sectors checkbox.
Clone an SD Card With Wondershare UBackit
Security Verified. Over 7,302,189 people have downloaded it.
Method 2. Clone an SD Card With Win32DiskImager (Free)
Win32DiskImager is a free, open-source tool that reads a card into an image file and writes that image to another card. It is the standard choice for Raspberry Pi and retro-handheld workflows and requires no installation beyond the portable executable.
Step 1. Download Win32DiskImager from its SourceForge project page and run it as administrator (right-click the executable and choose Run as administrator). Insert the source SD card.
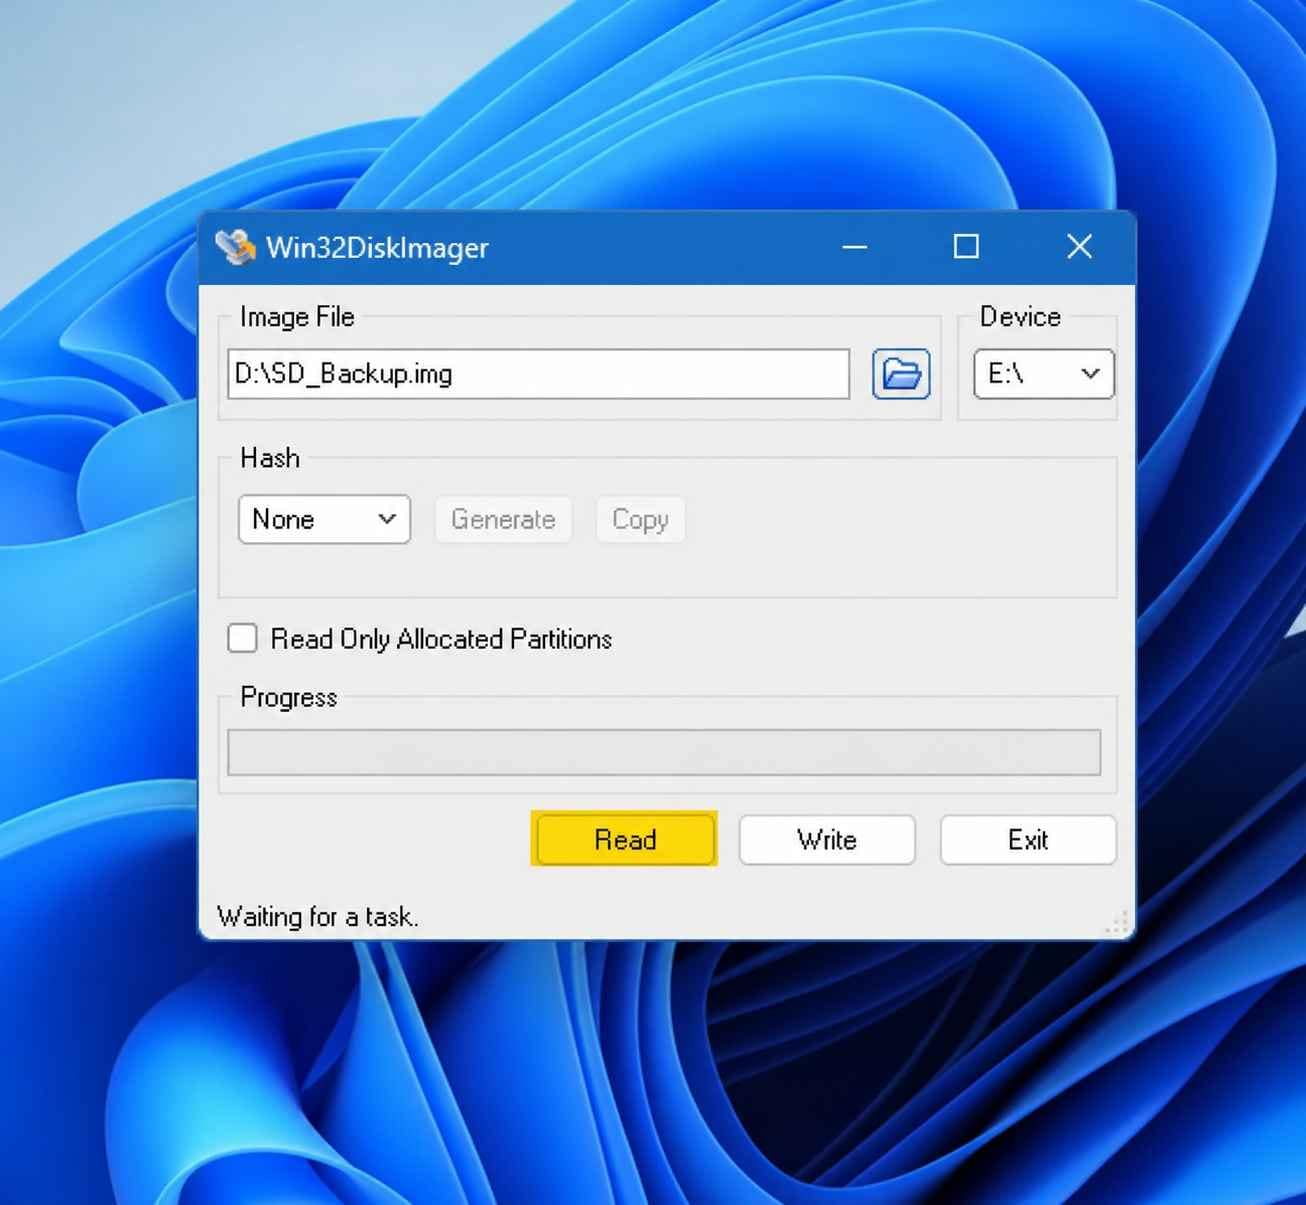
Step 2. In the Device field, select the drive letter of the source card. In the Image File field, choose a location and name for the backup, for example E:\sd-backup.img. Optionally check Read Only Allocated Partitions to capture only used sectors. Click Read and wait for the success message.
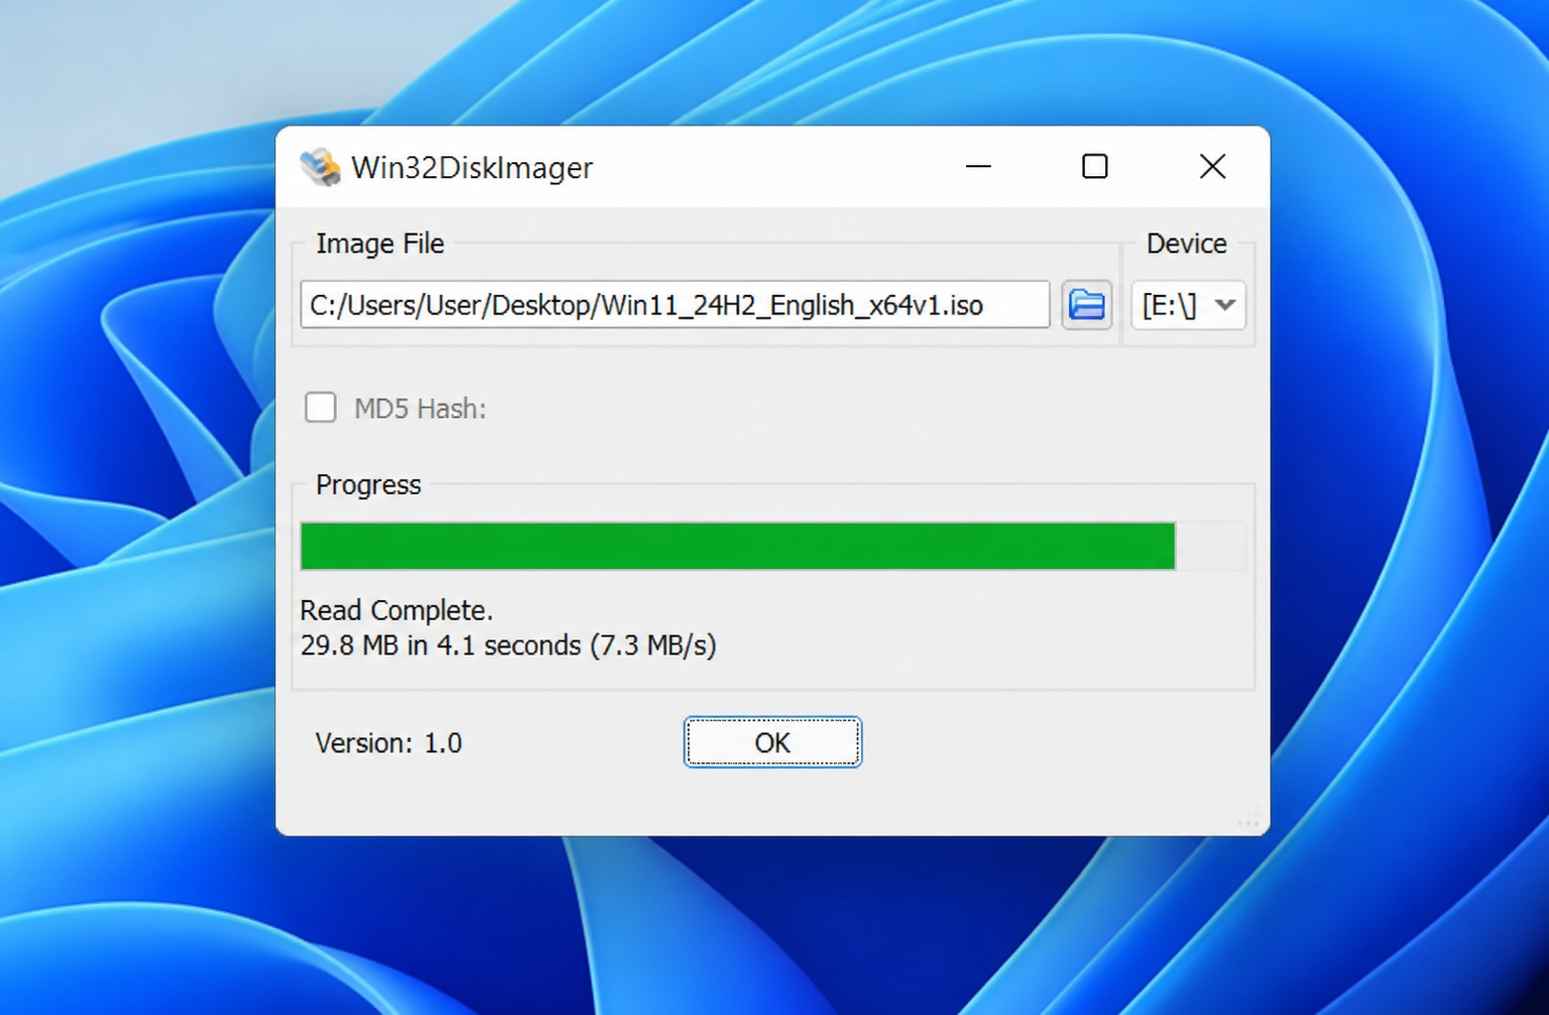
Step 3. Remove the source card, insert the destination card, and select its drive letter in the Device field. Select the image file you created in step 2. Confirm the overwrite warning, click Write, and wait for the success message.
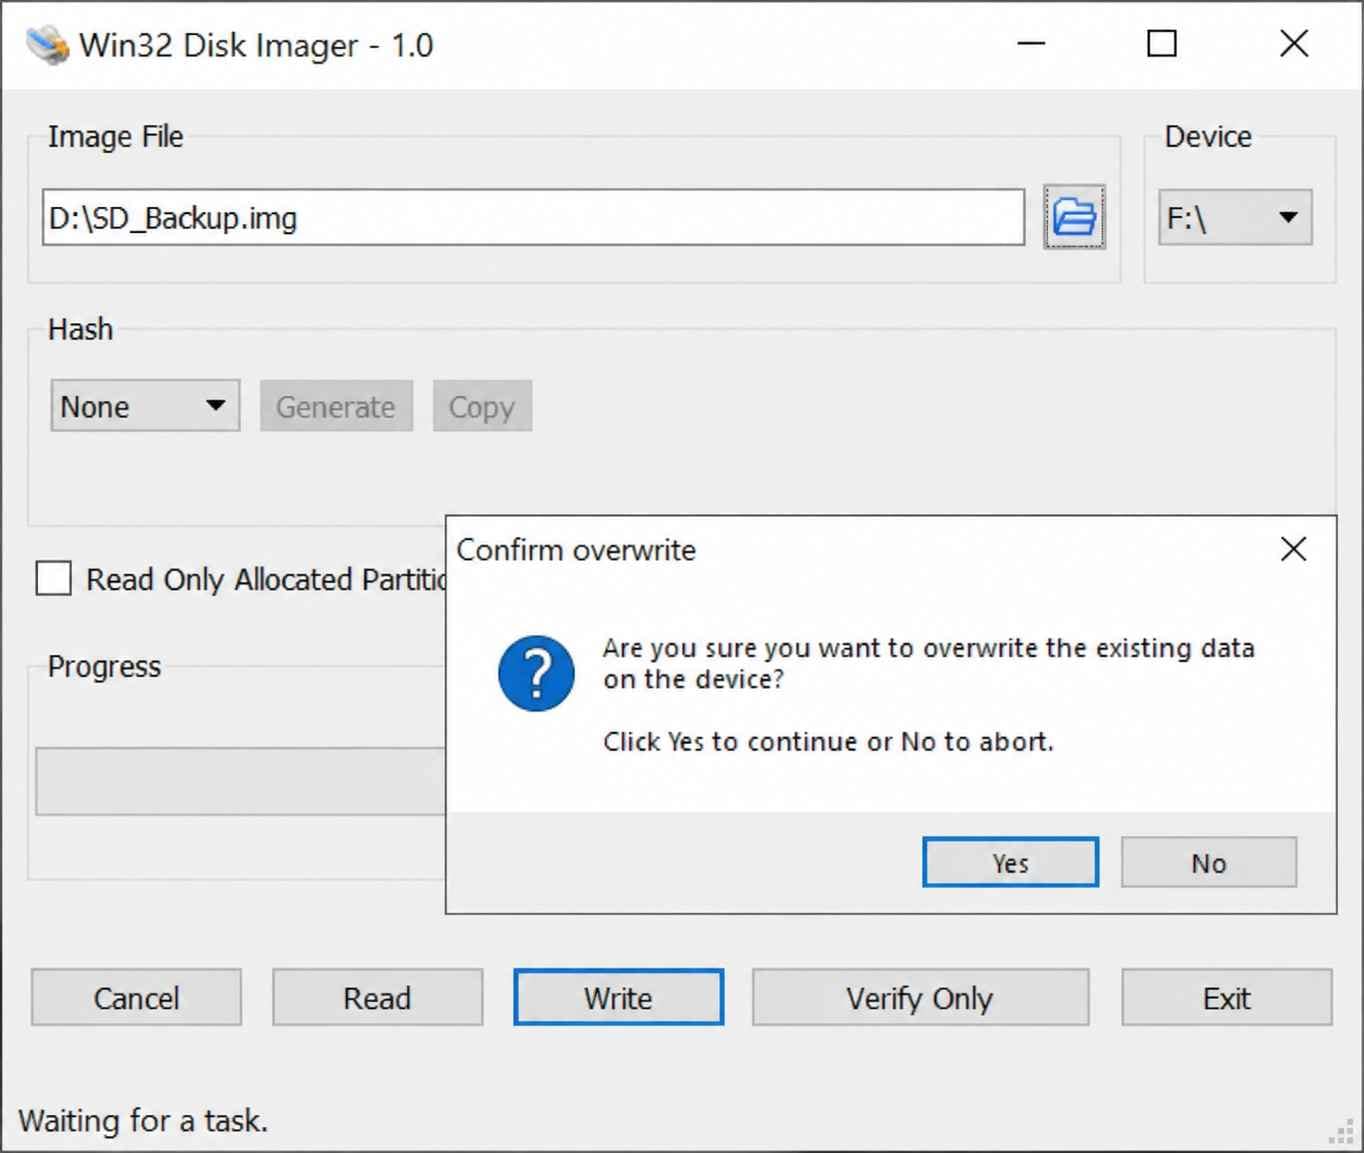
Limitation: Win32DiskImager has no capacity validation and no friendly warnings. Selecting the wrong drive letter in the Device field writes over the wrong disk, so double-check the letter before clicking Write.
Part 4. Free vs Paid SD Card Clone Tools
The table below compares the tools that currently rank for “clone SD card Windows” so you can pick by use case rather than by marketing.
| Tool | Price | Best for | Bootable card support | Beginner-friendly |
| Wondershare UBackit | 30-day free trial, then paid | One-click whole-card cloning with capacity checks | Yes | High |
| AOMEI Cloner | Free trial, then paid | Shrinking a large card into a smaller one | Yes | Medium |
| EaseUS Partition Master Free | Free with limitations | Single-partition clones | Limited | Medium |
| Win32DiskImager | Free (open source) | Raspberry-Pi-style image capture and flash | Yes | Low |
| Clonezilla | Free (open source) | IT pros and mass deployments | Yes, with live boot | Low |
| balenaEtcher | Free (open source) | Flashing an existing image to a card | Yes, write-only | High |
Detailed head-to-head reviews are available in our free cloning software comparison and the Raspberry Pi SD card cloning guide. Head-to-head with each alternative is at AOMEI vs Win32DiskImager and Digital Citizen's Win32 Disk Imager walkthrough.
Part 5. How to Verify Your Clone Worked
A clone can report 100% success and still be unusable. These three checks take under three minutes and catch every realistic failure mode.
- Check the file system. Open the destination card in Windows Explorer, right-click it, and choose Properties. The File system line must match the source: exFAT, FAT32, NTFS, or ext4. If it reads RAW or Unrecognized, the clone aborted mid-write; re-run it.
- Compare file counts. In PowerShell, run
Get-ChildItem -Recurse -Force 'X:\' | Measure-Objecton both cards. The counts should match within a few files (UBackit skips System Volume Information metadata). - Mount and exercise. Insert the cloned card into the original device. For a Raspberry Pi, boot with the destination card and watch the green LED pattern. For a camera, shoot a RAW burst and confirm thumbnails render. For a phone, boot to the lock screen.
For bootable cards with a Linux file system, Windows Explorer cannot read the partitions. Verify with a Linux live USB or with WSL instead.
Part 6. Troubleshooting Common SD Card Clone Failures
These are the failures users report most often, with the fixes our support team ships.
- The destination does not appear in the disk list. Windows has not assigned a drive letter. Open Disk Management (right-click Start, choose Disk Management), find the card by size, and use Change Drive Letter and Paths > Add to assign one. Microsoft documents the steps in Manage disks and volumes in Windows 11.
- “Storage is not enough” on the destination. The source has more sectors than the destination has total. Move up to a larger destination, or use the Intelligent Clone / Read Only Allocated Partitions option to copy only used sectors.
- The clone succeeds but the destination is RAW. Usually caused by a mid-write interruption. Reconnect both cards, format the destination as exFAT, and re-run the clone. If it fails twice, run
chkdsk X: /fon the source to surface bad blocks before retrying. - The clone hangs at 0% or 99%. Two causes: a USB power brown-out (use a powered port or hub), or bad blocks on the source. If the source is degrading, recover data first with Recoverit, then clone from the recovered image.
- A phone or camera will not read the cloned card. Android 11+ binds per-volume encryption to the original card’s UUID. The practical fix is to clone a card before first use in the device, not from a currently mounted phone card.
Part 7. Recover Files Lost When an SD Card Fails Before You Clone
File recovery and cloning are different jobs. Cloning copies a working card; recovery scans a failing card for data that was actually written to storage. If your card will not mount, recovery comes first, and the recovered result becomes the source for a clean clone.
Recommended Tool: Wondershare Recoverit
Wondershare Recoverit is relevant when a card is not recognized, shows as RAW, or contains files that disappeared. It scans readable storage and supports common document, photo, video, and audio formats on SD, microSD, and SDXC cards.
- Readable-storage scanning: Search an SD card, memory card, USB drive, or external drive for lost files.
- Document and media coverage: The official product page lists common Office documents, PDFs, photos, videos, audio, and archives.
- Preview before recovery: Open supported files to check whether their contents are usable before saving them.
- Separate save destination: Recover selected files to another drive to avoid overwriting the source.
What Recoverit Can Recover From a Failed SD Card
Recovery probability depends on the file’s state, the storage device, later writes, SSD TRIM, and encryption. Recoverit can be considered when the missing content reached readable storage before the failure.
- A card that shows as RAW or “not formatted” but is still detected by Windows.
- Files deleted or lost after a card was accidentally formatted.
- Photos, videos, and documents that disappeared after a card was removed mid-transfer.
- Supported scan results that can be previewed successfully before recovery.
Stop writing to the affected card as soon as files are missing. Do not install Recoverit on that card or recover results back to it.
How to Recover Files From a Failing SD Card
The screenshots below are from the official Wondershare Recoverit guide.
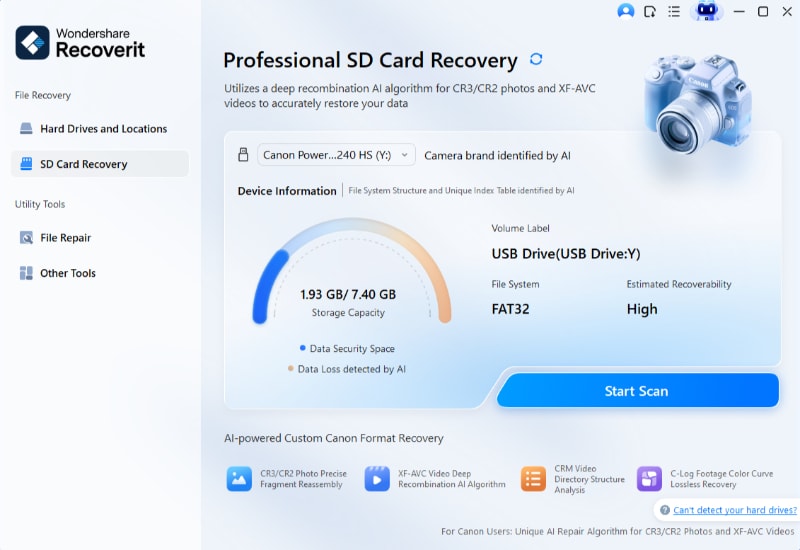
Step 1. Choose the recovery location. Install and open Recoverit on a healthy drive. Under Hard Drives and Locations, select the SD card, then start the scan.
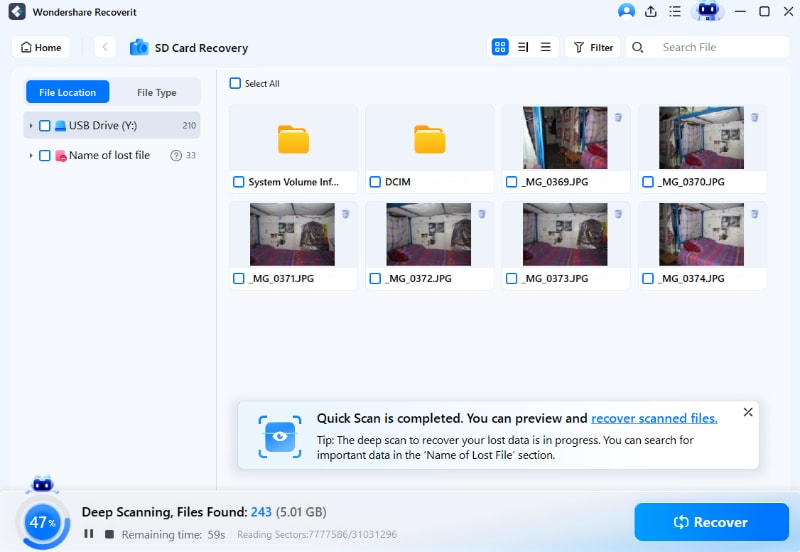
Step 2. Scan and locate lost files. Let the scan continue while using File Path or File Type filters. Avoid saving anything to the affected card during the scan.
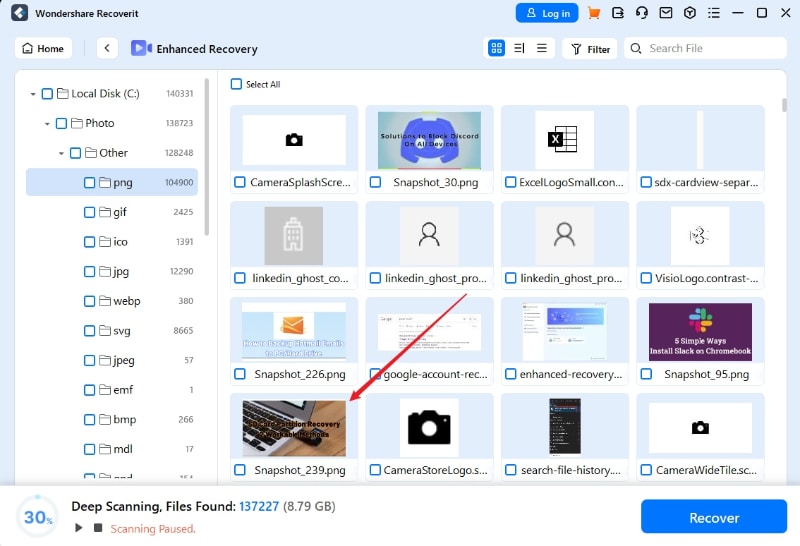
Step 3. Preview and recover files. Preview important candidates, select the usable versions, click Recover, and save them to a separate drive. Open and verify the recovered files before deleting any current copies.

What Recoverit Cannot Restore
No recovery program can reconstruct data that was never written to storage, and none can bypass hardware failure or encryption.
- Unsaved memory-only changes: Edits that existed only in RAM when the card was removed.
- Overwritten or TRIMmed data: Storage blocks replaced or removed by SSD maintenance.
- Physically inaccessible storage: Software cannot scan a card the computer and reader do not detect.
- Locked encrypted data: Recovery software does not bypass device or app encryption.
Part 8. SD Card Clone Facts and Commands to Remember
This reference separates cloning from copying and lists the commands used in the steps above.
| Task | Tool or command | Use |
| Clone a whole SD card | Wondershare UBackit > Clone > Start | 1:1 copy including hidden partitions and bootloader. |
| Create a card image | Win32DiskImager > Read | Save the card to an .img file without touching it. |
| Write an image to a card | Win32DiskImager > Write | Restore an .img file to a destination card. |
| Copy visible files only | robocopy X:\ E:\ /MIR /ZB /MT:8 |
File-level backup; skips hidden partitions. |
| Check a card for errors | chkdsk X: /f |
Surface bad blocks before retrying a clone. |
| Compare file counts | Get-ChildItem -Recurse -Force 'X:\' | Measure-Object |
Verify a clone after completion. |
Remember: Cloning preserves everything a card contains; copying preserves only what Windows shows. Use the least destructive operation that still does the job, and always confirm the destination drive letter before writing.
Conclusion
Most SD card cloning in Windows can be handled in five steps with Wondershare UBackit: open Clone, pick the source card, pick a destination with equal or larger capacity, confirm the wipe warning, and wait for the success message. The free Win32DiskImager covers Raspberry-Pi-style image workflows when you prefer an open-source tool.
Cloning is not the same as copying files. It preserves hidden partitions, app data, and the bootloader, so the new card works exactly like the old one. If the card fails before you can clone it, recover the data first with Recoverit, then clone from the recovered result.
FAQ
-
Does Rufus clone SD cards?
No. Rufus writes bootable .iso and .img files to a card; it does not read an existing card to a destination. For cloning, use Wondershare UBackit, AOMEI Cloner, EaseUS Partition Master, or the open-source Win32DiskImager. For flashing an image, Rufus is excellent. -
What is the difference between cloning an SD card and copying its files?
Copying duplicates visible files only. Cloning duplicates every sector, including hidden system partitions, app caches, encryption keys, and the boot sector. For bootable cards and cards with app data, cloning is the only reliable method. -
Can I clone a 64 GB SD card to a 32 GB SD card?
Yes if the used space fits. Use a tool with Intelligent Clone or used-sectors-only mode, such as UBackit, AOMEI Cloner, or Win32DiskImager with the Read Only Allocated Partitions checkbox. Plain sector-by-sector cloning requires the destination to be at least as large as the source’s total capacity. -
How long does cloning an SD card take?
On a USB 3.0 reader with a UHS-I card, expect 8–14 minutes for 64 GB and 16–28 minutes for 128 GB. On USB 2.0, the same sizes take 40 minutes to 2 hours. Real times vary with the destination’s write speed. -
Is Wondershare UBackit safe to use?
Yes. UBackit is read-only on the source card, and the wipe warning modal is the only point at which anything is written. The 30-day free trial fully unlocks the Clone module, so a one-time clone costs nothing. -
Will my cloned bootable SD card still boot?
Yes for sector-by-sector clones. Raspberry Pi OS, RetroPie, and other bootable systems use partitions that UBackit copies in order, preserving the GUIDs and bootloader the device requires. For writing a fresh stock image, use balenaEtcher or Raspberry Pi Imager instead. -
Can I clone an SD card to an external SSD instead of another SD card?
Yes. The destination is any drive with enough free space. A 32 GB card cloned to a 500 GB SSD produces a 32 GB partition with empty space after it; expand the volume in Disk Management if you want to use the rest of the SSD. -
What should I do if the source SD card is failing?
Recover first, then clone. Image the card with Win32DiskImager’s Read mode if possible, recover to a separate drive with Recoverit, and clone from the recovered result. Do not clone a dying card directly and expect a clean copy.


