5 Methods to Convert NTFS to FAT32 without Losing Data
To safely convert an NTFS partition to FAT32 without data loss, use a dedicated tool like AOMEI Partition Assistant for volumes up to 2TB or manually perform a volume shrink and transfer procedure using native Windows Disk Management.
● Native data preservation requires shrinking the NTFS volume by half, formatting the new unallocated space to FAT32, manually migrating your files, deleting the original NTFS partition, and extending the new FAT32 volume.
● Directly formatting the drive to FAT32 using Windows Disk Management causes total data loss and is strictly restricted to drives that are 32 GB or smaller.
● Direct formatting can also be executed via Command Prompt or Windows PowerShell, but the PowerShell method is exclusively supported on Windows 10.
Ask AI for a summary
FAT32 and NTFS are the two common file systems used by an operating system. While FAT32 is the older version of the file system, it is still popular on many devices. Devices like PS3 still support FAT32 as opposed to the newer NTFS.
As a result, many people often get stuck in situations where they're required to convert NTFS to FAT32 on a hard drive partition. If you're dealing with a similar situation, this blog will help. We've put together a list of the most effective methods to convert NTFS to FAT32 without losing your valuable data.
As we mentioned earlier FAT32 and NTFS are the two different file systems used by an operating system to read/write data on a drive. NTFS is a newer technology, which offers a multitude of benefits such as high security and efficient data organization.
Here are some differences between the two file systems.
| Features |
FAT32 |
NTFS |
| Creation |
It was created in 1977 and is an older version. |
NTFS was created in 1993 and is mostly used in recent times. |
| Support |
- Files less than 2GB and Volumes less than 2TB are supported
- Doesn't support file permissions
|
- It can support large files
- File permissions are supported too
|
| Security |
Shared permissions offered only |
You can set specific permissions to files or folders |
| Compression |
Compression options are not offered |
Here, one can perform individual compression of files |
| Fault Tolerance |
It keeps two different copies of FAT if damage occurs |
It repairs files automatically in case of any damage |
However, despite being the older file version, many devices still support the FAT32 file system only. It means if you have a hard drive with NTFS partition, you'll have to convert it to FAT32 before you can use it.
Now, while converting NTFS to FAT32 isn't challenging, the process can cause potential data loss, especially if you directly format the drive using conventional methods. So, let's guide you through different methods that'll help you convert NTFS to FAT32 without losing data.
Part 2: Convert NTFS to FAT32 without Data Loss
1. AOMEI Partition Assistant
The most convenient way to convert NTFS to FAT32 is to use a dedicated tool like AOMEI Partition Assistant. Unlike the conventional methods, the AOMEI partition assistant will keep your data completely untouched and can be used to convert up to 2TB of volume. Moreover, once the job is done, you can again convert the FAT32 partition back to NTFS without any hassle.
Follow these steps to convert NTFS to FAT32 using AOMEI Partition Assistant.
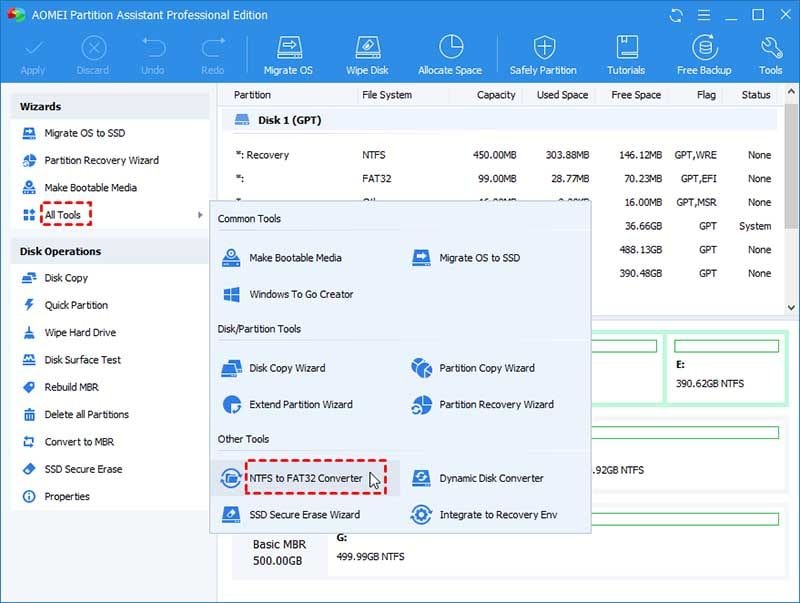
Step 1: Install and launch AOMEI Partition Assistant on your Windows PC and select "NTFS to FAT32 converter".
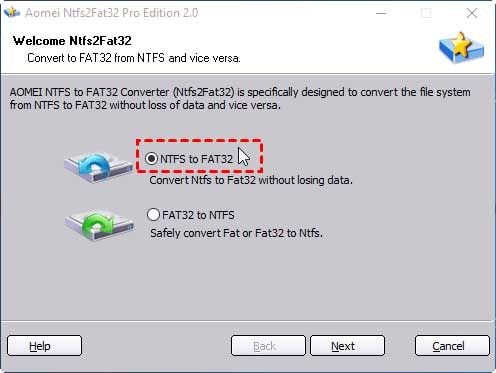
Step 2: In the next window, select "NTFS to FAT32" and click "Next".
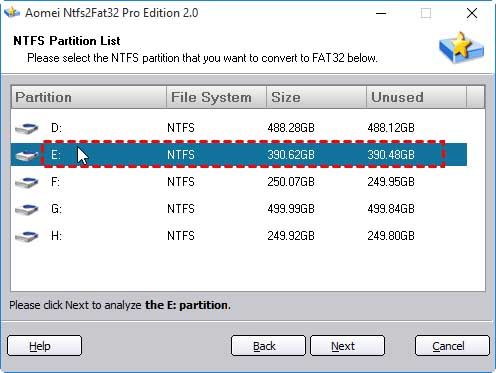
Step 3: Now, you'll be asked to select the specific partition you want to convert. Make sure to select the right partition.
Step 4: In the pop-up window, you'll be asked to confirm your actions. Simply tap "Proceed" to continue with the process.
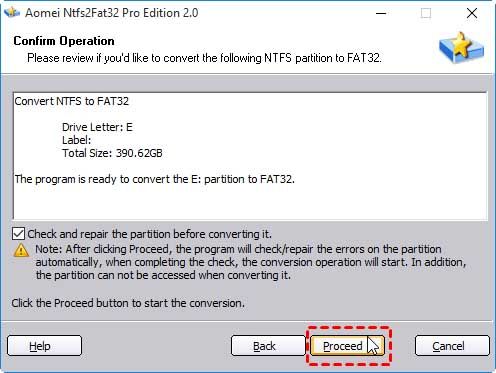
That's it; the file system will be converted to FAT32 and you'll be able to access it on the dedicated OS without any interruption.
2. Shrink NTFS disk with Windows Disk Management
Another way to convert NTFS to FAT32 without losing data is to use the Windows Disk Management tool. However, instead of directly formatting the drive to FAT32, you'll first have to shrink the volume to half of its size if you want to keep your data safe.
Here's the step-by-step process to convert NTFS to FAT32 using the Disk Management tool without losing data.
Step 1: Press "Windows" + "X" and select "Disk Management".
Step 2: Right-click on the dedicated partition and select "Shrink Volume".

Step 3: Type the size you want to shrink and select "Shrink".

Step 4: Once the volume is shrunk, format the drive to FAT32, and move the data from NTFS to the new FAT32 partition.
Step 5: In the next step, delete the NTFS partition. This will create a new unallocated space.
Step 6: Again right-click the FAT32 partition and select "Extend Volume". Now, select the unallocated space and tap "Extend".

That's it you drive will restore to the actual size and you won't lose any data during the process. However, since it's a complicated process, it's better to stick to the AOMEI Partition assistant to do the job.
Part 3: Convert NTFS to FAT32 by Formatting Directly (Data Loss)
If you don't want to install third-party software or feel like using Windows Disk Management is a complete challenge, an easier option would be to directly format the NTFS drive in FAT32. However, direct formatting will delete the entire data from the drive so it would be better if you are back-up all your files before moving ahead with the process. Formatting the NTFS drive in FAT32 can lead to data loss. Good news is that you can retrieve data from your partitions with high sucess rate just by a few clicks.
Here are three different ways to format a drive from NTFS to FAT32 file system.
1. CMD
Step 1: Expand the "Start" menu and type "CMD" in the Cortana search box. Right-click the search result and select "Open as Administrator".
Step 2: Once you're in the Command Prompt window, execute the following command.
convert d: /fs:fat32 (Replace "d" with the drive letter that you want to format)
That's how to convert NTFS to FAT32 CMD in a Windows system.
2. Powershell
You can also use Windows Powershell to format an NTFS drive into FAT32. Powershell is a Command-Line utility that's exclusively available on Windows 10 only. So, if you're using an earlier version of Windows, you'd have to stick to the previous conversion method only.
Here's the step-by-step guide to format NTFS partitions in FAT32 using Windows Powershell.
Step 1: Press "Windows" + "X" and select "Windows Powershell Admin".

Step 2: Once you're in the command-line interface, simply type the following command and press Enter.
format /FS: FAT32 D: (Again, make sure to replace "D" with the drive letter that you want to convert).

3. Windows Disk Management
Finally, you can format a drive in the FAT32 file system using the Windows Disk Management tool as well. However, you can only format a drive with up to 32 GB size. If the drive size extends this limitation, the "format" option won't be available for the select drive.
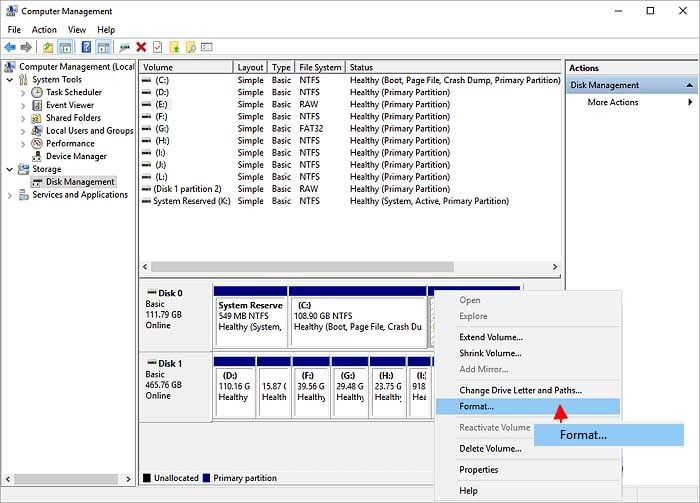
Step 1: Open the Disk Management Tool and right-click the drive that you want to format.
Step 2: Select "Format" and click "Yes".
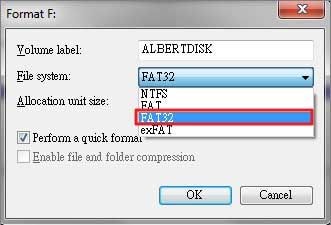
Step 3: Now, name the drive and use the drop-down menu to change the file system to "FAT32".
Step 4: Press "Ok" and the drive will be formatted to FAT32.
The Bottom Line
That wraps up our guide on different methods to convert NTFS to FAT32. If you're looking for a hassle-free way to convert NTFS to FAT32 file system, we'd recommend using AOMEI partition as it offers a quick and convenient solution without causing any harm to your data.
People Also Ask
-
How can I convert NTFS to fat32 without formatting?
To convert NTFS to FAT32 without formatting the drive, you can use AOMEI or any other partition assistant that offers a dedicated "NTFS to FAT32 conversion" feature.
-
How can I convert NTFS to fat32 in Windows 10 without losing data?
To convert NTFS to FAT32 in Windows 10, you can either use the AOMEI partition assistant or shrink the partition size using Windows Disk Management and then format it to FAT32. However, the latter would be an extremely challenging process for a non-technical person. That's why it's better to use the AOMEI partition assistant as it would automate the entire conversion process.
-
Among the two file systems, NTFS is considered superior as it's more secure and offers efficient disk management.
-
How can I convert NTFS to fat32 in Windows 7?
Windows 7 users can use the AOMEI partition assistant to convert NTFS to FAT32 in Windows 7. However, if you don't have any valuable data, you can directly format the drive to FAT32 using Windows Disk Management.
Partition Recovery
- Partition Management
- Solve Partition Problems
- Partition Tips


 ChatGPT
 Perplexity
 Gemini
 Claude
 Grok
Grok


Theo Lucia
chief Editor