Hard Drive Recovery
- Recovers deleted or lost files from hard drive effectively, safely and completely.
- Supports data recovery from 500+ data loss scenarios, including computer crash, partition loss, accidental human error, etc.
- Supports 1000+ file formats recovery with a high success rate and without any quality loss.

Fixed: Recovery Drive Almost Full in Windows 11/10

Jun 03, 2026 • Filed to: Windows Computer Solutions • Proven solutions
If your Recovery Drive (usually Drive D:) is nearly full, use these three primary fixes:
1. Run Disk Cleanup: Search for "Disk Cleanup," select the Recovery Drive, and remove unnecessary system files.
2. Uncheck Hidden Files: Go to File Explorer Options > View, and unhide protected operating system files. Delete any manual backups you accidentally saved there.
3. Disable the Warning: If the drive is full by design (common on HP/Dell), use Regedit to create a NoLowDiskSpaceChecks DWORD to stop the annoying notifications.
4. Warning: Do not format or delete the "Recovery" folder itself, as this is required to repair your PC if Windows fails to boot.
Recovery disks are very useful tools and they greatly facilitate the repair process of an operating system, however, recovery disks usually have very low space because in most cases, they are partitions of the main disk, however, several reasons can cause these disks to be filled with information that you do not need and for this reason, Windows will notify you that one of your disks is running out of space. In this post, you will learn how to solve this problem in various ways.
Fixed: Recovery Drive Almost Full in Windows 11/10
Q: "I have an HP laptop and for a few days now, Windows started notifying me that my recovery disk has low space available, how do I solve this without spoiling my operating system?"
Q: "My recovery drive is full what do i do"
If you have a Recovery disk without space, Windows will notify you that your disk is out of space, this notification may become annoying, but the problem is easy to solve using different methods.
Recovery Drive Solution Matrix
| Scenario | Difficulty | Risk Level | Recommended Fix |
| Annoying "Low Space" pop-ups | Medium | Low | Disable Low Disk Space Warning (Regedit) |
| Accidentally saved files to D: | Easy | Low | Unhide and Manually Delete Files |
| Drive too small for new updates | Hard | Medium | Extend Recovery Partition (Disk Management) |
| Recovery Partition is visible | Easy | Low | Remove Drive Letter (Hide the Drive) |
| System Protection taking space | Easy | Medium | Disable System Protection for D: |
- Extend Recovery Partition with Disk Management: Extending the size of the recovery volume will allow you to use some of the available space on your main disk to avoid alerts of low space on the recovery volume.
- Disable System Protection: By disabling the System protection you can change the designated value to activate low space notification. By adjusting the value to a smaller figure, you can prevent the alert from appearing.
- Delete files manually: In most cases, the recovery disk is inaccessible to the user but there are some cases in which it is possible. To do this you will need to disable the option "Don't show hidden files, folders or drives", once this is done, it is possible that the recovery device appears in the list of devices and you can manually access the files stored in it.
- Disable Low Disk Space Warning Windows 11/10: Choosing to remove the low space alert from the registry editor is a very effective and easy option to perform.
You may also want to read: How Much Recovery Partition is Needed for Windows 11?
What Is Recovery Drive in Windows 11/10?
Recovery disks are partitions where an operating system backup with factory features is stored, if necessary, recovery disks are a very practical option to repair your operating system.
These partitions are usually hidden and inaccessible to the user, however, new information may be stored in it, this is a problem because the recovery disk usually has much less space and can be filled up very quickly.
Causes for Recovery Disk Full Error
A Recovery Disk can be filled when the operating system has created many backup files as well as if you are using the Recovery Disk as a common storage medium for your files.
How to Recovery Drive Almost Full in Windows 11/10 | 5 Methods
Below I will describe some of the most common and simple methods to solve this problem.
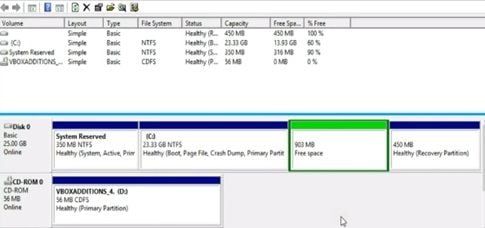
Method 1: Extend Recovery Partition with Disk Management
- To run Disk Management in Windows 11/10, press Win+R and type compmgmt.msc
- At that point right-click on the target partition D, you will see the "extend volume" is dimmed. So, you can't resize the partition size.
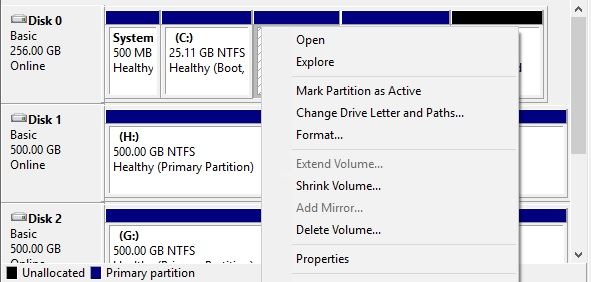
Why is this happening? The reason is due to the limitation of Windows Disk Management, to extend a volume you must meet some requirements. Here I will explain what you need:
A. There must be unallocated space or free space closely followed by a primary partition or logical partition.
B. The target partition must be in the RAW and NTFS file systems.
To do this, you must delete the volume, but this means that all the stored information will be deleted so, it's advisable to make a backup.
In 2026, many modern Windows 11 builds rely more on Cloud Recovery than local partitions. If you find your recovery drive is constantly full, consider creating a USB Recovery Drive (via Windows Recovery Media Creator) and then deleting the local D: partition to merge that space into your C: drive. This provides more local storage while keeping your recovery options safe on a physical thumb drive.
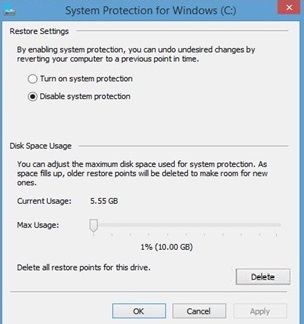
Method 2: Disable System Protection
You can try to disable system protection to stop low disk space error in Windows 11/10 by following these simple steps:
- Go to "This PC" and then right-click on "This PC" icon, this option will be located at the left panel, then click on properties.
- Now click on the "System protection" option that is located in the left panel, then choose the Recovery Drive and then click on the "Configure" button.
- In the pop-up window, tick the Disable system protection option.
Method 3: Unhide Protected Operating System Files
In some cases, it is possible to access the information stored in the device, if you want to manually delete information stored in the recovery device you will have to ascertain if the device is hidden. You can do this by following these steps.
- Open the Windows menu and type "File Explorer Options" and then click on the icon.
- When the pop-up window comes out select the "View" tab and then scroll down to find the "hide protected operating system files" option, here you have to tick "Show hidden files, folders, and drives" and click on "Apply"

What is Safe to Delete from the Recovery Drive?
| File/Folder Name | Status | Action |
| Recovery (Folder) | CRITICAL | DO NOT DELETE. Contains the base system image. |
| $RECYCLE.BIN | Safe | Empty it to gain immediate space. |
| Personal Files (PDFs, Images) | Safe | Move these to your Documents or C: drive. |
| System Volume Information | Protected | Do not touch; managed by System Protection. |
| Old Backups (.zip or .bak) | Safe | These were likely placed there by mistake; delete them. |
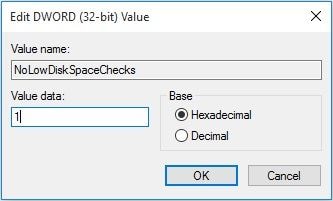
Method 4: Disable Low Disk Space Warning Windows 11/10
- Go to the Windows Search tool and type "Regedit", then click on the registry editor shortcut.
- Make a backup copy of your registry before starting the next step. To make a backup click on the computer icon, then go to "File" and click on "export".
- Go to the following address:
"HKEY_CURRENT_USER\Software\Microsoft\Windows\CurrentVersion\Policies\Explorer"
(if you don't have an "Explorer" folder, you can create it by right-clicking on the Policies folder, then clicking on new/key, finally, name this new folder as "Explorer"). - Into the "Explorer" folder, right-click on any place of the right side, this will open a menu, here you have to click on "New/DWORD (32-bit)" value and name it as "NoLowDiskSpaceChecks".
- Next, double click on this item to change the value from 0 to 1, then click on "OK".
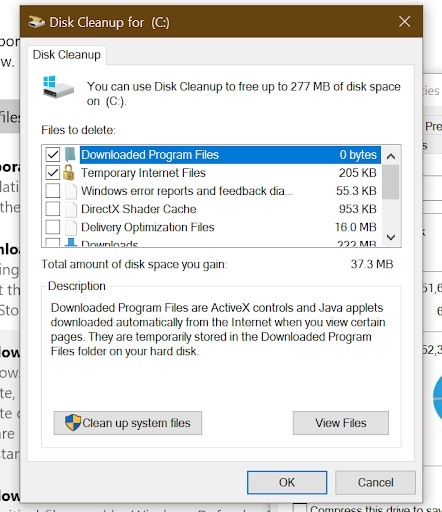
Method 5: Run Disk Cleanup to Fix Recovery Drive Full
The Recovery Drive is a separate partition stored on your PC that contains all the files needed for your PC fully restore. If the recovery drive is full, you can use the Diks Cleanup to remove unnecessary files to fix this problem.
- Type disk cleanup in the search box next to the start Menu, and press Enter to launch it.
- Select the drive you want to clean up and click OK to continue.
- Check the box of the files you want to delete.
- Press OK to start the cleanup process.
Other Suggestions to Clean Up Recovery Drive D Windows 11/10
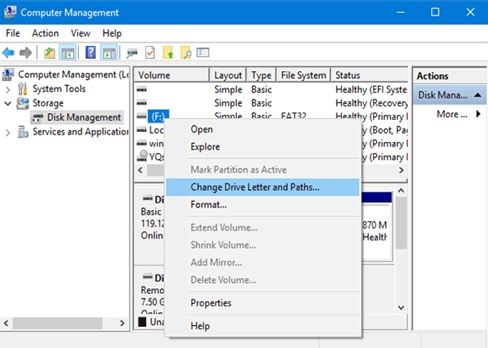
1) Remove the Recovery Drive Letter
When searching for the answers to the HP recovery drive being full on the internet, you will find advice to remove the drive letter of your HP recovery partition.
In Windows Disk Management, the recovery partition of a computer manufacturer has a drive letter, for example, HP assigns the letter "D" to this drive. Then right-click on the recovery partition, select "Change Drive Letter and Paths" to remove it.
More Related: How to Recover the Dell/HP/Lenovo Recovery Partition?
2) Delete Recovery Drive D
When the recovery drive is almost full, you will probably choose to delete such a partition since you think it is not useful and takes up disk space. It is not so.
Recovery partition can be used to restore your system in the event of system issues, just like how we have mentioned in part one. So, this is not the best solution. But if you have a backup of this partition, this would be a good method.
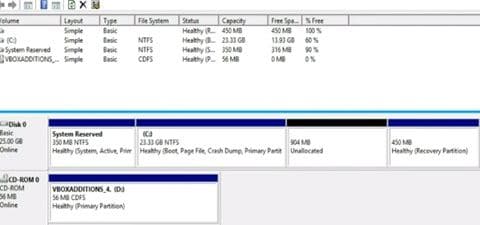
- Go to "Disk Management".
- Select the Drive volume you want to delete, right-click on it and then click on "Delete Volume".

- Once you've deleted the volume, the free space partition can be deleted to get unallocated space.
- You can use this unallocated space to create a new volume or extend another one.
3) Copy Partition to Another Disk
If you find there is not enough disk space to extend the partition by taking other free disk space or you decide to delete the recovery partition, you can choose to copy the recovery partition to another hard drive to resize the recovery partition during the copy process or make a backup.
Final Checklist: Cleaning Up Recovery Drive D
- Check for User Error: Ensure you haven't set your "Downloads" or "Pictures" folder to Drive D.
- Registry Hack: If the partition is full by factory design, use NoLowDiskSpaceChecks to mute Windows.
- Partition Management: Use compmgmt.msc to remove the drive letter; this stops Windows from monitoring the space while keeping the data for emergencies.
- Data Safety: Always perform a system backup before altering partition sizes or deleting volumes.
Conclusion
Preventing the low-space Windows alert from appearing is a simple task and as you have noticed, it is a quick process to perform, however, the most effective solution is increasing the size of the Recovery Disk volume; it is important to remember that to carry out this process you will first need to eliminate the volume and this means losing all the information that is stored in it.
People Also Ask
-
Why does my recovery disk become full?
Your recovery disk may become full because of the accumulation of unnecessary files over time, or if you have limited storage space allocated for it. -
How to check the storage space on my recovery disk?
To check the storage space on your recovery disk, go to "This PC" or "Computer" and right-click on the recovery drive. Select "Properties" to view the disk space usage. -
What are the consequences of having a full recovery disk?
A full recovery disk can prevent you from creating new system backups or restoring your PC in case of a malfunction. It may also slow down your computer's performance. -
Can I delete files from the recovery disk to free up space?
It is not advisable to manually delete files from the recovery disk as they are essential for system restoration. But you could use tools like Disk Cleanup to remove unnecessary files safely. -
How to prevent my recovery disk from being full in the future?
To prevent your recovery disk from filling up, regularly run disk cleanup tools, avoid saving large files on the recovery drive, and consider increasing the storage space allocated to the recovery partition, if possible.
Partition Recovery
- Partition Management
- Partition hard drive
- Partition manager
- USB flash drive to NTFS
- remove GPT partition
- Partition SD card on Android
- Recover GPT partitions
- Delete partition in Windows
- Solve Partition Problems
- Partition Tips


Theo Lucia
chief Editor