

While you’re filming family celebrations or recording vlogs, every video holds a memory. Such clips preserve moments that cannot be replaced, and you get to relive those moments. Therefore, it may be a heartbreaking loss when a video is lost or deleted accidentally because of problems with the SD card.
Luckily, you can recover deleted videos from a digital camera if you do it promptly. So, this article will explore effective methods to retrieve your lost footage. Also, we’ll introduce you to a data recovery tool that could be the best solution for recovering videos from your camera.
Try Recoverit to Perform Camera Data Recovery
 Security Verified. 3,591,664 people have downloaded it.
In this article

Part 1. Why Do Videos Get Deleted From Cameras? (5 Common Causes)
Before we explore ways to recover deleted camera videos, let's find out the reasons that could lead to this loss:
- Accidental Deletion: On most cameras, you can replay and control recorded videos. In the process, one may press the delete button, which may result in the loss of footage unintentionally.
- Recording Halt on Power Loss: When you are recording and the camera goes off because of a dead battery, it will leave you with corrupted video files. They tend to be unreadable by the camera software and playback because these files are not accessible.
- Incompatible and Damaged Memory Cards: Low-quality or physically worn-out SD cards can fail to record properly or delete files randomly. Cards can also falsely show space, leading to overwriting and data corruption.
- File System Errors Due to Improper Ejection: Removing the memory card from your camera or computer without unmounting it properly can damage the file system. This causes some or all of your videos to disappear or become inaccessible.
- Outdated Camera Firmware Malfunction: A bug in the camera firmware can interfere with how video files are saved and indexed. This can lead to the video not showing up in the playback while still residing on the SD card.
Part 2. Is It Possible to Recover Deleted Videos from Digital Cameras?
Indeed, you can recover deleted videos from digital camera provided that the data is not overwritten. When a video is deleted, the camera marks that space on the memory card as available to the new data but the file is still there until something replaces it. This implies that when you discontinue the use of the memory card on the spot and apply the appropriate data recovery software, you have a chance to retrieve the data.
| Camera Brand | Common Video Format | Storage Media | Recovery Difficulty |
| Sony / Canon | XAVC S / MP4 (H.264/H.265) | SD / CFexpress | Moderate (Requires Fragment Matching) |
| Nikon / Fujifilm | MOV / ProRes | SD / CFexpress | Moderate (High Bitrate) |
| GoPro / DJI | LRV / MP4 | MicroSD (High Speed) | High (Frequent File Fragmentation) |
| Blackmagic | BRAW | CFast / SSD | Easy (Linear Storage) |
Part 3. Wondershare Recoverit: The Best Service to Recover Deleted Videos from SD Cards
If you have realized that your videos have disappeared from the attached SD card, Wondershare Recoverit is the most reliable solution for camera video recovery. The tool is 100% virus-free and has dedicated privacy protocols that keep your data secure from breaches. Multiple files can be retrieved at once by using the batch recovery feature, with a claim of maintaining a 99.5% recovery rate for over 100 file formats.
The tool recovers data lost from multiple reasons, including hardware failure to accidental deletions. Additionally, if you’re recovering files that require formatting to be retained, like Word files, it keeps it intact as well. It supports over 2000 storage devices for recovery, including SD cards. Apart from this, it supports encrypted BitLocker drives and can recover from NAS and Linux devices as well.
Key Features
- Deep Search: The software carries out a deep scan through every corner of the computer to find even the seemingly hidden files for a complete recovery.
- Filter Option: You get the option of narrowing down your search by choosing from several filters that include file type and time.
- Preview Availability: There is a preview option available to approve the recovered files before you save them to your computer.
A Step-by-Step Guide to Recover Videos from an SD Card Using Wondershare Recoverit
Once you have decided to use this tool for digital camera recovery of videos, the given instructions will help you restore them securely:
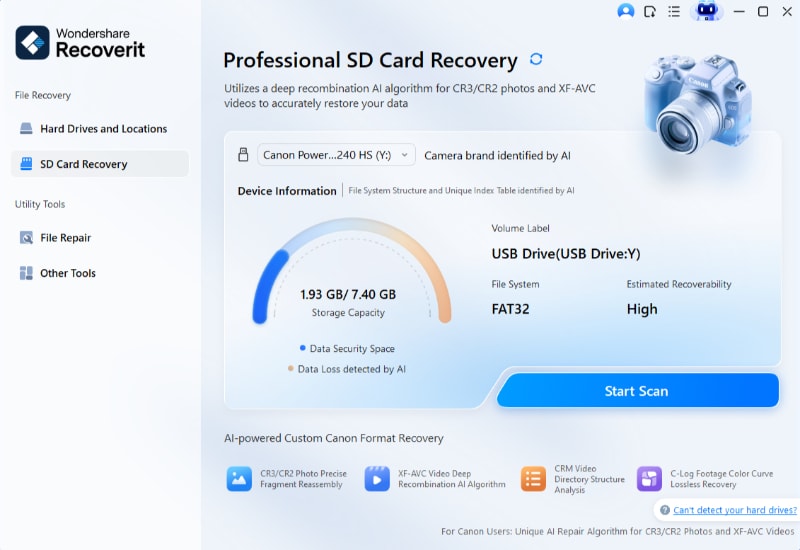
Step 1. Connect the SD Card and Select SD Card Recovery Mode
After launching the program, select the “SD Card Recovery” option from the side panel. Connect the SD card to your system, making sure it is recognized by the system. Now, press the “Scan” button, and scanning of the device will start.
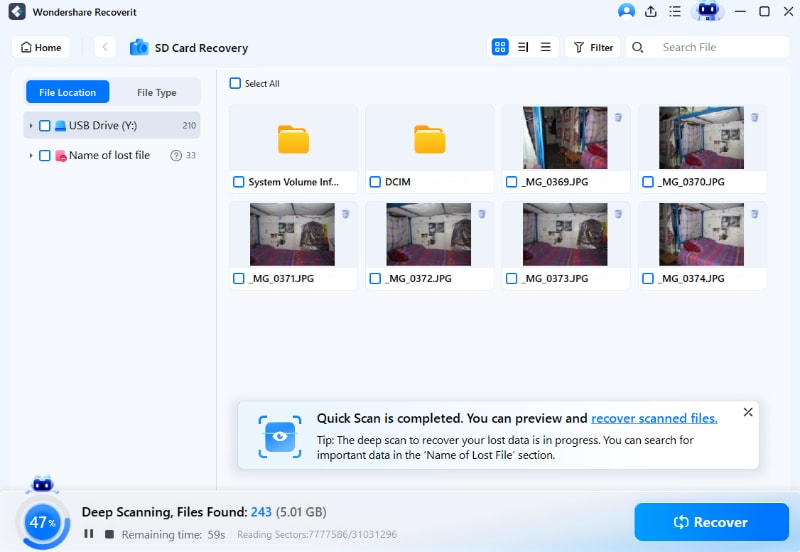
Step 2. Scan the Card to Find Lost Videos
When the scan has stopped, the lost files will appear on the screen. Select those you want retrieved to proceed with the recovery of the lost videos.
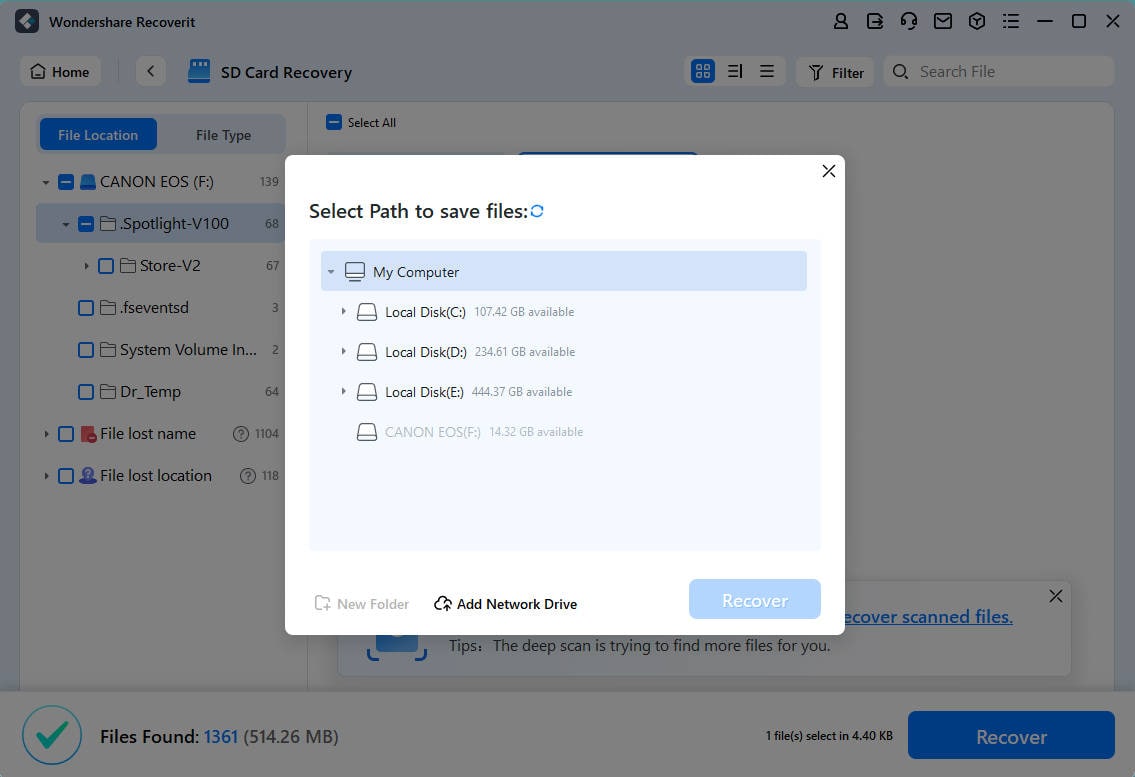
Step 3. Preview and Restore the Digital Camera Videos
After this, click the “Recover” button at the bottom of the screen and select the path for restoring your lost videos on the device.
Video Tutorial on How to Recover Deleted Photos/Videos from Digital Cameras
2026 Technical Note: Why 8K Videos Need "Enhanced Recovery"
In 2026, most mirrorless cameras record in high-bitrate HEVC or ProRes. When these files are deleted or the card is corrupted, the data is often "fragmented" across the SD card. Standard recovery tools might find a file that won't play. Wondershare Recoverit’s Enhanced Recovery technology specifically addresses this by scanning, gathering, and matching video fragments to ensure the final recovered file is 100% playable and synchronized.
Part 4. Without Software: Recover Deleted Videos from Digital Camera
Besides SD card data recovery, if you have already transferred the digital camera videos to the computer, you can ensure their recovery with built-in system features. Two of the most effective methods for such digital camera recovery are explained below:
1. File History
This is a Windows backup feature that keeps copies of your files saved from key folders on an external drive. You can recover full folders of your files without the third-party software, as long as you had the file history enabled by the time you deleted the files.
It is a background feature that takes snapshots of chosen folders at a particular frequency. Here are the steps you can follow to recover the folder to the state it was in before the files were deleted:
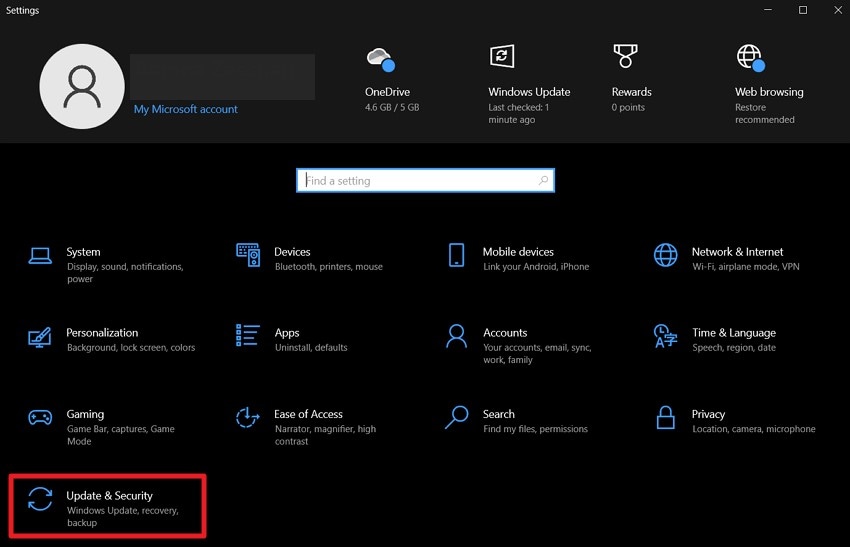
- Launch the “Settings” interface of your Windows and find the “Update and Security” option to proceed to the next step.
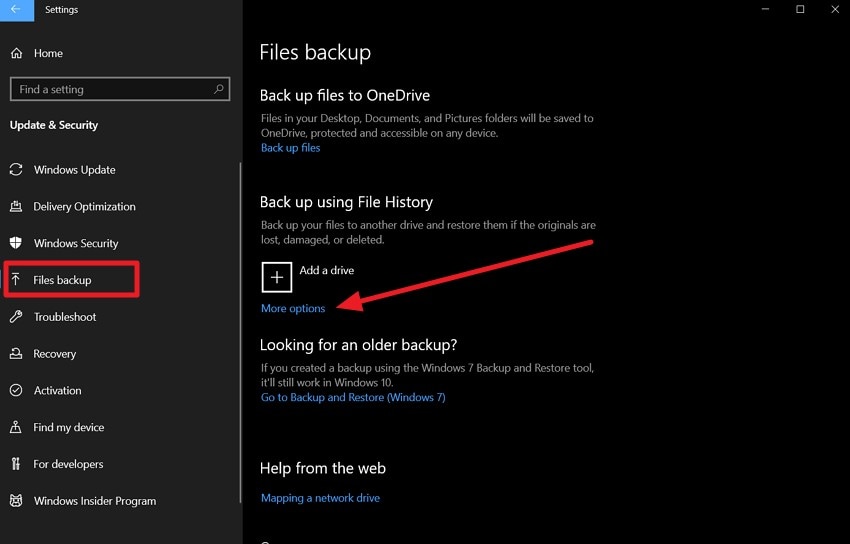
- Find the “Files Backup” option on the left column and select the “More Options” under “Backup Using File History” tab.
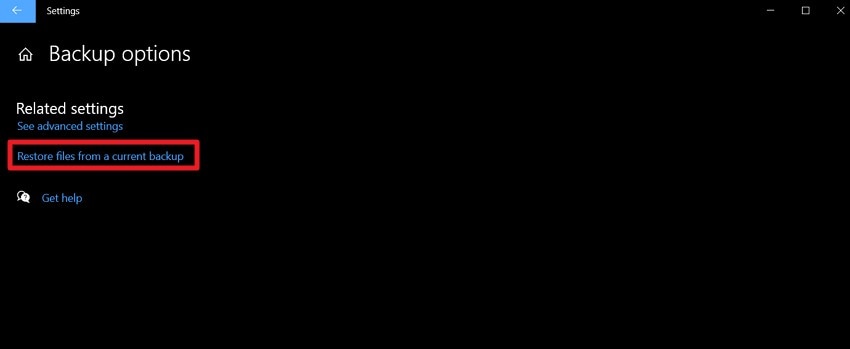
- You will then press the “Restore Files from a Current Backup” tab and find the files or folders you want restored. Now, hit the green button and select the location you want to restore your file to.
2. Previous File Version
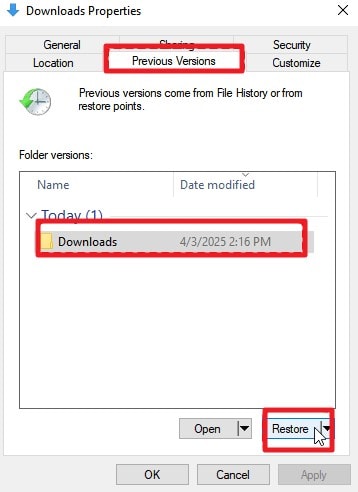
Windows also includes a Previous Version feature that allows turning files back to an older state. Unlike dedicated backup software’s, this function can be enabled with system restore or file history backups to take incremental snapshots of your files. If your videos are inaccessible due to data overwriting, restore them to a previous version with the images still intact by using this feature with the given steps:
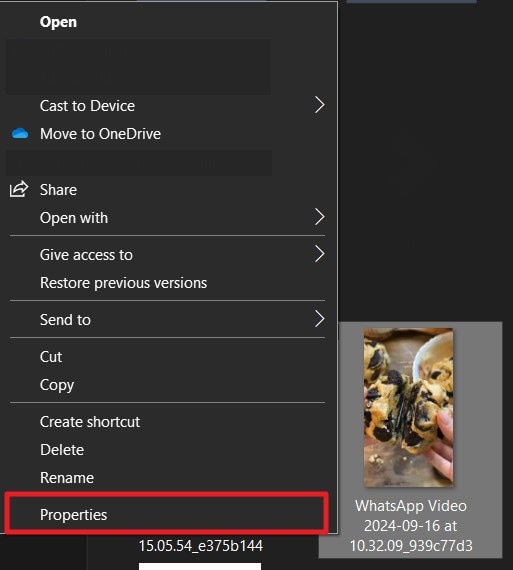
- Through Windows Explorer, go to the relevant file and right-click on it to select the “Properties” option from the menu.
- Look for the “Previous Versions” tab from the pop-up window, and a list of shadow copies created at different times will appear. Select the version you want restored and click on the “Restore” tab at the bottom.
Different Solutions Comparsion Chart
| Method | Success Rate | Video Repair Support | Best For... |
| Wondershare Recoverit | 99.5% | Yes (AI-Powered) | Formatted/Corrupted/8K Files |
| Windows File History | Low | No | Accidental Deletion (PC only) |
| CMD / CHKDSK | Minimal | No | Fixing Card Errors (Not Recovery) |
Part 5. Tips to Avoid Video Loss in Digital Cameras: A Way Out
After having gone through several ways to recover deleted camera videos, it's important to remember that this loss can be avoided in the first place. Learn the best practices that can save you this trouble and reduce the risk of video loss through corruption or any other reason:
- Regular Backups: Copy the data onto another device after the shoots to reduce the chances of losing the data. Backing up your data on a regular basis means that you will have a safe copy of your videos, and you will not lose them accidentally.
- Memory Cards: Memory cards will be of high quality and will be branded to minimize the chances of memory card failure and data corruption in case of continuous recording. They have a high write cycle as compared to cheap cards, and this helps in maintaining data integrity and avoiding loss of video.
- Safe Ejection of Cards: It is a good practice to switch off the camera or use the Safely Remove Hardware option to avoid incomplete file transfers. This will guarantee that your video files will not be lost in the process and will be available to you all through because chances of errors will be minimized.
- Camera Firmware Updates: The camera firmware must be up to date to solve bugs and enhance compatibility. It will improve the performance and stability and secure your videos and guard against data corruption.
- Format Camera’s SD Card: Make sure to format the card within the camera to ensure compatibility. The chances of corruption due to incompatibility or residual data errors will be decreased, making card failure and video loss less likely.
What if the Recovered Video Won't Play?
Sometimes, due to severe corruption or file fragmentation, a recovered video might show a "Cannot Play" error.
- Try Recoverit's "Enhanced Recovery": It automatically stitches fragments back together.
- Use AI Video Repair: If the file header is damaged, use the Recoverit Video Repair module to fix the metadata using a "sample file" from the same camera.
Conclusion
To conclude, it can be quite overwhelming to figure out how to recover deleted videos from a digital camera. In this article, we have talked about all the possible ways to retrieve videos using tools as well as built-in system features. Among all those discussed, we recommend using Wondershare Recoverit, which is potentially the best solution out there to recover videos from cameras across their SD cards.
FAQ
-
1. Are free video recovery tools safe to use?
Most of the free camera video recovery tools are safe to use, but they often come with limitations regarding file size or recovery caps. You should always download them from the official sites to avoid malware and scams. -
2. Can I recover videos if the SD card is physically damaged?
If your SD card is physically damaged, data recovery tools will not help much. A professional data recovery service with official cleanroom environments will be required for such cases. -
3. Do I need technical expertise to retrieve lost videos?
No, most of the recovery tools are designed for beginners with easy navigation and a simple interface. You will follow the provided on-screen instructions for scanning and restoring your files. -
4. Can I recover videos that were deleted a long time ago?
You will be able to retrieve data if it hasn’t been overwritten. Generally, the chances for recovery decrease the more a card has been used.
 ChatGPT
 Perplexity
 Google AI Mode
 Grok
Grok


