How to Sync Files in Dropbox Automatically on Mac and Windows?
To tell you one thing, Dropbox file sync issues are very common. Users can sync their personal files and folders and access them from any device like Mac, Computer, Android, or iPhone. You just need to create a Dropbox account and sync files. But sometimes you may face problem of Dropbox not syncing in Windows 10. We have summed up all the information in one place about Dropbox and its working. We will further discuss how does Dropbox sync files in detail. You will also be introduced to a data recovering tool (Wondershare UBackit) to recover your lost files. Its features will save you time and hassle.

Part 1. Overview of Dropbox
Dropbox is one of the most popular and widely used cloud storage service provider, just like Google Drive and OneDrive. It allows users to upload files and folders to the cloud that can be accessed through any device including Mac, Computer, Android or iPhone devices. If you are using a Windows device or computer, you can utilize the services of Dropbox and recover your important files. In case your hard drive fails or an accident happens to the computer, you will have all your data stored in Dropbox.
However, there were many reports from Windows 10 users regarding Dropbox problems including Shared folders not updating, Dropbox syncing fail, and Dropbox not connecting. Dropbox failing to sync is a serious issue. It is very common, just like Google Drive not syncing problems in Windows 10. There are many known causes of this problem such as bugs in user settings, files already in use, same files and folders names, misconfiguration, Proxy settings, and firewall settings.
If you are facing the above-mentioned problems and Dropbox is not syncing, then you are at the right place. We will further be discussing some of the best ways to sync files on Windows and Mac, so you won’t face such problems.
How Does Dropbox Sync Files Work
Sync is considered as a process by which files or contents are synchronized between your cloud storage, Android devices, or computers. This means you will always have access to your files. Do you want to know how to automatically sync files to Dropbox account? It's pretty simple as Dropbox gives this feature built-in with their desktop app. If you create a new folder or file or edit an existing file, Dropbox will automatically sync your data from one to all other signed devices.
Most importantly, their updates are initiated in the background with the help of a stable internet connection. You just need to make sure that you are signed in with Google or Outlook account. Even if you are offline, no need to worry as it will sync your files and folder as soon you are back online.
Part 2. How to Sync Files on Windows?
How does Dropbox sync files in Windows 10? If you are using Windows 10 and want to enable the auto-sync feature to save PC files in Dropbox then you can follow the guidelines given below:
- First install Dropbox for Windows from their official site.
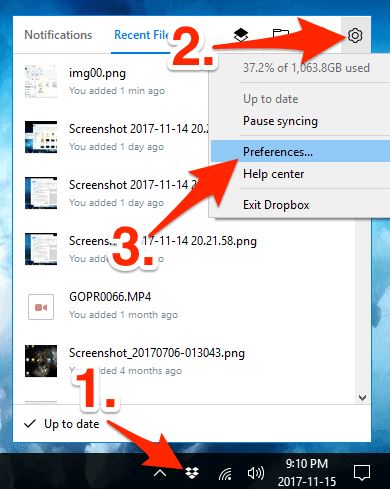
- Click the Dropbox icon from the menu bar or system tray.
- Select the gear icon and select Preferences from the menu.

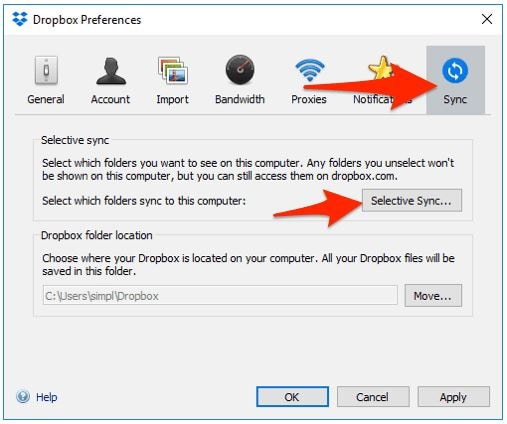
- Click on Sync.
- Then Click Selective Sync. Here select your operating system.
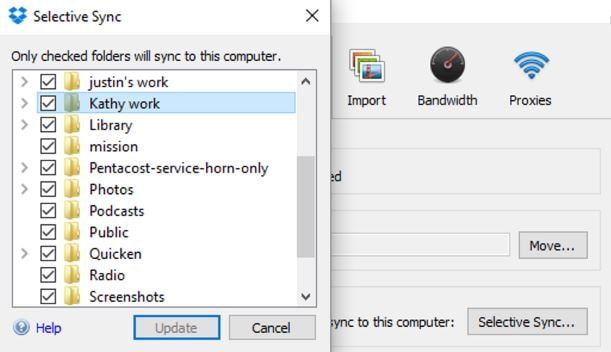
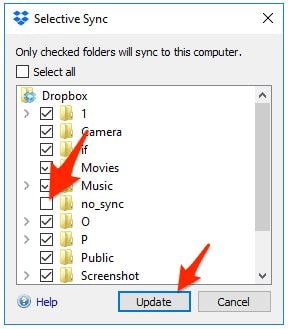
- A list window of all folders will be shown in your Dropbox folder:
- The folders checked are considered synced to your computer.
- Here user can uncheck any unnecessary folders that not needed to sync.
- The unchecked folders will be removed from your local disk, but will still be available on dropbox.com and any computers connected to your Dropbox account.
Part 3. How to Sync Files on Mac?
If you want to sync files on your Mac to Dropbox cloud without duplicating a file to your Dropbox folder, just follow these simple steps:
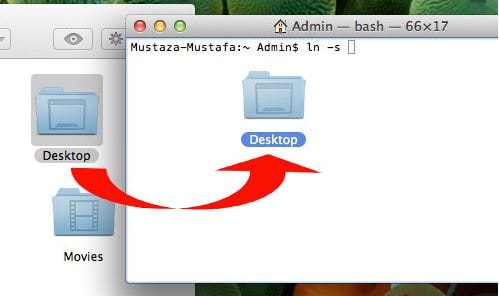
- Open the Terminal window, type "ln -s", hit space, and leave it, do not tap enter.
- Open Finder and navigate to the folders you want to sync with Dropbox.
- Using the drag and drop feature drag the folder to your Terminal window, and the path will be shown after the line ln -s. Again, don’t hit enter.
- Open Finder again, and navigate to the Dropbox folder, and drag it to the Terminal window. Now default the path has been changed to your Dropbox folder in your terminal.
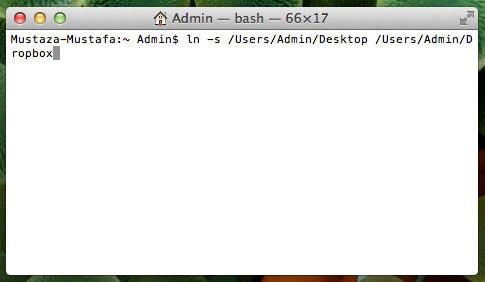
The final displayed line on your Terminal will be "ln -s <path to folder> <path to Dropbox>"
- Now hit enter, you won't see any changes but next time a file is saved, it will automatically sync with Dropbox. Open Dropbox and you will see that the folder shortcut has been created.

Here the Desktop folder is used to sync. Any changes made will be updated in Dropbox. Mac users can also copy files to Dropbox without syncing
Part 4. How to Copy Files to Dropbox and Access Dropbox files without Syncing on Windows and Mac?
If you want to copy files to Dropbox and access them without syncing, you can follow the given steps:
- Create a Dropbox folder and name it not sync. You can skip this step if you have already created such as folder.
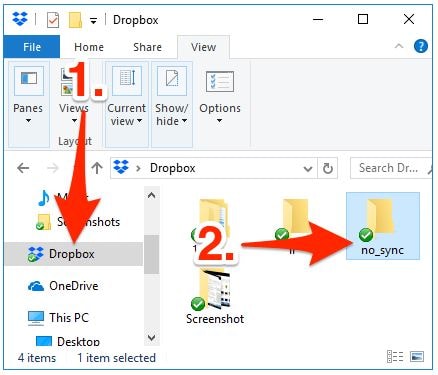
- Now configure Dropbox so that it does not sync the particular folder that we renamed. Click the Dropbox icon from the system tray and then select Settings then click Preferences.
- Navigate to the Sync tab from the top menu. Find and click the Selective Sync option.
- Now uncheck the folder you just created and it will not sync with Dropbox. Then click on update. You have to follow these steps to other computers also. Otherwise, this folder will sync with other computers.
You can also access the Dropbox files from this method. Just navigate to the Dropbox and access no sync folder files. As for a Mac user, you can copy files to the Dropbox with the above mentioned Sync file on Mac part.
Automatic File Backup Software for Windows 10: Wondershare UBackit
Windows is offering its own automatic File Backup tool that is a bit over the edge. People who are looking for a reliable and simple solution to recover their lost data can consider Wondershare UBackit. Let's discuss its amazing features:
- File are backed up automatically
Users can select a preferred frequency of many different time frames such as daily, weekly, monthly, or ongoing. UBackit has an integrated automatic backup option.
- Incremental backup Option is available
Most of the time users create a new copy of the backup, But with UBackit will provide an incremental backup by maintaining different versions of your system files. By adopting this method almost 80% of storage is saved.
- Customized filters for ease of access
This feature allows users to select the folders, and drive partitions they need to back up. If you are looking for a specific file to back up, just type the keyword in the search box.
- All types of formats are supported
UBackit offers all the main data types and file formats for music, photos, videos, compressed files, emails, document formats, and more.
UBackit comes with many useful bonus features such as an inbuilt virus detection so your important files are in safe hands. You can also preview data and has an advanced space management feature.
Now we have briefly discussed its features, let’s consider how to use them one step by step:
Step 1: Download & Install UBackit and Select the Backup tool
The installation is the first, then launch it if you are using windows and want to take an automatic backup. Navigate to the “Backup & Restore” option located on the sidebar and select to create a new backup.

Step 2: Select the required files/folders to back up
After selecting create a new backup option, the application will further ask you to select a file source. Here, you can navigate to the storage drives of your computer to select any specific partition or local disk, folders, or files to back up.
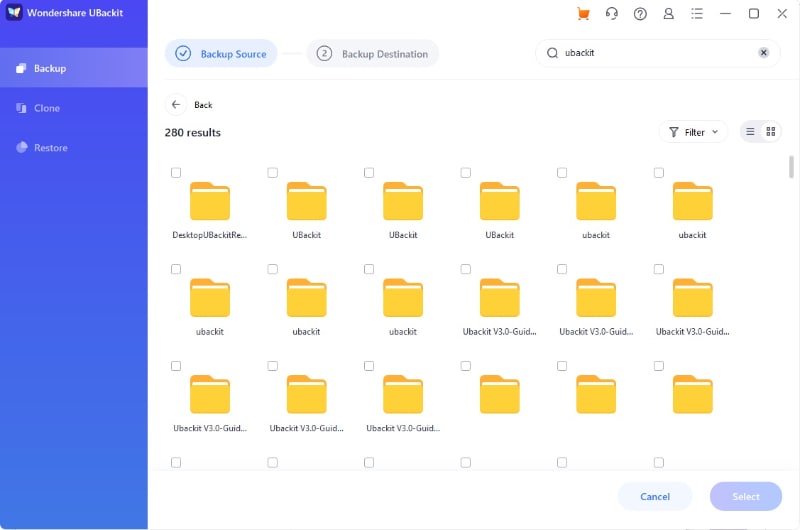
If you are searching for a specific file or folder to back up, enter the keywords on the given search bar and locate the file.
Apart from that, UBackit provides many filters to select the file type you want to add to the backup process.

Step 3: Select Storage Source
At this step, you can choose a location where the Windows backup files will be sent and stored. UBackit offers many storage options to select from such as a partition or an external source SD cards, portable hard drive, pen drives and etc.

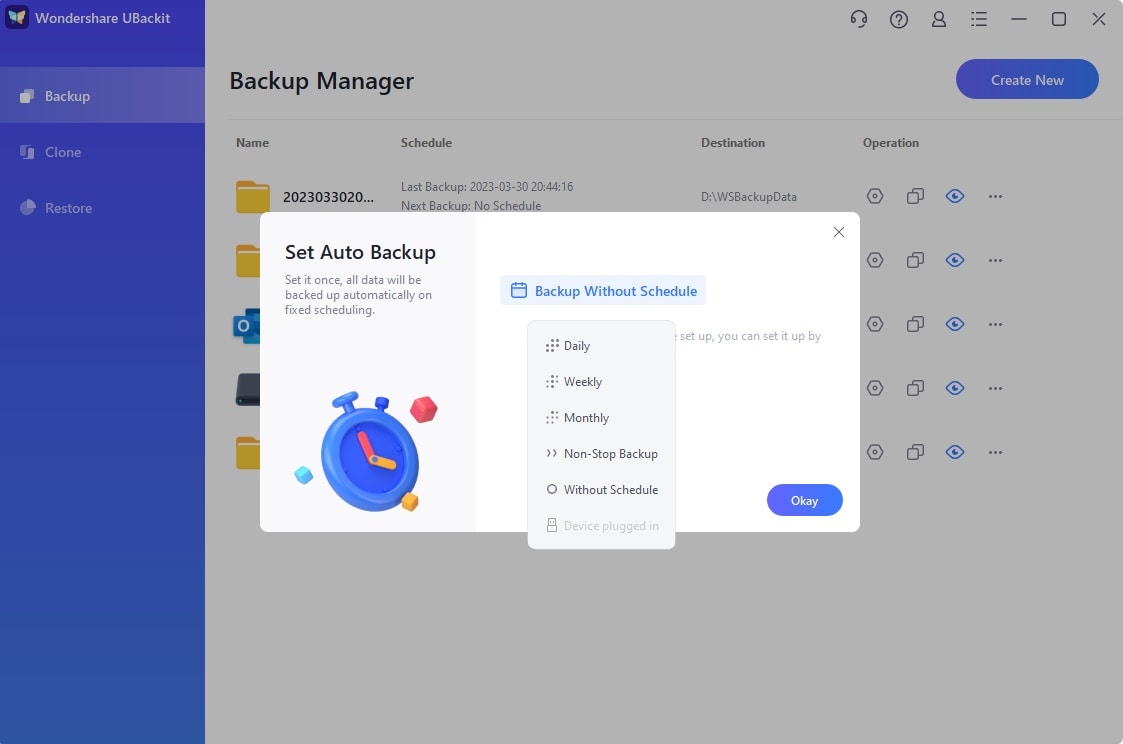
Step 4: Scheduled Automatic Backup facility
If you are tired of taking back up manually, you can set it to the “Set Auto Backup” option from the top. This way you can take a scheduled backup like daily, weekly, or monthly automatically in Windows. You can also add a schedule for a manual backup.
Step 5: Sit Back and Let UBackit Handle it
That pretty much sums up the UBackit job. Just click Start Backup and the process starts on Windows 10.
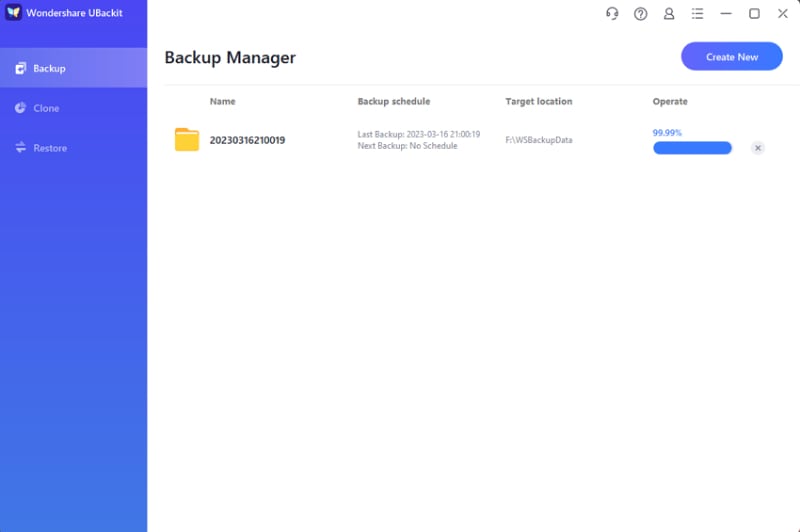
You will be notified of the current progress of the process, so you are free from checking it every minute. Once it's finished you will receive a notification and manage your data.
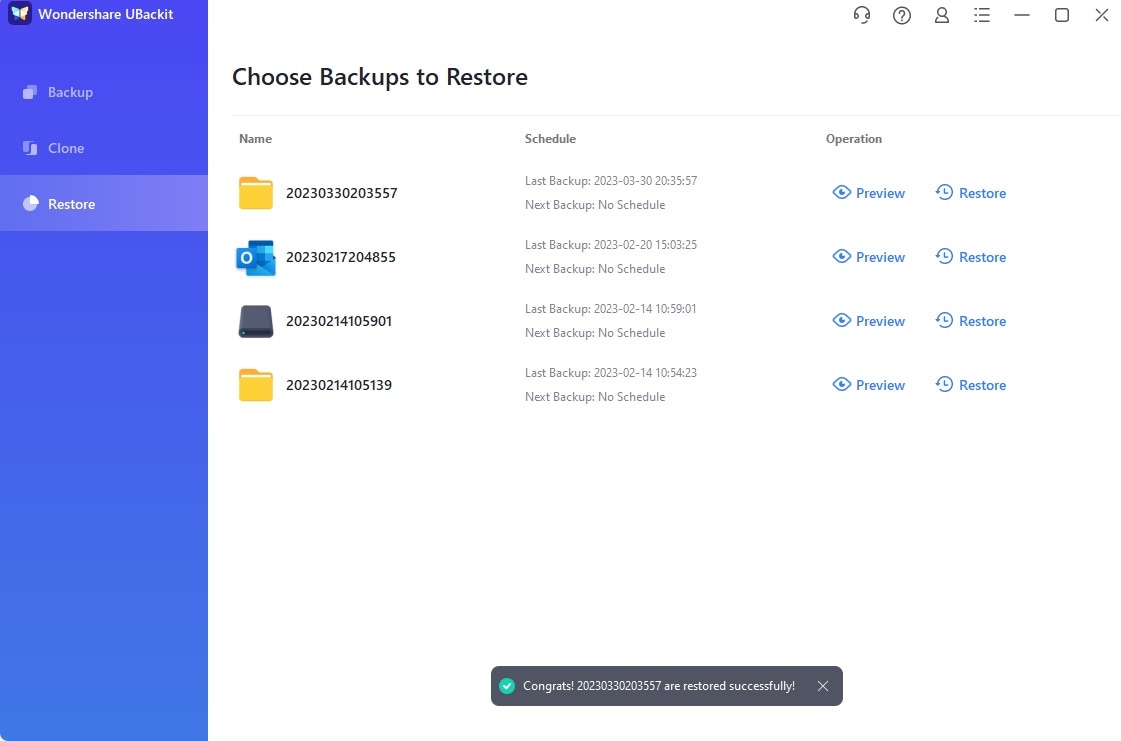
A backup version history is also available to preview which files were restored at which location.
Bottom Line
If you are not familiar with the working of Dropbox then this article has all the information you might need to get started. We have given an overview of Dropbox and its features. Cloud storage is trending and used widely to save files. Suppose, if you are using a computer and move to another, you can access your files on that one also. Isn't this a huge advantage? If you have lost all your data accident you can use Wondershare UBackit to retrieve it. It is very easy to use. We have already discussed it featured above. Make sure you give it a try.
Data Backup Services
- Computer Backup
- Hard Drive Backup
- Mac Backup
- Cloud Backup


 ChatGPT
 Perplexity
 Google AI Mode
 Grok
Grok


Amy Dennis
staff Editor