USB Flash Drive Recovery
- Recovers deleted or lost files from USB Flash Drive effectively, safely and completely.
- Supports data recovery from 500+ data loss scenarios, including computer crash, partition loss, accidental human error, etc.
- Supports 1000+ file formats recovery with a high success rate and without any quality loss.

How to Restore Your USB Drive to Full Capacity on Windows

Jul 07, 2026 • Filed to: USB Recovery • Proven solutions
 TL;DR:
You can restore a USB drive to its full capacity on Windows 7, 8, or 10 by resetting its partitions using native system tools, provided the hardware is not physically damaged.
● To rapidly rebuild the partition table, open Command Prompt, launch the "diskpart" utility, select your specific drive, and execute the "clean" followed by the "create partition primary" and "format fs=fat32 quick" commands.
● To treat bad sectors while restoring the original state, right-click the drive in Disk Management, select a FAT32 or exFAT file system, and intentionally uncheck the "Quick Format" option before proceeding.
● Because these capacity restoration methods will permanently erase all data on the drive, you must utilize a tool like Recoverit Data Recovery to scan and retrieve your lost files if you proceed without a prior backup.
Ask AI for a summary
 ChatGPT
 Perplexity
 Gemini
 Claude
 Grok
Grok
When a USB drive does not show its full capacity on Windows, the missing space is usually caused by hidden partitions, unallocated space, incorrect formatting, bootable USB creation, file system errors, or drive damage. For example, a 64 GB USB drive may suddenly show only 2 GB, 8 GB, or a few MB after being used as an installer or recovery disk.
The issue can usually be fixed by deleting the wrong partition layout and creating one new full-size partition. However, restoring a USB drive to full capacity often requires formatting or cleaning the disk, which erases data. If the USB drive contains important files, recover or back them up before applying the fixes below.
| Symptom | Most likely cause | Best fix | Data loss risk |
| USB shows only a few MB or GB | Bootable media partitions or hidden partitions | Use DiskPart clean and recreate one partition |
High |
| USB shows unallocated space | Deleted or damaged partition table | Create a new simple volume in Disk Management | High |
| USB has multiple partitions | Partition layout not suitable for normal USB use | Delete all partitions and recreate one volume | High |
| USB capacity changes randomly | Physical damage or fake USB capacity | Test the drive and recover data first | High |
| USB is detected but cannot be opened | File system corruption | Recover files, then format the drive | High |
Why Is My USB Drive Not Showing Full Capacity in Windows?
A USB drive may show less space than its real capacity when Windows can only access part of the drive, the partition table is damaged, or the drive itself is faulty. The most common causes include:
| Cause | What it looks like in Windows | Why it happens |
| Incorrect formatting | The USB shows the wrong size or cannot be formatted normally | The file system or partition table was created incorrectly |
| Hidden or multiple partitions | Only one small partition appears in File Explorer | The USB may have been used as a bootable installer or recovery drive |
| Unallocated space | Disk Management shows unused space that has no drive letter | The main partition was deleted, resized, or damaged |
| File system corruption | The USB asks to be formatted or shows 0 bytes | Logical errors prevent Windows from reading the volume correctly |
| Fake USB capacity | The drive advertises more storage than it can actually hold | Counterfeit flash memory reports false capacity |
| Physical damage | The USB disconnects, freezes, overheats, or changes capacity | The flash memory or controller may be failing |
If the drive is physically damaged or fake-capacity, formatting may not restore reliable storage. In that case, recover important files first and replace the USB drive.
Before Restoring USB Drive Capacity: Back Up or Recover Files
Restoring a USB drive to full capacity usually means deleting partitions, cleaning the disk, or formatting the drive. These operations can erase files on the USB drive.
Before you continue:
- Copy accessible files from the USB drive to another storage device.
- If files are missing or inaccessible, scan the USB drive with recovery software before cleaning or formatting it.
- Do not save recovered files back to the same USB drive.
- Check the drive in Disk Management to confirm the correct disk number and capacity.
- If the USB drive is making Windows freeze or disconnecting repeatedly, stop using it and recover data first.
How to Restore USB Drive to Full Capacity in Windows 10/8/7?
It's easy to restore your USB Drive to its full capacity and on Windows, the only condition is it shouldn't be physically damaged. You can easily achieve the objective by using one of the methods listed below, but these methods will erase all of your data from USB Drive, thus, it's recommended to take a backup.
| Method | Best for | Erases USB data? | Difficulty |
| DiskPart Command Prompt | USB has hidden partitions, bootable partitions, or severe partition layout issues | Yes | Medium |
| Disk Management | USB has unallocated space or needs a new simple volume | Yes | Easy |
| Recoverit Data Recovery | USB has important files before or after formatting | No direct fix to capacity, but helps recover files | Easy |
Method 1. Restore USB Drive to Full Capacity Using CMD
DiskPart is the most complete built-in method when a USB drive shows the wrong capacity because of hidden partitions, bootable partitions, or a broken partition table. Be careful: the `clean` command erases the selected USB drive.
Follow these steps:
- Connect the USB drive to your Windows PC.
- Search for Command Prompt, right-click it, and choose Run as administrator.
- Type the following command and press Enter:
diskpart - List all connected disks:
list disk - Identify your USB drive by size, then select it. Replace `#` with the correct disk number:
select disk # - Confirm the selected disk is the USB drive:
detail disk - Erase the partition layout:
clean - Create one new primary partition:
create partition primary - Format the USB drive. Use **exFAT** for most modern USB drives, especially larger drives:
format fs=exfat quick - Assign a drive letter:
assign - Exit DiskPart:
exit
| File system | Best for | Note |
| exFAT | Large USB drives used between Windows, macOS, cameras, and other devices | Best general choice for modern USB drives |
| FAT32 | Small USB drives that need broad device compatibility | Not ideal for single files larger than 4 GB |
| NTFS | USB drives used mainly on Windows PCs | Supports permissions and large files, but may be less compatible with some devices |
After these steps, Windows should show the USB drive at its full usable capacity.

Method 2. Restore USB Drive Capacity With Disk Management
Disk Management is easier than CMD and works well when the USB drive shows unallocated space or a damaged partition in Windows. This method also erases data, so back up or recover files first.
- Right-click Start and choose Disk Management, or search for `diskmgmt.msc`.
- Find the USB drive by checking its disk size carefully.
- If the USB drive has multiple small volumes, right-click each USB volume and choose Delete Volume.
- When the USB space becomes Unallocated, right-click it and choose New Simple Volume.
- Follow the wizard and use the maximum available size.
- Choose a file system such as exFAT, FAT32, or NTFS.
- Assign a drive letter and finish the wizard.

After the new volume is created, File Explorer should show the USB drive with its restored usable capacity.
What If the USB Drive Still Does Not Show Full Capacity?
If DiskPart and Disk Management do not restore the correct capacity, check these possibilities:
| Problem | What to check | Recommended action |
| Fake USB capacity | The advertised size is much larger than the tested writable size | Stop trusting the drive and replace it |
| Physical damage | The drive disconnects, overheats, or changes size randomly | Recover data and stop using it |
| Card reader or USB port issue | Capacity changes on different ports or adapters | Try another USB port, cable, or computer |
| Write protection | Windows cannot clean or format the drive | Remove write protection or replace the drive if the controller failed |
| Severe file system corruption | Formatting fails repeatedly | Recover files first, then replace the USB if errors continue |
How to Recover Lost Files From USB Before or After Restoring Full Capacity
If the USB drive contains important files, recover them before using DiskPart or Disk Management whenever possible. If you already cleaned or formatted the USB drive, stop using it immediately and scan it before saving any new files to it.
Wondershare Recoverit can help recover deleted, formatted, or inaccessible files from USB drives, pen drives, external drives, SD cards, HDDs, SSDs, cameras, and other storage devices.
Just Download the Recoverit program by clicking the buttons below, which can be used for either Windows and macOS.

Recoverit Data Recovery - The Best File Recovery Software
- You can recover all kinds of data like Audio, Video, Documents, ZIP, etc.
- You can recover lost files from USB Drive, Pen Drive, SSDs, HDDs, SD card, PC, Mobile, Camera, etc.
- You can configure the scanning process by using filters like File Type, File Path, Date, Size, etc.
 Security Verified. 3,591,664 people have downloaded it.
User Guide to Recover Data:
Preparations:
- Once you have restored the USB Drive to full capacity, make sure to reconnect it with your System and check if it's detected or not.
- Go to the official website of the Recoverit Data Recovery tool and download the version compatible with Windows. Install the tool on your PC and launch it.
Video Tutorial on How to Recover Deleted Files from USB Drive
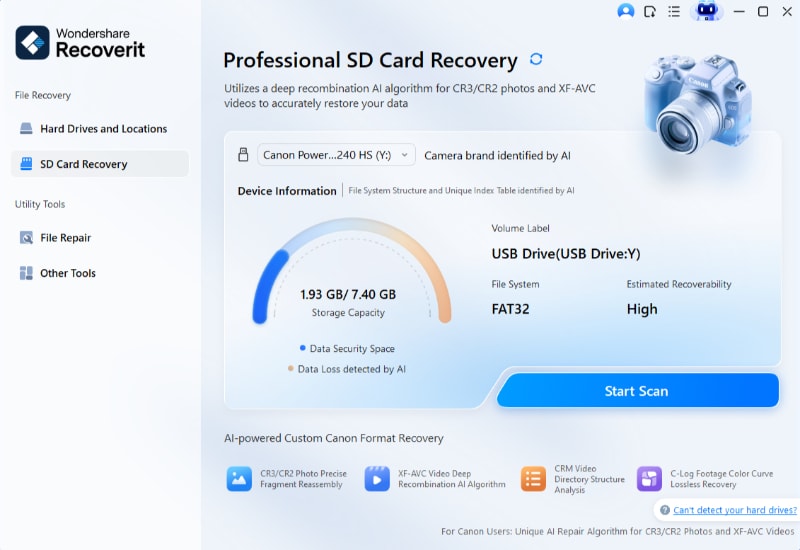
Step 1. USB Drive Selection
The first window you will see inside the tool is the "Hard Drives and Locations" window. Look for your connected USB Drive under the "SD Card Recovery" section. Select your USB Drive and click on the "Scan" button to initiate the scanning process.
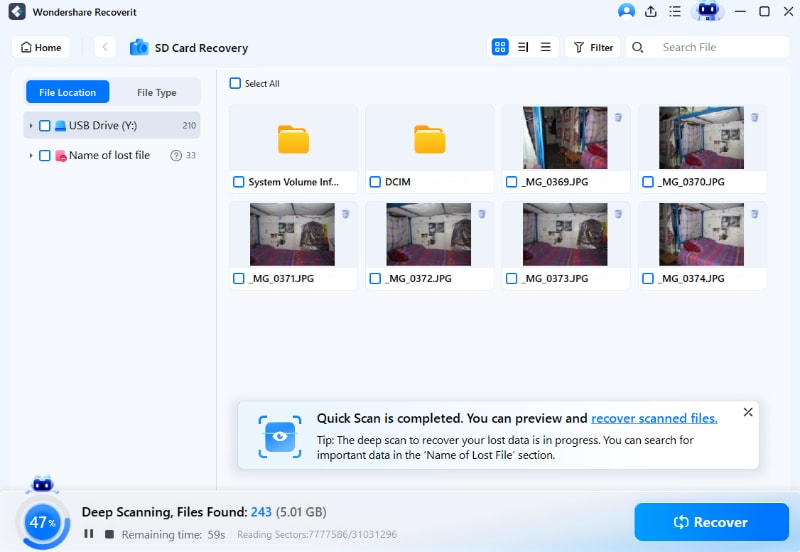
Step 2. Scanning Process
You will be transported to a new window, and during the scanning process, you are allowed to configure scanning through various means. From the left panel, you can select a File Type or a File Path for more accurate scanning. From the top panel, you can filter the scanning results by using filter options like Date, Size, Name, etc. You can also Pause and Play the scanning process.
Step 3. USB Drive Recovery
You will have all the recoverable files listed on the window after the scanning is done. Navigate to the files you want to recover. You can also Preview the files to be sure of the quality of recovery. Select all the files that you want to recover and click on the "Recover" button. You will be asked to choose a location on your PC to save files, choose a location, and click "OK".

After the recovery process is completed, you will be able to access all of your selected and recovered files at the location you choose.
Conclusion:
If your USB drive is not showing full capacity on Windows, the cause is usually hidden partitions, unallocated space, incorrect formatting, or a damaged partition table. DiskPart is the strongest built-in fix, while Disk Management is easier for simple unallocated-space cases.
Before using either method, back up or recover important files because restoring full capacity usually erases the USB drive. If the USB still shows the wrong size after cleaning, repartitioning, and formatting, the drive may be physically damaged or fake-capacity and should be replaced.
People Also Ask
-
How do I restore full capacity using Disk Management?
To restore full capacity via Disk Management:
1. Press Windows Key + X and select Disk Management.
2. Locate your USB drive and delete all existing partitions.
3. Right-click the unallocated space and select New Simple Volume.
4. Follow the wizard to create a single partition using the drive's full capacity. -
Can I fix a USB drive showing only a few MB of space?
Yes. This usually indicates a corrupted partition table or fake capacity drive. Use a low-level formatting tool like HP USB Disk Storage Format Tool or Rufus to completely wipe and reset the drive to its true capacity. -
Will formatting erase all data on my USB drive?
Yes, formatting will permanently erase all data. Before formatting to restore capacity, back up any important files. Use Quick Format for basic cleaning or Full Format to scan for and mark bad sectors.
USB Topic
- Recover USB Drive
- Recover files from USB.
- Recover data from raw drive.
- Recover corrupted USB.
- Recover Sandisk USB data.
- Recover Kingston USB data.
- Adata flash drive recovery.
- Format USB Drive
- Fix/Repair USB Drive
- USB device not recognized.
- Fixed: USB not detected.
- Repair your flash drive.
- Fix USB no media error.
- Know USB Drive


Sue Wayne
staff Editor