How to Format SD Card on Phone | Tips Included
An SD card may get corrupted or damaged, which makes the files stored on it inaccessible. If you are worried about losing your data after formatting your SD card, then this article is just for you.
How do I format my SD card on my phone?
If your SD card is not working on your phone, you can try using it on another device. If the memory card doesn't work on any device, formatting it may be the only option. But don't worry. You will not lose your data forever!
Read on, and you will learn all you need to know about formatting an SD card on your mobile and how to recover your lost data with Recoverit without a single worry.
What Format Does SD Card Need to Be for Android?
The format of an SD card is the file system used to store data on it. The file system is the way data is stored on a storage device and how it is managed and accessed. It's better to know which option to choose from when your device asks you to select between FAT32, exFAT, and NTFS. The right selection will boost the performance of your SD card.
1. Format SD Card VS Reset SD Card
There's no difference between resetting and formatting a micro SD card. Factory resetting a memory card is equivalent to formatting it. However, there is a big difference between 'Erasing All Data' and formatting. When you choose to 'Erase All Data,' the device will simply delete existing files without formatting the SD card. Deleting all files won't make it work if the card is damaged or corrupted.
2. Different SD Card Formats
Different formats mean different file systems on a memory card. The following are the three file systems you can choose to format your storage device:
3. Most Suitable Format for Android SD Card
The FAT32 file system is the most suitable format to be used on Andriod devices. This is because not all Android devices can recognize exFAT or NTFS formatted SD cards. On the other hand, almost all Andriod phones are compatible with the FAT32 file system.
Reasons and Tips for Formatting SD Card
When you want to free up space on your memory card, simply deleting the files doesn't open up a lot of space. To return your memory card to brand-new storage capacity, you will need to format it. Similarly, when the micro SD becomes corrupted and doesn't let you access your files anymore, formatting it is the best option.
You should also note that formatting doesn't mean that you're going to lose your data forever. It only makes it inaccessible.
Be careful! After formatting, do not move any files to the SD card and leave it be. If you add anything, it overwrites your previously stored data.
1. Why Format SD Card for Android
Sometimes an SD card may not work on an Android device because the device is not compatible with the current format on it. To make it work, you'll have to format the miniSD card to the FAT32 file system. Another reason why you may want to format the card is to free up space. To do this, you should first move the essential files to the internal storage of the device. When you're sure you want to erase all the data on the miniSD card, you can format it.
2. Tips for Formatting Android SD Card
You can instantly boost the internal storage of your Android device by formatting your SD card as internal storage. Formatting as internal storage increases the data sharing speed between the device and the removable storage device. It formats in a way that it won't be able to work with other devices anymore.
Sometimes your Android device may display an 'Android is unable to format SD Card' error. This issue can be solved by restarting your device or clearing all applications running in the background. If the problem remains, you can also use a computer to format the micro SD card.
How to Format SD Card on Phone?
Formatting a memory card on your mobile phone is a relatively straightforward process. Below is a thorough guide to formatting SD Card on different Android mobile phones.
Step 1: If you've not already inserted the SD card on your phone, take out the sim and SD card jacket and insert the SD card into your mobile phone.
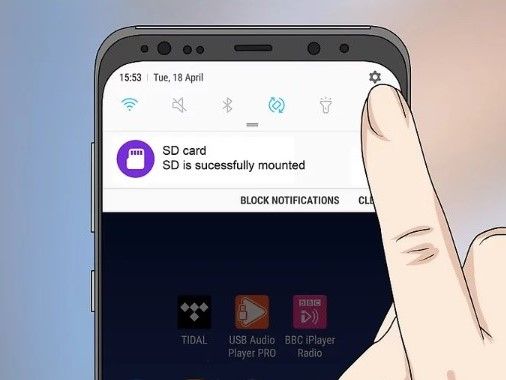
Step 2: When your device recognizes the SD card, a notification will appear that says SD card is successfully mounted.
Step 3: Swipe down from the top edge of your screen and then tap on the gear icon. The gear sign takes you to the settings.
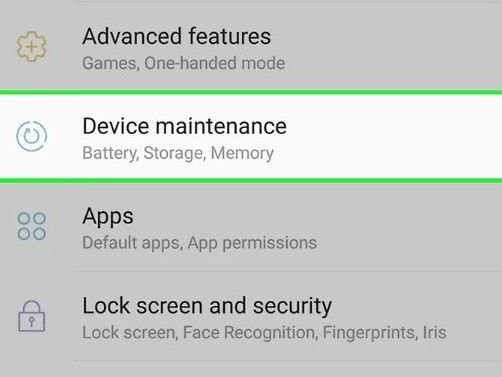
Step 4: Once you are in the settings, select the "Device Maintenance" option.
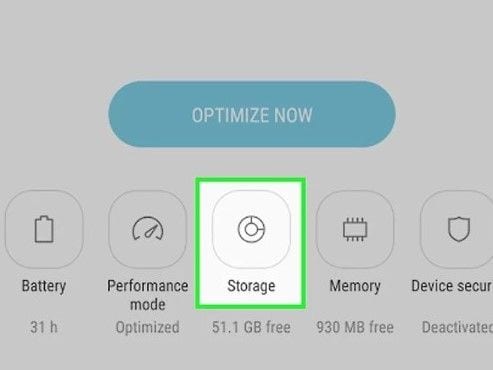
Step 5: In Device Maintenance, select "Storage."
Step 6: In the storage page that displays the free and used storage on the device, there will be three dots on the top-right corner of the screen. Tap on the three-dot icon.
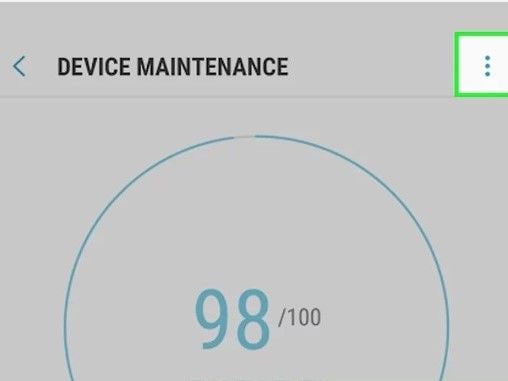
Step 7: When you tap on the three-dot or more icon, a pop-up will appear that says storage settings. Tap on that again.
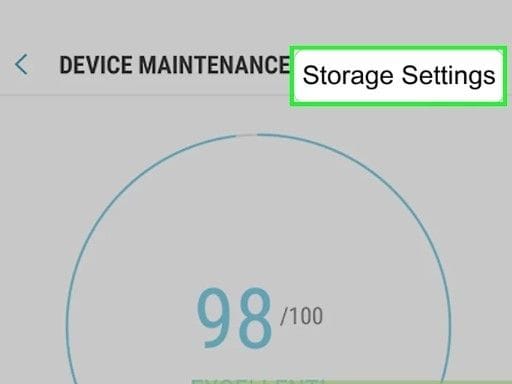
Step 8: Selecting 'storage settings' will take you to a page that displays the portable storage devices that are available in your device. Choose the SD card that you want to format.
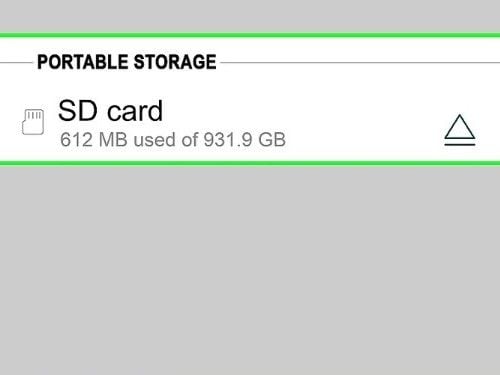
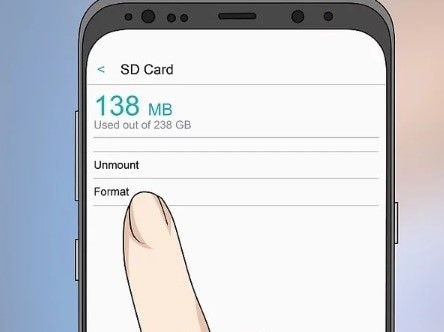
Step 9: The details related to the SD card will appear on the screen. There will be two options: Unmount and Format. You need to select "Format".
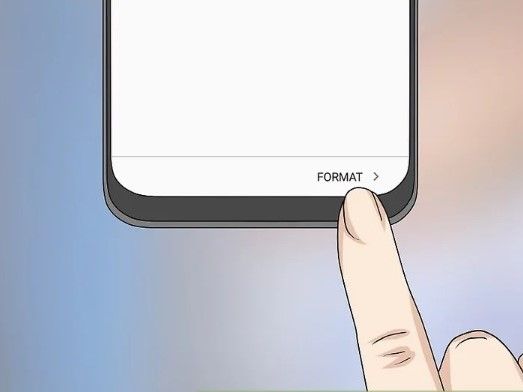
Step 10: A confirmatory message will appear that will ask you a second time if you want to format the memory card. Select "Format" at the bottom-right corner, and then the device will format your micro SD card.
2. Format Windows Phone Memory Card
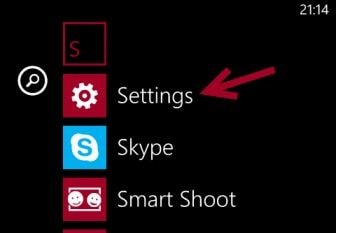
Step 1: From the phone menu, select "Settings."
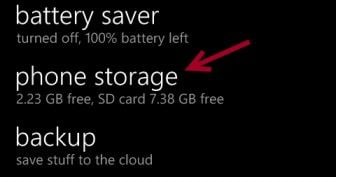
Step 2: Once in settings, go to Phone Storage.
Step 3: Tap on the SD card
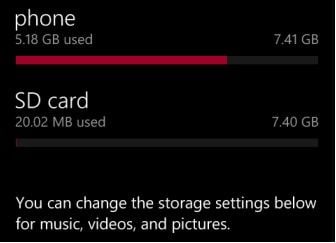
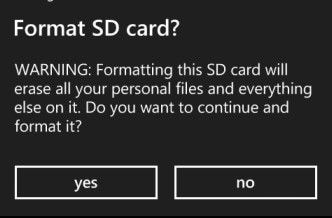
Step 4: A page will display SD card details on the screen. Tap on "Format SD Card."
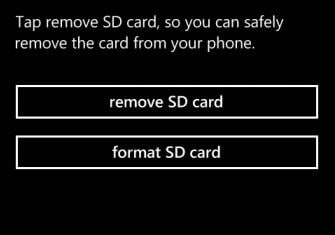
Step 5: The device displays a confirmatory window. Choose Yes, and the device will start formatting the memory card.
3. Format SD Card in Mobile LG Phone
Step 1: From the home screen, go to Apps > Settings > Storage.
Step 2: Choose the SD/Memory Card option.
Step 3: Tap on the (Menu) three dots on the upper right corner of the screen. It is the Menu.
Step 4: Choose Settings.
Step 5: Select Format.
Step 6: At last, tap on ERASE & FORMAT. The device will start formatting.
4. Format Memory Card for ZTE
To perform the steps mentioned below, make sure that the device reads the memory card.
Step 1: Ensure that the device isn't connected to another device via USB cable.
Step 2: From the Home screen, navigate to Apps > Settings > Storage.
Step 3: In the SD/Memory Card list, tap the name of the Memory Card you want to format. The name may vary depending on the type of card you use.
Step 4: Select Storage settings.
Step 5: Select Format. By formatting the card as internal storage, the SD card won't work with other devices anymore.
Step 6: Review confirmatory pop-up and then select ERASE & FORMAT. The rest of the process may take under a minute to complete.
How to Format Android Phone SD Card on Computer
If you are unable to format your micro SD card on your phone, you can do it on a PC. However, you'll need a few extra tools to complete this process.
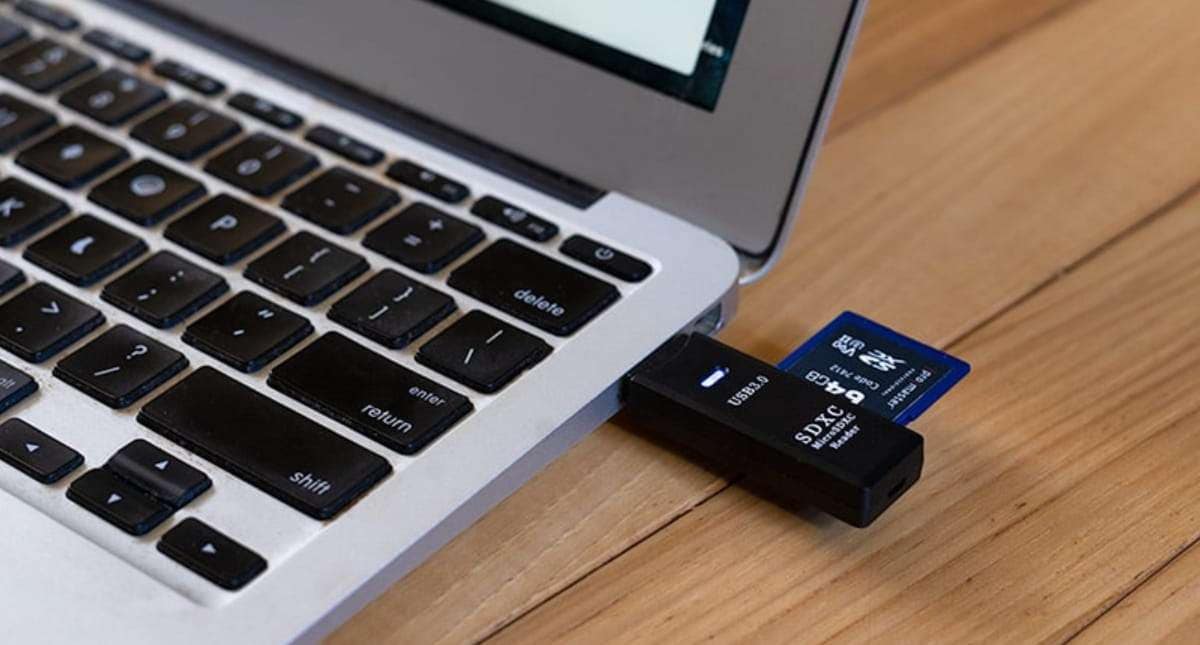
If your PC doesn't have an SD card slot, you will need an SD / Memory card reader that you can insert in a USB port.
Step 1: Insert the SD card in the SD card slot in your PC (if available). If there is no SD card slot, you can then insert the memory card into a memory card reader, make sure you insert it correctly. Plug the card reader into one of the USB ports.
Step 2: Wait for the computer to read the removable storage device.
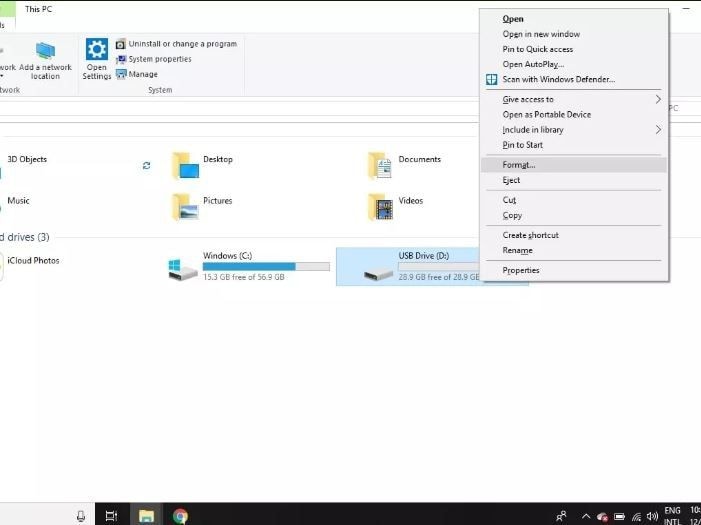
Step 3: Open My Computer, or File Manager.
Step 4: Right-click on the USB Drive and select "Format."
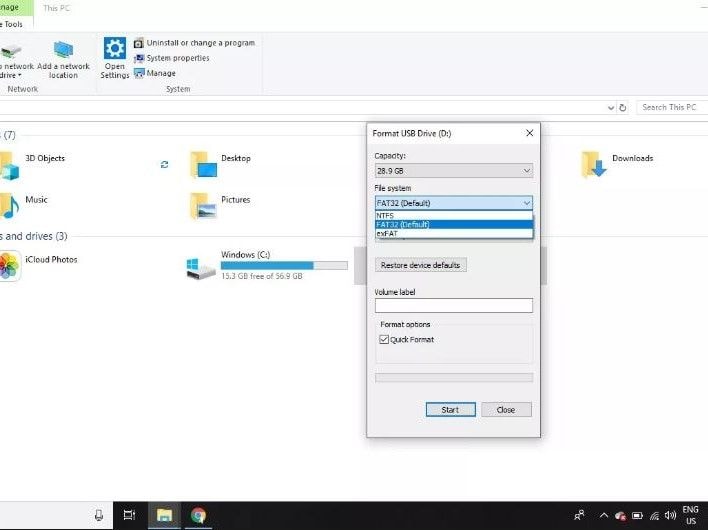
Step 5: The format window will open up. Set the file system to FAT32 for the best performance on Android.
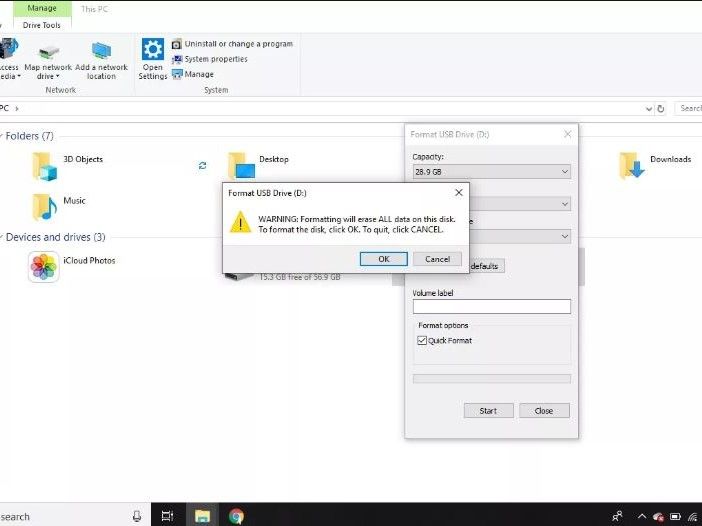
Step 6: A warning message will appear. Review the disclaimer and then click on OK. It isn't a problem when you have Recoverit to recover data from a formatted memory card. The formatting process may take a minute or two. After formatting is complete, a pop-up appears that says, "Format is Complete."
How to Format write-protected SD Card
Sometimes when trying to format an SD card, an error message may appear that says that the memory card is Write Protected or Read Only. You can solve this problem by toggling the tab built on the side of the SD card. If the card is write-protected, move the tab down if it up, or up if it is down.
How to Recover Data from Formatted SD Card
The fun begins here! While all of us think that our precious data is long gone after formatting our SD card, all the data is still there! All we need is a wonderful tool called Recoverit Data Recovery.
Step 1: Insert the SD card in the SD card slot in your PC (if available). If there is no SD card slot, you can then insert the memory card into a memory card reader, make sure you insert it correctly. Plug the card reader into one of the USB ports.
Step 2: Launch Wondershare Recoverit on your Windows PC or Mac. Double-click on the Recoverit icon on your desktop.
Step 3: Select the external drive from which you want to recover files. The Recoverit window will display the external devices connected to your computer. Select the SD card that you want to recover.

Step 4: After you select the external device, a thorough scan of the device will begin. The scanning may take a few minutes. Meanwhile, you can locate and filter the files you want. As the scanning process may result in a large number of recovered files. There are various parameters available to help you filter out the rest of the files and find the ones you are looking for.

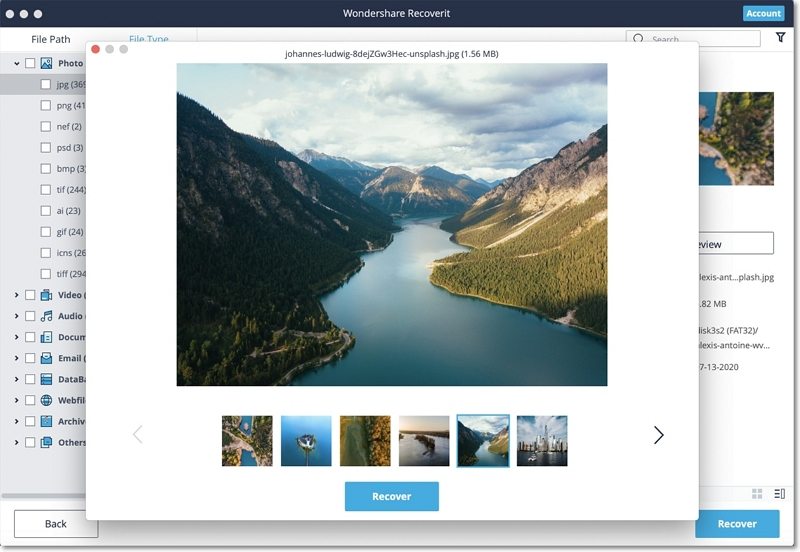
Step 5: After scanning is complete, Recoverit gives you the option of previewing your files before fully recovering them. You can preview a range of file types from pictures, video, music, documents, and more. After you've previewed the files, you can select the ones you want to keep, and Recoverit recovers all of them.
Extra Tips to Prevent SD Card Corruption in Mobile
Prevention is better than cure, no doubt. You wouldn't have had to enter all this fuss of formatting and recovering your memory card if you could prevent it from corruption in the first place. We're here to make sure you don't have to face an inconvenience like this again. Here are some tips to prevent memory card corruption:
- Format instead of Deleting all Data: If you wish to remove all data from an SD card, formatting it is a better option. Deleting data over and over again is likely to corrupt your SD card. Furthermore, formatting means you clear out any hidden problems from prior use.
- Unmount before Removing: If you want to remove the memory card from your device, it is better to select the Unmount SD Card option in the storage settings. Afterward, you can remove the SD card.
- Always leave a Little Space: Don't fill up your card with data. Leaving some space free means you never run out of storage capacity, and this prevents various errors and increases the card's lifespan.
- Don't keep your device on Low Battery: A phone on a low battery means it can die at any time. In case the phone shuts off at the very moment it is writing data on the SD card, this may damage it and cause corruption.
- Don't use the Card on Multiple Devices: It's better not to use a single SD card on many devices. Different devices work on different file systems, some of which might be incompatible with the file system on the memory card. This way, the memory card tends to die.
The Bottom Line
Credit goes to Wondershare Recoverit; formatting our storage devices is not a scary venture anymore. You don't need to stress after losing your data permanently anymore. Furthermore, the handy features offered by Recoverit make the recovering process a fun and effortless task.
Memory Card Users Also Ask
-
1. How do I get my SD card to work on my Samsung phone?
If your phone is not reading the memory card, try formatting it on PC to the FAT32 file system. If the problem persists, chances are the card reader on your phone is malfunctioning.
-
2. What format should my SD card be?
If you wish to use an SD card on Android, FAT32 is the default file system. However, for use in other devices, use FAT32 if the SD card is 32GB or below. For SD cards higher than 32GB, use the exFAT file system.
-
3. How do I format my SD card on my phone?
-
4. What is the best format for SD cards in Android phones?
-
5. How do I force an SD card to format?
If a memory card is write-protected, there is a way you could change the configuration settings of the device to switch it from write-protected to writable. Look for guidance on how to use Command Prompt to format write-protected SD card.
SD Card Troubleshooting
- Recover Data from SD Card
- Card Repair Solutions


 ChatGPT
 Perplexity
 Google AI Mode
 Grok
Grok


Eleanor Reed
staff Editor