
 TL;DR:
You can successfully recover files from an accidentally formatted SD card as long as your device performed a standard quick format and you have not written any new data to it.
● Immediately eject the card and engage the physical write-protect lock, as recovery is only possible if new files have not overwritten the original sectors and your camera did not execute a low-level erase (such as the CMD32/CMD33/CMD38 command sequence used by certain Sony models).
● Scan the card using dedicated software like Recoverit Memory Card Recovery to retain folder structures, or use free command-line tools like Microsoft's Windows File Recovery with the /extensive switch (requires Windows 10 version 2004 or later) or PhotoRec version 7.2 on macOS using sudo, though free tools will permanently lose original file names.
● Do not run file system repair utilities like chkdsk /f or save any recovered data back to the formatted card during the process, because repairing logical errors before extraction can delete orphaned clusters and permanently destroy the recoverable file fragments.
Ask AI for a summary
 ChatGPT
 Perplexity
 Gemini
 Claude
 Grok
Grok
If you just accidentally formatted an SD card, microSD, memory stick, or CF card from a camera, drone, dashcam, Android phone, or Nintendo Switch, your photos, videos, and documents are usually still on the card. A format operation only resets the file system; it does not overwrite the underlying data on a quick format. This guide explains when you can unformat an SD card, the exact recovery methods that work on Windows, macOS, Android, and Linux, and when you must send the card to a professional recovery laboratory.
Quick Answer
● Can you unformat an SD card: yes in most quick-format cases. The old file entries are reset, but the data blocks remain until new files overwrite them.
● First 5 minutes: stop using the card, eject it from the device, and lock it in a write-protected SD adapter if you have one.
● Best first recovery method: scan the card from a desktop computer with a dedicated tool like Recoverit Memory Card Recovery, save the recovered files to a different drive, and only then troubleshoot the card.
● Free alternatives: attrib and chkdsk X: /f on Windows, PhotoRec on macOS, or Microsoft's free Windows File Recovery (winfr) command-line tool.
In This Article
-
- Method 1. Scan the SD Card With a Dedicated Recovery Tool (Recommended)
- Method 2. Use Microsoft's Windows File Recovery (winfr) (Free, Command Line)
- Method 3. Restore Cleared File Attributes With
chkdskandattrib(Free, Command Line) - Method 4. Unformat the SD Card on macOS Using PhotoRec (Free, Open Source)
- Method 5. Send the Card to a Professional Recovery Laboratory
Part 1. Can You Unformat an SD Card?
There is no native "unformat" button in Windows, macOS, Android, iOS, or any camera menu. What "unformat" actually means in practice is data recovery from a card whose file system has been wiped. Whether that is possible depends entirely on how the card was formatted and what you have done with it since.
According to the SD Association's formatter FAQ, two different format operations exist for SD, microSD, SDHC, and SDXC cards:
- Quick format rewrites the file system structures (the volume boot record and the file allocation tables for FAT/exFAT, or the $MFT for NTFS) but leaves the user data area intact. The card appears empty to the device, but recovery software can usually read the original files because the sectors that hold them are still untouched. This is the case the SD Association labels "Format (Quick)."
- Overwrite format writes a pattern to every sector, marks bad blocks, and only then writes the new file system. The SD Association labels this "Format (Overwrite)." After this, the previous user data has been zeroed out and cannot be recovered with any consumer tool.
Camera, drone, dashcam, and Android "Format" buttons vary by manufacturer. Most perform a quick format, but some Sony cameras send an SD card command sequence (CMD32/CMD33/CMD38) that effectively performs a low-level erase, and some professional cameras from RED, ARRI, and similar vendors have a "secure erase" option that zeroes the card. If you do not know which path your device took, the safest assumption is that recovery is possible until proven otherwise, because a quick-format scan costs nothing and either returns your files or confirms the worst.
The four seconds-to-five minutes window matters: as long as you do not write new photos, videos, or other data to the card, the old file blocks remain in their original sectors, and recovery tools can reassemble them.
Part 2. Before You Do Anything Else
The first three actions you take after accidental formatting decide whether the file blocks survive. Run them in this exact order:
- Power the device down properly and eject the card using the operating system's safe-eject (Windows) or "Eject SD card" workflow in the camera or phone menu. This stops the device from writing thumbnails, telemetry, or sensor data that could overwrite your lost files.
- Remove the card and write-protect it if you are using a full-size SD adapter with a lock switch. Slide it down to lock so any host system mounts the card read-only and cannot accidentally write temporary files to it.
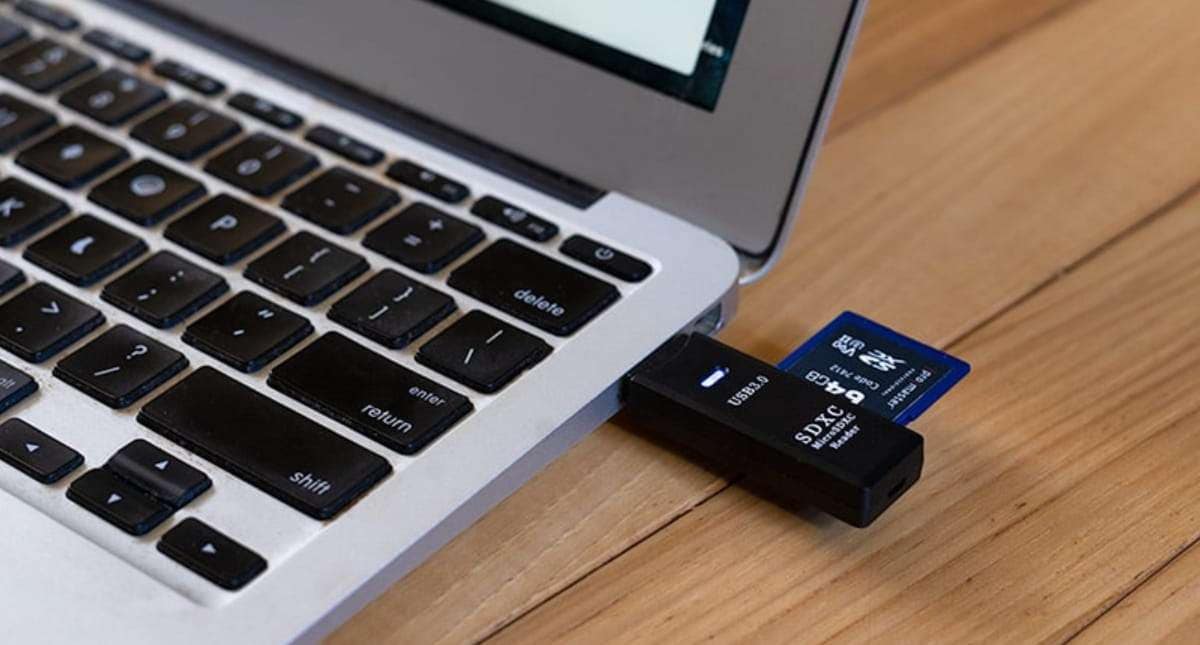
- Choose a stable card reader for the recovery. USB 3.0 SD readers from Ugreen, Anker, or the manufacturer of the card itself are generally reliable. Avoid unpowered USB hubs, multi-card adapters with multiple slots, and Bluetooth or Wi-Fi SD readers because they often drop the connection mid-scan, which can damage the file system further on cards that are already unstable.
Once the card is mounted on your computer, keep it in read-only mode until you have saved recovered files to a different drive. Do not run chkdsk, "First Aid" in Disk Utility, DiskPart clean, or another format against the card before you have copied the files you care about off it. chkdsk /f only repairs the file system, but it can erase orphaned clusters instead of recovering them, and any of these actions can reduce what a recovery scan finds.
Part 3. SD Card Recovery Confidence by Format Type
Before you spend time on any of the methods below, look up which format path your card actually took. The matrix below maps each scenario to a recovery outlook and a recommended action.
| Format scenario | File systems affected | Recovery outlook | Safest first action |
| Quick format on Windows, macOS, or Linux | FAT32, exFAT, NTFS | Often recoverable when the card has not been reused | Connect the card via a reader and run a full scan. |
| Camera or drone in-device "Format" on most consumer models | FAT32, exFAT | Often recoverable if no new shots were taken | Disconnect the card from the camera or drone; scan from a computer. |
| SD Association "Format (Overwrite)" or full format | FAT32, exFAT, NTFS | Very low to none for the overwritten area | Check backups first; consult a lab only for high-value cards. |
| Sony SD_ERASE command (CMD32/CMD33/CMD38) or "Secure Erase" | FAT32, exFAT | Effectively zeroed; consumer recovery is unlikely | Confirm whether the model performs low-level erase before scanning. |
| Android "Format as portable" or factory reset | exFAT, FAT32, ext4 (with adoptable storage) | Often recoverable when used as portable storage | Use a desktop scanner via a USB card reader. |
| Adoptable storage (SD card as internal memory) reset | Encrypted ext4 tied to the phone | Low without the original encryption key | Check Google Photos and the manufacturer's cloud backup first. |
| Card shows as RAW or "needs to be formatted" | Damaged or missing file system | Often recoverable when the controller is intact | Cancel the format prompt; scan with signature-based recovery. |
| Card not detected on any reader; visible in another reader only briefly | All | Physical damage likely | Stop DIY scans and contact a professional recovery lab. |
Cards over 32 GB (SDHC and SDXC) usually ship as exFAT, while cards 32 GB or smaller are typically FAT32. A 32 GB SDHC card is FAT32; a 64 GB SDXC card requires exFAT. If you see "RAW" instead of a file system in Disk Management or Disk Utility, the card's partition table is damaged or missing, and signature-based recovery (Method 1 or Method 4) is the correct path before any repair tool. The SD Association's SD Memory Card Formatter tool is the official utility for re-establishing the correct file system after recovery because it writes the SD specification's exact layout, including the proper reserved sectors and 32 KB alignment on SDXC.
Part 4. Five Ways to Unformat an SD Card
The five methods below are ordered from highest expected recovery rate to lowest. Your format type and operating system will determine which one to try first.
Method 1. Scan the SD Card With a Dedicated Recovery Tool (Recommended)
A desktop recovery application reads raw file signatures and reassembles them without relying on the card's rebuilt file system. Recoverit Memory Card Recovery works with SD, microSD, SDHC, SDXC, CF, CFexpress, and Memory Stick cards that Windows and macOS can still mount, and lets you preview photos, RAW files, videos, and documents before saving them.
The role of a tool like Recoverit here is to scan a card the operating system can see, recover a copy of the files to a different drive, and let you verify the data before you repair or reformat the card. It cannot recover data that has been overwritten, and it cannot read a card that is physically damaged or unreadable at the controller level.
To scan the SD card with Recoverit:
- Connect the formatted SD card through a reliable card reader. Wait for Windows or macOS to detect it. If the system prompts you to format the card, cancel the prompt.
- Launch Recoverit and choose the formatted SD card from the SD Card Recovery tile or the external drive list.
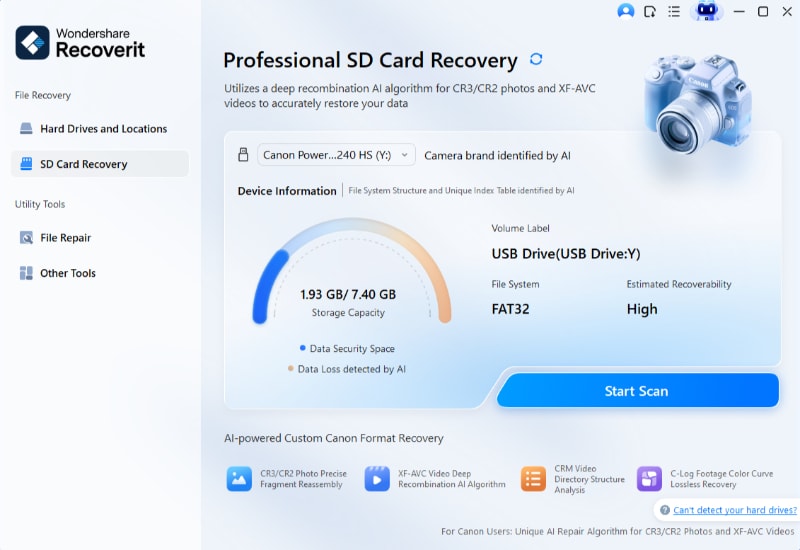
- Click Scan and leave the card connected until the scan completes. A 128 GB card with many 4K or 8K video segments can take an hour or more.
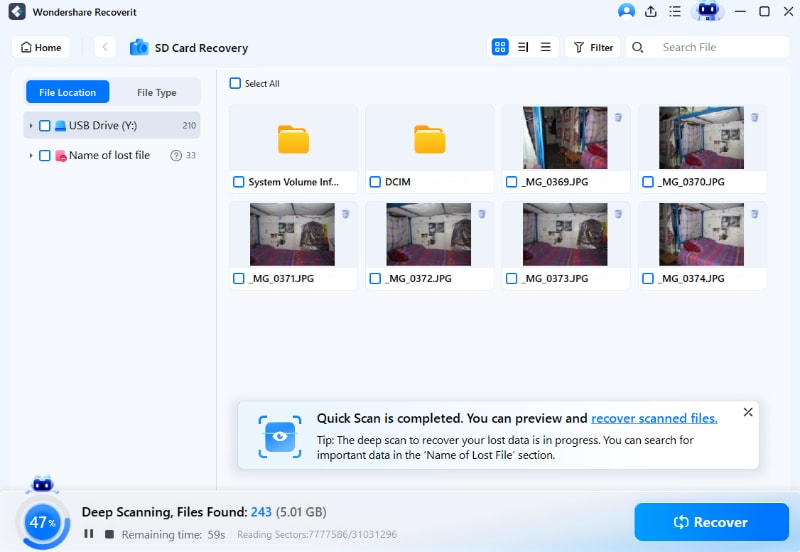
- Filter by file type or extension such as
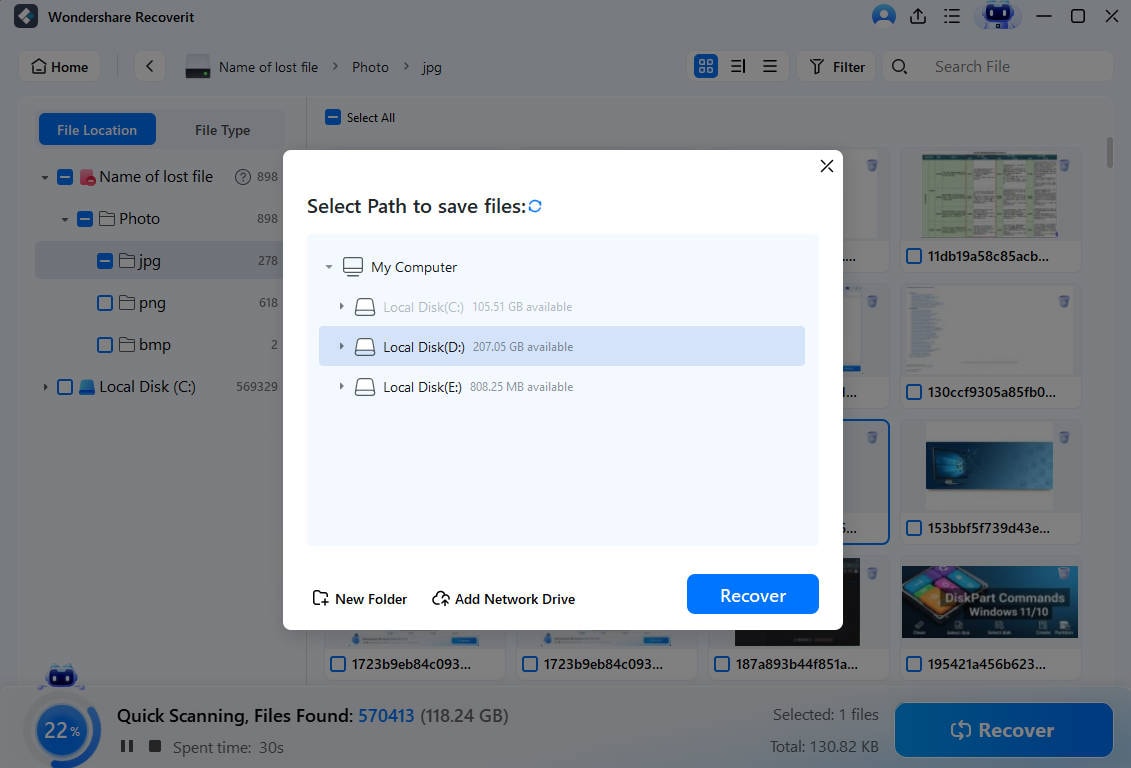
.jpg,.cr2,.cr3,.nef,.arw,.dng,.mov,.mp4,.docx, or.pdfto narrow down the results before previewing. - Preview recoverable files directly inside Recoverit before recovery. Photo previews are usually reliable; video frames are best opened from an external player after export.
- Select the files you need and click Recover. Choose a destination folder on your computer's internal drive or on a separate external drive — never the formatted SD card.
Related video: How to recover deleted or corrupted files from an SD card.
Try Wondershare Recoverit to Perform Data Recovery
 Security Verified. Over 7,302,189 people have downloaded it.
Method 2. Use Microsoft's Windows File Recovery (winfr) (Free, Command Line)
Windows File Recovery (winfr) is Microsoft's free command-line recovery tool. Microsoft recommends the /extensive switch for FAT, exFAT, and other non-NTFS filesystems and for formatted or corrupted disks. winfr will not restore original folder paths or file names — recovered files are dumped into numbered subfolders — and its format support is narrower than commercial tools, so it is best used as a fallback rather than a first choice on a high-value card.
To run winfr against the formatted SD card:
- Install Windows File Recovery from the Microsoft Store (search Windows File Recovery). It requires Windows 10 version 2004 or later, including all Windows 11 releases, and is not available on Windows 10 S mode.
- Connect the SD card and note its drive letter (for example
E:). Create an empty recovery folder on a different drive, for exampleD:\Recovery. - Open Command Prompt as Administrator: press Win, type
cmd, right-click Command Prompt, and choose Run as administrator. - Run the command below, replacing
E:with your SD card's drive letter andD:\Recoverywith your destination folder. Add or remove/nfilters to target specific file types:winfr E: D:\Recovery /extensive /n *.jpg /n *.cr2 /n *.nef /n *.mp4 /n *.mov /n *.pdf /n *.docx
- Type
Ywhen prompted to start the recovery. Do not interrupt the scan and do not save files back to the formatted SD card.
Method 3. Restore Cleared File Attributes With chkdsk and attrib (Free, Command Line)
This pair of Windows utilities belongs to the built-in recovery layer that Microsoft documents in detail. chkdsk with the /f parameter repairs logical file system errors by locking the drive and rewriting the volume's metadata. On FAT, FAT32, and exFAT volumes, chkdsk /f also frees orphaned cluster chains and can rename recovered fragments to File0001.chk in the root of the volume. The attrib command can then clear the read-only, hidden, and system flags on those recovered files so they appear in File Explorer again.
Use this pair only when you have only lost access to the files rather than truly erased them, for example when a quick format was interrupted or when a previous scanner set every directory entry to hidden. It is not an effective tool for recovering from a completed quick format if the file content blocks have been zeroed.
To unformat the SD card using chkdsk and attrib:
- Insert the SD card and open This PC to identify its drive letter (for example
E:). - Press Win, type
cmd, right-click Command Prompt, and choose Run as administrator.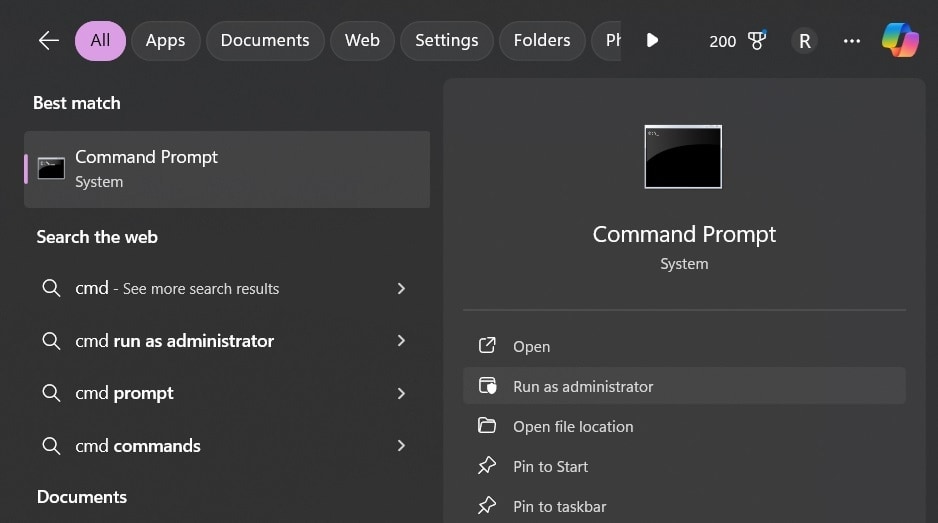
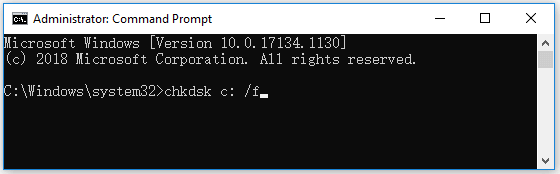
- Type the command below, replacing
Xwith your card's drive letter, and press Enter:chkdsk X: /f
- Type the command below and press Enter. This clears hidden, read-only, and system flags from any orphaned files on the card so they reappear in File Explorer with their original names where the file system still has them:
attrib -h -r -s /s /d X:\*.*
- Open the SD card in File Explorer. Any files with attributes restored are now accessible. Copy them to a different drive.
Method 4. Unformat the SD Card on macOS Using PhotoRec (Free, Open Source)
PhotoRec (the companion to TestDisk) reads file signatures directly from disk sectors and ignores the file system, so it works on FAT, NTFS, exFAT, ext2/ext3/ext4, and HFS+ volumes even after a quick format has emptied the file allocation tables. PhotoRec runs read-only against the source, which is safe for unstable cards. The trade-off is that recovered files lose their original names and folder structure; PhotoRec assigns numbered filenames and dumps them into a folder you choose.
PhotoRec releases version 7.2 (February 22, 2024) is the latest stable release distributed under GPLv2 or later and supports Windows 11/10/8.1/8/7/Vista/XP, Windows Server 2022/2019/2016/2012/2008/2003, Linux, FreeBSD, NetBSD, OpenBSD, Sun Solaris, and macOS. You can install it through Homebrew with one command or download the binary tarball for macOS from the TestDisk download page.
To unformat an SD card with PhotoRec on macOS:
- Insert the SD card into your Mac's built-in reader or a USB-C SD reader. If macOS Time Machine or Disk Utility prompts about the card, dismiss or cancel; do not initialize or reformat it.
- Open Terminal and run PhotoRec as administrator.
sudois required because the tool must read the device's raw block layer:sudo photorec
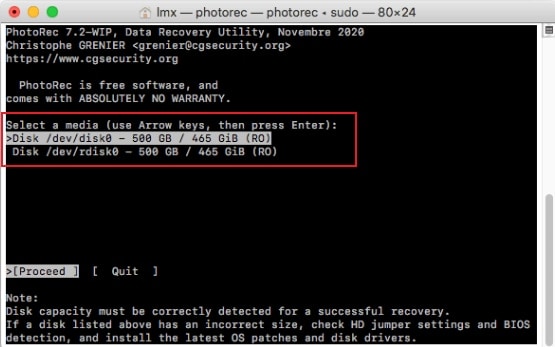
- Type your administrator password when prompted. Use the arrow keys to highlight the SD card's device entry (usually the size or manufacturer matches), select Proceed, and press Enter.
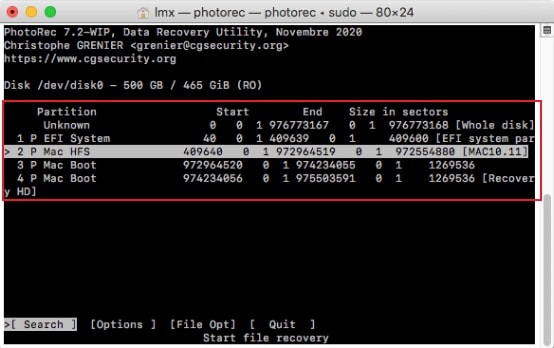
- If PhotoRec detects a partition table, highlight the SD card's primary partition and press Enter with Search selected. If not, choose No partition to scan the whole device.
- Select the underlying file system family. Choose Other for FAT32, exFAT, and similar layouts that the SD Association uses on consumer cards. Confirm with Enter.
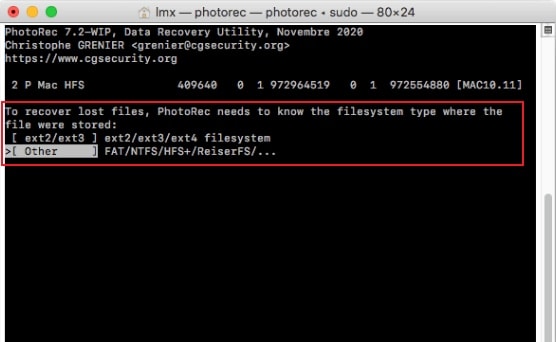
- Use the arrow keys to navigate into a destination folder on your Mac's internal drive and press C on the keyboard. PhotoRec will begin extracting files. The scan takes hours for a 256 GB card; do not interrupt it.
- When the scan finishes, press Enter on the highlighted Quit option. Open the destination folder and sort the recovered files by type, since original file names are lost.
Method 5. Send the Card to a Professional Recovery Laboratory
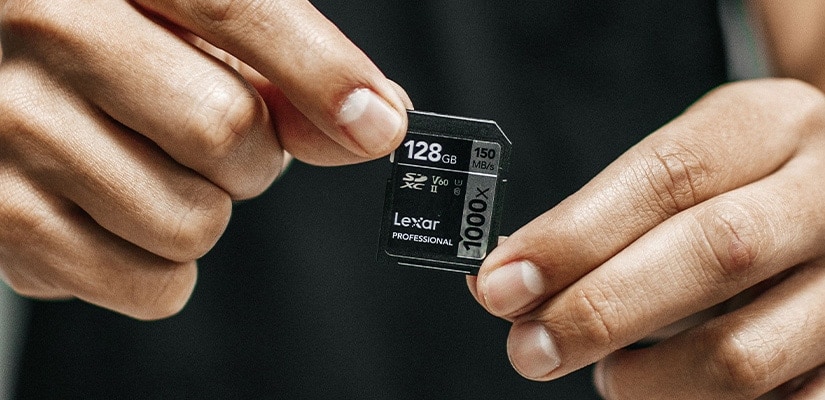
If the card does not appear in Disk Management or Disk Utility, makes clicking or beeping noises, disconnects from every reader you try, or has visible physical damage such as cracked plastic or bent pins, no consumer software can read the underlying flash blocks. You need a recovery lab equipped with NAND flash readers that bypass the card's controller chip and read the raw memory.
Choose a lab whose pricing model is "no recovery, no charge," who provides a written confidentiality agreement, and who quotes a fixed-price evaluation. Pack the card in an anti-static bag inside a padded envelope, label the package as fragile, and write down the card's brand, model, capacity, and the exact failure symptoms before shipping. Reputable labs typically charge USD $300 to $1,500 for SD card recoveries in 2026, depending on capacity, controller damage, and required clean-room work.
Part 5. Reformatting the SD Card After Recovery
Once your files are safe on a different drive, you can reformat the card to make it usable again. Match the file system to the device that will hold the card:
| Use this file system | For this device | Notes |
| FAT32 / MS-DOS (FAT) | Most cameras, drones, dashcams, Android phones, Nintendo Switch, Mac and Windows PCs sharing the card | Maximum single file size is 4 GB. Best cross-device compatibility. |
| exFAT | 64 GB and larger SDXC cards, modern cameras, drones, dashcams, Windows PCs, macOS, Android, and most Linux kernels from 5.4 onward | Required for cards over 32 GB that record large 4K or 8K video segments. |
| NTFS | Windows-only use | Mac and Linux can read NTFS but cannot natively write to it without extra software. |
| ext4 | Linux only | Use only when the card will remain on a single Linux device, NAS, or single-board computer. |
Two tools are recommended for the reformat step:
- The SD Memory Card Formatter from the SD Association: writes the SD specification's exact layout, which matters for cards over 32 GB and for cameras that look for manufacturer-specific boot blocks.
- Windows Disk Management or macOS Disk Utility: supports all three file systems above and works when the SD Association formatter is not installed.
Avoid reformatting to a different file system on the camera's menu if you plan to share the card with a computer later, because some cameras write proprietary metadata that is not recoverable through standard tools. If your goal is a clean and consistent layout, the SD Association's formatter is the closest match to the card's factory state.
Part 6. How to Stop Your SD Card From Being Formatted Again
Most accidental formats start with one of five repeatable causes. Address them once and the chance of repeating the mistake drops sharply.
- Label and color-code your cards. Mark "in use," "ready to offload," and "archived" with a sticker, label tape, or color-coded card case. A card you can identify without inserting it is less likely to be chosen during a rushed format.
- Eject before removing. Always use the operating system's safe-eject on a computer or the camera's "Eject SD" workflow. Yanking the card or powering the device off mid-write is the leading cause of file system damage that later causes the device to demand a format.
- Lock write-protect switches on full-size SD adapters. The lock slider is mechanical and prevents the host device from writing temporary or thumbnail files. Keep it locked unless you are actively recording.
- Offload after every shoot or recording day. Copy the contents to a computer drive plus a cloud or NAS backup, verify the copy, then use the SD Association's formatter to re-establish the card's file system before the next use.
- Replace cards that have been formatted twice in a row, read errors out of the box, or have been in service for more than three years of heavy use. NAND flash wear makes late-life cards more susceptible to controller errors that present as a forced format prompt.
Combined with the recovery steps above, those habits keep you out of the "unformat" mindset in the first place.
FAQ
-
Can you unformat an SD card and recover all of the files?
You can usually recover most or all of the files from a quick-formatted SD card that has not been reused, but a "100%" guarantee is not realistic. Every byte of free space on the card is now eligible for new writes; the moment you take a new photo, copy a new file, or run a system repair against the card, some sectors of the old data may be replaced. Stop using the card immediately, run a recovery scan from a desktop computer, and save the recovered files to a different drive. The faster you act and the lower the card usage after the format, the higher the recovery rate. -
How long does unformating an SD card take?
The scan duration depends mainly on card capacity and the chosen scan depth. A 64 GB SDXC card takes 20 to 45 minutes for a standard scan with a tool like Recoverit and 1 to 3 hours for a deep scan. Windows File Recovery and PhotoRec run on similar timescales; a 1 TB card can take half a day. The professional-lab option is slower still: most labs take 5 to 15 business days for SD card work in 2026. -
Is free SD card recovery software safe to download?
Established tools such as Microsoft's Windows File Recovery, CGSecurity's PhotoRec/TestDisk, and the SD Association's SD Memory Card Formatter are safe and have verifiable release histories. Unknown "free recovery" downloads from third-party sites frequently bundle adware or unrelated installers; download only from the vendor's own domain and verify checksums where provided. Any free tool you choose should run read-only against the source card and never ask you to write recovered files back to it. -
Can I recover files from an SD card that is not detected on Windows or Mac?
If you have already tried two reliable card readers and another computer without the card appearing, the most likely cause is controller or NAND wear rather than a software-level failure. Repeated DIY scans will not help and may stress an already unstable card further; for personally valuable data, stop using the card and contact a professional recovery lab that uses PC-3000 Flash or a comparable NAND reader. The lab can read the raw memory blocks even when the controller reports the card as defective. -
Will formatting an SD card on the camera delete photos already on it?
Yes, every camera "Format" menu I am aware of either rewrites the file system (quick format) or zeroes the data area (overwrite format). The good news is that a quick format is what most consumer cameras use, so the photo data blocks remain on the flash until you shoot over them, and recovery software can reassemble them when you stop using the card and connect it to a computer. The bad news is that some professional cameras and certain Sony consumer models perform a low-level erase (the SD_ERASE command sequence CMD32/CMD33/CMD38), so before you trust the menu you should check the camera manual or the manufacturer's support page for the exact behavior of your model. -
What is the difference between unformat and format?
A "format" operation is a real, documented process: it creates a new file system on the card by writing a volume boot record, file allocation table, and (for exFAT) a folder dump, then optionally zeroes the data area for security. "Unformat" is not a real command on any mainstream operating system. When we say "unformat," we mean scan a card whose file system has been freshly emptied (most often by accident) and reassemble the previous files from their underlying data blocks. -
I formatted the SD card and then took new photos. Can I still unformat it?
Partially, and it depends on where the new photos were written. When you shoot after a quick format, each new photo is stored in clusters the file system now marks as free — some may fall on top of your old files, others may not. Once a cluster is overwritten, that piece of the old file is gone permanently, so a formatting-then-reusing scenario always has a lower recovery rate than an untouched card. This is especially true for large 4K or 8K video files from cameras, drones, and dashcams: one new clip can occupy hundreds of contiguous clusters and quickly cover older footage. Stop recording immediately, scan the card, and accept that files occupying clusters that were overwritten cannot be brought back by any tool.


