


 TL;DR:
A read-only file is a system-level protection feature that prevents direct content modification, requiring users to either adjust folder permissions, uncheck file attributes, or use the "Save As" function to create an editable duplicate.
● For individual files, toggle the "Read-only" attribute via Windows Properties or Mac's "Get Info" permissions, but removing this restriction from entire Windows folders requires executing the `attrib -r drive:\path\foldername` command in CMD.
● To bypass the restriction without changing original file attributes, open the document in programs like Microsoft Word, make your edits, and use the "Save As" command to save the content under a new file name.
● If read-only files are lost, you can restore them while perfectly preserving their restricted permissions using built-in tools like Windows Backup and Restore, third-party software like Recoverit, or disk imaging software like Clonezilla.
Ask AI for a summary
 ChatGPT
 Perplexity
 Gemini
 Claude
 Grok
Grok
Have you received a file that has a read-only attribute turned on?What is a read-only file? This is a common question many computer users ask. A read-only file is a file you can view but cannot edit. The system prevents changes or deletions. Many users wonder about its purpose. Knowing its function helps in managing files efficiently.
Read-only files play a vital role in computing. They safeguard important data from accidental edits. They also make file sharing easier while preserving content. You can view the file, but modifications are restricted, ensuring its security.

Learning how to change a read only file is crucial for daily computer use. Sometimes you need to edit these files. Other times you want to know how to make a file read-only for protection. This article covers everything about read-only files and their management.
In this article
Part 1: What is Read-Only File?

What is read-only file exactly? A read-only file has restricted permissions. The system blocks any edits or deletions. You can view its contents, but saving changes is not allowed.
Read-only files have specific attributes set by the system. These attributes tell the computer to block write operations. The file remains unchanged even if you try to edit it. This protection works at the file system level.
The read-only meaning extends beyond simple file protection. It's a security feature that prevents data corruption. It also helps maintain file integrity in shared environments. Understanding this concept helps you manage files more effectively.
Part 2: Why Are Files Set to Be Read-Only?
Files become read-only for several important reasons. Here are the main causes:
- Protecting important data - System files and critical documents need protection from accidental changes
- Sharing files without allowing edits - You can share documents while keeping the original safe
- Preventing virus damage - Read-only files are harder for malware to modify or corrupt
- Maintaining file integrity - Important documents stay unchanged in collaborative environments
- System security requirements - Operating system files need protection from user modifications
- Network drive restrictions - Files on shared networks often have read-only permissions by default
- File corruption prevention - Setting files to read-only prevents accidental deletion or modification
Part 3: How to Make a File Read-Only
Making a file read-only is a simple process. This helps protect your important documents from changes. You can easily set this protection on any file you want to keep safe.
How to make a file read-only varies slightly between operating systems. The basic concept remains the same across platforms. You change the file properties to restrict write access.
Steps to Make a File Read-Only: (Windows)
- Right-click on the file you want to protect. Select "Properties" from the context menu.
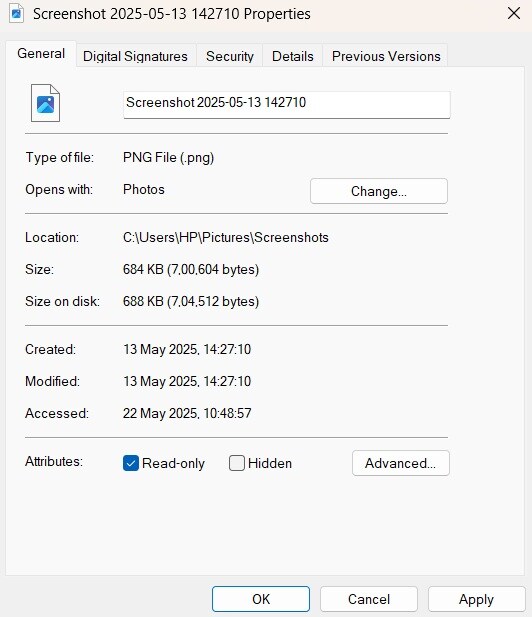
- Check the "Read-only" box in the Attributes section. Click "OK" to apply the changes. The file is now protected from modifications
Steps to Make a File Read-Only: (Mac)
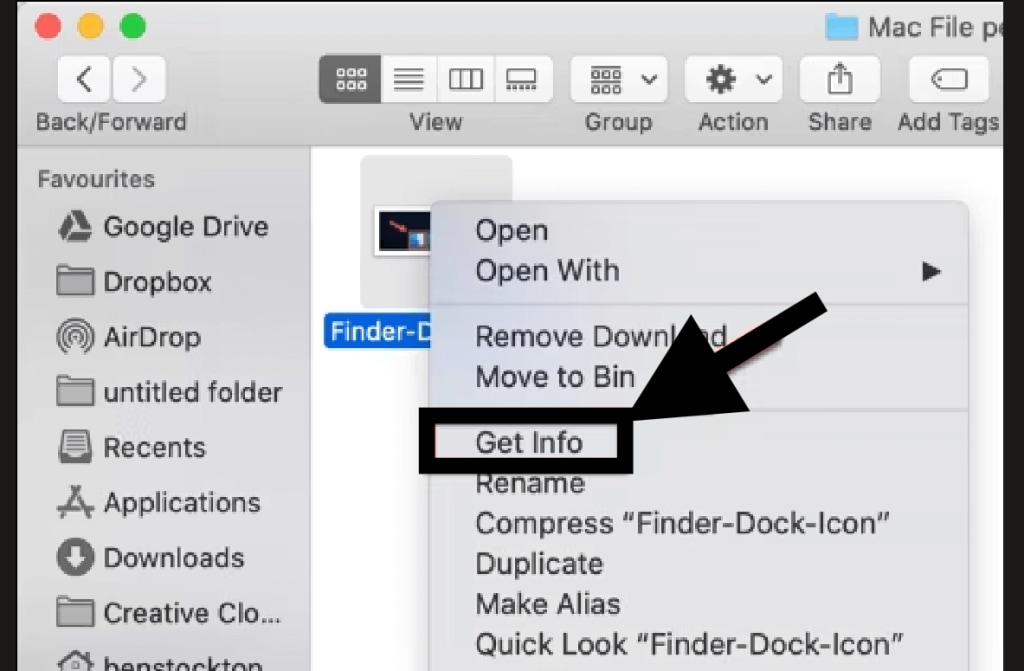
- Locate the file you want to make read-only. Right-click the file. Select Get Info.
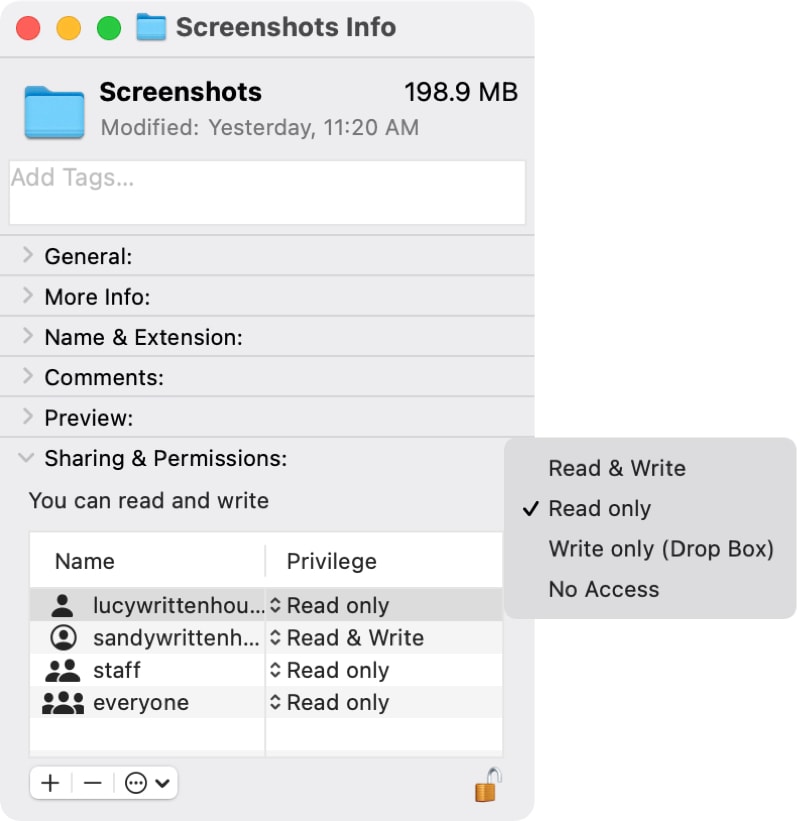
- In the Sharing & Permissions section, find your user name. Change the permission to Read Only. Close the window. Save the changes.
Part 4: How to Open a Read-Only File?
If you want to open a file as a read-only, you may use the "Save As" option from the File menu and save the document as a read-only file with a different file name. Opening a file as read-only requires a bit of consciousness to avoid messing up with your file. Follow these steps to open a document as read-only.
1. Open Files as Read-Only in Microsoft Word 97
- Step 1: Launch Microsoft Word 97. From the File menu, select Open.
- Step 2: A dialogue box will appear, letting you search for the file you want to open.
- Step 3: Click on the File name. Then, click the Commands and Settings Button.
- Step 4: A context menu will be displayed. From this context menu, select Open Read-Only.
2. Open Files as Read-Only in MS Word 2000 or Later
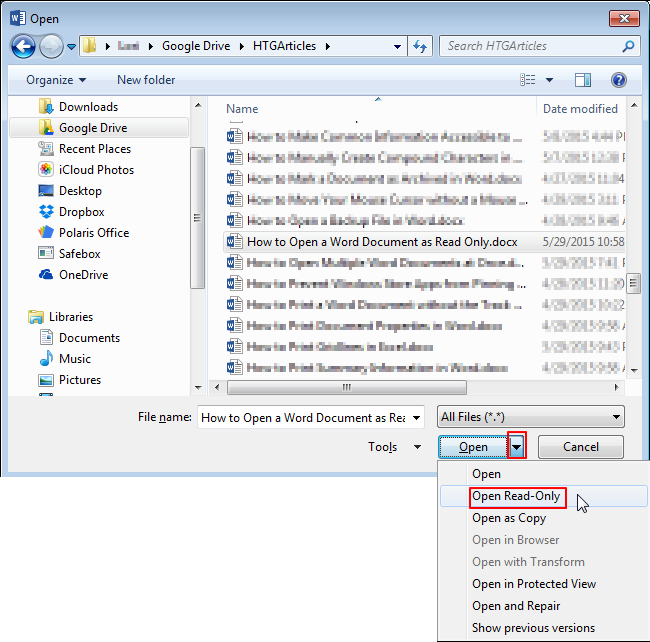
- Step 1: Launch Microsoft Word, go to the File menu and select Open.
- Step 2: A dialogue box will appear. Now locate the file that you want to open
- Step 3: Click on the File name. On the right side of the Open button, you will find a "Down Arrow". Click it.
- Step 4: Different ways to open the file will be displayed. Finally, select the "Open Read-only" option from the drop-down menu.
Part 5: Pros and Cons of Using Read-Only Files
Pros and cons of read-only files help you decide when to use this feature. Understanding both sides helps you make better file management decisions.
Pros of read-only files:
- Prevents Accidental Changes: Since the file can't be modified, it avoids unintentional edits or deletions.
- Maintains Data Integrity: Useful for important documents where original formatting and content must be preserved.
- Security Benefits: Helps safeguard sensitive files from being altered by unauthorized users.
- Stable References: Great for official documents, templates, or guidelines that shouldn’t be altered.
Cons of read-only files:
- Inconvenience: If changes are needed, users must first remove the read-only restriction.
- Limited Collaboration: Read-only files restrict editing, making real-time teamwork difficult.
- Not Always Secure: While read-only prevents edits, it doesn’t necessarily stop someone from copying or renaming the file for modifications.
- Version Management Issues: If people need to make changes, they may create multiple versions, leading to confusion.
Part 6: How to Change a Read-Only File?
It is possible that the read-only files are read-only on a folder or a file level. This means you can edit a read-only file according to the level at which it has been marked as read-only.
1. Change a Single Read-Only File
If only a single file has a read-only attribute on it, you can edit it by unchecking the appropriate attribute in the file's properties. And then, you can make changes to it easily. Once you have made those changes, you may re-enable the attribute. Below are the steps to remove read-only attribute for a single file:
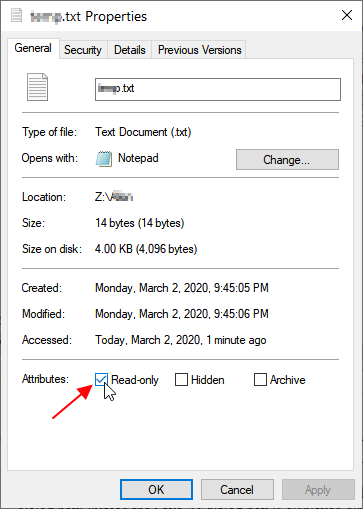
- Step 1: Right-click the read-only file, then choose the Properties option.
- Step 2: Remove the check mark by the Read Only item unter the General tab. As mentionted in Part 4, you can place a check mark to set the read-only attribute.
- Step 3: Finally, click OK to save your changes.
2. Change a Read-Only Folder
On the other hand, if a folder has a read-only attribute turned ON, this means that all the files in that folder are Read-Only files. This requires making changes to the folder's permissions. To remove the read-only attribute for a folder, go through the following steps:
- Step 1: Copy the path of the folder you want to change.
- Step 2: Click the "Start" button in your Windows PC and type "cmd" in the search field. Then, press "Enter".
- Step 3: The command window will show up. Type the command "attrib -r drive:\path\foldername" and press "Enter" to remove the read-only attribute from a folder. Note: You should replace the drive:\path\foldername with the path of your folder that you have copied on Step 1.
- Step 4: Finally, type "exit" and press "Enter" to close the command window.
You can also use the equivalent command "attrib +r drive:\path\foldername" to set the folder to read-only.
It is possible that you may not want to change this attribute for all the files in that folder, rather just one or two files to which you wish to make changes. So, in this case, just edit the file in a folder that does allow editing. After that, move to the newly created file in the original file's folder, and overwrite the original file. Over here, you are not actually making changes to the original file, instead, you make a new file and replace the old one with it after making certain changes.
Part 7: How to Recover Lost Read-Only Files
Losing read-only files can be frustrating. These files often contain important data that needs protection. Fortunately, several methods can help you recover lost read-only files effectively.
Recovery methods vary based on your needs. Some are built into your system, while others require special software. Each approach has different benefits and success rates.
Method 1: Use the Recoverit Tool
Recoverit File Recovery tool can restore read-only files without altering their original state. It retrieves important data that was accidentally deleted or lost due to system errors. This feature is useful for preserving protected files.
The software supports various file formats and storage devices. It recovers word, excel, ppt, zip, email documents from hard drives, USB flash drives, SD cards, and formatted partitions. Its deep scan technology ensures effective file retrieval.
Recoverit is easy to use, with a simple recovery process. Users can restore read-only files with a few clicks. It provides a reliable solution for businesses, education, and personal data protection.
Steps to use Recoverit:
- Download and install Recoverit software. Launch the program and select the drive location. Click "Start" to begin the scanning process.

- Preview the found read-only files. Select the files you want to recover.

- Click "Recover" and choose a save location.

Video Tutorial on How to Recover Lost Files in Windows?
Method 2: Use Windows Backup and Restore
Windows Backup and Restore is a built-in recovery tool. It helps restore read-only files from previous backups. This method works best if you regularly backup your system. It's free and integrated into Windows operating systems.
How it helps:
- Uses existing system backups
- Restores files to previous states
- Works with read-only files automatically
- No additional software required
Steps to use Windows Backup and Restore:
- Open Control Panel and select "Backup and Restore". Click "Restore my files" option.
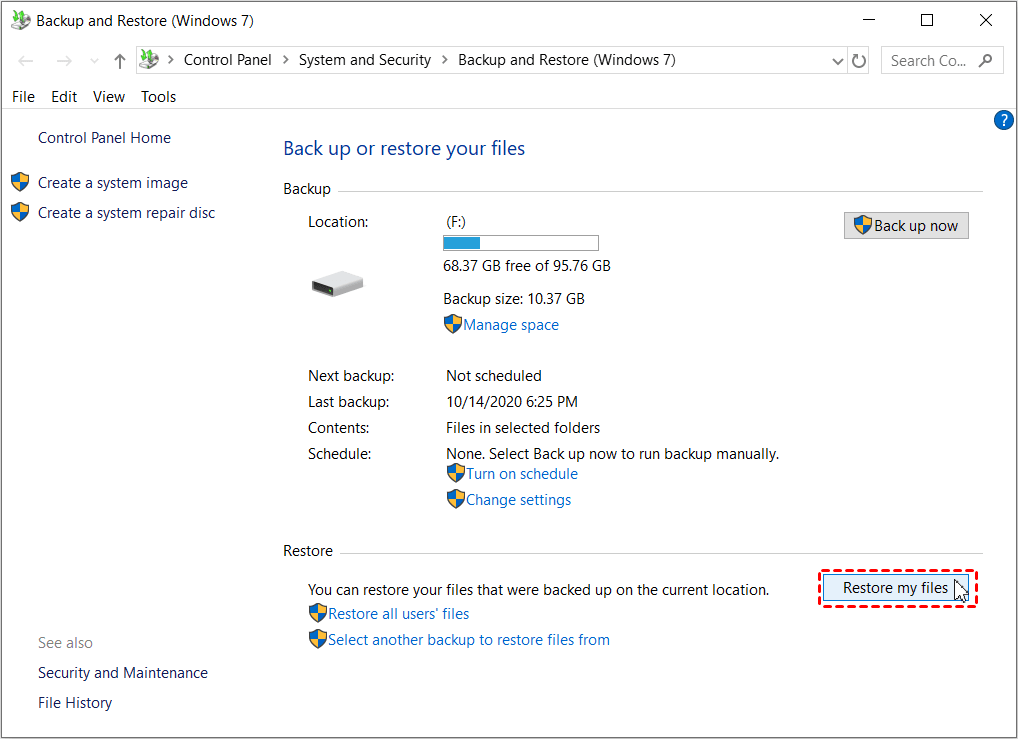
- Browse or search for your lost read-only files. Select the files you want to restore. Choose a restore location. Click "Restore" to complete the process
Method 3: Create a Disk Image
Creating disk images provides comprehensive backup solutions. This method captures entire drive contents including read-only files. It's excellent for complete system recovery scenarios. Disk images preserve file attributes and permissions perfectly.
How it helps:
- Creates complete system snapshots
- Preserves read-only file attributes
- Enables full drive restoration
- Protects against major system failures
Steps to create a disk image:
- Download disk imaging software like Clonezilla. Boot from the imaging software. Select source and destination drives. Choose full disk cloning option.
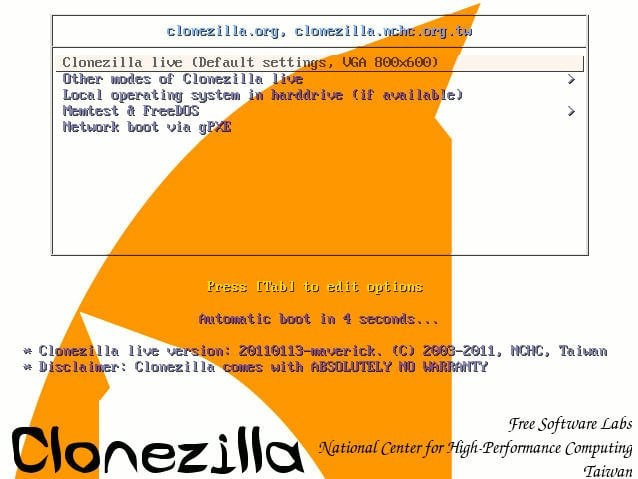
- Start the imaging process. Verify the image creation was successful
Part 8: Tips to Avoid Read-Only Hassles in the Future
Read-only files can be useful for protecting important documents, but they can also create frustration when you need to make changes. To avoid unnecessary hassle, it's best to manage file permissions carefully and take preventive measures before encountering issues.
By following simple strategies, you can ensure smoother file access and avoid restrictions when you need to edit or share documents. Here are some useful tips:
- Check File Permissions: Before saving, verify that the file isn’t set to read-only.
- Use Backups: Keep editable copies of important files to avoid permission issues.
- Avoid Saving to Restricted Locations: Some system folders automatically set files as read-only.
- Disable Read-Only in Properties: Right-click the file, go to properties, and uncheck "Read-Only."
- Use Compatible Software: Ensure the program supports editing for the specific file format.
- Save with a Different Name: Creating a new version can bypass read-only restrictions.
- Manage User Access Rights: Set appropriate permissions for shared files to allow editing.
- Utilize Cloud Storage: Services like Google Drive or OneDrive provide flexible file access.
These steps will help you manage files efficiently and prevent future read-only frustrations.
Conclusion
Understanding what is read-only file improves your computer skills significantly. These files serve important protective functions in computing. Learning how to edit a read-only file and how to change a read only file gives you more control over your data.
The pros and cons of read-only files help you make informed decisions about file protection. Recovery methods ensure you can restore lost data when needed. Following prevention tips helps avoid future read-only file complications and keeps your workflow smooth.
Try Wondershare Recoverit to Perform Data Recovery
 Security Verified. Over 7,302,189 people have downloaded it.
FAQ
-
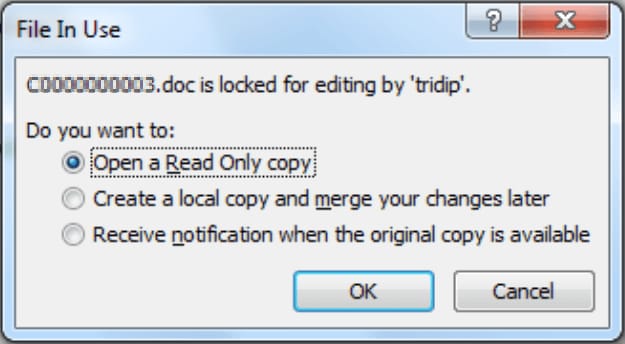
Q: What happens when I try to edit a read-only file?
When you try to edit a read-only file, the system prevents you from saving changes. Most programs will show an error message or warning. You'll need to learn how to change a read only file to make modifications. Some programs let you edit in memory but won't save the changes to the original file. -
Q: Can read-only files be deleted?
Yes, read-only files can usually be deleted, but the system may ask for confirmation first. The read-only attribute protects against modifications, not deletion. However, some system files with read-only status may require administrator permissions to delete. Always be careful when deleting read-only files as they're often important. -
Q: How do I know if a file is read-only?
You can identify read-only files by checking their properties or looking for visual indicators. Right-click the file and select Properties to see if the read-only box is checked. Some file managers show read-only files with special icons or text indicators. Understanding read-only meaning helps you recognize these files quickly in your system.


