How to Fix SD Card Not Showing Up on Mac?
The SD card errors can result from minor factors, such as dust, any other substance coating the contact points, or imperfect insertion into the slot. These are usually the first areas to address before you even get worried.
There are also other causes surrounding the issue of your SD card not showing up on Mac. How can we fix this issue? Or How to solve the device not support the SD card? Let’s together find the solutions.
How to Fix SD Card Not Showing Up or Reading on Mac
Considering the issues mentioned above, how can you repair a corrupted SD card or perform any other fix? Looking at some of the possible solutions, they include:
Method 1. Restart your Mac
A simple restart may resolve the SD card not showing up on your Mac issue. There are three ways to do so:
- Click on the Apple icon and choosing to restart on its menu.
- Press the Power button and on the dialog box that appears, click on "Restart."
- Simultaneously hold on Control + Command + Eject/Power button. It is the most reliable option, as it’s not dependent on the OS.
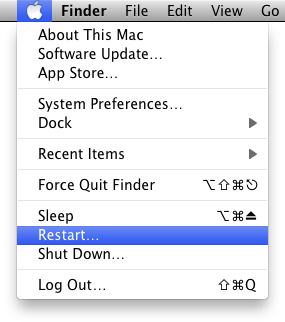
After that, try inserting your SD card once again. With this method, most people can find their SD card recognized on Mac now. If not, you need other solutions.
Method 2. Check your SD Card
- Physically Checking: Check that there is no damage, i.e., scratches on the shiny contact points or greasy coatings of any kind like food substances, dust, or mud. Clean your SD card with a clean and soft dry cloth. Do it thoroughly, especially on the corners around the contact points. However, don’t use water or lick the fabric with saliva. The moisture can destroy it when you insert it into the device.
- Write Protection Checking: To avoid write protection, make sure the switch on the side is on.

Method 3. Check Finder Preferences Settings
You need to make sure that the Finder is set to display external hard drives and devices if your SD card is not showing up on your Mac.
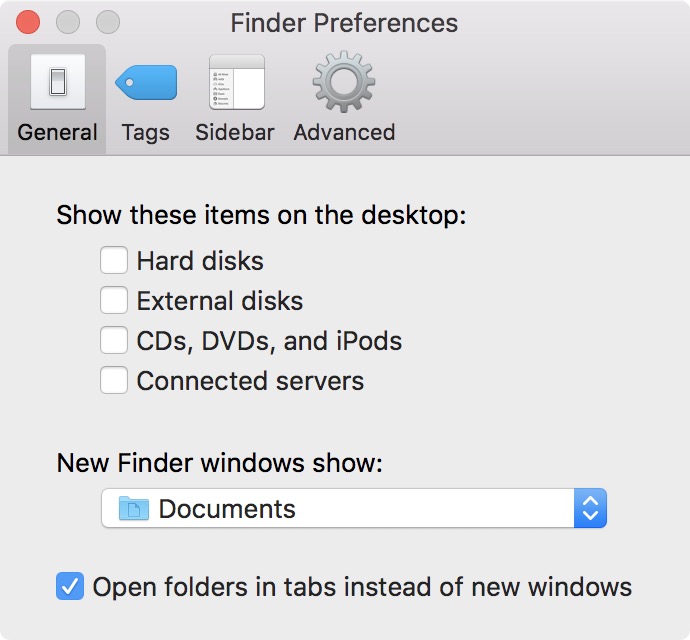
- Open Finder, go to Finder->Preferences->General. Ensure that the "Show hard disks" and "Show external discs, CDs, and DVDs" are checked.
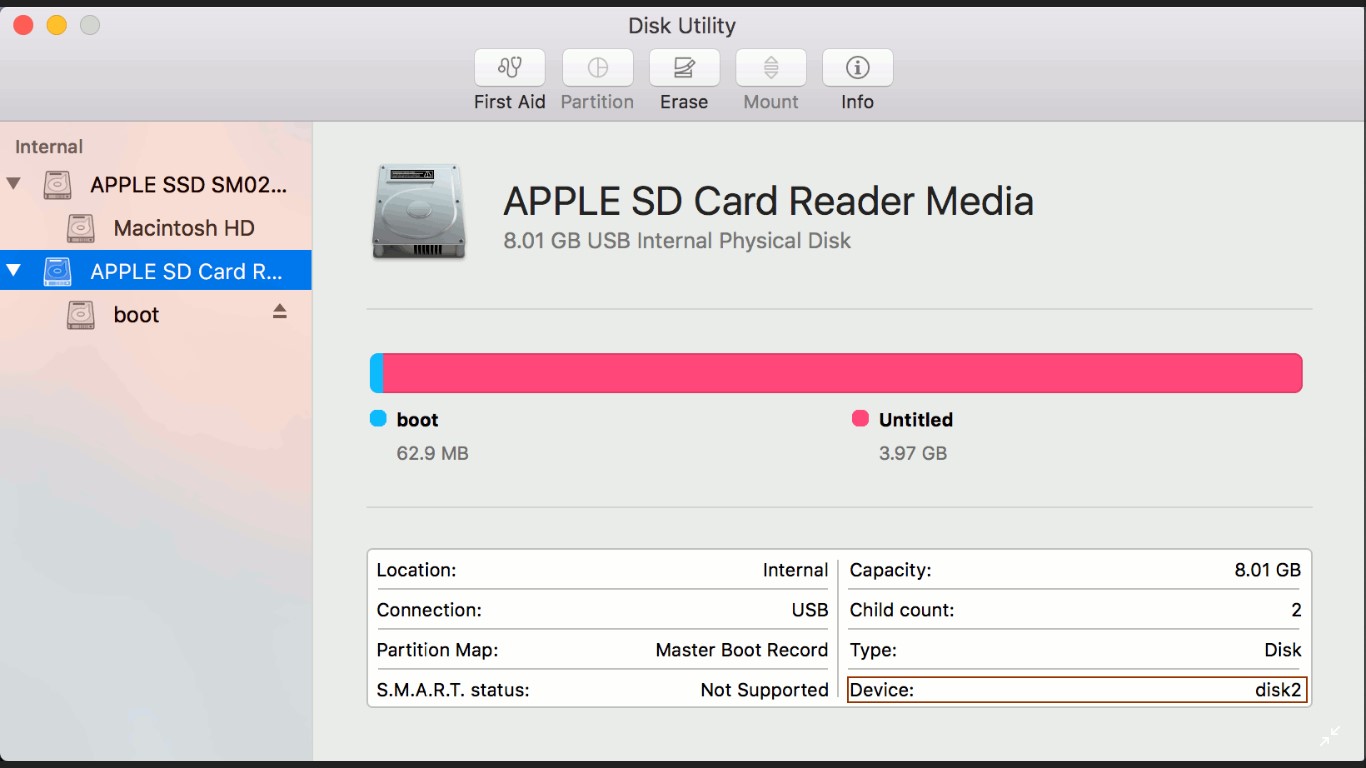
- If you'd like to see it on the desktop, change preferences on Finder Preferences. Under the General tab, select External disks. Do the same under the sidebar tab.
- After the steps, you can now open the SD card and access the contents through the Finder app. Enter into the SD card folder. On the right pane, contents get displayed.
However, if the above processes don’t work for you and your SD card is not reading, take a look at the next part.
Method 4. Test the SD Card
- Connect a different external hard drive to your Mac to check if the computer's SD card reader is working properly.
- Insert the SD card to another computer to check if the problem persists. If it works on other computer, then the issue may be caused by your Mac. If it doesn't work either, you can continue with the following solutions to fix the SD card not showing up on Mac error.
Method 5. Mount Your SD Card
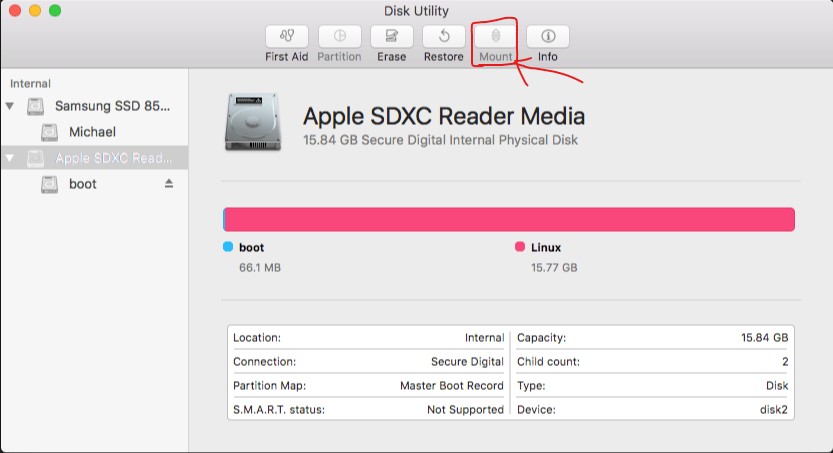
Even after modifying your Mac preferences, your SD card might still not be visible on the desktop. It means it’s only visible from the disk utility, thus not mounted.
- You can access Disk Utility through the spotlight. Type it on the search box or use the shortcut command + space.
- On the left pane, select your SD card. The right side of the screen will display the details.
- On the top sections towards the right is the mount option. If mounted, there will be an option of unmounting. Click on it to mount your SD card.
Method 6. First Aid Check
The First Aid check on Disk Utility is complete when you suspect something could be wrong with your SD card or any other external disk plugged in on your Mac.
- Go to Disk Utility.
- Select your SD card from the left pane.
- On the top options, First Aid is on the far left. Click on it.
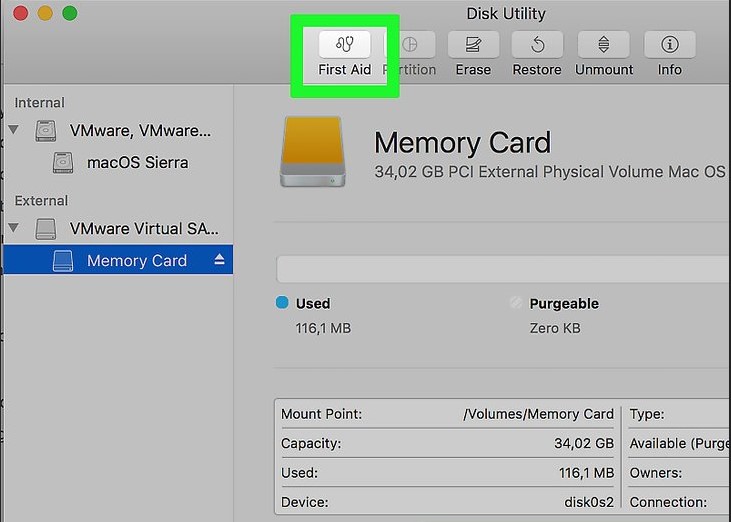
- Disk Utility performs a check on the partitions to verify their contents.
If the SD is going to fail, Disk Utility will inform you, and you should perform a backup before it’s too late.
Method 7. Repair your SD card
Perform a repair on your SD card if it did not mount successfully.
- Through Applications > Utilities open Disk Utilities.
- Select your SD card from the sidebar.
- On the details pane, click on the First Aid at the top and wait for the repair process until it completes.
- When complete, a drop-down sheet displays detailed information. Select the Repair Disk option on the bottom right.
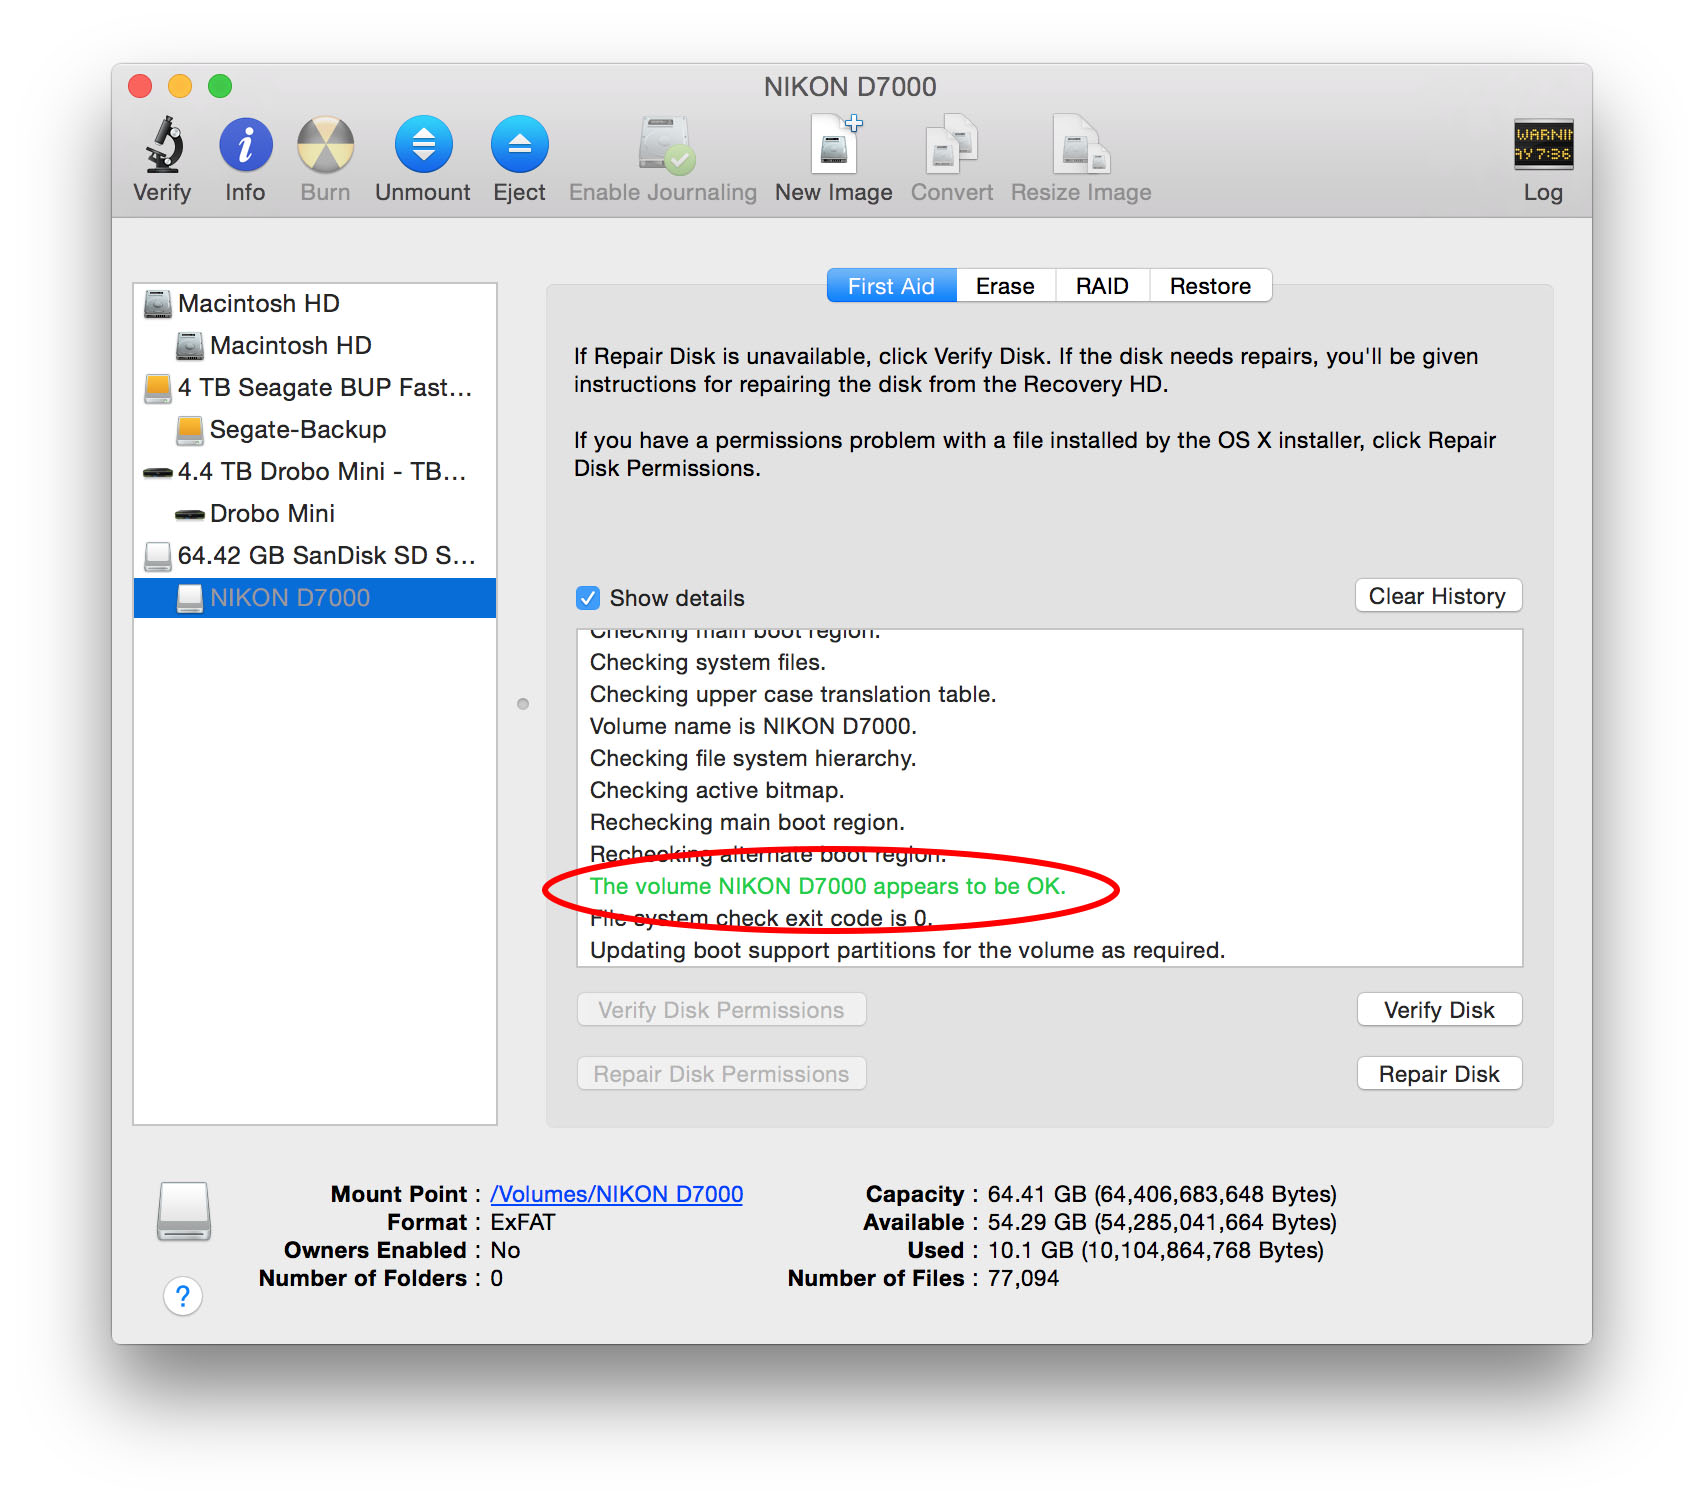
In some cases, Disk Utility might fail to repair your SD card. In such a case, it will warn you of failure so you can make a backup.
Method 8. Repair Disk Permissions
As from MacOS X Yosemite and earlier, you can repair disk permissions on your start-up disk. It would help if you did this because your internal hard disk permissions could, in some ways, be hindering your SD card from reading.
- Launch Disk Utility and select your Hard Disk from the sidebar.
- On the details pane, click on First Aid.
- Under the drop-down sheet, on the left bottom side, click on "Repair Disk Permissions."
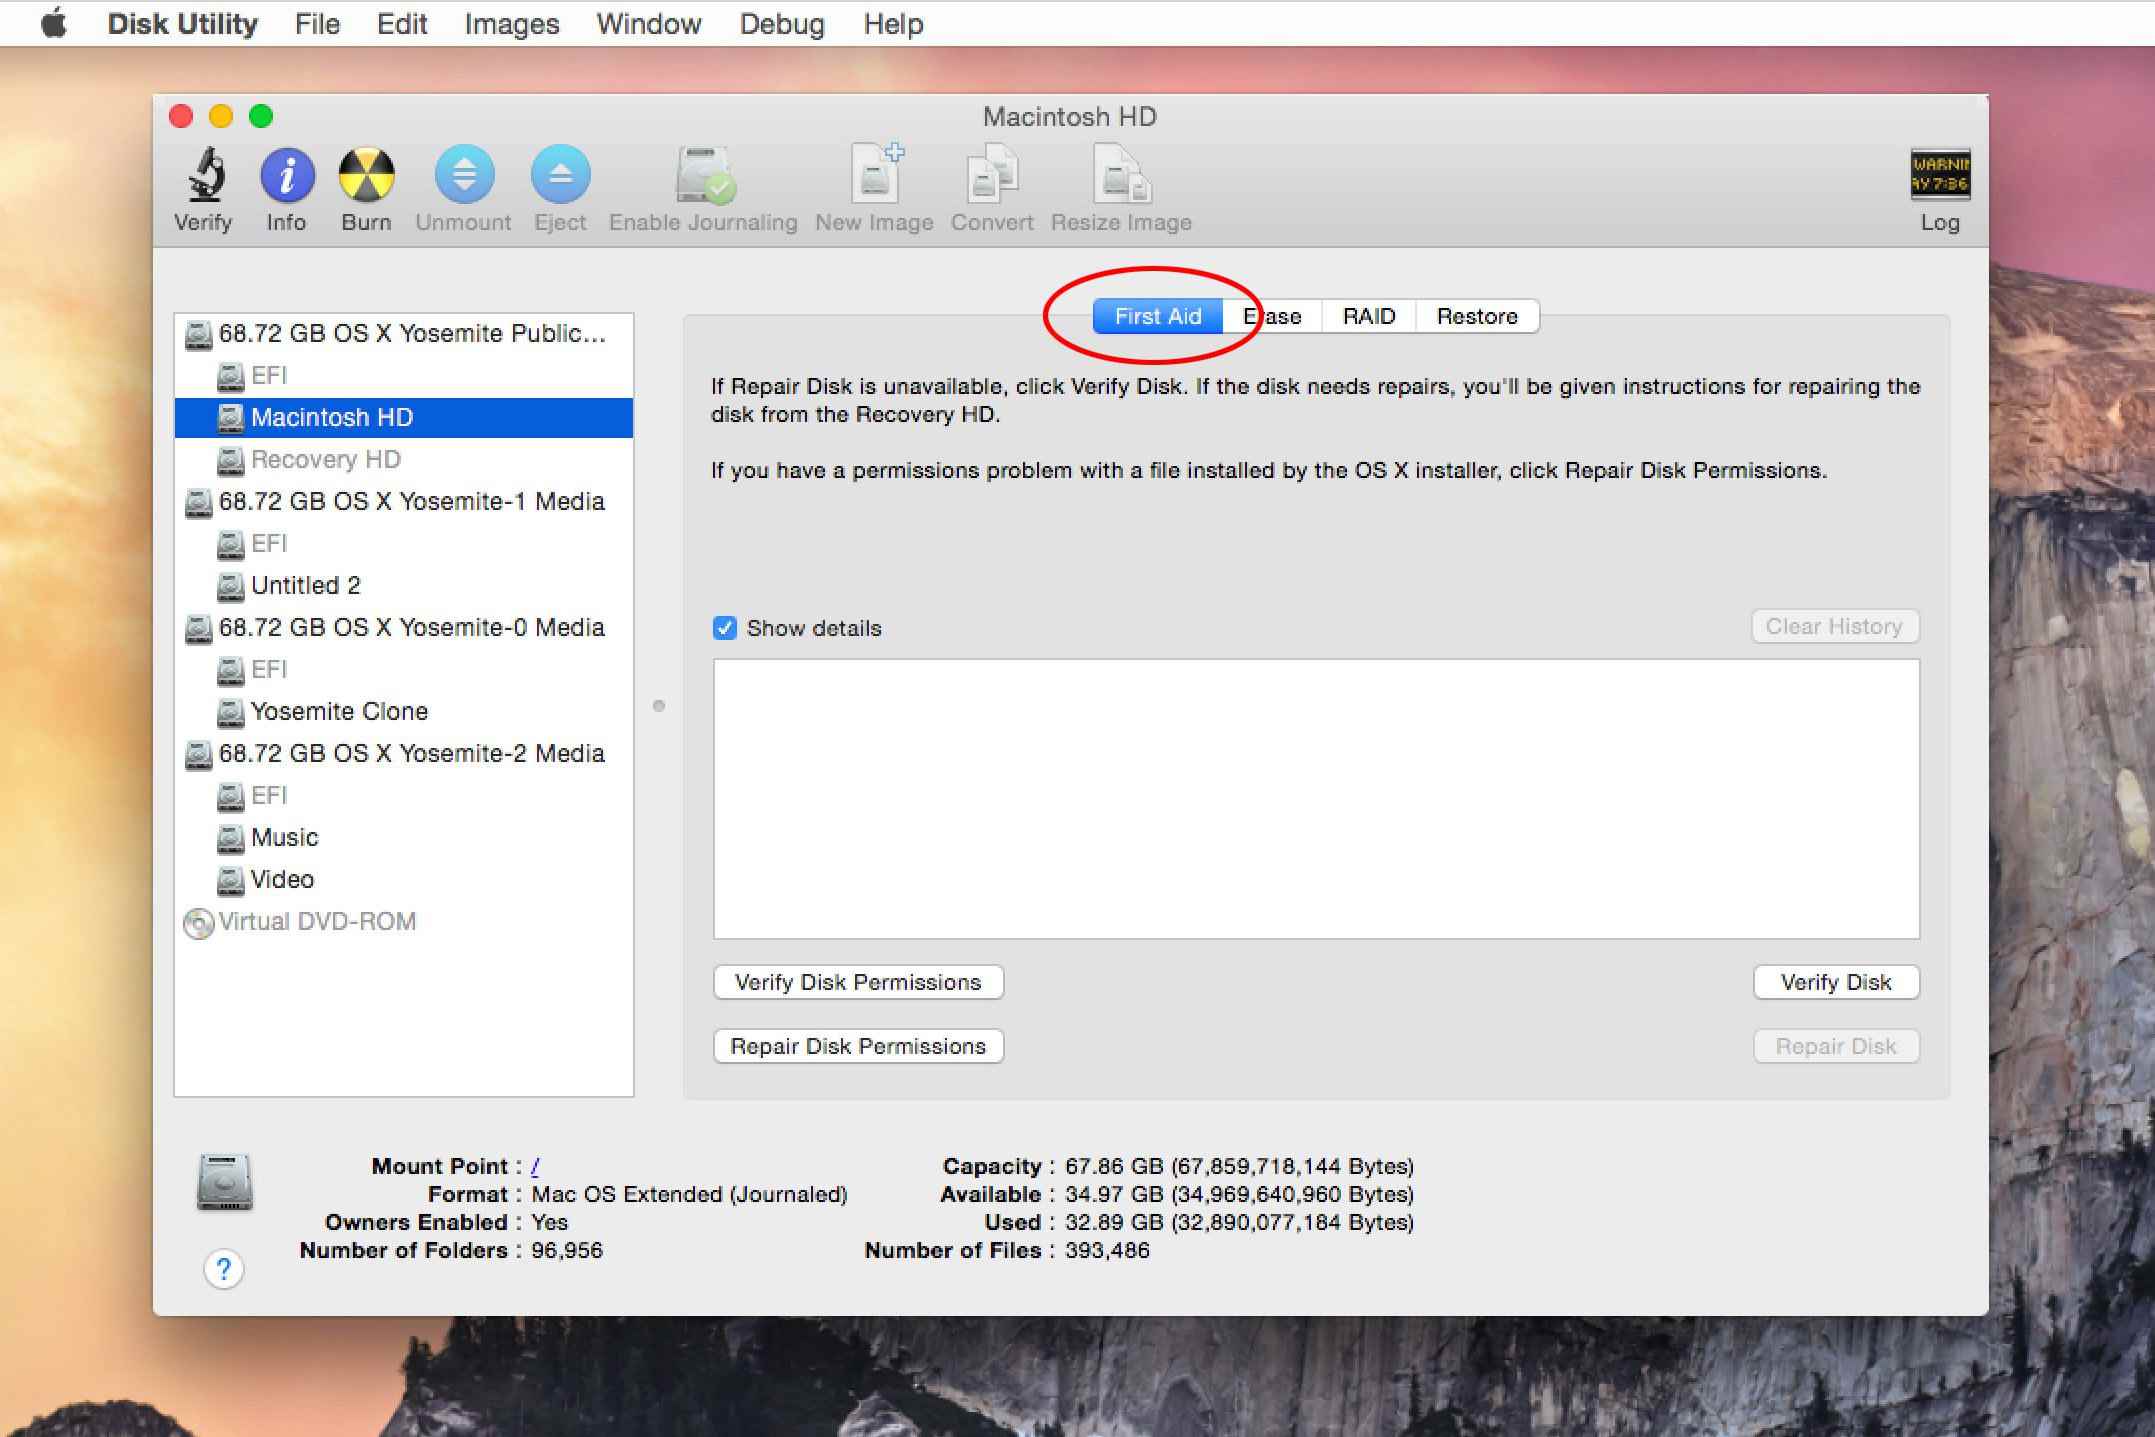
Method 9. Format your SD card
The option to format your SD card certainly sounds scary. However, do not be dismayed. Formatting your device, even though you may not have been able to perform a backup, is not the end for you. The article later addresses a means to recover files.
- Go to the Utility Disk. After selecting your drive, click on "Erase" at the top.
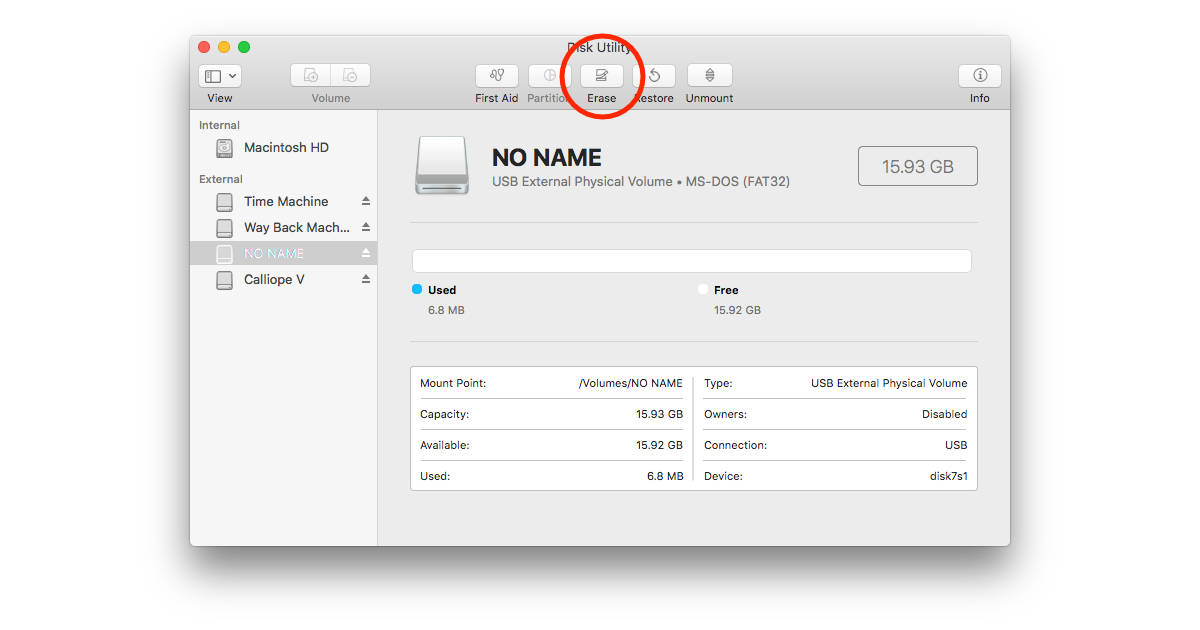
- Disk Utility will choose a format for you. You can also select your preference, depending on how you plan to use the SD card.
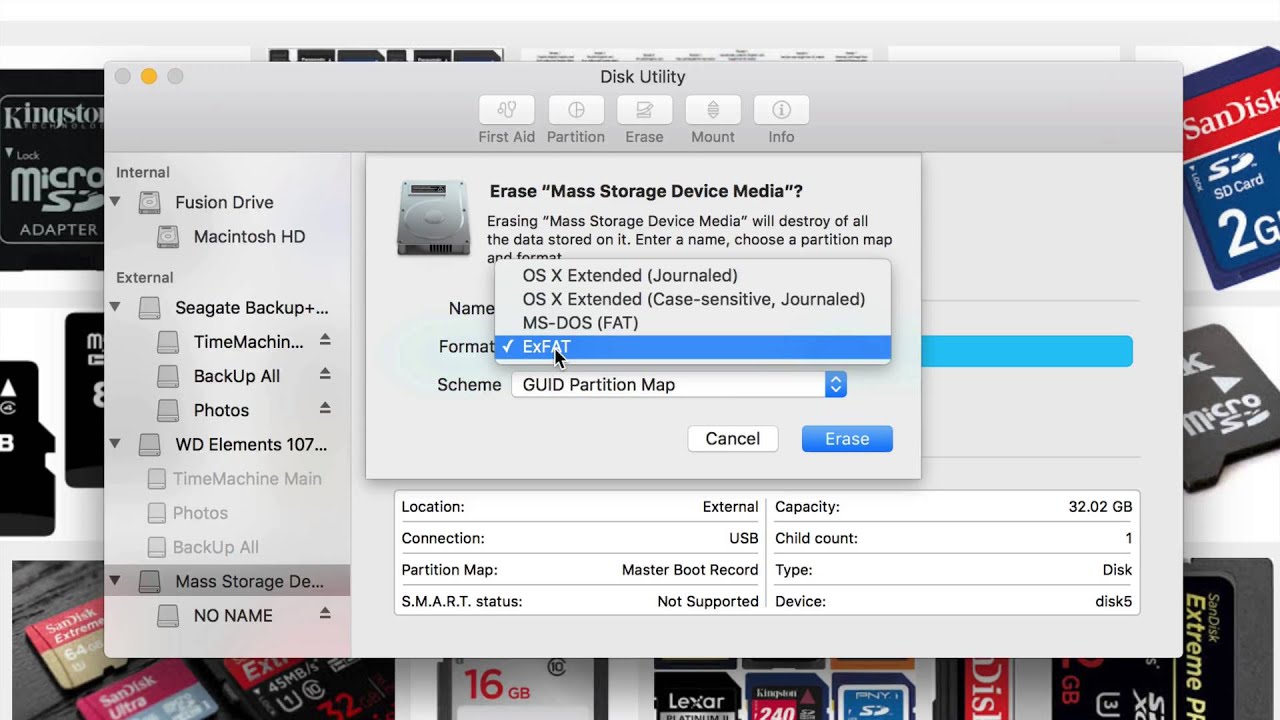
- You are required to name the drive. Let it be a memorable name.
- On the security options, move the slider to where it is least secure to allow you to recover any lost files. It is also the fastest way of performing the erase.
After that, click on the erase button on the bottom right. When erasing is complete, you can now make the recovery of your files.
Video Tutorial on How to Fix External Hard Drive Not Showing Up on Mac?
Part 3. Recover Lost Data from SD Card on Mac
In this case, formatting is one method of restoring your SD card functionality, but you probably can't view the files or have no backup, and thus data gets lost. Here Recoverit comes in.
Recoverit Data Recovery software is an efficient software in recovering files from your SD card on Mac.
- With precision, it lets you select the file format types you like.
- Preview files before you save a batch of data onto the desired location.
- When scanning for images, it offers a sneak preview of images, videos, and documents in a larger window.
- The files you recover are usually intact. Also, it can retrieve raw data.
- Recovered files come with their original names and paths.
Step 1. Find and select your SD card from the Mac drives displayed on the screen.

Step 2. Click on Start for the software to begin scanning files.

Step 3. The preview window helps you get a sneak peek of your data. You can choose your preferred files if you don't want to recover everything. Finally, press the Recover button on the bottom right of the interface.

You also have the option of doing a deep scan of the files at the bottom.
The process of troubleshooting an SD card can seem tedious, but it is enriching. Furthermore, the steps might seem much at first as this article goes out of its way to give extra details, but the information will always be useful in the longer run.
In case files are not visible on your SD card, don’t panic if you have no backups. It is a common characteristic of an SD card that can’t read data. Just follow the instructions, and an option to recover lost files will be available.
Lastly, if this article has been of any help to you, please don’t forget to share it widely with everyone.
Possible Reasons for SD Card not Showing Up on Mac
Like every other advanced piece of technology, the SD card is bound to be affected by inevitable glitches in one way or another.
In reality, many technical reasons are associated with your SD card not showing up on your Mac.
Damage to the SD card reader slot.
It can be very frustrating because the damage might be too small even to notice. So how would you know? You can try inserting your SD card into another machine and see if it responds.
The operating system errors.
If your OS prevents your SD card from being recognized, reinstall it and try restarting your Mac. It should generally solve the issue for you.
Viral infection of the SD card.
A virus can most likely affect your SD card if you share it with several people, especially Windows users with no virus protection. Viruses are dangerous.
An unsupported SD card format.
Your SD card should conform to SD 1.x, 2.x, and 3.x standards for it to work. To investigate this, check out your SD card’s manufacturer's website. There are also file systems that your macOS version might not support.
The Corruption of your SD card firmware.
If your SD card gets corrupted, how would you know? You can check if your SD card has the signs as follows.
- A black screen appears, displaying the error "SD card is not accessible. The file or directory is corrupted or unreadable".
- Most of the contents in your SD card are missing.
- An error message "Read/Write error on SD card" appears. You can't open any folders.
- Materials on your SD card are visible, but you can’t copy them.
- When you are trying to access your images or files, an error message "memory card error" pops up.
- The SD card has been recognized but is blank on your computer, even though you had data stored in it.
Bonus: Learn What SD Card for Mac Is and How It Works?
If you are still wondering how the SD card works, then you are in the right place. The SD card is a nifty little device that can pack a tone of storage capacities of more than 1 TB.
With an SD card adapter used together with a microSD card, it gives you the flexibility to access files it may have from any other source.
But what does SD stand for? It stands for Secure Digital, a standard that describes non-volatile memory. Mac computers come with the SD card slot, also known as Secure Digital or Secure Digital Extended Capacity (SDXC) card slot through which you can insert your SD card.
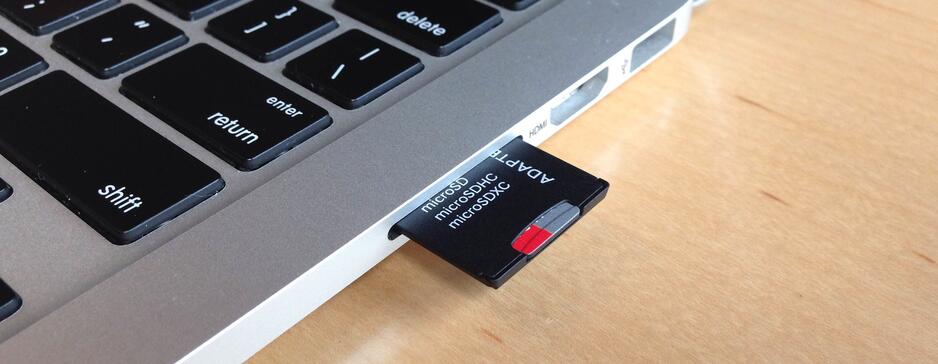
So, there are formats and standards discussed above. Also, the SD card slot has its measures such as:
- The SDXC standard supports 4GB to 2TB in capacity.
- MMC standard.
- The UHS-II standard supports up to 2TB that’s only available to iMac pro.
- The SDHC (Secure Digital High Capacity) standard supporting 4 to 32 GB.
- The average SD supports 4MB to 2GB.
You can use these cards with adapters that conform to the specified physical standard.
All these storage media use specified file systems to store data. File systems store data in a breakdown of various clusters, depending on the type of file system.
The most known file system is the FAT32 format. It is available up to 32GB in capacity. For media that exceeds this uses the exFAT file system. Cards of smaller sizes utilize the FAT16 file system.
People Also Ask
-
Why is my SD card not showing up on my Mac?
There can be several reasons why an SD card may not be showing up on a Mac. It could be due to a faulty or incompatible SD card, a loose connection, an outdated or incompatible card reader driver, a corrupted file system on the SD card, or an issue with the Mac's settings or software.
-
How to fix SD card not showing up on my Mac?
If your SD card is not showing up on your Mac, you can try:
Restart the Mac.
Change Finder preferences settings.
Mounting the SD card in Disk utility.
Perform a First Aid check.
Repair the SD card. Repair disk permissions.
Format the SD card.
SD Card Recovery
- Recover Card Data
- Repair Card Errors


 ChatGPT
 Perplexity
 Google AI Mode
 Grok
Grok


Eleanor Reed
staff Editor