When you plug in your USB drive or SD card, you might see an error message. It says CHKDSK is not available for RAW drives/USB/SD card. This error makes your device unreadable. Your files seem lost. Many users face this problem daily.
The CHKDSK is not available for RAW drives error occurs when a storage device becomes corrupted, causing its file system to shift from NTFS or FAT32 to RAW. Since Windows cannot properly read RAW drives, this results in the system displaying the error message.
Don't panic if you see the type of file system is raw CHKDSK not available error. This guide will help you fix CHKDSK is not available for RAW drives. Explore simple proved methods to fix RAW drive issues.
In this article
Part 1: Common Causes: CHKDSK is not available for RAW drive
CHKDSK is an inbuilt utility command in Windows that is used to fix a hard drive (or a partition). It can get rid of various kinds of logical errors and can even fix a corrupt file system. Though, the command will only work with file systems that are recognized by the computer like FAT32 or NTFS. If the external drive is in a format that Windows can't recognize, then it would be categorized as RAW and the command won't be able to process.
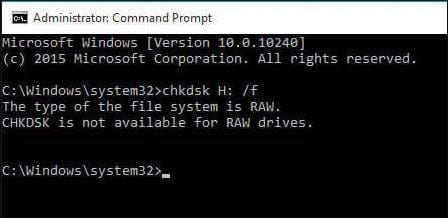
In this case, an error message like this stating "CHKDSK is not available for RAW drives" is displayed.
Understanding why RAW drive CHKDSK not available errors occur helps you prevent them. Here are the main reasons:
- Sudden power loss - Your computer shuts down unexpectedly while the drive is being actively used. This corrupts the file system badly.
- Improper ejection - Removing the USB or SD card without safely ejecting it first. This damages the file allocation table.
- Virus attacks - Malicious software can corrupt the file system structure and cause serious RAW errors throughout your drive.
- Bad sectors - Physical damage to a storage device can result in unreadable areas, rendering certain sectors incapable of storing data correctly.
- File system corruption - The master boot record or partition table gets damaged or completely overwritten by accident.
- Hardware failure - The storage device controller chip starts to fail physically. This makes data access impossible.
- Outdated drivers - Old or corrupted device drivers cannot communicate with modern storage devices properly.
- System crashes - Blue screen of death errors while accessing the drive can corrupt the entire file system structure.
Part 2: Simple Fixes to Resolve the CHKDSK is not available for a RAW drive Error.
If you’ve tried running CHKDSK on a RAW drive only to be met with an error message, you’re not alone. A RAW drive means the file system is unrecognized or corrupted, making standard disk repair tools like CHKDSK unusable.
But don’t worry—there are still ways to fix the issue and recover your data. In this guide, we’ll explore practical solutions to get your drive back in working order.
Fix 1: Use Properties to Check and Repair RAW Drive
This is the easiest solution to repair a RAW drive that the CHKDSK command can't fix. Since Windows has offered tons of solutions to repair a drive, we can take the assistance of its native methods. One of them is the Error-checking feature that can perform RAW disk repair and yield positive results in less time. Here's how to fix a RAW hard drive without format via its Properties.
1. Connect your external source to your Windows computer and once it is detected, go to My Computer.
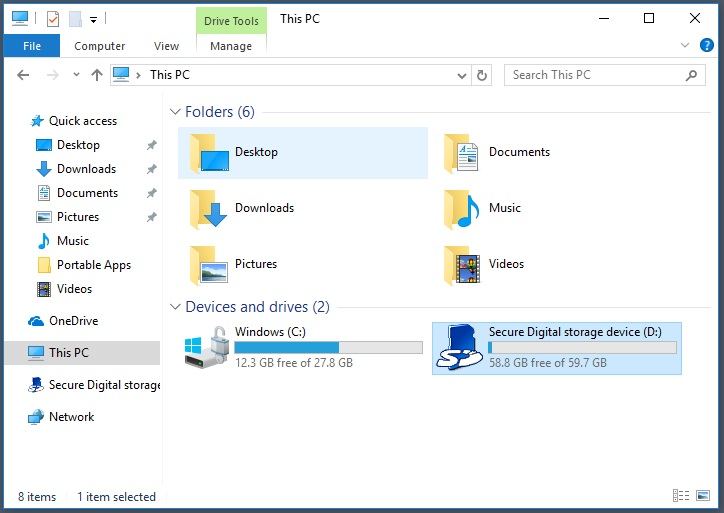
2. Now, select and right-click the drive you wish to check and enter its Properties.
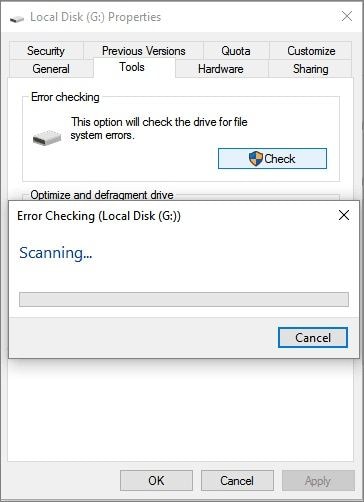
3. This will open a dedicated Properties window on the screen. From here, go to the "Tools" tab and click on the "Check" button under the Error Checking section.
4. Confirm your choice by entering the administrator credentials and wait as Windows would repair the RAW drive subsequently.
Fix 2: Reformat the RAW Drive to NTFS
As you know, most of these issues occur when a hard drive with an unsupported file system is connected to Windows. To fix this, you need to reformat the source to a compatible file system like NTFS. Though, you should know that this will get rid of all the stored content from the hard drive. The good thing is that it will make the drive compatible with Windows in the end. Here's how to fix the RAW hard drive to NTFS on Windows.
1. Connect your external hard disk to your computer and wait for it to be detected. Afterward, launch My Computer and select the drive of your choice.
2. Right-click its icon and select the "Format" option from the list.
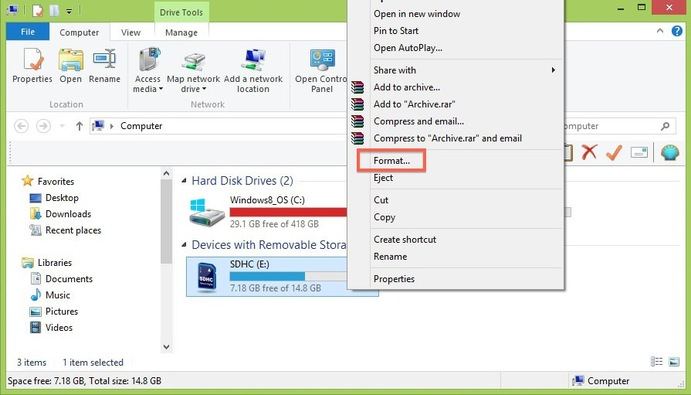
3. A pop-up window will open for formatting the drive. Click on the dropdown option under the File System. From here, select a compatible format like NTFS and click on the "Start" button to confirm your choice.
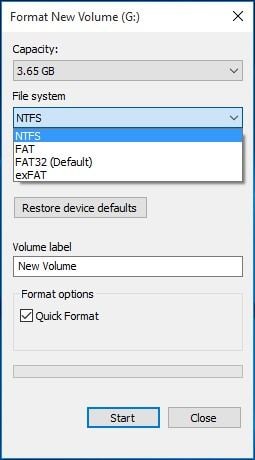
In this end, this will format the drive to NTFS format. Now, you can use it without any trouble with a Windows system.
Fix 3: Use CMD to Repair the RAW Drive
CMD (or Command Prompt) is the native command user interface in Windows that helps us perform numerous tasks. In case if you are not able to repair the RAW drive using the CHKDSK command, then don't worry – there is another option. The DISKPART (Disk Partition) utility command will let you clean the drive and format it to the file system of your choice. You can follow these steps to fix the RAW drive on Windows using the DISKPART command.
1. Connect the hard drive to your computer and from its Start menu, launch the Command Prompt window.
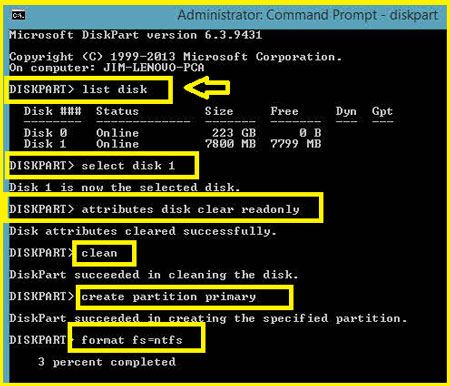
2. Now, just type and enter the "DISKPART" command to load the utility tool. Firstly, enter the "list disk" command to start with.
3. This will list the details of all the connected disks with their identifier. From here, simply note the name (like disk 1 or disk 2) of the RAW drive.
4. Now, you need to select the disk. To do this, just enter the "select" command followed by its identifier. For instance, to pick disk 2, enter "select disk 2".
5. Furthermore, enter the command "attributes disk clear readonly" to make sure that the disk won't stay write-protected.
6. Once it is processed, enter the "clean" command to wipe all the data stored in the disk. This would be followed by the "create partition primary" command to make a primary partition on the disk.
7. That's it! In the end, you simply need to format the disk to a particular file system. To do this, type the "format" command, followed by "fs" and the name of the file system. If you wish to format it to an NTFS system, then enter "format fs=ntfs".
Fix 4: Use Windows Error Checking Tool
Windows comes with a powerful built-in tool that can help with various drive errors. This useful tool scans your drive thoroughly for problems. It tries to fix minor corruption issues automatically without any user input. Many people don't know about this hidden feature.
The Error Checking tool works completely differently from the standard CHKDSK command. It can sometimes read problematic RAW drives when CHKDSK totally fails. This makes it definitely worth trying as your first solution attempt. The tool uses advanced algorithms to detect issues.
This method works best for minor corruption problems. It might not fix severely damaged drives. But it's completely safe to try. You won't lose any existing data by running this scan. The worst-case scenario is that it doesn't help at all.
Steps:
- Open File Explorer. Right-click on the RAW drive. Select "Properties". Click the "Tools" tab. Click "Check" under Error checking.
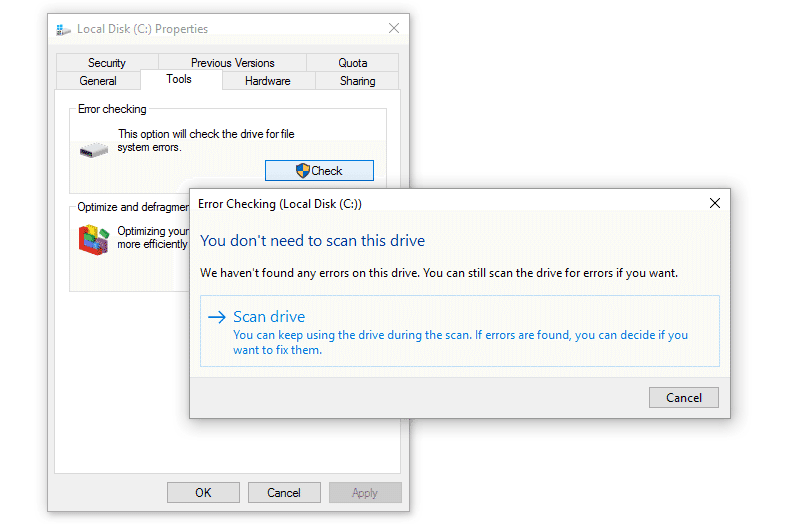
- Select "Scan drive". Wait for the scan to complete. Restart your computer
Fix 5: Assign a New Drive Letter
Sometimes the original drive letter gets completely lost or conflicts with another connected drive. Windows cannot properly access any drive without a unique letter assignment. Assigning a fresh new letter can magically solve this confusing issue instantly.
This particular method works great when the drive actually shows up in Disk Management tools. You can clearly see the drive listed but simply cannot access its contents. The check disk not available for RAW drives error might completely disappear after this simple fix.
Drive letter conflicts happen more often than you might think. Multiple USB devices can cause these conflicts. External hard drives often grab letters from other devices. This creates a messy situation that Windows cannot handle properly.
Steps:
- Press Windows + X keys. Select "Disk Management". Find your RAW drive in the list. Right-click on the drive. Choose "Change Drive Letter and Paths".
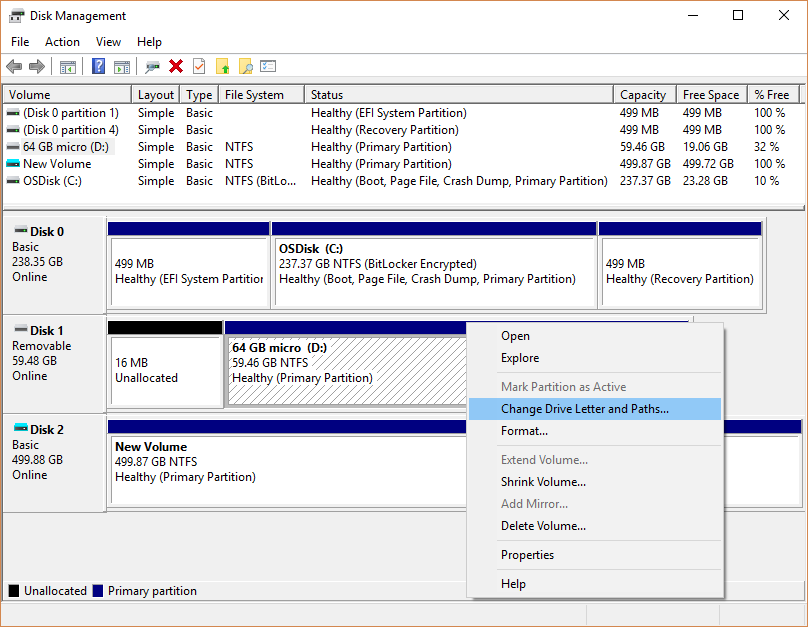
- Click "Add" or "Change". Select a new drive letter. Click "OK" to confirm
Fix 6: Update or Reinstall Drivers
Outdated or completely corrupt device drivers cause many different drive problems daily. Your computer simply cannot communicate properly with the storage device anymore. This communication breakdown leads directly to the RAW drive CHKDSK not available error message appearing.
Updating drivers to the latest versions often fixes mysterious recognition issues instantly. If simply updating doesn't work at all, try completely reinstalling them from scratch. Fresh new drivers can restore proper communication between your computer and storage device.
Driver problems are more common with older computers. Windows Update doesn't always install the best drivers. Manufacturers release updated drivers regularly. These updates fix compatibility issues and bugs that cause RAW drive errors.
Steps:
- Press Windows + X keys. Select "Device Manager". Expand the "Disk drives" section. Right-click on your problematic drive. Select "Update driver".
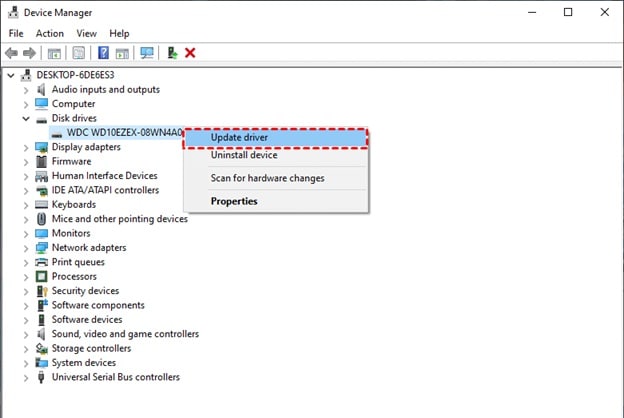
- Choose "Search automatically for drivers". If updating fails, select "Uninstall device". Restart your computer to reinstall drivers
Fix 7: Convert RAW to NTFS Using CMD
The powerful Command Prompt can convert stubborn RAW drives back to proper NTFS format. This advanced method uses the special CONVERT command instead of the broken CHKDSK tool. It often works successfully when all other simpler methods completely fail.
Be extremely careful with this particular method as it might cause permanent data loss. Always try professional data recovery software first if your files are truly important to you. This fix should definitely be your absolute last resort for valuable data.
The CONVERT command is very powerful but also dangerous. It rewrites the entire file system structure. Sometimes this process fails halfway through. This can make your data recovery much more difficult or even impossible.
Steps:
- Press the Windows + R keys. Type "cmd" and press Ctrl + Shift + Enter. Type: convert X: /fs:ntfs (replace X with your drive letter). Press Enter to execute the command.
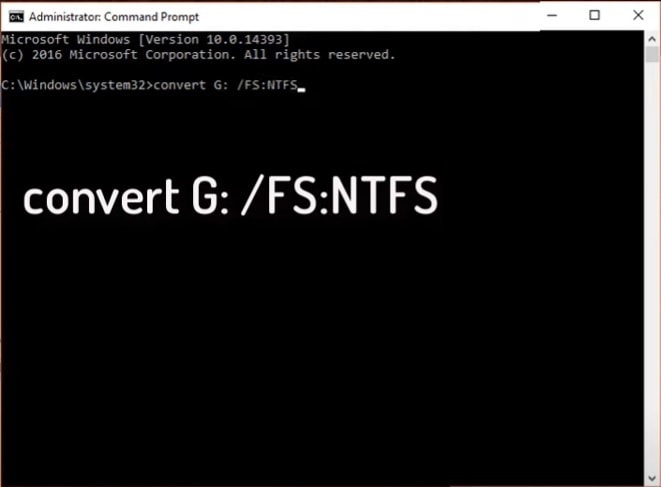
- Wait for the conversion to complete. Type "exit" to close Command Prompt. Check if your drive is accessible now
Fix 8: Format the RAW Drive Using Disk Management
Formatting completely erases the entire drive and creates a brand new file system from scratch. This nuclear method will definitely fix RAW drive issues permanently and reliably. However, absolutely all your precious data will be lost forever in this process.
Only use this drastic method if you already have complete backups stored safely elsewhere. Or if you truly don't need any of the data currently stored on the drive. Formatting is honestly the most reliable way to make any RAW drive perfectly usable again. The CHKDSK is not available for RAW drive error will be completely gone forever.
Formatting essentially starts over with a clean slate. It creates new file allocation tables. It sets up proper directory structures. This fixes any corruption that might exist. But it also destroys every single file in the process.
Steps:
- Press Windows + X keys. Select "Disk Management". Find your RAW drive. Right-click on the drive. Select "Format".
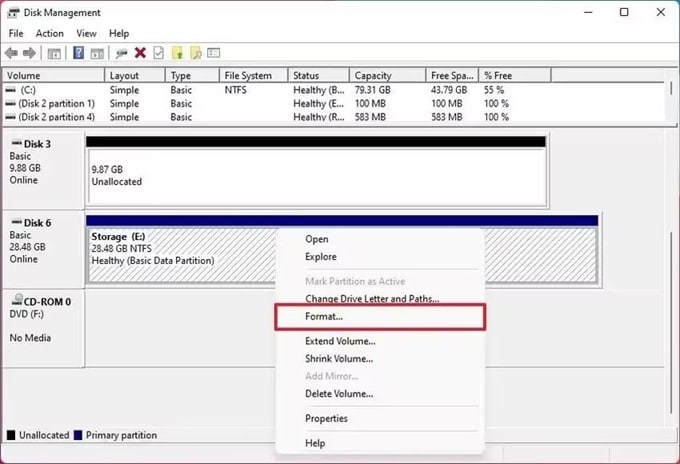
- Choose NTFS as the file system. Click "OK" to start formatting. Wait for the process to finish.
Video Tutorial on How to Fix CHKDSK Is Not Available for RAW Drives?
Part 3: Lost Data Due to Formatting RAW Drive?
Formatting your RAW drive definitely solves the "the type of file system is raw CHKDSK not available" error completely. But it also permanently deletes all your precious and irreplaceable files. Family photos from vacations disappear instantly. Important work documents vanish without a trace. Favorite music collections are gone forever. Don't panic yet - professional data recovery software can still help you.
Recoverit is an incredibly powerful and reliable data recovery tool that can restore your lost files effectively. It works amazingly well even after complete formatting or severe corruption damage. The advanced software scans extremely deep into your storage device systematically. It finds files that seem completely deleted and unrecoverable by normal means.
Steps to Recover Data:
- Download and install Recoverit software. Launch the program on your computer. Select your formatted RAW drive. Click "Start" to begin scanning.

- Wait for the deep scan to complete. Preview the found files.

- Select the files you want to recover. Click "Recover" and choose a safe location. Wait for the recovery process to finish.

Video Tutorial on How to Recover Data from RAW Partition in Windows 10?
Part 4: Tips to Fix the CHKDSK is not Available for RAW Drivers Issue
Prevention is better than cure when dealing with check disk is not available for RAW drives errors. These simple tips can save you from future headaches. Follow them to keep your drives healthy and accessible.
- Always safely eject devices - Use the "Safely Remove Hardware" option before unplugging any USB device or SD card
- Use only quality cables - Cheap or damaged USB cables can cause serious connection issues and file system corruption
- Avoid sudden computer shutdowns - Always shut down your computer properly through the Start menu instead of forcing it
- Create regular backups - Keep multiple copies of important files stored in different locations for safety
- Scan regularly for viruses - Use reliable antivirus software to prevent malicious infections that corrupt drives
- Update drivers regularly - Keep all your system drivers current and compatible with modern storage devices
- Don't ignore small errors - Fix minor problems immediately before they grow into major data disasters
- Use quality surge protectors - Protect all your valuable devices from dangerous power fluctuations and electrical storms
Conclusion
The CHKDSK is not available for RAW drives/USB/SD card error is frustrating but fixable. We've shown you five different methods to fix CHKDSK is not available for RAW drives. Start with the Error Checking tool and work your way down the list.
Remember that some methods might cause data loss. Always try data recovery first if your files are important. Recoverit can help you get back lost data even after formatting. Follow our prevention tips to avoid future RAW drive CHKDSK not available problems.
Try Wondershare Recoverit to Perform Data Recovery

FAQ
-
Q: Why does my USB drive show as RAW?
Your USB drive shows as RAW due to file system corruption. This happens from improper ejection, power failures, virus attacks, or physical damage. The Check disk not available for RAW drives error appears because Windows cannot read the corrupted file system. You need to repair or reformat the drive to make it accessible again. -
Q: Can I recover data from a RAW drive before fixing it?
Yes, you can recover data from a RAW drive using specialized software like Recoverit. The "the type of file system is raw CHKDSK not available" error doesn't mean your files are gone forever. Data recovery tools can scan RAW drives and extract your files safely before you format or repair the drive. -
Q: Is formatting the only way to fix a RAW drive?
No, formatting is not the only solution to fix RAW drive issues. You can try the Error Checking tool, assign new drive letters, update drivers, or use CMD commands first. These methods might restore your drive without data loss. Only format as a last resort when other methods fail to resolve the RAW drive CHKDSK not available error.


 ChatGPT
 Perplexity
 Google AI Mode
 Grok
Grok


