How to Eject SD Card Correctly on Windows PC
If you've purchased your SD card from the local camera store, the guy at the counter is most likely to have advised you to always eject the card before removing it from a PC. Believe it or not, but he was telling the truth. Safely ejecting the SD card from your PC is extremely useful and can increase the life-span of your card. It will also protect you from encountering unexpected SD card errors.
So, in this guide, we're going to show you the best approach to eject an SD card from a Windows PC so that you can boost its performance and protect it from getting damaged.
| Method |
Speed |
Best For... |
| File Explorer (Right-Click) |
Standard |
General users and beginners. |
| System Tray (Icon) |
Fast |
Quickly ejecting while working in other apps. |
| Settings App |
Slow |
Troubleshooting when Explorer freezes. |
| Command Line (Diskpart) |
Advanced |
IT professionals or automated scripts. |
Part 1. How to Eject SD Card from Windows PC Correctly
Fortunately ejecting an SD card isn't rocket science. All you have to do is follow a couple of easy steps and you'll be able to safely remove the card without causing any damage whatsoever.
Here's how to eject the SD card from your PC.
Step 1 - Press "Windows+E" to open File Explorer and click on "This PC".
Step 2 - Right-click the SD Card icon and choose "Eject". Alternatively, you can select the SD card icon and tap the "Eject" button by expanding the "Drive Tools" tab at the top of the screen.

Step 3 - Now, safely remove the SD card from its slot and place it in a secure location.
2026 Technical Update: High-Speed USB4.0 & Thunderbolt 5 Readers
If you are using a modern USB4.0 or Thunderbolt 5 SD card reader, your data transfer speeds can exceed 300MB/s. However, these high speeds often rely on Write Caching. Even if the progress bar in Windows 11 shows "100% Complete," the hardware may still be flushing the cache to the SD card for several seconds. Always wait for the "Safe to Remove Hardware" notification before pulling the card from a USB4.0 slot to ensure the file allocation table (FAT) is properly closed.
That's how you can safely eject an SD card from the Windows system. Irrespective of the Windows version you're running, you can follow these steps to eject the SD card from PC. After ejecting, make sure to place it in a dedicated SD card case so that it doesn't experience any physical damage.
Part 2. What to Do When SD Card Cannot Be Safely Removed/Ejected in Windows 7/8/10
If your system is triggering the "SD card cannot be safely removed" error and restricting you from ejecting the SD card, you'll have to follow a couple of troubleshooting methods. Here are the two methods that'll help you fix the issue and successfully eject the SD card.
Use Task Manager to End Apps/Files Running in the Background
The easiest way to fix the "SD Card Cannot Be Safely Removed" error is to kill the background programs through Windows Task Manager. Usually, these background processes interrupt various Windows functionalities and can restrict users from using their system properly.
Follow these instructions to stop background processes through Task Manager.
Step 1 - Right-click the taskbar and click on "Task Manager".

Step 2 - In the "Task Manager" window, select a particular background process.
Step 3 - Tap the "End Task" button to kill the process. Make sure to remove all the programs that are consuming too much power.

Step 4 - Now, try ejecting the SD card again and you won't be prompted with the error anymore.
Use CHKDSK to Test and Fix SD Card Problem
If you're still encountering the same error, there's a possibility that your SD card has damaged or contains bad memory sectors. In either case, you can fix the issue by running CHKDSK utility in the command prompt.
CHKDSK is a Windows built-in utility that's designed to help users automatically diagnose and fix different drive issues.
Here's how to use CHKDSK to fix SD card problems.
Step 1 - Open the Cortana Search box and type-in CMD. Right-click the command prompt icon and select "Run as Administrator".
Step 2 - Insert your SD card into the PC using an SD card reader.
Step 3 - Execute the following command to check the SD card for errors.
chkdsk [sd card letter]: /f

CHKDSK will automatically fix SD card issues and you won't face any problem while ejecting the SD card from the PC.
Learn more about fixing a corrupted sd card using CHKDSK
| Problem |
Likely Reason |
Immediate Action |
| "Drive is in use" |
File Explorer or App is open. |
Close all windows and check Task Manager. |
| No "Eject" option |
Card is recognized as a Fixed Disk. |
Use the Safely Remove Hardware icon in the tray. |
| Card stuck in slot |
Physical locking mechanism. |
Push the card in slightly to trigger the spring release. |
Part 3. Why Can't You Remove SD Card Without Ejecting
Now that you know how to eject an SD card safely from Windows PC, let's understand the importance of ejecting an external drive like an SD card. The truth is no one knows when a system is writing files onto the SD card.
Pro Tip: Understanding Windows Removal Policies
Windows has two disk policies: Quick Removal (disables write caching) and Better Performance (enables write caching). You can check this in Device Manager > Disk Drives > Properties > Policies. While "Quick Removal" is the default for most SD cards, it does not protect against data corruption if a background app (like an Antivirus scan or Cloud Sync) is actively reading the card. Safely ejecting remains the only 100% secure way to prevent "Ghost Files" or "RAW Drive" errors.
Even when you've completely transferred the files from your system to the SD card, there might be some files that are being written in the background. In this scenario, if you directly pull out the SD card, it can corrupt the files and turn them into unreadable data.
Directly yanking out the SD card can also result in data loss, especially if you do it while your PC is writing media files on the card. This is why it is always advised to eject the SD card before removing it from a computer.
Part 4. What if SD Card Gets Corrupted/Damaged While Ejecting?
In case your SD card has damaged completely, it can cause several problems. For instance, your camera/smartphone might not recognize the SD card, or worse; you might end up losing valuable data.
For any user whose SD card has been damaged, the priority is to recover the data and later on take effective measures to fix the card itself. One of the ways to retrieve data from a corrupted SD card is to use Wondershare RecoverIt. It is a data recovery tool that'll help you restore deleted files from an SD card or other external devices.
Video Tutorial on How to Recover Files from SD Card?
Follow these steps to restore deleted SD card files using Wondershare RecoverIt.
Step 1- Connect SD Card
Install Wondershare RecoverIt and launch it. Now, connect your SD card to the PC using an SD card adapter.
Step 2- Select SD Card as Location
Once the PC has successfully recognized the SD card, it'll appear in RecoverIt's window under the SD Card tab. Select the SD Card icon and click "Scan".
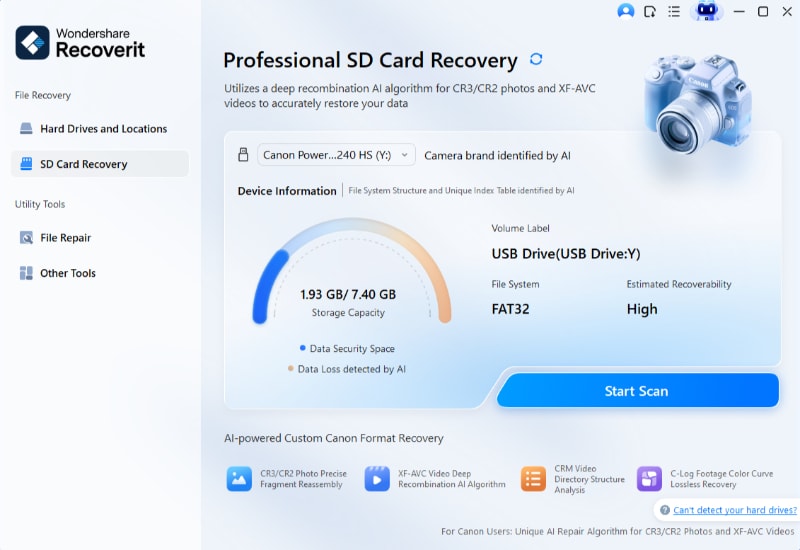
Step 3- Scan SD Card for Deleted Files
The tool will start scanning your SD card for deleted files. This process can take a while, depending on the SD card's size.
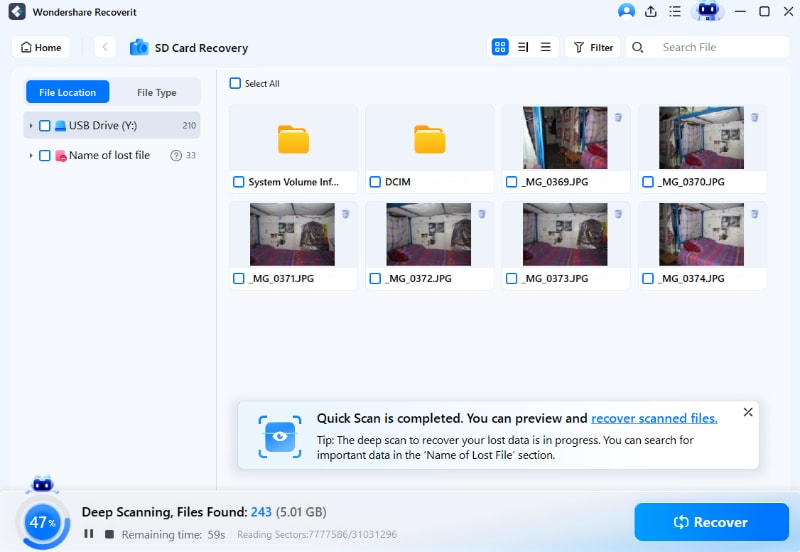
Pause the Scanning Process
Fortunately, you won't have to sit through the entire process as you can also stop it midway by tapping the "Pause" button, mainly if you've already found the file you're looking for.
Step 4- Preview and Save the File
Select the file that you want to restore and tap "Preview" in the right-side panel. If the preview is fine, click "Recover" to safely store the file on your computer.

Conclusion
We hope that the above guide helped you understand the importance of ejecting SD card and how to do it to keep your SD cards safe and secure. Safely ejecting the SD card will help you protect your valuable data and increase the SD card's life-span at the same time. However, if you have lost any data from an SD card, make sure to use Wondershare RecoverIt to instantly retrieve and secure it on your computer.
People Also Ask
-
How Do I Safely Remove My SD Card?
To safely remove your SD card, make sure to follow the dedicated steps to eject it from the PC. Always pull out the SD card after you've ejected it safely.
-
What Does It Mean to Eject SD Card?
When you eject the SD card, your system will stop writing data on it and you'll be able to safely remove it from the slot.
-
How do I Eject an SD Card from Galaxy S7?
Follow these steps to eject the SD card from your Samsung Galaxy S7.
Step 1 - Go to Device Care>Storage and select the SD card.
Step 2 - Click the menu button in the top-right corner and tap unmount.
Step 3 - Now, remove the SD card from its slot safely.
SD Card Recovery
- Recover Card Data
- Repair Card Errors


Eleanor Reed
staff Editor