File Recovery
- Recovers deleted or lost files effectively, safely and completely.
- Supports data recovery from 500+ data loss scenarios, including computer crash, partition loss, accidental human error, etc.
- Supports 1000+ file formats recovery with a high success rate and without any quality loss.

How to Fix a Slow Dell Laptop Computer

Jun 03, 2026 • Filed to: Windows Computer Solutions • Proven solutions
 TL;DR:
Fixing a slow Dell laptop requires identifying and resolving physical hardware degradation, thermal throttling, or software bottlenecks through built-in diagnostic tools, system configuration changes, and component upgrades.
● Run Dell's integrated PSA or ePSA diagnostic tool by pressing F8, Del, F12, or F10 during the boot manager sequence to accurately determine which physical hardware components are failing.
● Disable the Intel SpeedStep utility to prevent system instability caused by automated voltage management, and update your BIOS using flash memory to fix OS compatibility or component detection errors.
● Resolve constant freezing and slow startup times by upgrading insufficient RAM, cleaning dust-clogged fans to stop thermal throttling, or replacing a damaged HDD with a faster SSD while using Recoverit for any necessary data salvage.
Ask AI for a summary
 ChatGPT
 Perplexity
 Gemini
 Claude
 Grok
Grok
Performance problems on laptops are very common, however, these problems are usually very easy to solve. In this post I will explain in detail why laptops and desktops decrease their performance, so you can easily and accurately diagnose the cause of the problem and I will also show you how to solve each one step by step. In this way, you will not only improve the performance of your laptop, you will also significantly increase the life of your computer.
Part 1: The Ultimate Guide to Fixing a Slow Dell Laptop Computer
Have you ever wondered why computers decrease their performance over time? So, this post is for you, because despite being a very common problem, it is easily solvable.
"Q: I bought a Dell Laptop a year ago and it is getting slower, what's happening?
Many factors influence the proper functioning of your computer and it is highly recommended that you know them so that you can prevent such problems.
Part 2: What Are Dell Performance Issues?
Knowing if your computer has performance problems is very easy, here I will tell you about the most common symptoms and how they can be generated.
It is very slow and unresponsive
This problem is strongly related to damage or physical wear on HDD disks. Laptops are common work tools and therefore and they constantly have to be transported from one place to another. It is important to remember that HDDs are extremely fragile components and any sudden movement, shock, or voltage variation can permanently damage them.
It keeps freezing now and then
Freezing problems are very common in computers with insufficient RAM. This is because when you open a program and your RAM is saturated, the RAM has to free up space to store new information and must perform this process with more frequency, generating a bottleneck and slowing down the rest of the processes.
It's extremely slow to start up
Again, this may indicate that your hard drive is damaged. The reason why it takes too much time for an operating system to start is that it has not yet been able to finish the booting tasks, such as running programs, mainly due to low data reading speeds.
It runs hot quickly and overheats
If your computer heats up more than usual, your ventilation system is likely clogged with dust. The biggest source of heat in your computer is the processor, but you can keep calm, if your processor were damaged, you could not turn on your computer, also, it is very difficult for a processor to be damaged and when this happens, it is usually due to variations in voltage.
Other performance issues
Remember that desktop computers, like laptops, were designed to work properly and are subjected to rigorous quality controls before being marketed. Any malfunction or anomaly is a sign that something is not going well. It is important to identify the cause of the problem to solve it before this has an impact on the health of your components.
Part 3: How to Speed up a Slow Dell Laptop?
There are many options to increase the performance of the laptop computer, here I will talk about the most common and easiest ways to solve these problems.
Fix 1. Disconnect all external devices and restart
An external device may be the source of the problem, try disconnecting the flash memories from your computer and then restart the computer.
Fix 2. Running Disk Cleanup
"Disk Cleanup" tool will erase temporary files, the contents of the recycle bin, among other expendable files and this can greatly increase the performance of your computer.
Step 1: Open Cleanmgr.
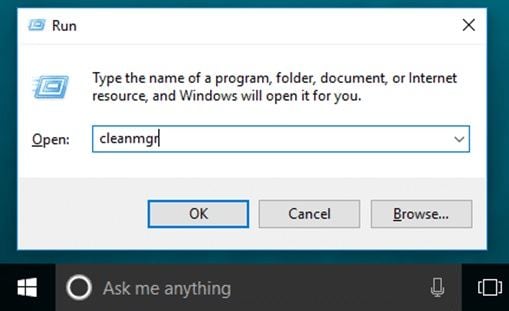
Press "Windows + R", write "cleanmgr", and then click on "OK".
Step 2: Choose a drive.
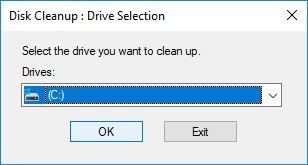
In the "Drive Selection" window you can choose a specific disk to free up its space.
Step 3: Configure the cleaning characteristics.
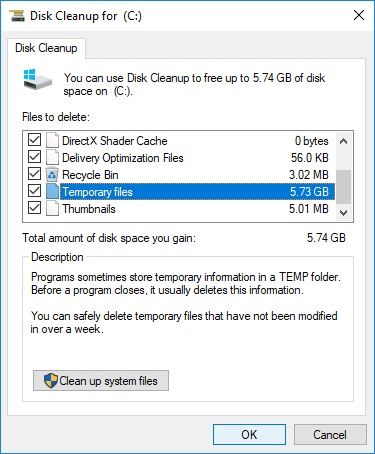
Here you can select the items you want to delete, among which is the recycle bin so you should be careful if you do not want to delete the items in it, once you have finished configuring the features, click on "OK".
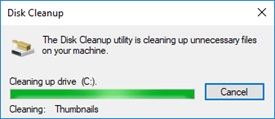
Step 4: Confirm the process.

A pop-up window will appear, this will request your confirmation to delete the files. Click on "Delete Files".
Once the previous steps have been completed, a window will notify you about the progress status.
Fix 3. Defragment your hard drive
The disk defragmentation process reorganizes the information stored in the device, organizing the information in an adjoining way to speed up the writing and reading process.
Step 1: Open the "Defragment and Optimize Drives" tool
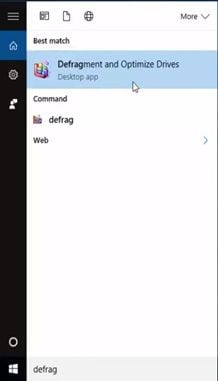
Go to the Win menu and type "Defragment" and click on the "Defragment and Optimize Drives" icon.
Step 2: Analyze the Drive
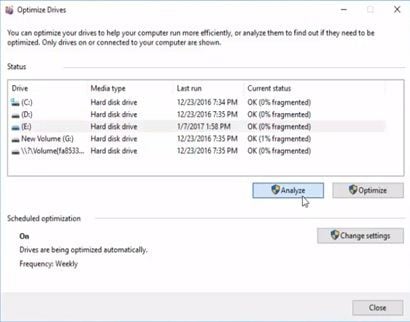
Select the drive and click on "Analyze", this process should take several minutes to recognize all the fragmented sectors
Step 3: Click on "Optimize"
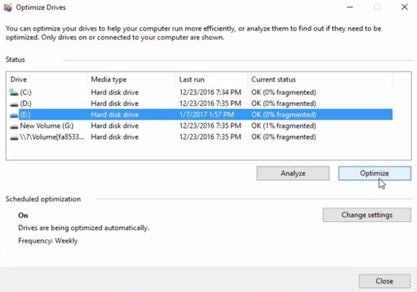
Once the analyzation process has finished, you will be able to click on "Optimize" and once it has finished, you can click on "Close"
Fix 4. Running PSA Diagnostics
Dell computers have the PSA tool in their BIOS. This tool allows a diagnosis of the hardware status and maintenance processes that allow solving problems of this nature.
Step 1: Run "Diagnostics" in Boot Manager
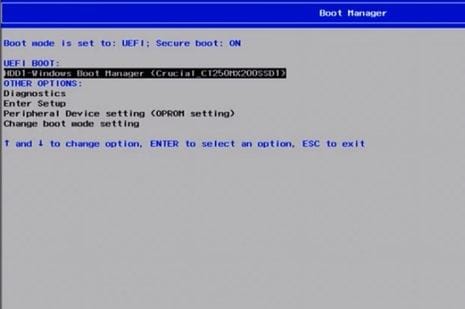
To access Boot manager, you must press the key that indicates your BIOS during boot, this varies between (F8, Del, F12, F10).
Step 2: Perform the diagnostic processes

Through the ePSA tool, you can easily check the health status of your Hardware and so you can determine precisely whether or not you should replace any component.
Fix 5. Running System Maintenance
Windows 10 has an automated maintenance tool, which you can run from "Security and Maintenance". Next, I will show you how to access this tool.
Step 1: Go to "Security and Maintenance"
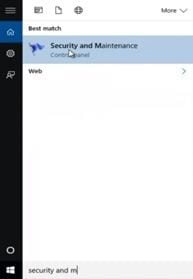
Go to the Windows menu by Pressing the Win key, type "Security and Maintenance" and then click on its shortcut.
Step 2: Click on "Start Maintenance"
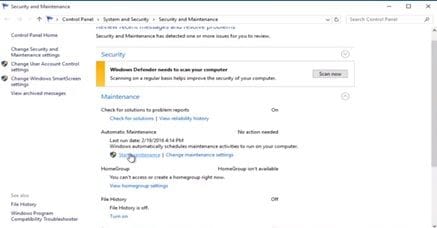
Once you have opened the "Security and Maintenance" tool, click on the "Maintenance" label, now you will be able to click on "Start Maintenance".
Fix 6. System Restore
It is possible that restoring system settinggs and features help improve your computer's performance and is an extremely easy process to perform. Next, I will show you how to do it.
Step 1: Go to "Recovery"
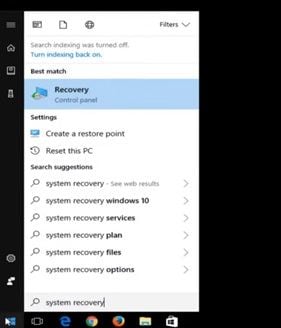
Go to the Windows menu and type "Recovery", then click on its shortcut
Step 2: Click on "System Restore"
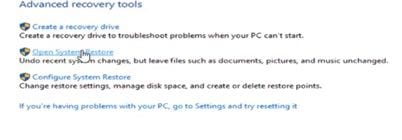
Once you have opened the "Recovery" tool you will see three options in the "Advanced Recovery tools" section, click on "Open System Restore".
Step 3: Select a restore point and click on "Next".
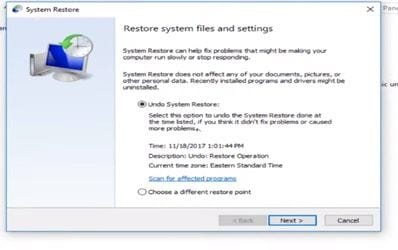
The "System Restore" tool allows you to choose a restore point, the number of options depends on the configuration of your operating system but, in general, you should have at least three options to choose from. Select the one that corresponds to a date before the appearance of performance problems.
More Related: How to Fix Dell Laptop Black Screen?
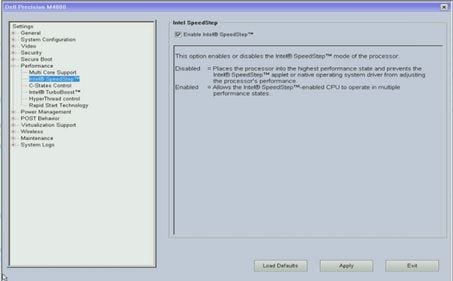
Fix 7. Disable Intel SpeedStep utility
Intel's SpeedStep function intervenes in the configuration and management of resources, frequencies, and voltages to improve the performance of your computer, however, this tool can cause instability in the system and cause performance problems, therefore it is advisable to disable it to avoid that kind of troubles.
Fix 8. Update outdated device drivers or BIOS settings
Update Drivers
The components of your computer need the help of software that helps your operating system to take advantage of the features of your components. If your drivers are outdated, your computer may become slow and have compatibility errors.
Next, I will show you how to easily update your drivers.
Step 1: Open the "Device Manager"
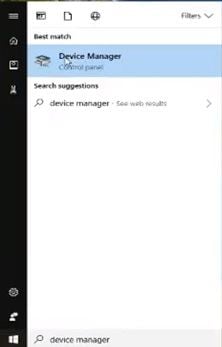
Go to the Windows menu and type "Device Manager", then click on its icon.
Step 2: Click on "Update Driver Software"
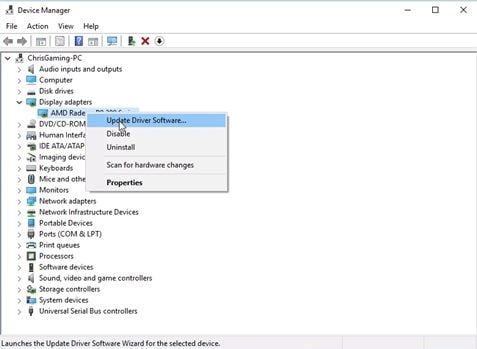
Select the device and right-click on it, this will open an option list, then click on "Update Driver Software".
Step 3: Click on "Search automatically for updated driver software"
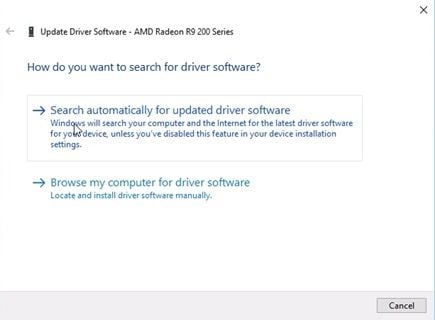
Remember that you must have a connection to the internet, this process will automatically search the most recent and compatible drivers for your hardware.
Step 4: Wait until the process finishes and click on "close"
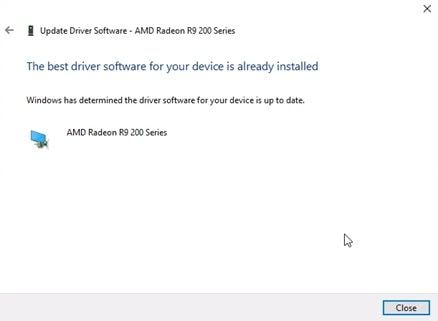
Once the process has finished the tool will display the result of the process, then click on "Close".
Update BIOS
The BIOS is a software installed on the Motherboard, whose purpose is to manage the configurations and features of the hardware connected to the Motherboard. When a BIOS is outdated it can cause performance problems, compatibility problems with the operating system, or even component detection problems.
Solving this problem is quite simple, for this you will need to find out the version of your BIOS, you can check the installed version by accessing the BIOS, the version is usually indicated at the bottom of the screen or by pressing Win + R and typing "dxdiag".
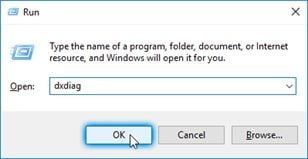
Once this is done, you will see a window with the hardware information installed on your computer.

Once you know the current version of your BIOS and you have checked if there are available updates, you should go to the official support page of your motherboard and download the latest version of your BIOS, this update must be stored in flash memory and access it through the update tool of your BIOS. The method to access this function varies depending on the model of your Motherboard and the version of your BIOS but all BIOS have this tool included.
Fix 9. Prevent overheating by with a fan system cleaning
High temperatures are a very common problem in all types of computers, and this is due to three reasons.
- Performance reduction: All the components of your computer require an energy supply and this energy generates heat. Computers are designed to reduce their performance when they are working at high temperatures to reduce energy consumption and thus regulate the temperature of their components to protect them from possible damage caused by heat.
- Insufficient ventilation: All computers have a dissipation system, usually composed of radiators and copper pipes connected to a fan. These dissipation systems are very efficient, but it is a fact that, by manipulating the airflow of their surroundings, the fans will accumulate dust and with time, this dust will be able to drastically reduce the airflow, generating thermal throttling.
- Thermal paste in poor condition: The thermal paste is responsible for creating a link between the processor and the radiator so that the ventilation system works properly. The thermal paste hardens over time and this causes it to lose its heat conductive properties and when this happens, thermal throttling problems appear.
For all these reasons it is highly recommended to keep your computer fans clean and clear, and in addition to having an extra thermal paste in case, it is necessary to replace it.
Fix 10. Update software programs
Programs and applications usually have automatic updates whose purpose is to improve performance and compatibility; however, you can search for and install more recent versions of your programs.
Fix 11. Upgrade the RAM
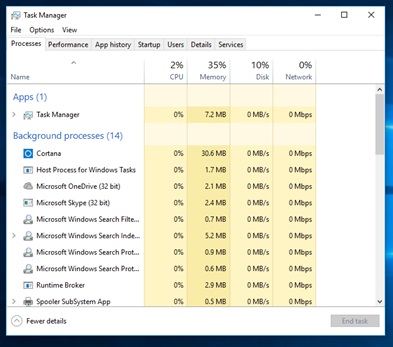
If your computer reduces its performance when opening applications or browser windows, it is possible that the cause of the problem is because your RAM is insufficient. You can check it by pressing Control + Alt + Del, this will open the "Task Manager" tool, with which you can monitor the consumption of application resources; the higher the percentage of consumption, the computer will have a lower performance.
More Related: How to Fix a Slow HP Laptop?
Fix 12. Replace an HDD with an SDD
If none of the above methods solved the problem, the problem is likely in the health status of your HDD. HDDs are fragile components because they internally use a disk and magnetic head that can be damaged relatively easily by shock, constant movement, or voltage variations.
To solve this problem, you will have to replace the damaged disk with a new one. It is highly recommended to use an SSD instead of an HDD since, although they tend to have a lower storage capacity, these are much more reliable and faster. Replacing your HDD means that you will lose all the information you have stored in it, however, there is a way to recover all that information even if the HDD is damaged.
If you are looking for a reliable way to recover your information, Recoverit Data Recovery is a professional data recovery tool that can recover and repair damaged disk files with great ease.
I will show you how to use Recoverit.
Step 1: Select a Drive
Launch Recoverit and look into "Hard Disk Drives". Your drive will be there. Select and click on "Start".

Step 2: Scan Your Drive
Recoverit will initiate a scan on the drive. You'll have great features you can use to streamline the scan and recovery process. For instance, you can simply tick the file types you want to recover instead of each one.

Step 3: Preview and Recover Drive Data
The conclusion of the scan will reveal a long list of the files the software found. Recovering them is just a matter of you selecting all the files or specific ones and clicking "Recover". The files will all be retrieved and saved on any location of your choice.

Conclusion
As you have noticed, it is not difficult to solve the performance problems in a computer, many times, the performance problems are usually related to the overheating of its components, mainly in laptops, since its fans and air intakes are smaller and easier to clogging; however, the second most common cause, is a bad hard drive and although replacing them with an SSD is usually a definitive solution, it is a headache to lose your information, fortunately, Recoverit allows you to recover and even repair the files of a hard drive, even if it is damaged.
Partition Recovery
- Partition Management
- Partition hard drive
- Partition manager
- USB flash drive to NTFS
- remove GPT partition
- Partition SD card on Android
- Recover GPT partitions
- Delete partition in Windows
- Solve Partition Problems
- Partition Tips


David Darlington
staff Editor