How to Fix a Slow External Hard Drive in Windows 10/11
There are many reasons why an external hard drive works slowly. Regardless of the reason for the problem, it is understandable that the user wants to solve it as soon as possible. It is worth mentioning that stored information may be at risk if there is a malfunction in any external hard drive, fortunately, this problem has a solution. In this post, I will teach you to step by step to improve the performance of your computer, keep your information safe and if your external disk is damaged, I will teach you how to recover your information easily.
Try Wondershare Recoverit to Perform Hard Drive Data Recovery
 Security Verified. Over 7,302,189 people have downloaded it.
Part 1: Is it possible to fix a slow external hard drive through Windows 10/11?
External hard drives are very comfortable devices for storing information, its practicality and easy transportation makes it the easiest way to carry large amounts of information with you.
Q: Is it possible to fix a slow external hard drive through Windows 10/11?
Yes, Windows 10/11 has several tools that will help you optimize the performance of your disks; however, it is important to know how external hard drives work to avoid future problems.
There are two types of external drives, SSD and HDD. HDD disks read and write information through a magnetic head on a disc that spins at high speeds. This technology allows storing large amounts of information but it is important to keep in mind that HDDs are very fragile due to their complex composition.
An external HDD is highly vulnerable to physical damage because they are designed to be transported from one place to another constantly, therefore, when using an external HDD, be sure to transport it in the safest and the most stable possible conditions.
SSD discs store and read the information like flash memory, which makes them much ber and even lighter, but these are more expensive than the HDD version.
Part 2: What Makes an External Hard Drive Slow?
The fact that an external hard drive disk works slowly may be due to several factors. Next, I will list the most common:
- It's been a long time since you run disk defragmentation: With time your external hard drive may be filled with information and this may cause its operation to be affected. Defragmenting your disk can help a lot since by this procedure you can reorder your files to save space and thus allow your external hard drive to work more freely.
- Logic errors, bad sectors: Your external hard drive, may have a logical error based on a defective sector, this happens due to several reasons, it can be due to the wear of the device after a long time of use, malware, or some reading or writing problem generated by physical damage to the disk or the head. Most of these problems can be easily fixed with Windows tools.
- Several applications are working with the disk in an active mode: When several applications are executed from your external hard drive disk, it may work slowly, as the reading and writing processes are multiplied. It is important to remember that Hard Drive Disks have a limited read and write speed, which will be easily exceeded by the processing speed of your CPU, thus generating a bottleneck that will greatly reduce the performance of your computer.
- Torrents and P2P software: Remember that when you download a Torrent file, it will be stored on your hard drive and will serve as a host for other users to download the contents of the file. It is important to keep the boot of your operating system clean, only the necessary programs and services should be run during the boot of your operating system to avoid performance problems.
- Insufficient power, USB ports: External hard drives require electrical power to work. Occasionally, the power and data transfer cables are damaged which may prevent the electrical current or information from transferring correctly. This problem puts the integrity of stored information at risk and may even damage your external drive due to voltage variations.
- Damaged disk: Because external hard drives are somewhat fragile, an abrupt movement, or a blow that can be considered not serious, it may be enough for it to be damaged and no longer have the same operation as before. An electric shock and even a virus can also prevent your device from performing processes and tasks effectively. This situation is the most serious of all and it is almost certain that you need to acquire a new external hard drive.
Part 3: How to Fix a Slow External Hard Drive in Windows 10/11?
Windows 10/11 operating system is capable to help you to fix some of the external hard drive problems; checking your device for some damaged components should help you too. Here I will show you some options that may help you to make your external hard drive work properly again:
Fix 1: Defrag Your Disk Drive
Step 1: Run the "Defragment and Optimize Drives" Windows 10/11 tool.
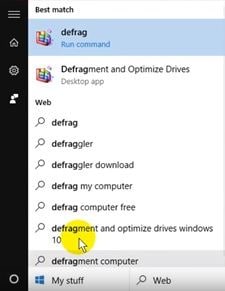
Open Start Menu and write "defrag", scroll up and then click on "Defragment and Optimize Drives" to open it.
Step 2: Start to defragment your external hard drive.
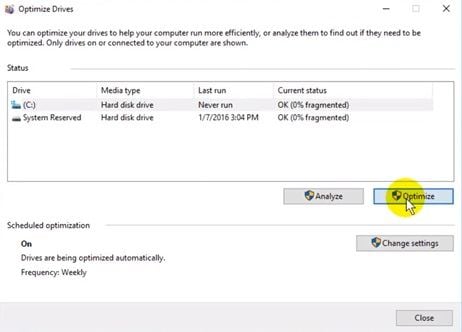
Once you have opened the application, search for the external hard drive you want defragmentation, click on it to select it, and click on "Optimize". Windows will start the defragmentation automatically.
Step 3: Choose an optional optimization schedule.
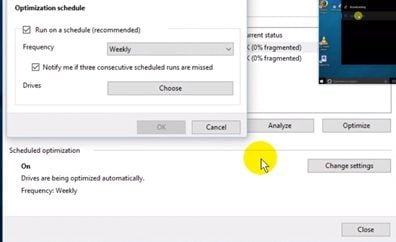
It is recommendable to defragment your disk frequently to optimize its space and keep safe your data. To do it, just click on "Change settings" in the "Optimize drives" tool, and choose for a frequency, then click on "OK". Now Windows will automatically make defragmentation in the selected frequency.
Fix 2: Run a Check Disk Scan
Step 1: Run the "Command Prompt" tool.
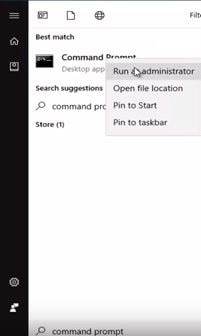
Open Windows Start Menu and write "Command Prompt", scroll up and right-click on the tool, then click on "Run as administrator" in the pop-up list. If the User Account Control's window emerges, click on "Yes".
Step 2: Write the command to start the Check Disk Scan.
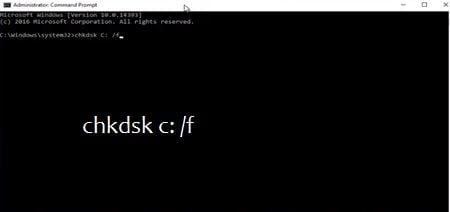
Make sure you have closed all the applications. Once you have opened the "Command Prompt" tool, write the letter of your external hard drive unit with a colon after it then hit the space bar and write "/f". After that, hit Enter.
Step 3: Wait for results.
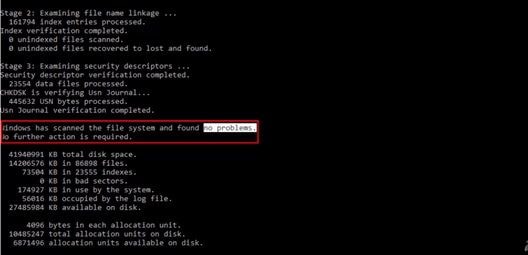
Whether the process found problems or not, it will notify you. If there's a corrupted file or something wrong, this tool will help you to fix it.
Fix 3: Check Disk Drive for Physical Damage
Make sure your disk drive is in good condition. Check it entirely and search for a warp, a loose screw, or a bent pin. If there's nothing evident, search for a professional to check it inside. In some cases, the disk could be repaired if the damage is superficial, however, if your disk suffered serious damage, likely, you will only use it to recover your information and replace it with a new drive.
The information retrieval process may seem like a complicated task, however, some tools make this process extremely easy.
Next, I will show you how to recover and repair the information of any drive using Recoverit Data Recovery. Once you have downloaded it, run thee installer and open it.
Step 1: Select the Drive

Launch Recoverit. Your drive will be there. Select and click "Start".
Step 2: Scan your Drive

Recoverit will initiate a scan on the drive. You'll have great features you can use to streamline the scan and recovery process. For instance, you can simply tick the file types you want to recover instead of everything.
Step 3: Preview and Recover Drive Data

The conclusion of the scan will reveal a long list of the files the software found. Recovering them is just a matter of you selecting all the files or specific ones and clicking "Recover". The files will all be retrieved and saved on any location of your choice.
Fix 4: Check the Cables for Wear and Tear
Cables are easy to wear and tear, if you constantly connect and disconnect your hard drive, or you just move it on some occasions, they can start to trigger connection problems. If one of the cables is not in good condition, change it for a new one and this should be enough to make your hard drive work again properly.
Fix 5: Too Much Disk Activity
Sometimes you don't realize about applications that are running on your computer. Remember that there are programs that run automatically at the moment that Windows 10/11 starts and they are not necessary for you or your system. You can close them through the Task Manager tool.
Step 1: Open Task Manager.

Right-click on the taskbar and select "Task Manager" to open it. Alternatively, you can press "CTRL + SHIFT + ESC".
Step 2: Search for applications you don't need to run.
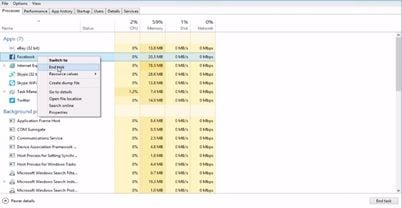
Right, click on the app you want to close and click on "End task".
Fix 6: Check for Viruses and Malware
There are many applications to check for viruses and malware, Windows has a native tool (Windows Defender) which can help you to make an effective scan.
If you do not have an antivirus installed, you can use Windows Defender.
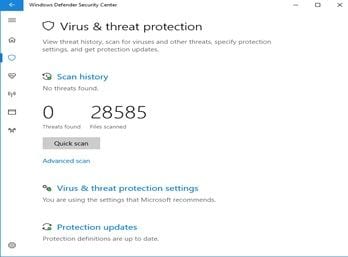
Fix 7: Disable Windows 10/11 Indexing
Disable indexing can greatly help improve the performance of your computer, facilitating the processes of reading and writing the files stored on the disk.
Step 1: Go to "This PC"
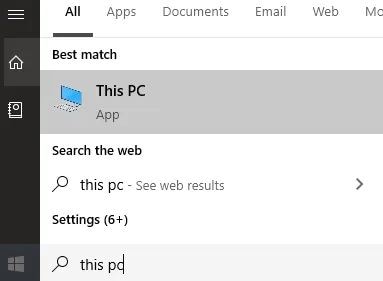
You can find this option by pressing the Windows key and typing "This PC".
Step 2: Open the "Properties" of your drive
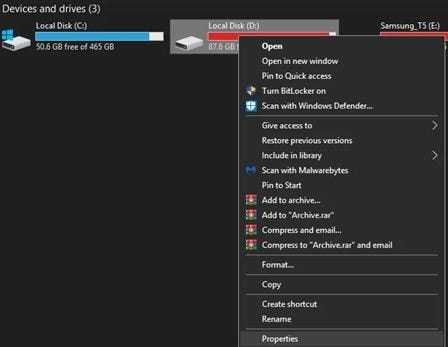
Right, click on the drive you want to disable its index feature and click on "Properties".
Step 3: Disable the Index option by unchecking the box
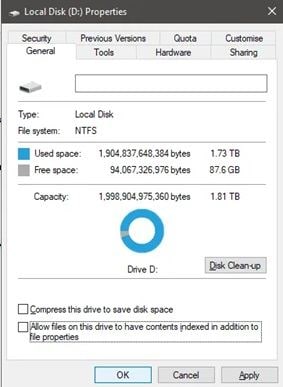
Go to the bottom of the window and find the Index option, once you have found it, uncheck its box and click on "Apply".
More Related:
How to Fix a Slow HP Laptop?
How to Fix a Slow Dell Laptop?
Conclusion
Sometimes, external disks can reduce the performance of your computer and in most cases, it is an easy problem to solve. External disks are very useful, practical and allow you to comfortably transport large amounts of information, but it is important to keep in mind that, if your external disk uses a magnetic mechanism, it needs to be transported very carefully since any blow, sudden movement or even voltage variations can irreversibly damage it and compromise the integrity of the information stored in it. Fortunately, information can be easily recovered and even repaired with tools such as Recoverit.
Partition Recovery
- Partition Management
- Solve Partition Problems
- Partition Tips


 ChatGPT
 Perplexity
 Google AI Mode
 Grok
Grok


David Darlington
staff Editor