

 TL;DR:
You can create a Windows 7 System Repair Disc to resolve boot failures without reinstalling the OS by utilizing the native "Backup and Restore" feature or a bootable USB drive.
● The built-in CD/DVD method requires an optical drive and is initiated through the Control Panel by selecting "Backup Your Computer" followed by "Create a system repair disc."
● The portable USB method requires downloading a 32-bit or 64-bit Windows 7 ISO file, processing it through the Windows 7 USB Download Tool, and transferring it to a flash drive with a minimum capacity of 4 GB.
● If you accidentally delete files from your existing repair media, Wondershare Recoverit can scan the targeted external drive to locate and restore the missing data.
Ask AI for a summary
 ChatGPT
 Perplexity
 Gemini
 Claude
 Grok
Grok
System crashes can disrupt users' workflows when they’re working on their computers. In this situation, a Windows 7 System Repair Disc is essential for fixing boot issues. This disc provides essential recovery tools to help users restore their systems without reinstalling Windows.
This article will examine the most effective techniques for making a rescue disc and will walk you through the full procedure step by step. Additionally, we will discuss how to recover a lost system repair disc using a powerful tool designed to help you retrieve lost or deleted recovery files with ease.
Try Wondershare Recoverit to Perform Data Recovery
 Security Verified. Over 7,302,189 people have downloaded it.
In this article

Part 1. What is The Purpose and Benefit of Creating a Windows 7 System Repair Disc?
You must first understand the purpose of a Windows 7 reboot disc before diving into the methods available for creating it. The following section explains why having this disc is essential and how it can help users in critical situations:
- Fix Boot Issues: Repair Disc helps resolve startup problems caused by corrupted system files, failed updates, or malware infections. By using its built-in recovery tools, users can fix boot-related errors and recover access to their systems efficiently.
- Diverse Recovery Tools: This disc offers access to crucial recovery choices like Startup Repair, System Repair, and additional options. These tools enable users to diagnose system problems, reinstate prior settings, and fix corrupted files without requiring extensive technical knowledge.
- Repairing the System Without Reinstalling: With a disc, users can fix their system without having to reinstall Windows. This guarantees minimal data loss and eliminates the inconvenience of reinstalling applications, making system recovery quicker and easier.
- Recover From System Failures: Rescue disks act as a dependable emergency solution when the system does not boot up due to crashes or hardware issues. It enables users to diagnose problems, restore system backups, and recover essential data to prevent complete system loss.
Part 2. Defining Ways To Create a Windows 7 System Repair Disc
Now that you understand the role of repair discs in fixing system issues let's explore two methods to learn how to create a Windows 7 system repair disc:
1. Using "Backup and Restore" Method
One of the simplest ways to create a system repair disc is by using the built-in Backup and Restore utility. This integrated tool eliminates the need for third-party software that makes the process easy. It creates a bootable disc containing essential recovery tools to help resolve boot issues and restore your system in emergency situations. Follow these steps to create your Windows 7 system repair disc using the Backup and Restore method:
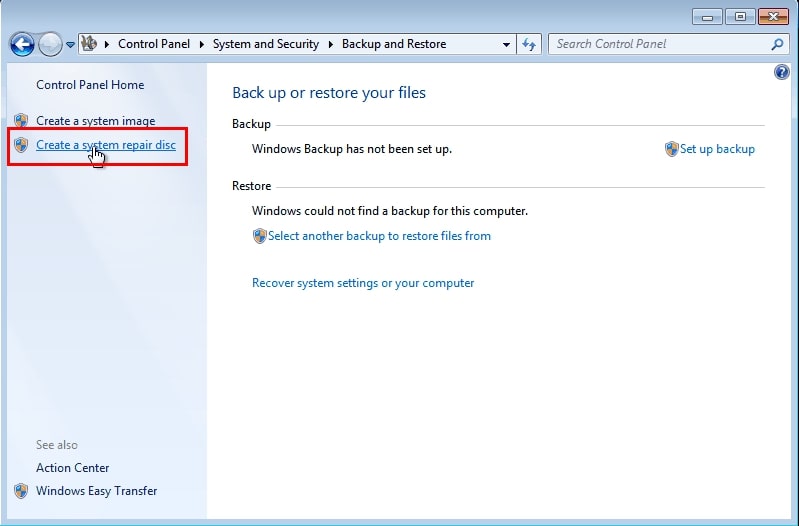
Step 1. To begin with, insert the CD/DVD into the computer’s drive and ensure its detection by the computer. After that, open the “Control Panel" and navigate to the “Backup Your Computer” option. Then, hit the “Create a system repair disc” option from the left panel.
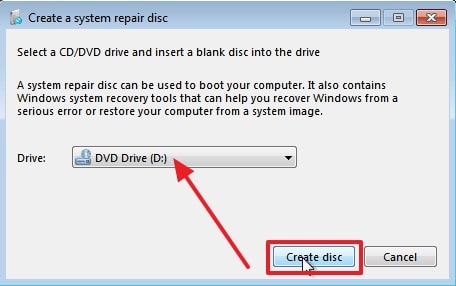
Step 2. Now, select CD/DVD within the “Drive” section, click the “Create Disc” button, and wait for the process to be completed.
2. Trying the ISO For Creating Windows 7 Recovery Disc USB
An alternative way to create a Windows 7 rescue disk is utilizing an ISO file to create a bootable USB drive. This method is ideal when users lack a CD/DVD drive or prefer a more portable recovery option. By converting a USB drive into bootable media with a trusted tool, you can access a complete range of recovery utilities.
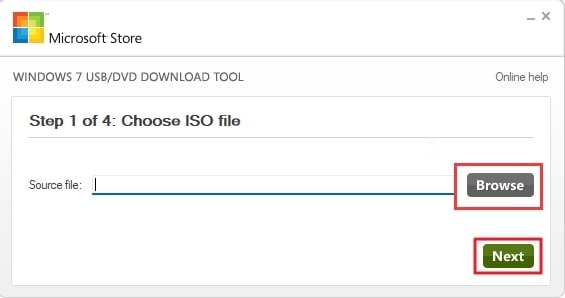
Step 1. Start the task by downloading Windows 7 ISO 32-bit or 64-bit from Windowstan.com. Next, download the Windows 7 USB Download Tool and open it. Then, click “Browse” to select the ISO file you downloaded earlier and tap “Next.”
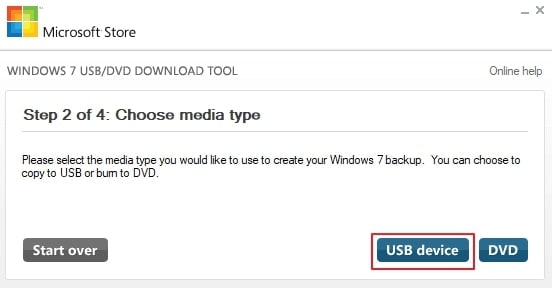
Step 2. Moving on, insert a USB flash drive with a minimum capacity of 4 GB into your computer. In the Windows 7 USB Download Tool, click “USB device” to select your inserted device as the target for the bootable media.
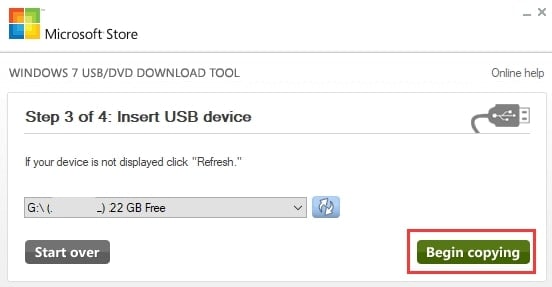
Step 3. Once you've selected the drive, hit the "Begin copying" button to start the transfer of ISO contents to the USB. Wait for a while for the copying process to stop, and when it’s complete, safely eject your USB drive.
Part 3. Recover Lost System Repair Disc To Perfection With the Best Tool
Losing your repair disc or accidentally deleting its files can be a stressful setback, especially when you need it most. As an advanced solution to this issue, Wondershare Recoverit can retrieve lost or deleted files. This software features a data recovery tool, which allows users to retrieve data from 2000+ storage devices, including discs and external devices. Moreover, it has a success recovery rate of 99.5% which sets it apart from its competitors.
Apart from that, its data recovery process takes around 5 minutes, which makes it an ideal tool for quick data retrieval. This Windows 7 professional repair disc tool also ensures that the process is completely safe and secure with full encryption. Additionally, Recoverit offers a user-friendly interface that is easy to navigate, even for users with limited technical expertise.
Key Features
- Quick File Locating: There are various filtering options available in this software, allowing users to quickly find the desired files by filtering the file type, status, and more.
- Corrupt Photo & File Repair: Recoverit’s advanced scanning algorithm can automatically identify and repair corrupted images and documents.
- Video Repair: Users can repair corrupted or damaged videos from widely used devices and even smartphones using Recoverit.
- BitLocker Data Recovery: With the help of Recoverit, users get the ability to retrieve removed data from BitLocker-encrypted devices.
Guide to Recover Lost System Repair Disc With Recoverit
Upon exploring the powerful data recovery features of Recoverit, it is time to learn how to utilize it for repairing lost or deleted Windows 7 reboot discs. The given guide will help you navigate the data recovery process effectively:
Step 1. Connect the External Device
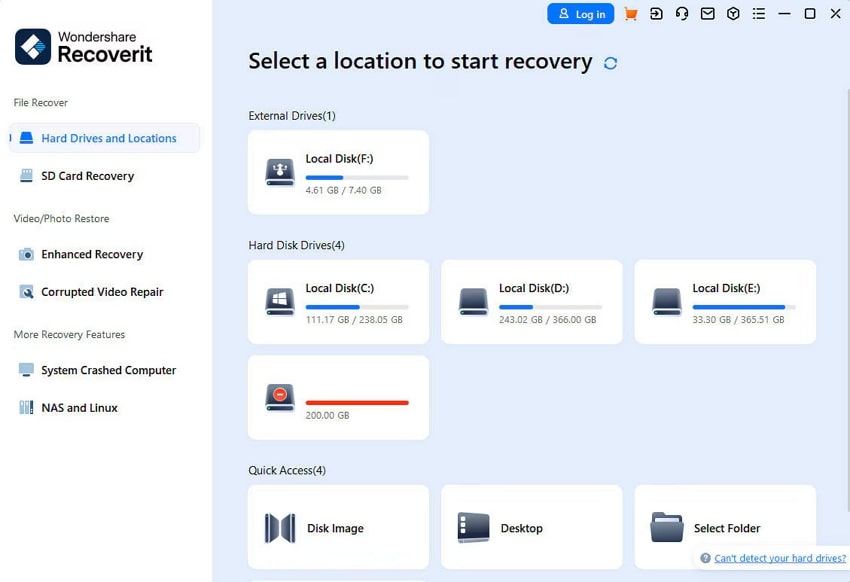
Before launching Recoverit on your PC, connect your external device to your computer. After doing so, go to the “Hard Drives and Locations” section and select the device as the target location. Then, hit the “Start” button to proceed to the next window.
Step 2. Scan the External Device
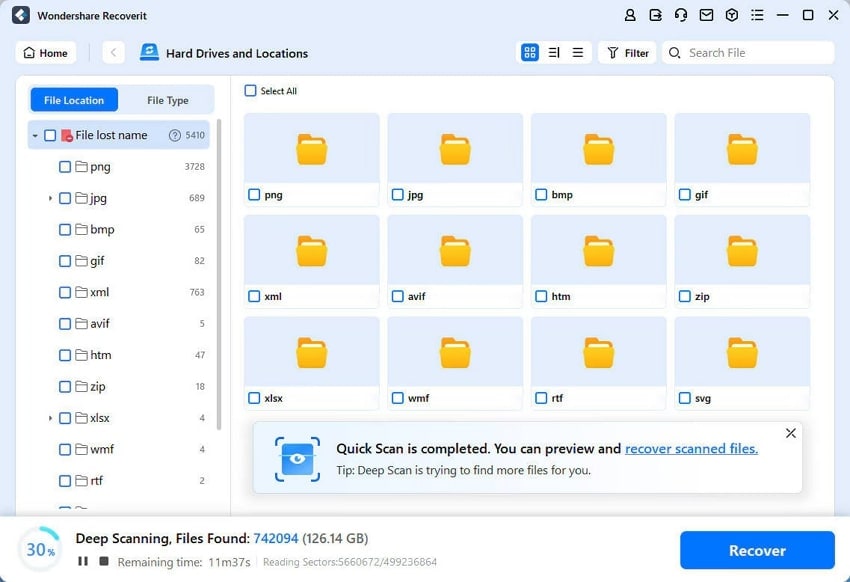
The software will begin the scanning of all the files on the device, letting you find and select your desired targeted files.
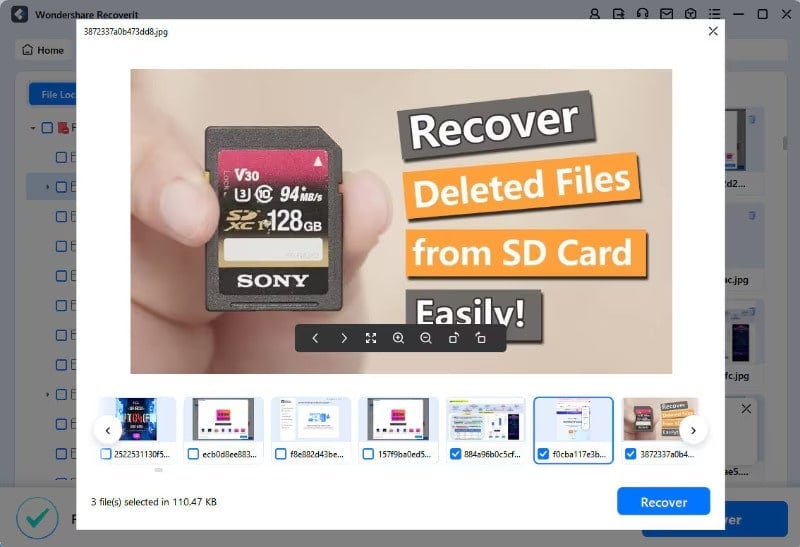
Step 3. Preview and Recover Files
When the scanning is complete, you will be able to preview the recovered files. To get the files back on your device, hit “Recover” and save them in another safe location.
Conclusion
To conclude, facing system crashes and unexpected errors can be frustrating for users while working on their PC. To help fix such issues, creating a Windows 7 rescue disk is a proactive step that ensures you have reliable tools to repair your system. This article explored two methods for its creation, including the built-in Backup and Restore feature and creating a bootable USB recovery drive from an ISO file.
Additionally, if you ever face a situation where you accidentally delete files from a repair disk, Wondershare Recoverit can help you restore them quickly. This powerful data recovery software ensures your crucial recovery files and other data remain accessible.
FAQs
1. How can I repair Windows 7 without a repair disc?
To do this, head to the Windows Search bar and type “Change Advanced Startup Options.” After that, click the “Restart Now” button to let the computer reboot. When the PC restarts, choose the “Troubleshoot” option and hit “Advanced Options.” From the options, select the “Startup Repair” option to automatically fix startup issues.2. How do I recover files from a crashed Windows system?
For this purpose, you can utilize advanced repair software like Wondershare Recoverit. Using this software, users can easily recover critical files from a crashed computer across both older and the latest Windows versions.3. Is a USB recovery drive as effective as a CD/DVD rescue disk?
Yes, a USB recovery drive created from a Windows 7 ISO file is just as effective as a CD/DVD rescue disk. The only difference is that USB offers greater portability and is more convenient for systems that lack an optical drive.


