How to Recover Camera Photos in Android Phone
Feb 05, 2026 • Filed to: Photo/Video/Audio Solutions • Proven solutions
Photos chronicle our lives and serve as a permanent record of the past. For most people, the loss of cherished photos would be a great tragedy. But, the thing is, deleted photos are not gone forever.
In this article, we demonstrate how to recover camera photos on an Android phone.
Part 1. How Does Camera Store Photos on Android?
Depending on the Android phone settings and the device used to take photos, images are stored in the internal memory or an SD card.
Storage in the Android Internal Memory
This is usually the default storage location for photos taken using the Android phone camera. The default storage location for camera images is the Digital Camera Images folder which has the DCIM abbreviation.
The location of this folder is always the same. It is the DCIM/Camera folder. The full path to this folder is storage/emmc/DCIM.
However, you can opt to change the default location of camera images from the internal memory to an SD card. Do this by opening the default camera app and going into the camera settings menu.
Depending on your Android version and the device's Original Equipment Manufacturer (OEM) settings, there are various ways to get to this menu. You may need to swipe left while some devices/versions may have an options icon. Look for the option to change the preferred location and tap to select the SD card, as shown below.
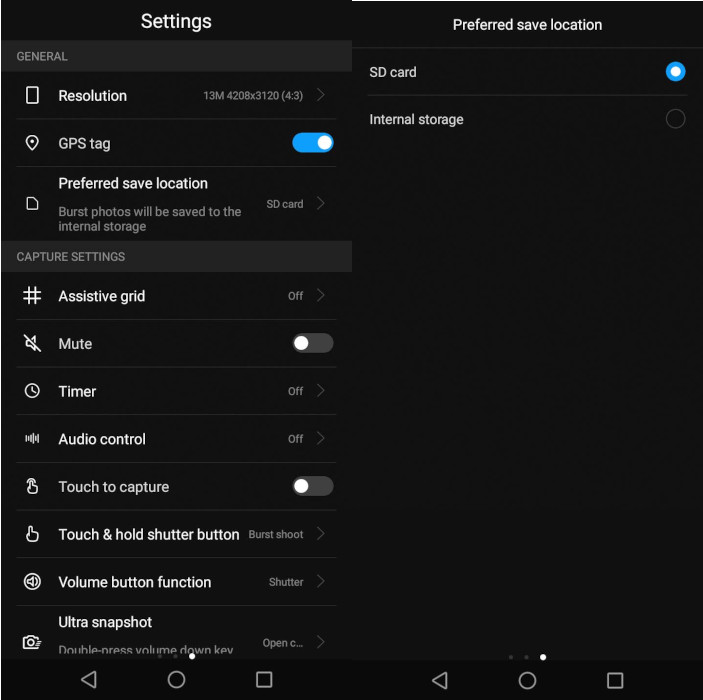
The full path to the DCIM folder on the SD card is always /storage/sdcard0/DCIM.
Storage of Digital Camera Pictures
Images taken using a digital camera are stored on an SD card. They do not change location even when the memory card is inserted into an Android phone.
Android Internal Storage VS SD Card Storage
There are several issues to consider when weighing the benefits and disadvantages of storing photos in internal storage or on an SD card.
- 🚀 Speed: Images stored in internal storage always load faster.
- 💾 Portability: Images stored on an SD card are more portable. You can quickly move the images from a phone to a digital camera, smart TV, or any other device.
- 🛡 Security: The portability of images on an SD card makes them less secure. Losing an SD card can mean losing your photos to someone with nefarious intentions. But if you lose your Android phone, you can always wipe it remotely using your Google account.
Using the internal memory or an SD card to store photos depends on the priority you place on the three issues above.
Part 2. Why Are Photos Lost on Android?
Scenarios Where Camera Photos Get Lost
A few of the common scenarios where camera photos get lost include:
- 😔 Losing the SD card: If you misplace your SD, you can kiss your precious memories goodbye.
- 😑 Corrupted SD card: SD cards often suffer corruption due to physical and software issues. For example, there is sudden power loss when an SD card is connected to a PC and performing data transfer. Software problems such as factory defects can also cause an SD card to delete files. Failure to take good care of the SD card, such as leaving it in a dusty or damp area, can also cause storage defects that lead to data loss.
- 😑 Accidental deletion: Images are often deleted accidentally. Tapping the wrong button or letting your toddlers play games on your phone or tablet can erase cherished memories.
Part 3. How to Recover Camera Photos on Android Phone Without Root
There are various pro methods to recover photos from the internal memory of an Android phone, depending on the circumstances. And all these can be accomplished without rooting your phone and voiding the warranty.
Method 1. View the DCIM Folder on Android
This method applies when you can't view the photos in your Android phone gallery or the DCIM folder is invisible when connecting the phone to a PC.
Step 1 Delete a .Nomedia file in your DCIM folder
.Nomedia refers to a file extension in the Android operating system. .nomedia files don't have a prefix. The purpose of including this file in a folder is to hide the contents from view.
Several privacy apps, such as Telegram, use this file extension to hide the app's image gallery from the normal gallery.
Also, in tinkering around with some apps, you may accidentally turn on such a feature in an app, causing it to add a .nomedia file in the DCIM folder rendering it and its contents invisible. You may then think that you have lost your photos.
Before you begin, you will need a free Android file explorer. If you don't have one, search at the Google Play Store.
To check if there is a .nomedia file in your DCIM folder, go to File Explorer/Local/Settings. Tap the Show Media Files option.
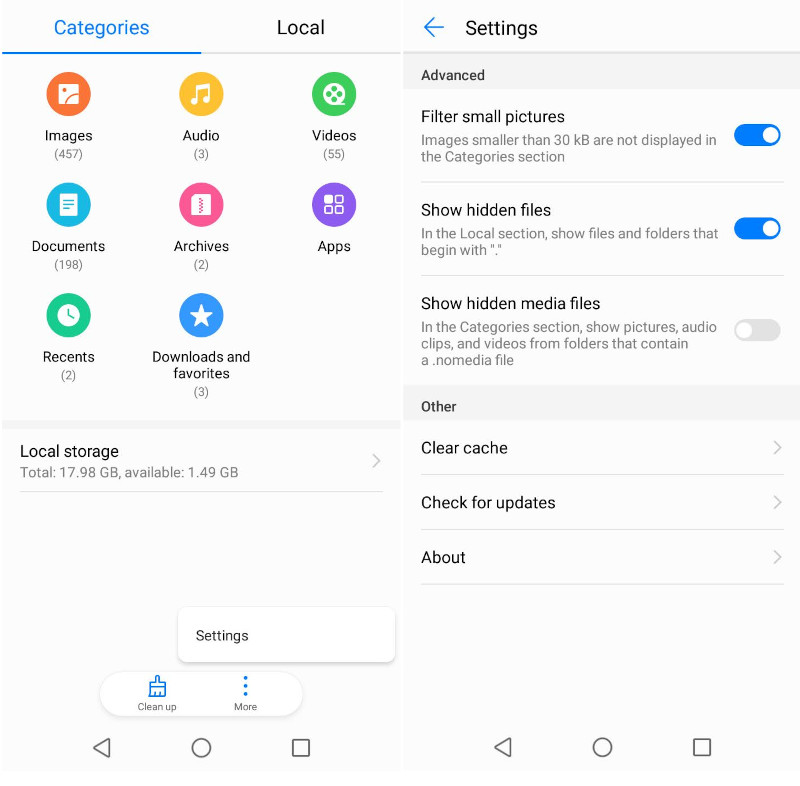
Next, go to the DCIM/Camera folder using an Android File Explorer and check if there is a .nomedia file. If you find one, delete it by holding it and tapping Delete.
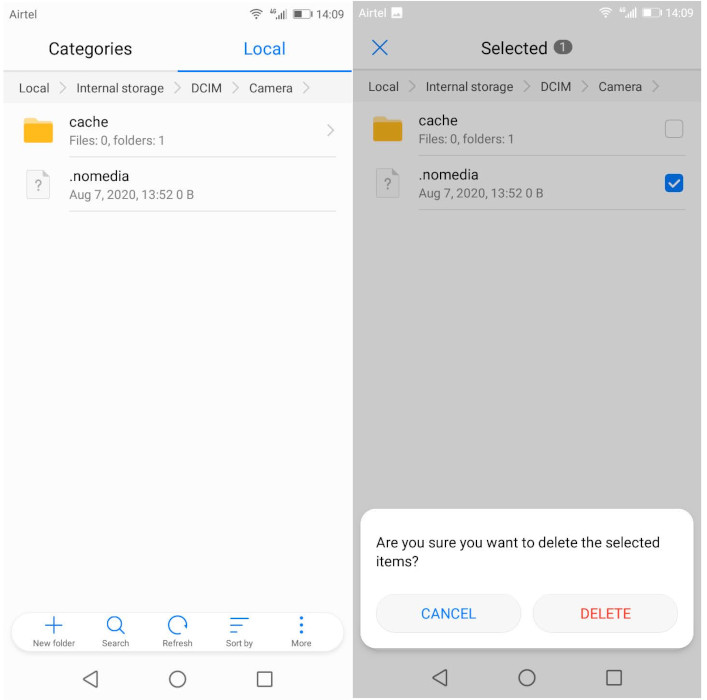
This makes your photos visible in the gallery.
Step 2 Clear the Cache
If you can see the pictures in the phone gallery, but the DCIm folder is empty when connecting your phone to a PC, you may need to clear your cache.
To clear the cache memory:
- Go to Settings > Apps & notifications > App info and tap the three dots at the top right of your screen.
- Select Show system files.
- Scroll down and tap Media Storage.
- Tap both the Clear cache and Clear data buttons.
To complete this fix, reboot the phone and reconnect it back to the PC.
Method 2. Restore Android Internal Photos from Backups
The Android phone comes with apps that offer to back up your photos in the background. If this feature is turned on, you will not lose your photos. You may only need to retrieve them from the cloud backup. Deleting a photo from the gallery does not delete the image from the cloud application.
Below, we examine how to recover camera photos from three of the most common cloud backup services in an Android phone.
Google Photos
If you have deleted a photo and want it back, check your Google Photos bin to see if you can find it.
On your phone or tablet, open the Google Photos app. Tap Library at the bottom then Trash.
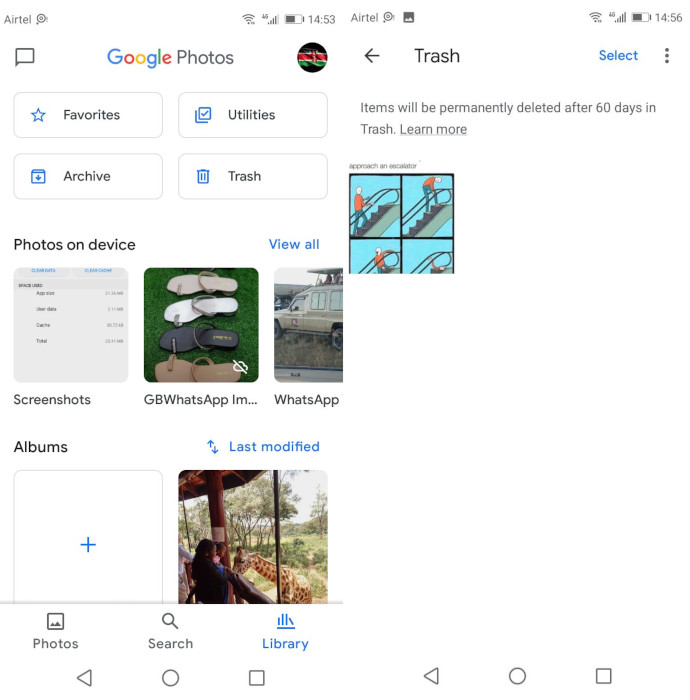
Touch and hold the image you want to recover and tap Restore at the bottom. The item will immediately be restored.
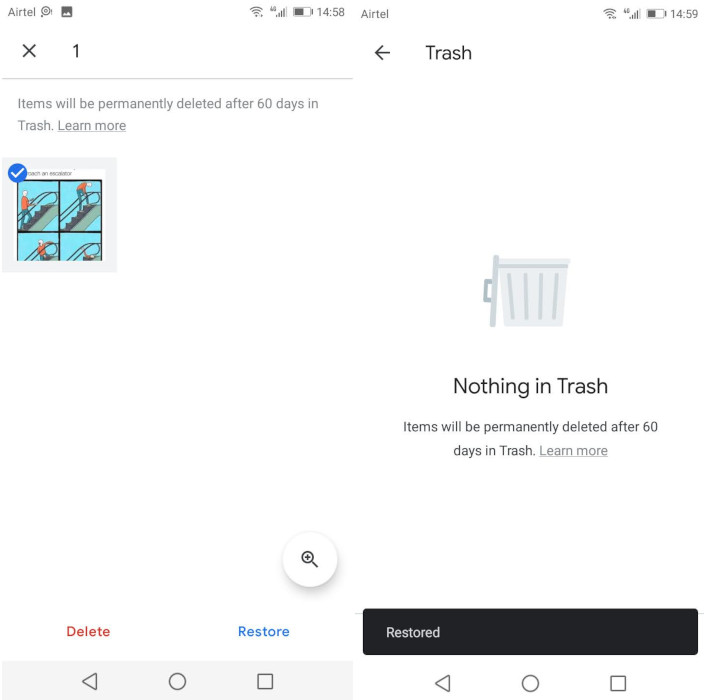
Take note that items in the trash are automatically removed after 60 days.
Dropbox
To recover a deleted photo from Dropbox on Android, navigate Files > Deleted Files and choose the ones you want to recover.
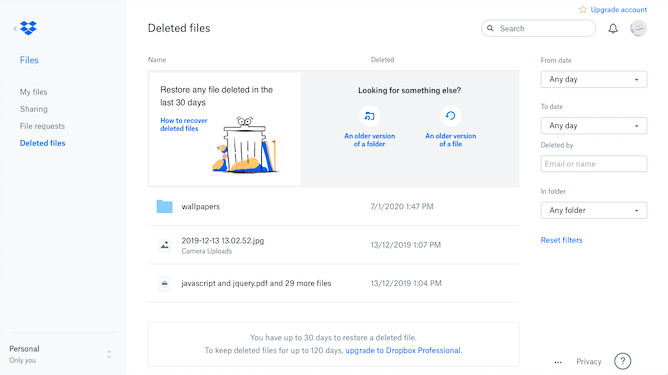
Dropbox keeps files for 30 days after deletion.
OneDrive
In OneDrive, open the application and navigate to Me > Recycle Bin. Select the photos you want to recover and tap Restore.

OneDrive keeps deleted files for 30 days though they may be removed much earlier if the recycle bin is bigger than your total storage space.
Part 4. How to Recover Camera Photos from Android SD Card on Computer
Have you accidentally deleted a precious photo from your Android SD card? Or maybe it malfunctioned, and now you can't seem to locate your photos. Don't worry. Below we will show you how to recover photos on an Android phone.
All you need to do is connect your SD card to your computer using an adapter and then use special software to recover the photos.
When you delete files from your SD card, they remain until they are overwritten with new data. So, as soon as you realize you have accidentally deleted your photos, remove the SD card from the phone and follow the steps below.
You will need to download and install Wondershare Recoverit software. This tool performs data recovery from a wide range of storage devices. It can recover data in over a thousand formats and even comes with a video repair tool to repair recovered videos.

- 🖥 Drives & Disks Recovery - Recover photos from all the drives and disks of your system.
- 🔍 Dual Scanning Modes - Comes with 2 different scanning modes, an All-Around scan and a Deep scan for better recovery results.
- 👁 File Preview - Supports to preview all the scanned files before recovering deleted photos from Recycle Bin.
- 💪 Powerful - Supports 1000+ file formats recovery, and can help you recover deleted files from all kinds of storage devices like SD cards, hard drives, PCs, laptops, Windows, digital cameras, etc.
- ⚡ High Success Rate A high recovery success rate without any quality loss.
 Security Verified. 3,591,664 people have downloaded it.
Once you have downloaded and installed the application, launch it from the shortcut icon on your desktop. You can also launch it from the Windows search box. Search for it and click to launch.
Step 1: Locate the SD Card from the List of Drives
The first screen will present you with a list of locations. The SD card is located in the External Drives section. Select it and click Start.

Step 2: Scanning Lost Files
You will observe the tool performing an SD card scan on the next screen. The tool combs through the sectors in the memory card to find data fragments of the deleted images and reassembles them into the original image.
This all happens very fast. The progress bar shows you the number of photos recovered and shows the overall progress. You can use the pause and stop buttons from interrupting or terminate the process.
You can also select and preview each image. Detailed information regarding each previewed image is provided. This information includes the file name, the file size, the path to the file, and the date it was last modified.

Step 3: Recover the Photos
In this final step, you recover the photos you want by clicking the photos and then clicking Recover. You can also select many files as a batch and click Recover. Select a different location to save your recovered photos on your computer.

Suffice it to note that photos aren't the only type of files you can recover with Wondershare Recoverit. You can use the tool to recover all types of files.
This method is great to recover photos from an SD card but can't be used to recover deleted photos from the Internal memory of an Android phone because the Android system no longer uses the USB mass storage protocol.
Below we show you how to recover camera photos on an Android phone (internal memory).
Part 5. Tips for Protecting Your Camera Photos
The best way to avoid losing your photos is to take steps not to lose them in the first place.
Tips That Can Protect Your Camera Photos
The best advice you can be given to protect your camera photos is to backup using any of the following services:
- Always backup with Google Photos:
Google Photos is free and gives you unlimited photo storage for 16-megapixel images. It usually comes installed on Android phones. You need to activate the backup and sync features in the app's settings. After that, the app does its job silently in the background. - Any other cloud backup service:
If you are not keen on using Google Photos, there are numerous other free camera apps in the Play Store in addition to services like Dropbox, OneDrive, Amazon, and similar.
Closing Words
And that's a wrap! We have done our best to provide you with the most up-to-date information on recovering camera photos on an Android phone. The takeaway from this is that you should always have a backup, but if you can't find your photos, you can always recover them using Wondershare Dr.fone software.
Solve Media File Problems
- Recover & Repair Photos
- What's picture recovery?
- SD card pictures are lost?
- Top 5 free photo recovery software.
- Restore photos from recycle bin.
- Recover & Repair Videos
- Recover SD card videos.
- Repair MOV/M4V/MP4 videos.
- Repair MKV videos.
- Solve video black screen.
- Repair restored videos.
- Recover & Repair Audio
- Repair video without sound.
- Fix audio sync problems.
- MP4 No Sound?
- Repair corrupt WAV files.
- Corrupted video repair guide.
- Recover & Repair Cameras

 ChatGPT
 Perplexity
 Google AI Mode
 Grok
Grok


Eleanor Reed
staff Editor