How to Make Dell Boot from USB Drive?
To boot a Dell XPS or Inspiron system from a USB drive, insert a bootable flash drive, power on the laptop, and immediately press the F12 key to select the USB device from the boot options menu.
● Creating the required bootable media necessitates an empty USB drive with at least 8GB of storage and a formatting tool like Rufus or UNetbootin to write a Windows 10 or Windows 11 ISO file.
● If the USB drive is missing from the boot selection screen, boot into Windows normally, navigate to Power Options in the Settings menu, and disable the Fastboot feature to allow hardware recognition.
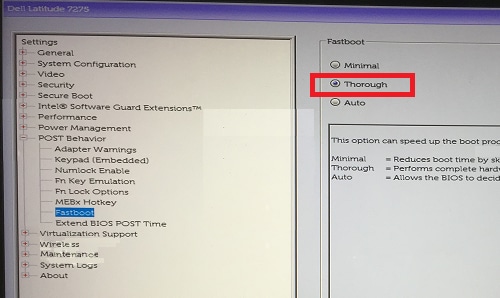
● To bypass the Device not identified error when booting from a USB Type-C connection, enter the BIOS setup via F2 or F12, change the POST behavior Fastboot setting to Thorough, enable Thunderbolt Boot Support, and activate Legacy Option ROMs.
Ask AI for a summary
I've tried everything I can think of to get this to boot. I've followed many tutorials online, but nothing works. I've updated the BIOS to the latest (needed doing anyway - even though it's a brand new machine). Whatever I try, it just won't see the USB stick as a boot device.
Have you ever confront the same problem as the above? If so, please scroll down and we will provide you solutions in this article.
Dell XPS is one of the most preferred series of Dell laptops. Stylish, sturdy, and designed for business needs, the slim mobility of Dell XPS laptops comes with better performance and longer battery life. XPS in Dell stands for Xtreme Performance System and it was coined in 1990.
The XPS technology has evolved for decades, and the latest Dell laptops have been designed keeping the future in mind. However, sometimes, you may not be able to boot from USB on a Dell Inspiron XPS, here in this article, we've provide you 3 methods to solve this problem, let's give it a shot.
Preparations for Dell Boot from USB
1. Reasons for Dell Boot from USB Drive
There are several scenarios where you can use a bootable usb drive.
- You can make Dell boot from a bootable USB drive to reinstall the operating system.
- If you’re using an old operating system, you can boot Dell from a USB drive to upgrade it to Windows 10/11.
- If you want to use the Windows operating system on a Mac, it’s also achievable with a bootable USB drive.
- If you forgot the password of your laptop or it is corrupted, you can use a bootable USB drive to recover the inaccessible data.
To make Dell boot from USB, we need to prepare a bootable USB at first.
2. Create a Bootable USB Drive
Obtain a USB flash drive with sufficient capacity (at least 8GB) and ensure it is empty, or backup the contents as the drive will be erased during the creation process.
Download the ISO file or create an image of the operating system or software you want to boot from on the USB drive. You may find official ISO files from the respective software or operating system provider's website. Here are the official websites for downloading Windows operating systems from Microsoft:
Windows 11: www.microsoft.com/software-download/windows11
Windows 10: www.microsoft.com/en-us/software-download/windows10
Use a reliable tool such as Rufus, UNetbootin, or the official Windows USB/DVD Download Tool to create a bootable USB drive.
How to Perform Dell Boot from USB?
There are various instances when you may need to look for alternate ways to boot your Dell XPS and USB boot is one of them. When you research for Dell boot from USB, you will come across multiple methods suggested by different sources. But, remember, not all methods are safe and may result in data loss. So, it is always advisable to look for tried and tested methods to reduce risks associated with USB boot. Sometimes, you may have to disable the secure boot and enable Load legacy option ROM in BIOS.
Here are 3 methods for USB boot on a Dell XPS system -
Method 1. Use F12 to Boot Dell from USB
It is suggested to keep the laptop plugged for charging so the system won't shut down due to low battery during boot. What you need is the key F12 to open the boot screen and select USB boot. Follow these steps:
- Turn off your laptop.
- Now, plug in the USB drive that you want to use to boot your system. Mostly, the name of a USB drive will be the same as the brand of the USB.
- Next, switch on the laptop.
- Now, press the F12 key on the keyboard.
- You will find the boot options screen. Here select the drive to boot Dell from USB.
Method 2. What if the USB devices are unavailable under boot options
If the above method doesn't display the USB drive as a bootable option. In this case, you may have to modify a couple of settings in the settings section. The steps to be followed are:
- First and foremost, turn off your laptop.
- If there is any USB drive connected to the laptop, unplug the USB drive.
- Now, boot up Windows normally.
- Go to the Settings section, and look for Power Options.
- Under Power Options, disable the option to Fastboot the system.
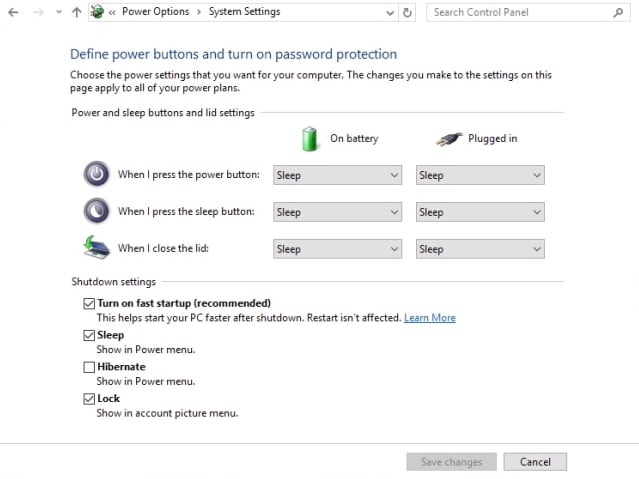
Once you disable Fastboot in Windows, remember to click on the Save button. If you do not click save, the new settings won't be implemented.
Method 3. Alternate way to perform Dell Inspiron boot from USB
The third method also uses options present at the start of the boot and is considered as a dell bios boot. The steps are as follows:
- Turn off your laptop.
- Now, boot your laptop again and press the F2 or F12 key to enter the BIOS setup.
- Look for POST behavior on the screen.
- Under POST behavior, select Fastboot.
- On the right side, you will come across 3 options – Minimal, Thorough, and Auto.
- Select the Thorough option.
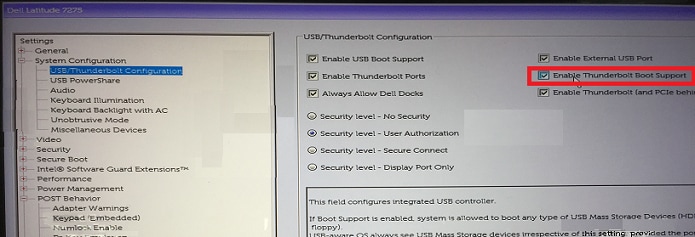
- Now, go to the System Configuration option under Settings. Select USB/Thunderbolt Configuration->Enable Thunderbolt Boot Support.
- Next, go to the General tab. Look for Advanced Boot Configuration under this tab. Check if check Enable Legacy Option ROMs & Enable UEFI Network Stack are enabled. If they are not enabled, enable them.
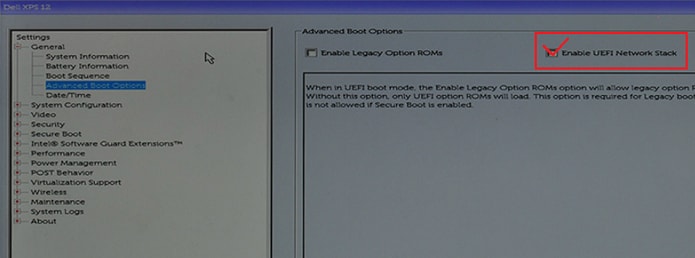
- Now reboot the system. You will be able to find the USB Type-C device under boot options.
How to Prevent Data Loss While Booting
Losing data from your computer or laptop can be really frustrating! No matter whether data loss is due to malware or virus, it can be a big loss when you do not have a data backup. Though it is advisable to backup your data regularly, laptop crashes can be sudden and you will still lose the latest files and documents.
The only way to deal with the data crash is to find a way to recover lost data. When you research on ways to prevent data loss on booting, you will come across several varied ways. But remember, not all the ways are genuine, precise and result-oriented. Here are 2 genuine and tested solutions that you can trust -
Solution 1. Backup the File
- Decide where you want to take the backup. An external hard disk is one of the most preferred options to take backups. You can also choose USB drives or online locations like Dropbox or Google Drive. The choice of the device will depend on the volume of data.
- Make a list of folders or files that you need to backup. If possible, collect all the files in a single location. This saves time as you do not have to browse through multiple files or folders while taking backup.
- Connect the drive or log into the online location and choose the files for backup. If you are using an external hard drive, you can also copy-paste the files.
Solution 2. Recover Lost Data Using Wondershare Recoverit
Wondershare Recoverit is a smarter and safer way of recovering lost data. This dynamic software helps you recover lost and deleted files in just 3 steps and within a few minutes. It supports more than 1000 types and formats of data that are available. The software can help recover data from the laptop, recycle bin/trash, internal hard drive, external storage media, and even a crashed computer. There are several benefits of using Wondershare Recoverit to recover lost data from your system.
To use Wondershare Recoverit for data recovery, follow these steps –
Install and Launch Wondershare Recoverit Software
You need to install Wondershare Recoverit software on your computer. To access it, click on the icon on the desktop or search by name. Find the app using search and right-click to open.
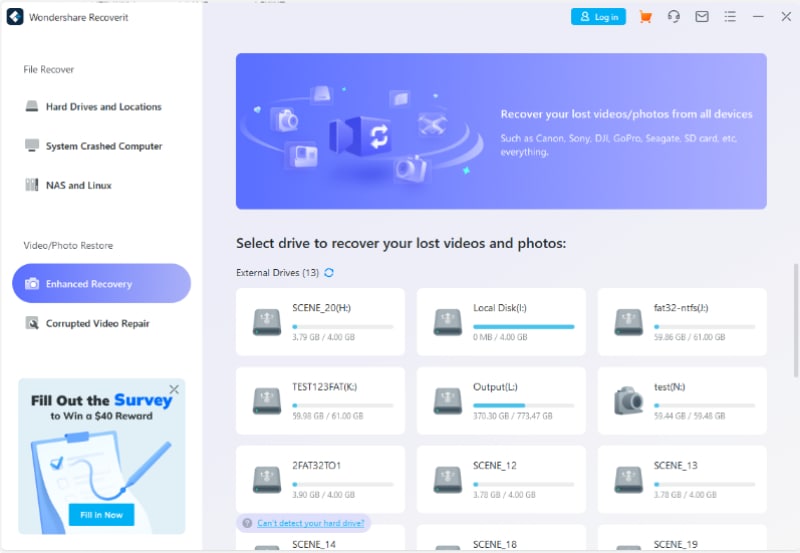
Step 1: Select a Location
To recover data on a computer, it is necessary to choose a location where you have lost data. Select a hard disk under the "Hard Disk Drives" tab or Desktop under the "Select location" tab. Click "Start" to begin the scanning on the selected location.

Step 2: Scan Deleted Files
Once you choose a location, start scanning it. Wondershare Recoverit will perform an all-round scan. Depending on the size and volume of files, the time of scanning will vary between a few minutes to a few hours. f you are looking for lost or deleted videos, then you can click on the "Advanced Video Recovery" option that is located at the bottom-left corner on the interface. Simply click on it to perform a deep scan to look for large-sized videos.

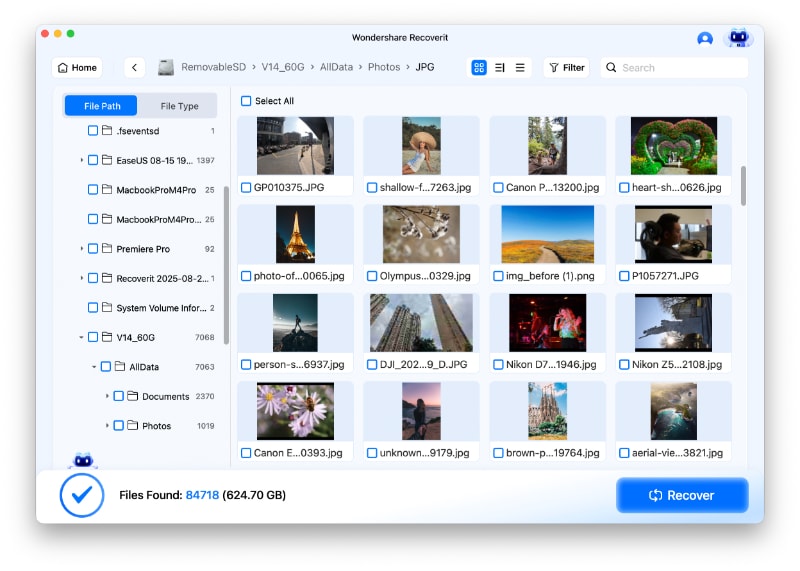
Step 3: Preview Scanned Files
Now preview files after the scanning is complete. You can also preview data by clicking on the file. A thumbnail will show you on the right panel. Besides, a preview window will pop up after clicking the "Preview" button or double-clicking a file.
Video Tutorial on How to Recover Deleted Files on Windows 10/8/7 Easily?
Video Recovery with Wondershare Recoverit
Wondershare Recoverit software comes with the provision of looking for large-sized and complex videos. This can be done with the help of its deep video scanning feature.
To recover a video with this feature, choose the Advanced Video Recovery option. This option can be accessed from the panel or the preview of a video window. Launch the feature to start.
The Wondershare Recoverit smart scan can merge video fragments. So, it usually takes more time to complete the scan. Just confirm your choice and click on the "Start" button to proceed. Deep Scan merges and splices video fragments to recover them. It is possible to pinpoint results, or search for specific files and narrow down the search using filters.
Once the application displays the results of the scan, you can preview the results. It is possible to choose specific file/videos and view them in Wondershare Recoverit. Once you are able to find the video that needs to be recovered, click on the Recover button at the bottom. You will come across a window to choose a location to save the recovered file. Make sure you choose an easy to remember location to save the file. Avoid saving it at a location where it was lost.
Closing Words
Data recovery not only involves the recovery of files present within the disk, but users also need a way to recover deleted, corrupted and missing files. This is where software like Wondershare Recoverit comes into the picture. A feature-rich, useful, and easy-to-use software, Wondershare Recoverit is simply the answer to recovering lost data. The application comes with special features for advanced video recovery. It is a totally safe and reliable tool for data recovery. You won't come across a device or media that deem unrecoverable with this software. Wondershare Recoverit has one of the highest data recovery success rates in the industry. It makes data recovery simple with its 3 step process.
People Also Ask
-
Often Dell XPS users complain that they are unable to boot to externally connected USB Type C devices. The system reports a "Device not identified" error. The reason behind this error is that the default specification of Dell XPS bypasses the USB boot sequence to reduce boot times in the default configuration.
There are 2 ways to boot using Type C USB. Both methods have been detailed out in the article above.
-
How do I boot from a USB drive in Windows 10?
To boot from a USB drive in Windows 10, you may need to tweak the BIOS setup. The regular boot method does not work as the PC's BIOS system does not support it.
-
How do I boot from USB in UEFI mode?
There are 2 ways to boot from USB in WEFI, and you can use any of the following ways –
Way 1. Check the manufacturer's key to open the menu. Common manufacturer's keys are Esc, Delete, F1, F2, F10, F11, or F12. If Windows is already installed, select Power (Power button icon) > hold Shift while selecting Restart. Select Troubleshoot > Advanced options > UEFI Firmware settings.
Way 2. From the firmware menus, boot to drive, or network while in UEFI or BIOS mode: On the boot device menu, select the command that identifies both the firmware mode and the device.
-
How to recover lost data during Dell boot from usb?
You can use Wondershare Recoverit to recover lost data. The steps are:
1.Launch Wondershare Recoverit software.
2.Select a location.
3.Scan the location.
4.Preview & Recover.
USB Solution
- Recover USB Drive
- Format USB Drive
- Fix/Repair USB Drive
- Know USB Drive


 ChatGPT
 Perplexity
 Gemini
 Claude
 Grok
Grok


Theo Lucia
chief Editor