


 TL;DR:
To format a write-protected USB drive in Windows 11/10, you must first identify and remove the active restriction because a standard format requires write access and cannot bypass organizational policies or physical hardware locks.
● Before modifying attributes or running the DiskPart clean command, immediately copy readable files to another drive or use recovery software for inaccessible data, avoiding the clean all command entirely as it writes zeros to every sector and permanently deletes data.
● For a logical restriction, use an elevated Command Prompt to run the DiskPart attributes disk clear readonly command on the selected USB, followed by a standard format using exFAT for macOS and Windows cross-platform compatibility or NTFS for native Windows environments.
● If the drive refuses writes across multiple computers after clearing software attributes, the device controller has likely triggered a protective read-only state due to failing NAND flash memory, meaning the USB must be replaced rather than formatted.
Ask AI for a summary
 ChatGPT
 Perplexity
 Gemini
 Claude
 Grok
Grok
If Windows says “The disk is write protected”, you normally cannot format the USB until the active write restriction is removed. The safest order is to protect any files you still need, identify whether the restriction is software-, policy-, or device-enforced, clear a removable read-only attribute when possible, and only then format the drive.
A “force format” is not a universal bypass. Windows DiskPart can clear a logical read-only disk attribute, but it cannot make a failing flash controller accept writes or override an organization’s intentional removable-storage policy. If the USB remains read-only on multiple computers after the software attribute is cleared, copy or recover important files before replacing the device rather than repeatedly erasing or rewriting it.
In This Article
Part 1. Check Why the USB Is Write-Protected Before Formatting
Write protection describes a result, not one single fault. Windows may be honoring a removable disk attribute, an administrator policy, a security feature, or a device-level read-only condition. Identifying the branch first prevents destructive commands from being used on the wrong problem.
Decide Whether You Need the Files on the USB
Before changing attributes or formatting the pen drive, decide whether the current files matter. Formatting changes the file system and is a data-destructive operation, so the correct path is different for an empty USB than for one holding the only copy of important data.
- Files open normally: Copy them to another healthy drive before troubleshooting further.
- Files are missing or cannot be opened: Do not format yet. Treat this as a data-recovery decision first.
- The USB is empty or fully backed up: You can proceed to remove logical write protection and format it.
- The device disconnects, overheats, or behaves erratically: Avoid repeated write attempts because the problem may be hardware-related.
Identify a Logical, Policy, or Hardware Read-Only State
Use the behavior below to narrow the cause before you run DiskPart. The same error message can lead to very different next steps.
| What You See | What It May Mean | Safest Next Step |
| The USB is readable but Windows blocks delete, rename, copy-to-drive, and format actions. | A logical read-only attribute or another write restriction may be active. | Protect the files, then check the disk attributes with DiskPart. |
| Every removable drive is read-only on a work or school PC. | Windows removable-storage policy may intentionally deny write access. | Check with the administrator instead of trying to bypass the policy. |
| The same USB stays read-only on multiple computers even after software-level checks. | The USB controller or flash memory may have forced the device into a protective read-only state. | Copy or recover the files and plan to replace the drive. |
| A physical lock switch exists on the USB device or its adapter. | Hardware write protection may be enabled. | Move the switch to the unlocked position, reconnect the device, and retest. |
| Only one file cannot be changed, but the USB accepts new files. | The issue is more likely file permissions or an individual file attribute than whole-disk write protection. | Troubleshoot that file instead of formatting the entire drive. |
If your goal is only to make a read-only USB writable and you do not intend to format it, see the separate Recoverit guide to remove write protection from a read-only flash drive. This page focuses specifically on getting a protected USB to the point where it can be safely formatted.
Part 2. Protect USB Files Before Any Format Attempt
The strongest improvement you can make to this troubleshooting process is to separate data protection from device repair. If the USB still contains readable data, save it before formatting; if the data is not readable, decide whether recovery is needed before any command that rewrites partition or file-system structures.
If the Files Are Readable, Copy Them First
If File Explorer can still open the USB, copy the important folders to a different healthy internal or external drive. Do not use the same USB as the backup destination, and verify a few copied files before continuing.
This is especially important when a USB suddenly becomes read-only after working normally. A read-only state can sometimes be a protective response to flash-memory problems, so successful read access is an opportunity to preserve the data rather than a reason to keep forcing writes.
If Files Are Missing or Inaccessible, Recover Before Formatting
If the USB is detected by Windows but important files are deleted, missing, formatted, RAW, or inaccessible, recovery should come before formatting. Recoverit USB flash drive recovery can be considered for a logical data-loss case when the storage device is still detectable. Stop using the USB to reduce overwrite risk, and save recovered files to a different healthy location.

If you still need the files on the write-protected USB, use the following recovery steps before clearing attributes, running clean, or formatting the drive.
Step 1. Select the write-protected USB drive.
Connect the USB drive to the computer and open Recoverit. Under the available drives, select the affected USB by its drive letter or capacity. Make sure you choose the original USB rather than another disk.

Step 2. Scan the USB for missing or inaccessible files.
Start the scan and keep the USB connected while Recoverit searches for deleted, formatted, RAW, or inaccessible files. You can use file type, path, and other filters to narrow the results as they appear.

Step 3. Preview and recover the files to another drive.
Preview the files you need, select the recoverable items, and click Recover. Save them to your computer or another healthy drive, not back to the write-protected USB, so you do not overwrite data that may still be recoverable.

No recovery software can guarantee a file after its data has been overwritten. If the USB is not detected on any computer, repeatedly disconnects, has visible physical damage, or shows other signs of hardware failure, software scanning is not the right next step.
Part 3. Clear USB Write Protection with DiskPart
When the files are safe and the USB is detected normally, DiskPart is the most direct built-in Windows tool for checking and clearing a disk-level read-only attribute. Microsoft documents the attributes disk command for Windows 11 and Windows 10.
Check and Clear the Read-Only Disk Attribute
The method below changes a disk attribute rather than formatting the USB immediately. Take extra care when selecting the disk number, because later DiskPart commands act on the disk that currently has focus.
Step 1. Open an elevated Windows Terminal or Command Prompt.
Right-click Start, open Terminal (Admin) or an administrator Command Prompt, type diskpart, and press Enter.
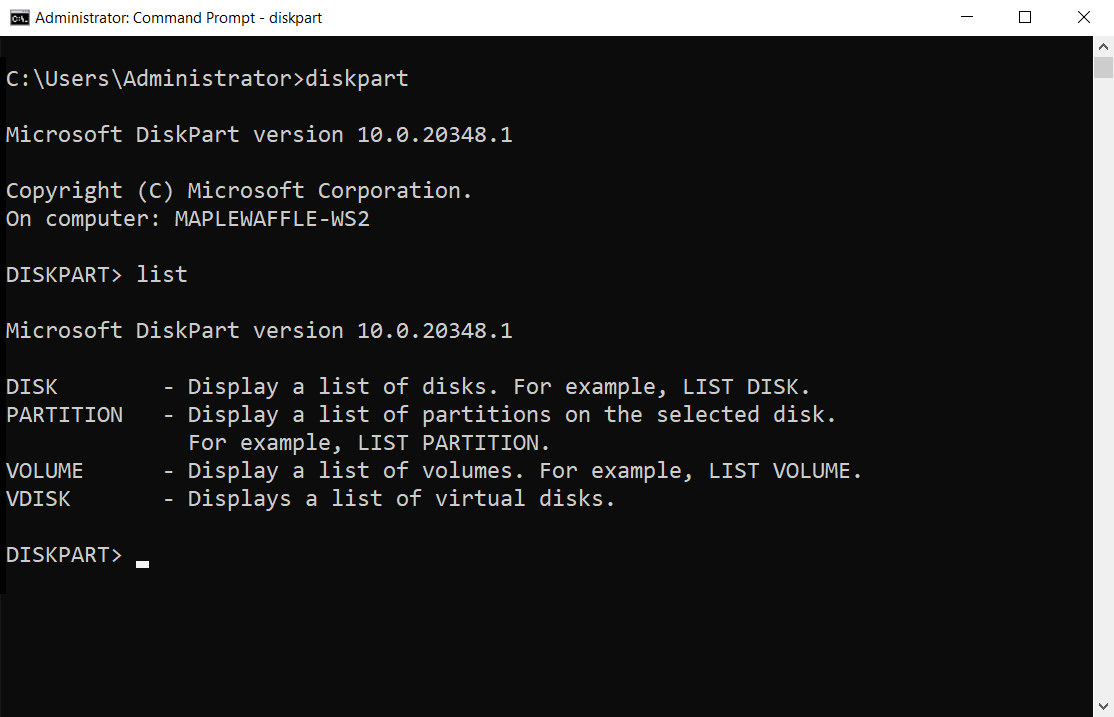
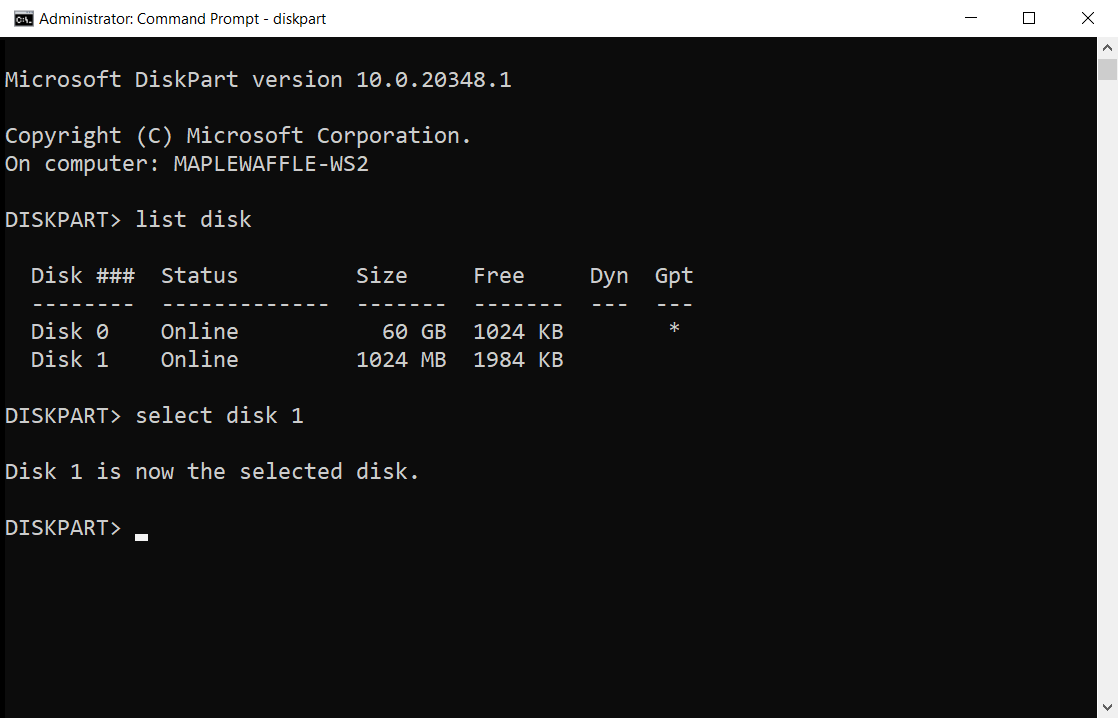
Step 2. List the disks and select the USB by capacity.
Run list disk. Compare the reported sizes carefully, then run select disk N, replacing N with the number of the USB drive. Do not guess the disk number from its position in the list.
Step 3. Inspect the selected disk attributes.
Run attributes disk. Microsoft notes that a disk must be selected before this command can display or change its attributes.
Step 4. Clear the read-only attribute if it is set.
Run attributes disk clear readonly. This uses the same Microsoft-documented attributes disk command family that can set or clear the read-only attribute. See the Microsoft DiskPart attributes disk documentation for the current syntax.
Step 5. Verify before formatting.
Run attributes disk again, exit DiskPart, then try creating a small test file on the USB. If Windows still blocks writes, do not jump straight to clean; go to Part 5 and identify whether policy or device-level failure is keeping the drive read-only.
Part 4. Format the USB After Write Protection Is Removed
Once the USB accepts writes again and the files you care about are safe, formatting becomes a separate task. Start with a normal format of the existing volume; use a partition rebuild only when the existing layout is damaged or ordinary formatting still cannot complete.
When a Normal Format Is Enough
If the USB volume is healthy enough to appear normally and Windows now accepts writes, you do not need to erase the partition table. Use the ordinary Windows formatting interface for the existing volume rather than jumping to clean. Microsoft’s current format documentation confirms support for FAT, FAT32, NTFS, and exFAT, and notes that a quick format replaces the file table and root directory without a sector-by-sector scan. See the current Windows format command documentation.
If the existing-volume format succeeds, you are finished. If it still fails because the partition layout is damaged, the next method rebuilds the disk structure and therefore has a much higher data-loss risk.
Rebuild and Format the USB Only as a Last Resort
Use this method only after every needed file has been copied or recovered. The clean command removes partition or volume formatting information from the selected disk, so selecting the wrong disk can destroy access to data on another drive.
Step 1. Open DiskPart and select the USB again.
Run diskpart, then list disk, and use select disk N only after matching the USB by capacity.
Step 2. Remove the existing partition information.
Run clean. Microsoft documents that this command removes partitions or volume formatting from the disk with focus. Do not use clean all here: Microsoft states that clean all writes zeros to every sector and completely deletes the data on the disk. Review the Microsoft clean command documentation before using it.
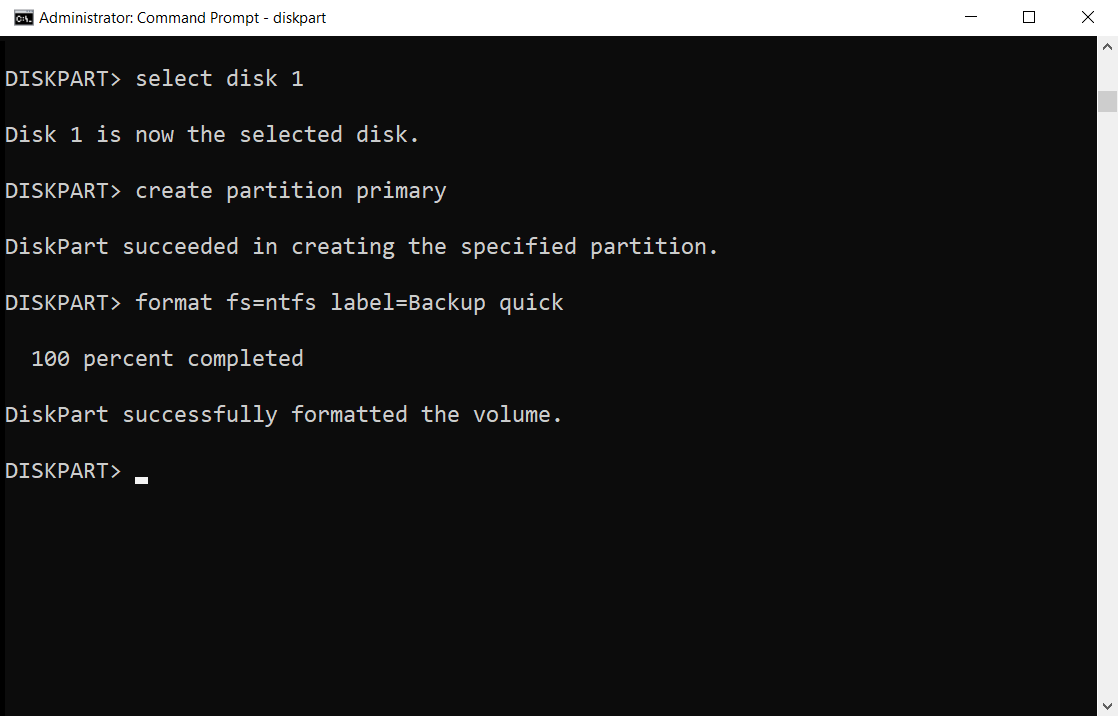
Step 3. Create a new primary partition.
Run create partition primary. DiskPart will create a partition using the available space unless you specify another size.
Step 4. Format the new partition.
For a Windows-focused USB, you can run format fs=ntfs label=USB quick. If the drive also needs to work with macOS and other modern devices, use format fs=exfat label=USB quick instead.
Step 5. Assign a drive letter and exit.
Run assign, then exit. Reopen File Explorer and test the USB by creating and deleting a small nonessential file.
Important: DiskPart clean is not a hidden write-protection override. Its documented purpose is to remove partition and formatting information. If the device still refuses writes after the read-only attribute was cleared, investigate Part 5 instead of repeatedly running destructive commands.
Part 5. What If the USB Is Still Write-Protected?
A USB that stays read-only after DiskPart is telling you that the restriction may exist outside the ordinary disk attribute. At this point, the useful question is no longer “which formatter is stronger?” but “who or what is enforcing read-only access?”
Check for a Managed Windows Write Policy
Windows supports removable-storage policies that can deny write access to removable disks. Microsoft documents a Removable Disks: Deny write access policy for managed Windows devices. If all USB drives become read-only on the same work or school computer, or the computer is managed by an organization, the correct next step is to ask the administrator rather than trying to bypass the control. See Microsoft’s Removable Storage policy documentation for the current policy definition.
Recognize Controller-Enforced Read-Only Failure
If one USB remains read-only across different ports and computers, the device itself may be protecting failing flash memory. SanDisk documents that a USB flash drive can become write-protected when usable storage blocks fall below a threshold or when storage-block corruption prevents safe updates to critical information. In that situation, continuing to “force format” the drive is not a reliable repair strategy.
Use the remaining read access to copy important files if possible. SanDisk’s current support guidance also recommends trying another USB port, cable when applicable, and another computer before concluding that the device should be replaced. Review the SanDisk write-protected drive guidance for the manufacturer’s current explanation.
If the drive contains important inaccessible data, prioritize recovery or a professional service before replacement. A format utility cannot repair worn NAND flash, a failing controller, burned electronics, or a USB device that is no longer detected by the operating system.
Part 6. Which File System Should You Use?
Choose the file system based on where the newly formatted USB will be used. The file system choice does not remove write protection; it only determines how Windows formats the volume after the device accepts writes.
| File System | Choose It When | Main Consideration |
| exFAT | You want a general-purpose USB that also needs broad compatibility with modern macOS and Windows systems. | A practical choice for cross-platform removable storage. |
| NTFS | The USB will mainly be used with Windows and you want the native Windows file system features. | macOS does not provide the same native write workflow as Windows for NTFS volumes. |
| FAT32 | You need compatibility with older devices that specifically expect FAT32. | Older format with more limits than exFAT for modern large-file use. |
If you are unsure, exFAT is often the simplest cross-platform choice for a USB used between current Windows and Mac computers. Keep the allocation-unit size at its default unless you have a specific technical requirement.
Part 7. Can a USB Format Tool Force a Write-Protected Drive?
A third-party “write-protected USB format tool” cannot reliably override every form of read-only protection. If the restriction is a Windows disk attribute, the built-in DiskPart command can clear it before formatting. If the restriction comes from organization policy, hardware, firmware, security software, or a failing flash controller, a generic formatter may fail for the same reason Windows does.
For that reason, avoid utilities that promise to bypass protection without identifying the cause. They can add write activity without improving recoverability. A more reliable decision path is: preserve the files, clear a documented logical attribute, format only after writes are accepted, and replace a device that remains controller-enforced read-only.
Conclusion
To format a write-protected USB drive safely, do not begin with formatting. Protect readable files or recover inaccessible data first, then use DiskPart to check and clear a logical read-only attribute. Once the USB accepts writes, perform a normal format; use DiskPart clean and partition rebuilding only after the data is safe and only when the existing disk structure truly needs rebuilding.
If the USB remains write-protected across multiple computers, stop treating the problem as a formatting error. A managed Windows policy or a protective device-level read-only state may be responsible, and repeated “force format” attempts will not repair failing flash hardware.
FAQ
-
Why does attributes disk clear readonly fail on my USB?
The read-only state may not be coming from the ordinary DiskPart disk attribute. An administrator policy, hardware switch, secure-device setting, or controller-enforced read-only mode can still block writes. Test the USB on another computer and protect the files before trying more destructive actions. -
Does formatting remove write protection from a USB drive?
Not by itself. Formatting requires write access, so active write protection normally has to be removed first. Clear a logical read-only attribute before formatting; if the device itself remains read-only, formatting will usually fail. -
Can I format a write-protected USB without losing data?
Formatting is a data-destructive operation. If the files are readable, copy them to another healthy drive first. If files are missing or inaccessible, consider recovery before formatting and save recovered files somewhere other than the affected USB. -
What is the best write-protected USB format tool?
For a logical Windows read-only attribute, built-in DiskPart is usually sufficient to clear the attribute, and Windows can then format the volume. No generic formatter can guarantee a bypass of hardware-, firmware-, or policy-enforced read-only protection. -
Why did my USB suddenly become write-protected?
A software attribute or policy can cause it, but flash-memory failure is also possible. Some manufacturers document protective read-only behavior when the device can no longer safely update storage blocks. If the condition follows the USB to multiple computers, copy or recover the data and consider replacing the drive. -
Should I use clean all to force-format a protected USB?
No. Microsoft documents that clean all writes zeros to every sector and completely deletes the data on the selected disk. It is not a write-protection bypass and should not be used as a routine fix for a protected USB.


