

 TL;DR:
To isolate the root cause of a flickering Lenovo Yoga screen, test the display by opening Task Manager, connecting an external monitor, observing the pre-Windows BIOS menu, and gently adjusting the physical hinge angle.
● If Task Manager flickers along with the desktop, roll back or reinstall the exact-model graphics driver via Lenovo Vantage; if Task Manager remains stable, an incompatible app is the likely cause and requires disabling hardware acceleration.
● Flickering that persists in the BIOS menu or changes predictably when moving the laptop lid indicates a damaged internal cable or panel that requires physical Lenovo service rather than software troubleshooting.
● Retrieve and save your 48-digit BitLocker recovery key before installing model-specific firmware updates or sending the device for repair to prevent permanent data lockout on encrypted Windows drives.
Ask AI for a summary
 ChatGPT
 Perplexity
 Gemini
 Claude
 Grok
Grok
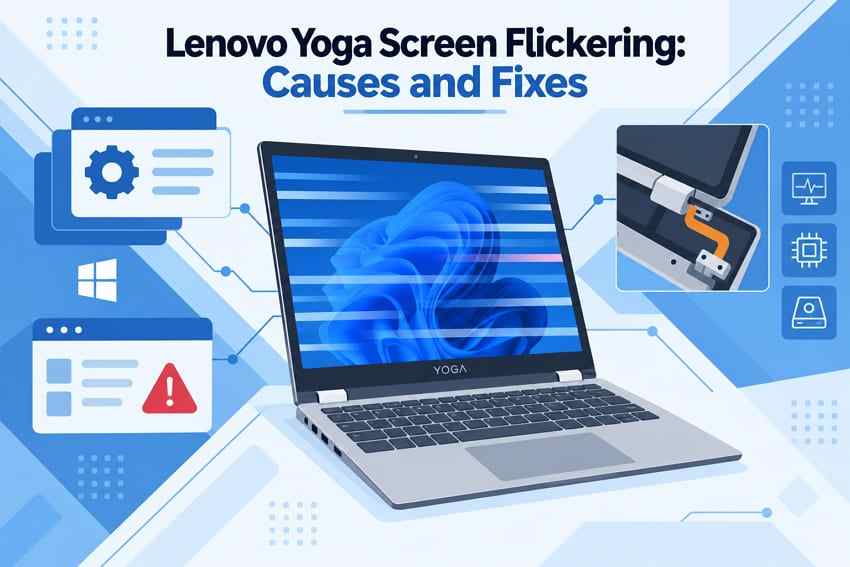
A Lenovo Yoga flickering screen can look like rapid flashing, brief black frames, horizontal lines, brightness pulsing, or intermittent blinking. Those symptoms do not point to one universal fault. Depending on the exact Yoga model and when the problem appears, the cause may be a Windows graphics driver, an incompatible app, an unsupported display setting, firmware, a dock, the internal panel, or the display cable running through the hinge.
Quick answer: Open Task Manager while the screen is flickering, compare the built-in display with an external monitor, note whether moving the lid changes the symptom, and check whether flicker also appears before Windows loads. Together, those observations give you a safer direction than repeatedly reinstalling drivers. Begin with reversible Windows checks; move to firmware or physical repair only when the evidence supports it.
In this article
Part 1. Find the Cause of Lenovo Yoga Screen Flickering
Start by observing where the flicker appears instead of assuming that every Yoga has the same display system. A 2-in-1 model can have a different panel, GPU arrangement, refresh-rate range, and hinge design from another Yoga generation. The checks below are clues, not absolute verdicts; combine two or more results before changing drivers or arranging repair.
Quick Diagnosis Table: Task Manager, BIOS, External Monitor, and Hinge Angle
| Test | What You See | What It Suggests | Best Next Step |
| Task Manager | It flickers with the rest of the screen | A display-driver or broader display-path problem is more likely | Continue to Part 3; do not rule out hardware |
| Task Manager | It stays stable while other content flickers | An incompatible app is more likely | Continue to Part 4 |
| BIOS or pre-Windows screen | Flicker is visible before Windows loads | Windows apps and normal Windows drivers are less likely; firmware or hardware moves higher on the list | Continue to Part 6 |
| External monitor | External image is stable while the internal display flickers | The built-in panel, cable, connector, or internal-display-specific configuration is more likely | Continue to Part 5 |
| Hinge angle | Flicker starts, stops, or changes as the lid moves | A cable, connector, panel, or hinge-area fault is more likely | Stop repeated flexing and continue to Part 5 |
If Task Manager Flickers With the Rest of the Screen
Press Ctrl + Shift + Esc while the problem is visible. Microsoft says that if Task Manager flickers together with everything else, the display driver is probably causing the problem. Treat “probably” carefully: the test does not prove that the GPU driver is the only possible cause, and it does not exclude a panel or display-path fault.
Instructions. Leave Task Manager open for long enough to compare its title bar, menus, and process list with the surrounding desktop. If the entire image blanks or flashes together, follow the driver path in Part 3. If movement of the lid also changes the symptom or the same flicker appears in BIOS, prioritize the hardware evidence instead.
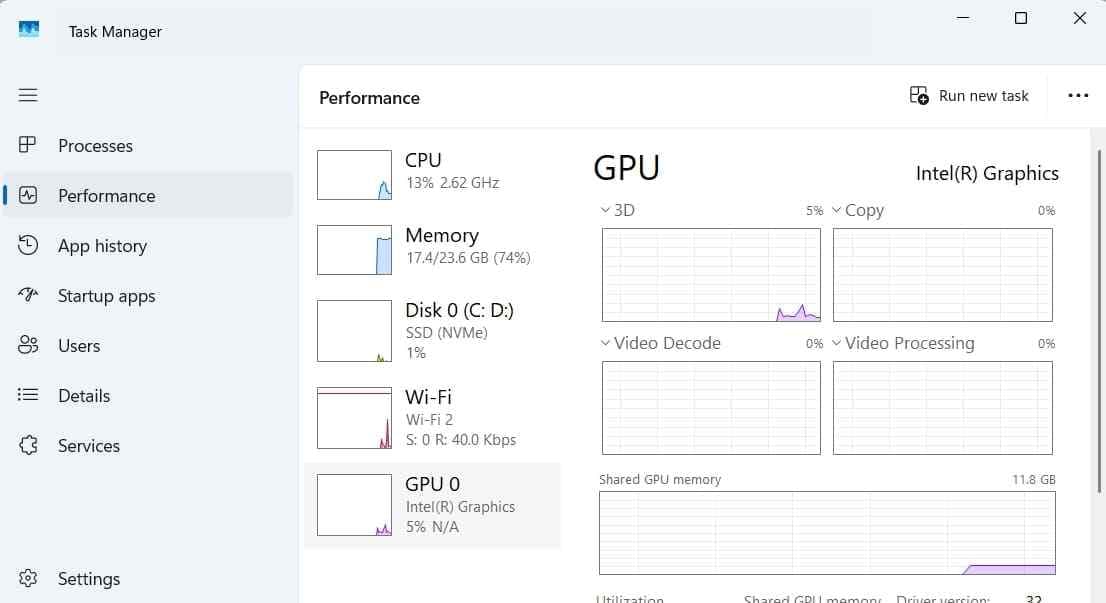
See Microsoft’s current Windows screen-flickering guidance for the same Task Manager distinction.
If Everything Except Task Manager Flickers
A stable Task Manager while another app or the surrounding desktop flickers makes an incompatible application more likely. Note which programs are open, whether the effect appears only in full-screen video or games, and whether disabling acceleration in that one app changes the behavior. Do not globally disable every graphics feature at once; changing one variable at a time preserves a useful diagnosis.
If Flickering Starts When the Lid or Hinge Moves
A Lenovo Yoga screen blinking at repeatable hinge angles is a stronger physical clue than a general desktop flicker. The display cable passes through a mechanically active area, so a loose connector, damaged cable, strained hinge, or failing panel can produce intermittent lines or blackouts. Move the lid gently only as much as needed to confirm the pattern. A Windows driver reinstall cannot repair a damaged connection.
If the Internal Screen Flickers but an External Monitor Is Stable
Connect a compatible display directly when possible, avoiding the dock or adapter you are trying to eliminate as a suspect. A stable external image increases suspicion of the internal panel, cable, connector, or a setting unique to the built-in display. It is not proof of a failed panel: the internal and external outputs can use different refresh rates, HDR modes, and signal paths. If both displays flicker together, investigate the graphics driver, GPU, dock, or broader system path.
Part 2. Try the Fast, Non-Destructive Fixes
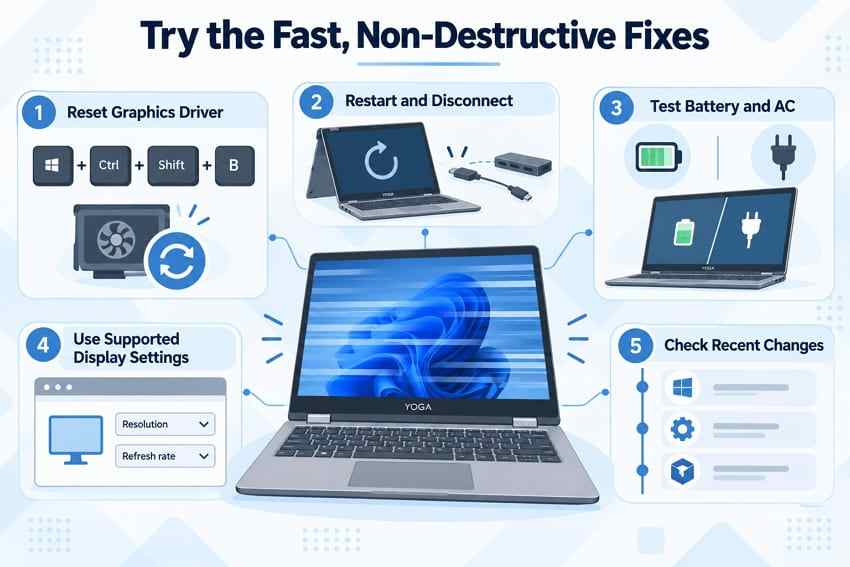
These checks do not erase files, uninstall Windows, or change firmware. Test the screen after each one and keep the combination that reproduces the problem—display, power source, connected device, app, and hinge position—in your notes.
Reset the Graphics Driver With Windows + Ctrl + Shift + B
Press Windows + Ctrl + Shift + B once. Windows may beep and the display may briefly go black while the graphics driver resets. Microsoft lists this shortcut as a possible quick response to screen flicker. It does not install a new driver or repair hardware, so a recurring problem still needs the tests that follow.
Restart and Disconnect Docks, Adapters, and External Displays
Shut down the Yoga, disconnect nonessential USB devices, docks, video adapters, external displays, and removable drives, then start it with only power connected. If the internal screen is stable, reconnect one device at a time. A result tied to one accessory may reflect that device, its cable, power delivery, firmware, or the display mode it negotiates—not necessarily the laptop panel.
Test on AC Power and Battery Power
Observe the display once on battery and once with the correct Lenovo power adapter connected. A change between modes can point toward brightness behavior, a power profile, charger or dock power delivery, or hardware. Do not interpret the test alone as proof that the battery or adapter has failed. Stop using any charger that is damaged, unusually hot, sparking, or producing an odor.
Return Resolution and Refresh Rate to Supported Values
Open Settings > System > Display, select the built-in display, and choose the resolution marked Recommended. Then open Advanced display and select a refresh rate actually listed for that panel. The available choices depend on the model, connection, and display. Microsoft’s current refresh-rate instructions use this same path.
Check Whether the Problem Started After an Update
Write down the last time the screen worked normally. Compare that date with Windows Update history, a graphics-driver update, a new app, a BIOS update, or a change to HDR or refresh rate. Timing is evidence, not certainty: a component can also fail coincidentally after an update. Use the date to choose between a driver rollback, an app test, and hardware-focused checks.
Part 3. Repair the Display-Driver Path
If Task Manager flickers with the rest of the image—or the problem began immediately after a graphics update—work through the driver path in order. Avoid downloading a driver merely because it has the same Intel, AMD, or NVIDIA brand name. Yoga models use different panels, GPUs, power-management components, and validated driver packages.
Roll Back the Driver After a Recent Update
Rollback is most useful when the Lenovo Yoga screen flicker began after a known display-driver change and Windows still retains the previous package.
Step 1. Open the graphics adapter properties. Right-click Start, choose Device Manager, expand Display adapters, select the relevant adapter, and open Properties.
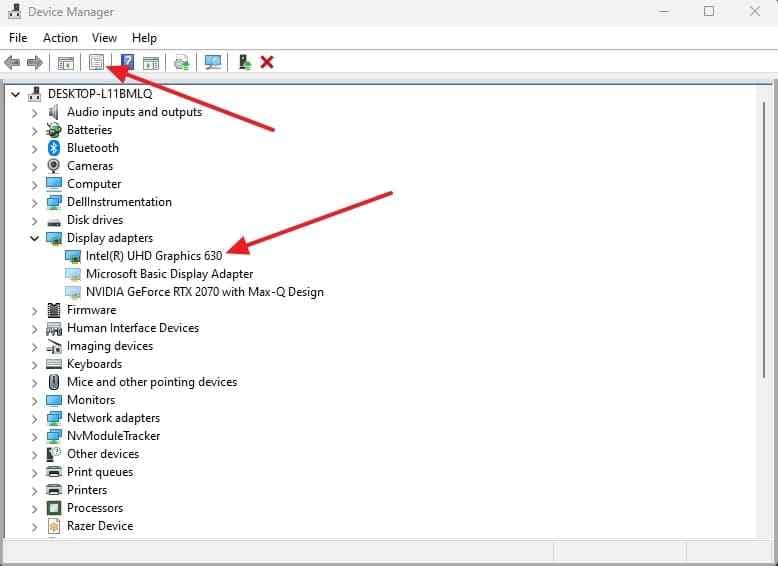
Step 2. Roll back and restart. Open the Driver tab, choose Roll Back Driver, give the requested reason, finish the rollback, and restart. If the button is unavailable, Windows does not have a previous driver package available through this route; move to an exact-model installation instead of forcing an unrelated package.
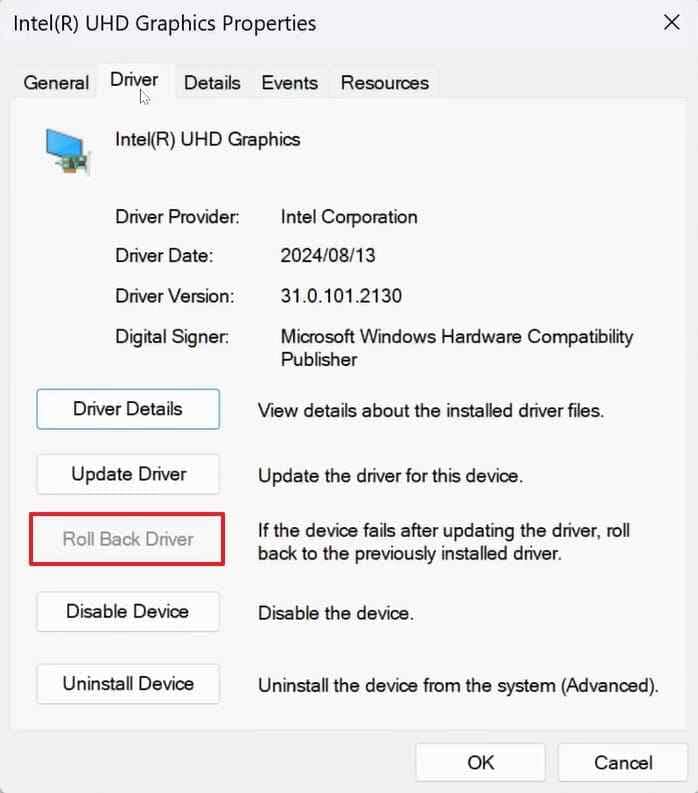
Reinstall the Lenovo-Validated Graphics Driver for the Exact Model
If rollback is unavailable or does not help, identify the full Yoga model and machine type before downloading anything. A “Yoga 7,” “Yoga Pro,” or “Yoga Slim” family name alone may cover multiple hardware configurations. Use Lenovo Vantage’s device information or the label and system details for the machine; do not post the serial number publicly.
For an existing driver that may be corrupted, uninstalling the display adapter in Device Manager and restarting can let Windows detect the device again. After that, install the package Lenovo validates for the exact machine when one is offered. During the transition, Windows may use a basic display driver with reduced resolution or features.
Update Through Lenovo Vantage or the Serial-Number Support Page
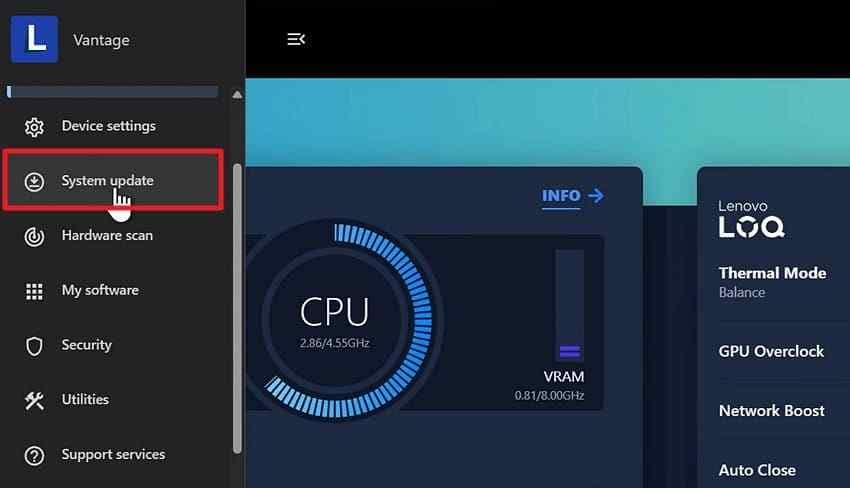
Lenovo Vantage is the simpler route because it identifies the computer locally. Its wording and layout can change by version, so use the System Update area shown in your installed app rather than relying on an identical button position.
Step 1. Open System Update. Launch Lenovo Vantage, open its menu if necessary, and choose System Update.
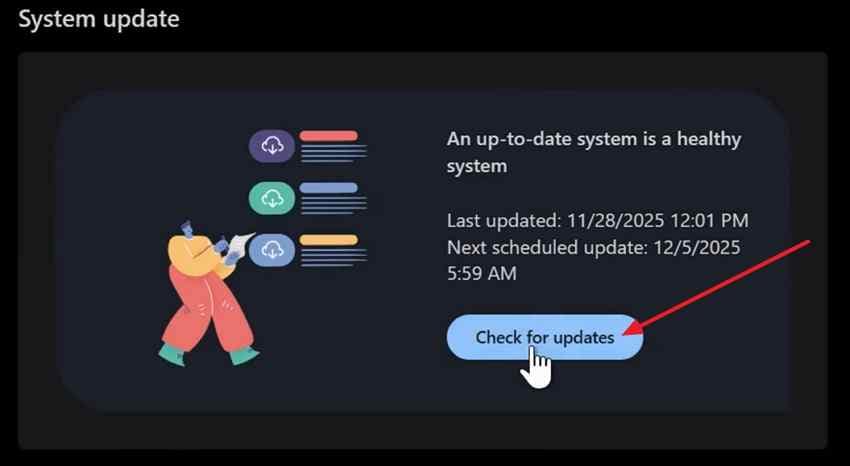
Step 2. Check the offered packages. Select Check for Updates, review the model-specific results, and install an applicable graphics or display package. Restart when requested, then retest the same scenario that caused the flicker.
If Vantage is unavailable, use Lenovo’s support page and identify the device by its serial number or exact machine type. Because Lenovo’s regional support routes and page labels can change, begin from Lenovo Support rather than copying a driver URL for a different Yoga.
Step 1. Identify the exact product. Use the support page’s product-detection option or enter the specific model details manually. Confirm that the displayed machine matches your laptop before continuing.
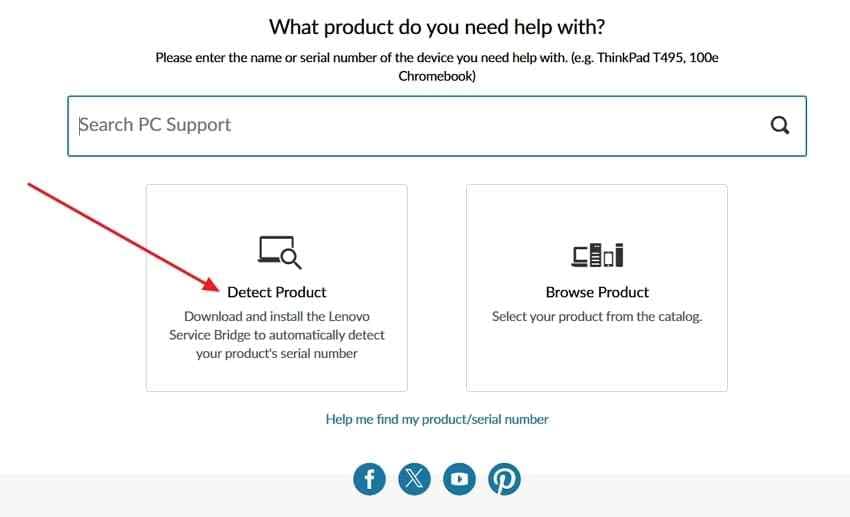
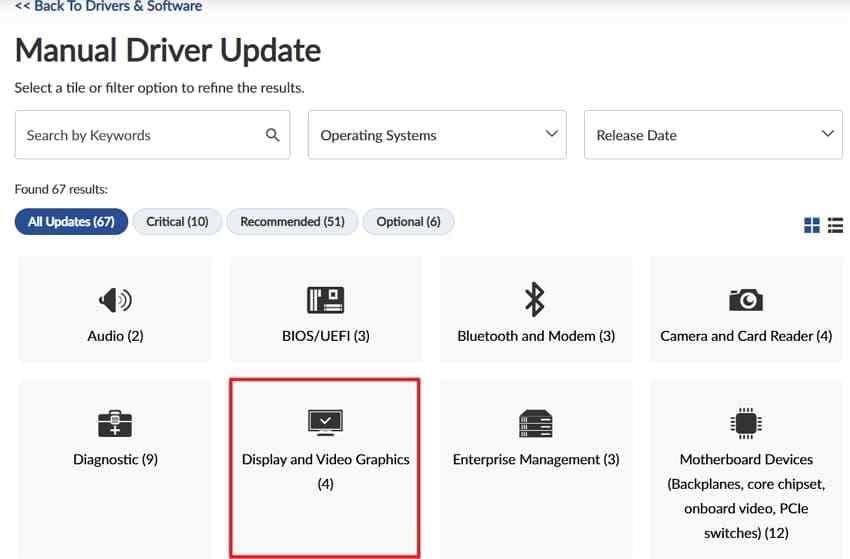
Step 2. Select the display category. Open the manual driver area, choose the display or video-adapter category, and download only a package listed for the identified model and installed Windows version. Install it, restart, and test again.
Update Both Integrated and Discrete Graphics on Dual-GPU Models
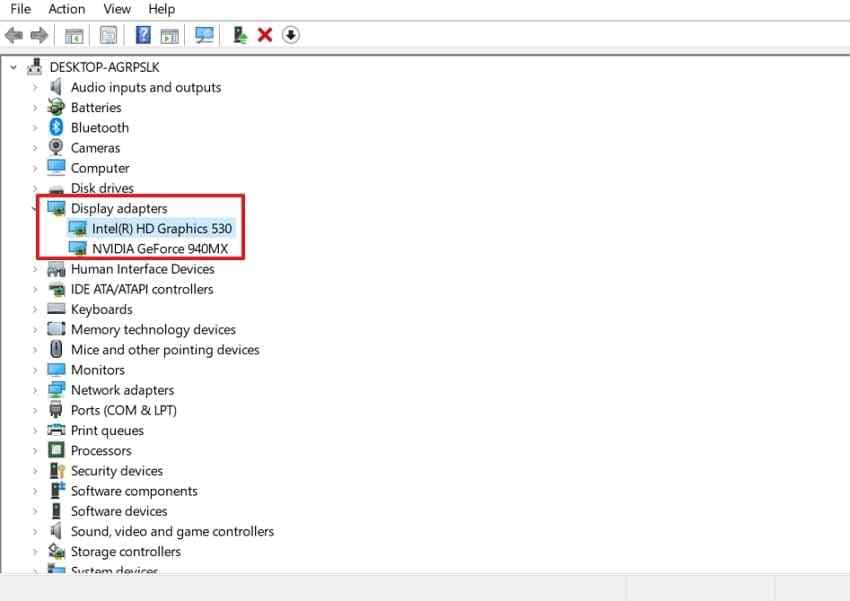
Some—but not all—Yoga configurations contain both integrated graphics and a discrete GPU. Open Device Manager and expand Display adapters. If two adapters are listed, record both names and check for applicable exact-model packages for both. A workload can switch GPUs between the desktop, video, and 3D applications, so updating only one side can leave a scenario-specific problem unresolved.
Use Safe Mode to Confirm a Driver or Software Cause
Safe Mode starts Windows with a limited set of files, drivers, and services. Stability there means something loaded during normal startup—such as a driver, service, or application—is more likely. It does not name the culprit, and instability in Safe Mode does not by itself prove hardware failure.
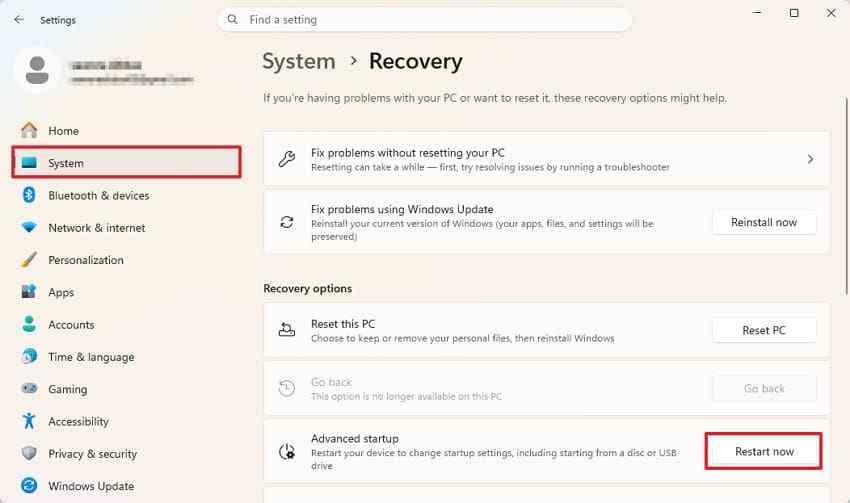
Step 1. Enter Advanced startup. In Windows 11, open Settings > System > Recovery. Beside Advanced startup, select Restart now. Save open work first.
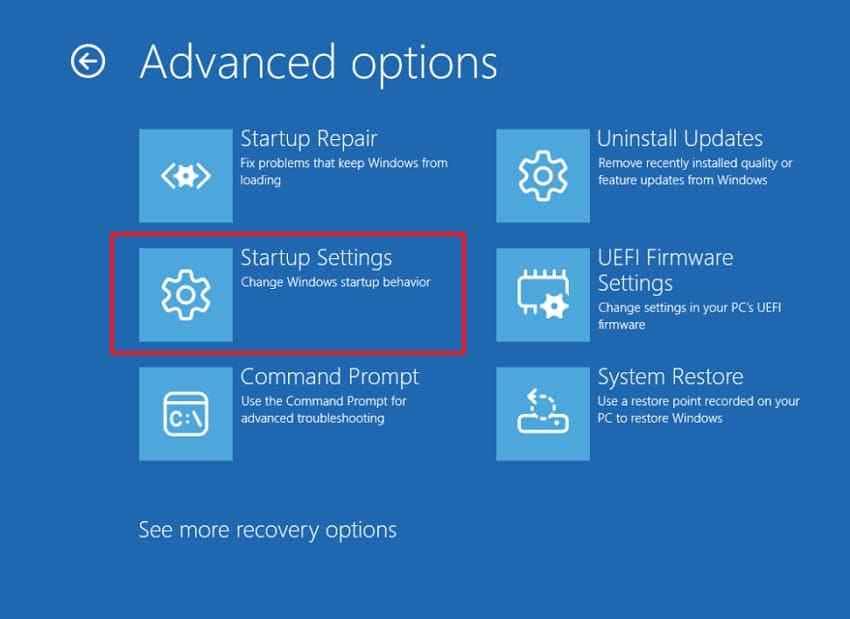
Step 2. Open Startup Settings. After restart, choose Troubleshoot > Advanced options > Startup Settings > Restart.
Step 3. Start Safe Mode. When Startup Settings appears, press 4 or F4. Reproduce the same display scenario for several minutes, then restart normally to exit Safe Mode.
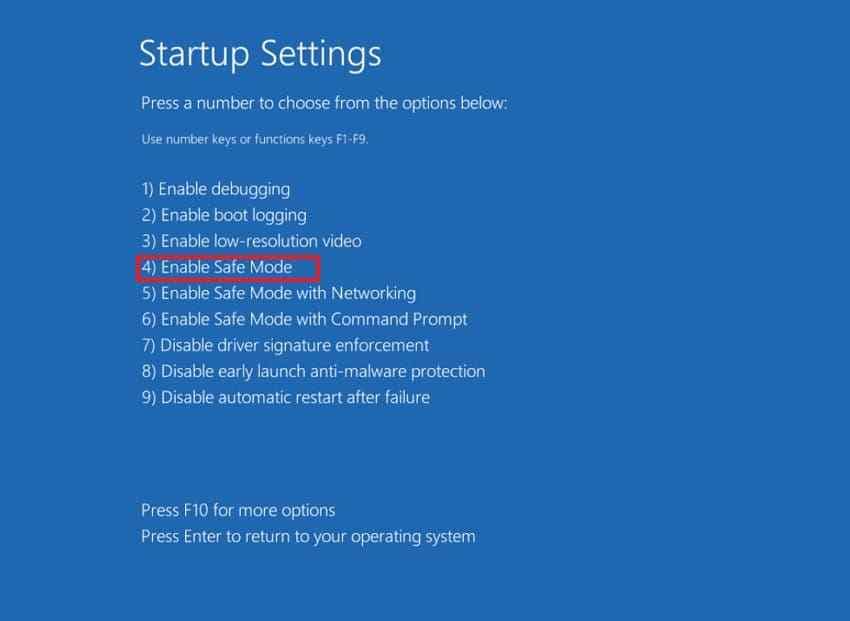
Microsoft documents the current route and the diagnostic purpose of Safe Mode in Windows Startup Settings.
Part 4. Isolate an App or Windows Setting
If Task Manager stays stable while the rest of the screen flashes—or the symptom appears only in one browser, editor, streaming app, or game—test the application path before changing firmware. Record the original setting so every experiment can be reversed.
Update or Remove Recently Changed Applications
Prioritize software installed or updated near the first occurrence. Test one suspected app at a time; removing several together may stop the flicker but leave you unable to identify which one mattered.
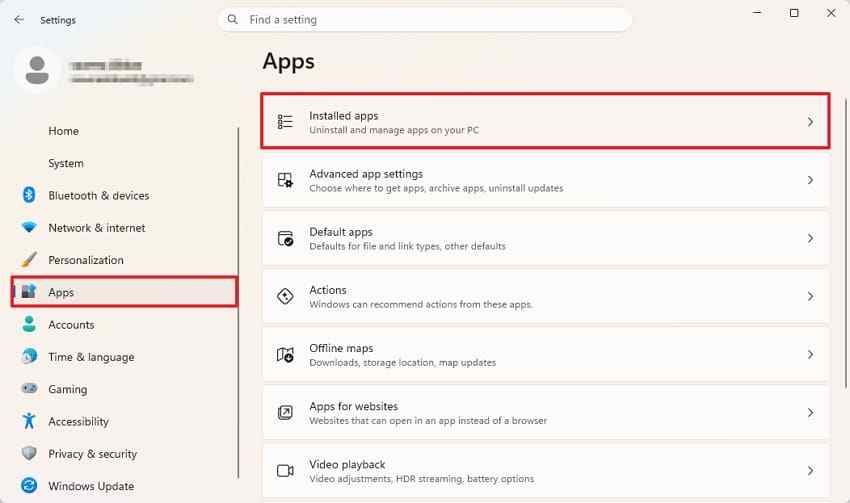
Step 1. Review installed applications. Open Settings > Apps > Installed apps and look for software added or updated around the start of the problem.
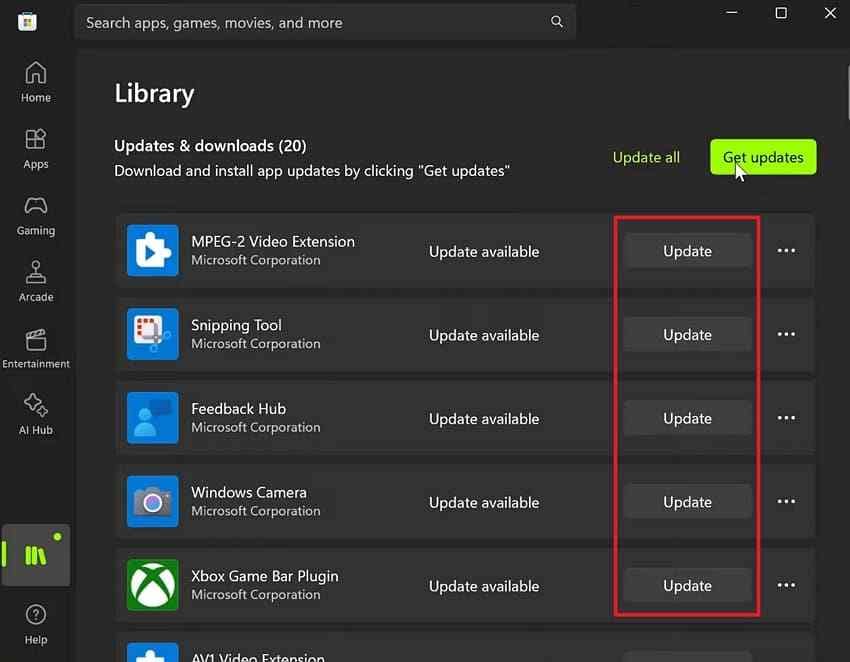
Step 2. Update the suspected app. Use Microsoft Store’s update area or the publisher’s built-in updater. Restart the app and reproduce the same content, window mode, and monitor arrangement.
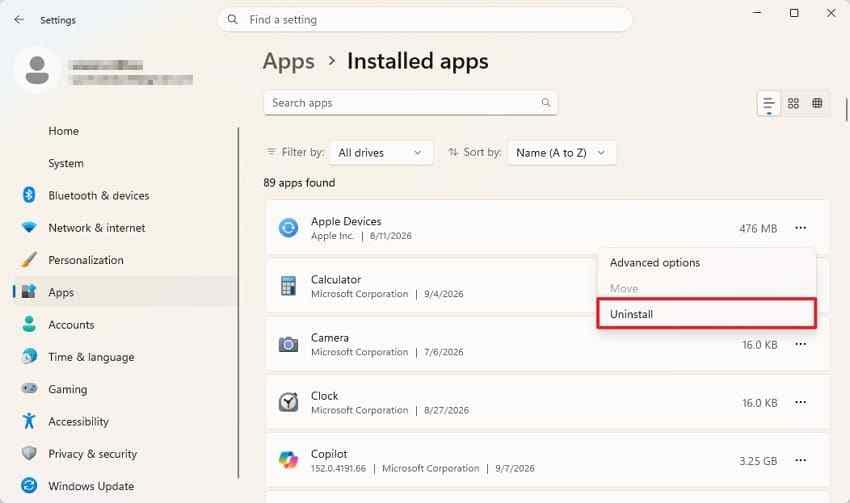
Step 3. Remove the app only if needed. If a current version still causes the problem, return to Installed apps, open the app’s menu, choose Uninstall, and restart Windows. Preserve licenses, profiles, or exported settings you will need before removal.
Test Browser and App Hardware Acceleration One App at a Time
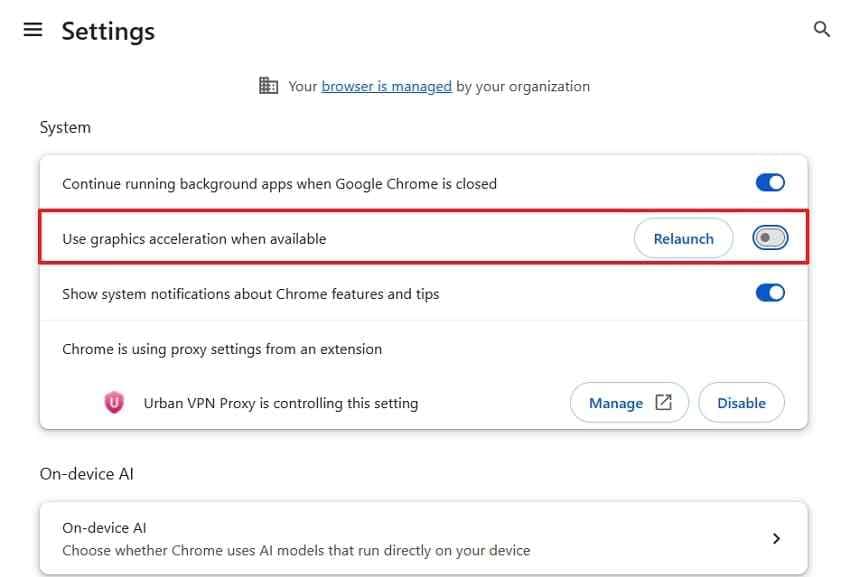
Hardware acceleration lets an application use the GPU to render video and interface elements. A flicker limited to one accelerated app can come from the app, driver, media path, or their interaction. Disable acceleration only inside the affected app, retest, then update both the app and graphics driver before making the workaround permanent.
Step 1. Open the app’s graphics setting. In Chrome, for example, open Settings > System. Other applications use different labels and locations.
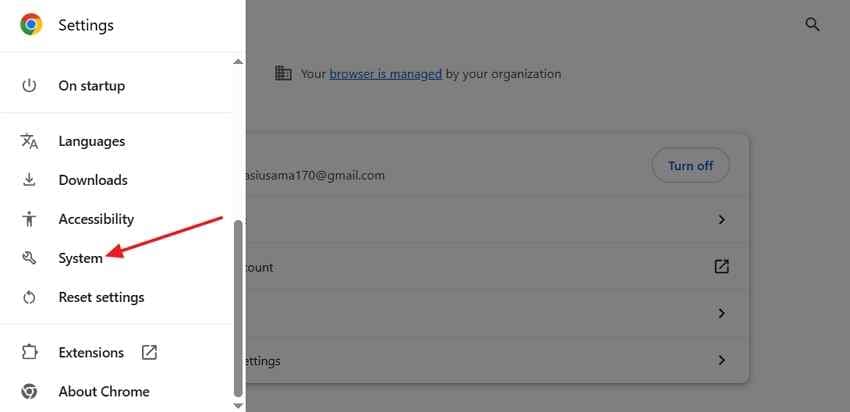
Step 2. Disable acceleration and relaunch. Turn off Use graphics acceleration when available, select Relaunch, and repeat the exact activity that flickered.
Use a Clean Boot to Isolate Background Software
A clean boot starts Windows without most non-Microsoft services and with disabled startup apps. It is useful when the flicker is not tied to one visible program. It is a diagnostic state, not a permanent configuration.
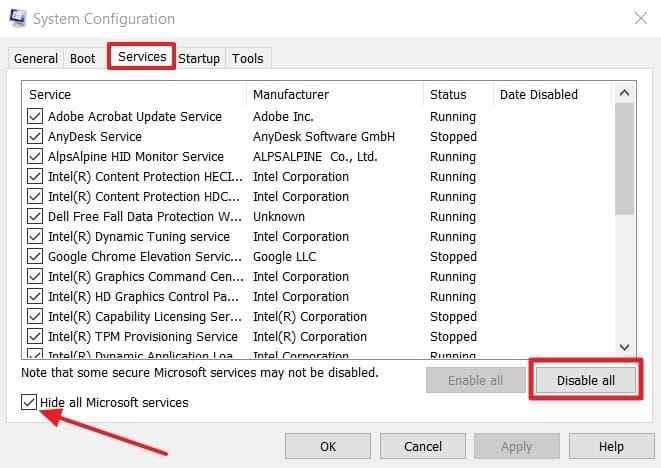
Step 1. Disable non-Microsoft services for the test. Open System Configuration, select Services, check Hide all Microsoft services, and then choose Disable all. Hiding Microsoft services first is important.
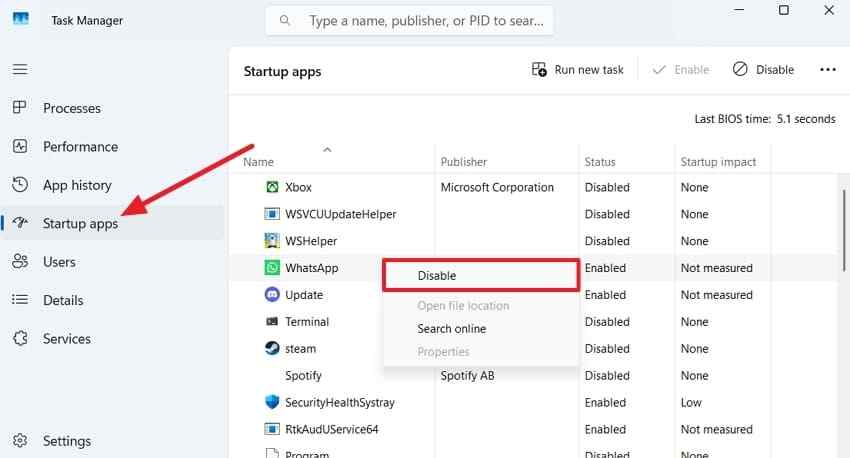
Step 2. Disable startup apps. Open the Startup tab, select Open Task Manager, disable the enabled startup items, close Task Manager, and restart. If the screen becomes stable, re-enable items in small groups until the trigger returns.
When testing is complete, restore a normal startup and re-enable the services and startup items that are not responsible. Follow Microsoft’s current clean-boot procedure so you do not accidentally leave required services disabled.
Test HDR, Variable Refresh Rate, and Dynamic Refresh Rate Only if Supported
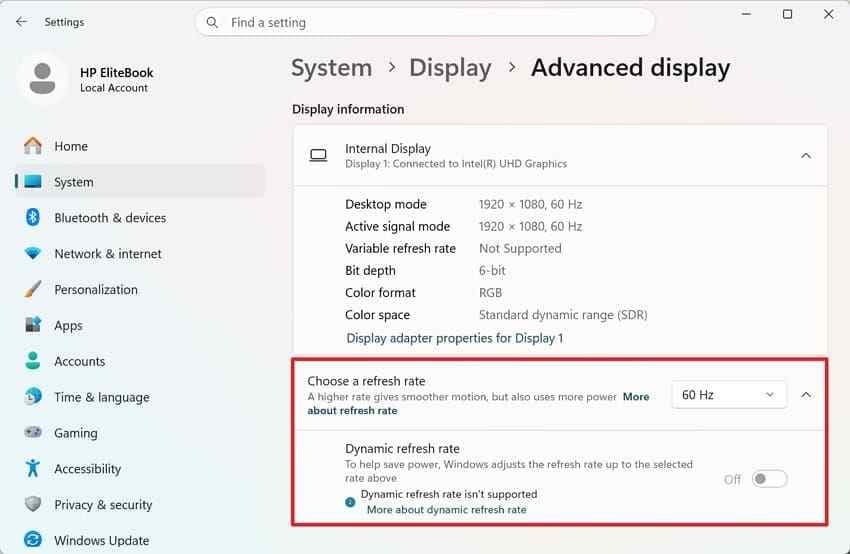
Yoga display options differ widely. HDR, Variable Refresh Rate (VRR), and Windows 11 Dynamic Refresh Rate (DRR) may not appear on a given panel, and their absence is normal. Microsoft says DRR requires supported hardware, a VRR-capable display, and a refresh rate of at least 120 Hz. Do not install generic utilities to force a feature the panel does not support.
Step 1. Test HDR if the option exists. Open Settings > System > Display > HDR, select the built-in panel, turn HDR off temporarily, and reproduce the flicker. Restore the original setting if it makes no difference. Microsoft’s HDR settings guide explains the current controls.
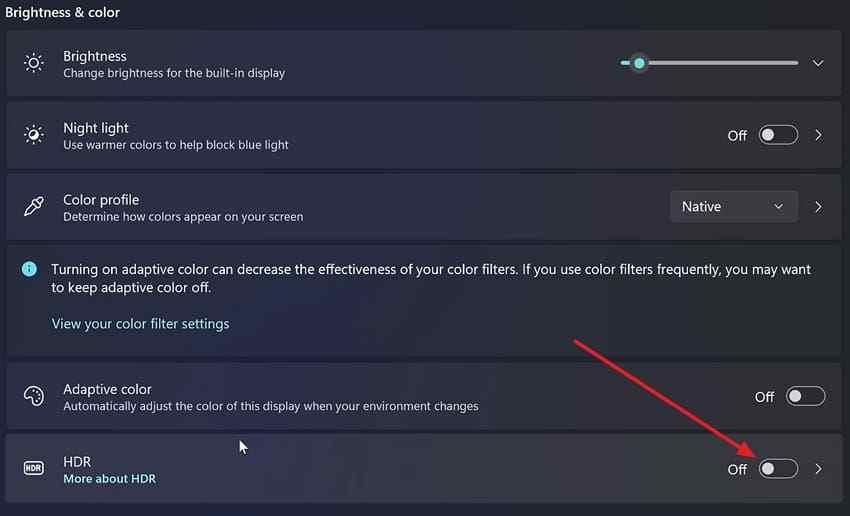
Step 2. Test a fixed supported refresh rate. Return to Display > Advanced display. If DRR is available, turn it off temporarily, or choose a fixed rate listed for the panel. If Advanced display reports VRR support and the applicable graphics software exposes a VRR control, test it off once. Restore any setting that does not affect the symptom.
Part 5. Check Yoga-Specific Display and Hinge Scenarios
Convertible Yogas add a physical variable that ordinary laptop guides often miss: the screen and cable move through a wide hinge range. At the same time, “Yoga” covers many generations and panel types. Use the following checks to separate a repeatable position-related symptom from normal OLED characteristics or Windows behavior.
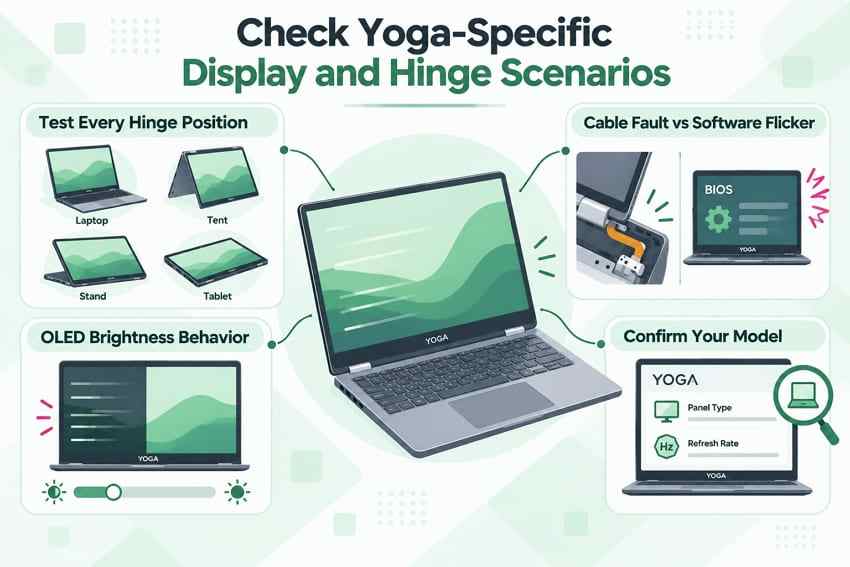
Test Laptop, Tent, Stand, and Tablet Positions
Place the Yoga on a stable surface and move through the positions the model is designed to support: laptop, tent, stand, and tablet. Pause at each position rather than repeatedly swinging the lid. Record whether the image changes at a precise angle and whether touching the display frame—not the panel surface—affects it.
A symptom that appears in one posture can still have more than one cause. Rotation, tablet-mode behavior, and display settings can change with posture, while the cable and connector also move physically. Compare the result in BIOS and with an external monitor before deciding which explanation fits.
Distinguish a Hinge-Cable Fault From a Software Flicker
A hinge-cable fault becomes more likely when the internal display cuts out, develops lines, changes color, or flickers at repeatable lid angles while an external display stays normal. A software cause becomes more likely when the symptom follows one app, disappears in Safe Mode, or affects both displays together without any relationship to hinge movement.
These patterns guide the next action; they are not a substitute for inspection. Stop flexing the lid if movement worsens the image, makes a cracking or grinding sound, or reveals hinge separation. Continued movement can aggravate a damaged cable or enclosure.
Check OLED Flicker or PWM Sensitivity Without Calling It a Driver Bug
Some OLED panels control perceived brightness by pulsing light over time, often called pulse-width modulation (PWM). A sensitive user may perceive this as flicker or eye strain, particularly at certain brightness levels, even when recordings and screenshots show no Windows fault. This is not the same symptom as random blackouts, colored artifacts, or lines triggered by moving the lid.
Do not assume every Lenovo Yoga has OLED or that every OLED Yoga behaves identically. Check whether the exact unit uses OLED, then compare several normal brightness levels without installing unofficial panel tools. If the image visibly blanks or distorts, or if the symptom is new, continue the driver and hardware diagnosis rather than labeling it PWM.
Confirm Panel Features for the Exact Yoga Model
Resolution, native refresh rates, touch support, HDR capability, VRR support, and panel technology vary by machine type. Verify the exact configuration using the device’s machine type and Lenovo’s Product Specifications Reference. A family marketing page may list several optional panels and therefore cannot prove which one is installed in your computer.
Part 6. Check BIOS, Firmware, and Hardware
Move here when the screen also flickers outside normal Windows, reacts to hinge movement, or remains unstable after careful driver and app isolation. Firmware updates are not routine “try everything” steps: install them only when they apply to the exact model and their release information is relevant to the problem.
Test Whether the Screen Flickers in BIOS
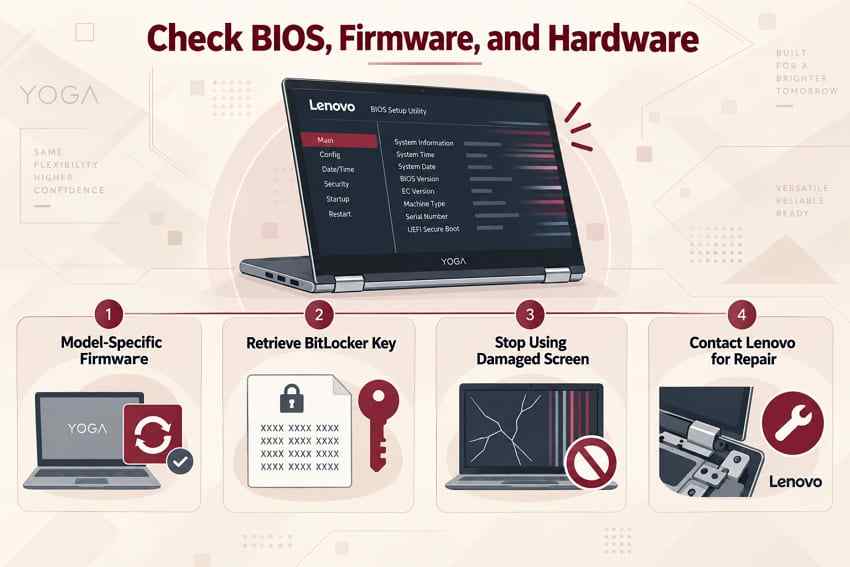
Enter the Yoga’s BIOS/UEFI setup using the method documented for the exact model; the key, button, or Windows recovery route can differ across generations. Leave the firmware screen open long enough to observe the display without changing settings. If flicker appears there, installed Windows apps and the normal Windows graphics stack are less likely causes. Firmware, panel, cable, connector, GPU, or mainboard issues remain possible.
If BIOS is stable, the result supports—but does not prove—a Windows-side cause. Return to Safe Mode, exact-model drivers, clean boot, and per-app tests. If you are unsure how to exit BIOS, choose its exit option without saving changes.
Install Only Model-Specific Lenovo BIOS and Firmware Updates
Confirm the complete model, connect reliable AC power, close applications, and follow the instructions supplied with the Lenovo update. Never install BIOS meant for a similar-looking Yoga or interrupt the firmware process by powering off the laptop. If the screen cannot remain stable enough to follow the process safely, arrange service instead of attempting an update blind.
Prepare the BitLocker Recovery Key Before Firmware Changes
A firmware, security, or hardware change can cause Windows to request the 48-digit BitLocker recovery key. Before making that change, check whether device encryption or BitLocker protects the drive and retrieve the key from the account or organization that manages it. Microsoft explains how encryption protects inaccessible devices in its BitLocker overview and how to locate a saved key in its recovery-key guide.
Microsoft Support cannot recreate a lost key. On a work or school laptop, contact the organization’s administrator before firmware changes or service. Recovery software cannot bypass BitLocker encryption without authorized access to the key.
Stop Using a Screen With Lines, Blackouts, Heat, or Physical Damage
Shut down and disconnect power if you see enclosure damage, a separating hinge, liquid exposure, smoke, sparks, swelling, an electrical smell, or abnormal heat. Persistent lines and blackouts that appear before Windows loads also warrant hardware assessment, especially when they react to lid movement. Do not press on the panel, spray cleaner into the bezel, or force the hinge.
Contact Lenovo Service for Panel, Cable, Hinge, or Mainboard Repair
Service is the sensible next step when flicker occurs in BIOS, multiple operating states produce the same fault, the lid angle reliably changes it, or physical damage is visible. Give the technician your test results: exact machine type, internal-versus-external behavior, BIOS behavior, hinge angle, power source, and any recent update. Those observations are more useful than describing the screen as merely “blinking.”
Part 7. Protect Files Before Reset or Service
Screen flickering usually affects the display path, not the files themselves. Even so, a reset, reinstall, drive replacement, or service visit can put the only copy of important data at risk. Protect it before a major change. If a normal backup works, use that; data-recovery software is not a substitute for an ordinary copy.
Back Up Files Normally if Windows Remains Usable
Connect a trusted external drive and copy irreplaceable documents, photos, project files, browser exports, and recovery keys. If the internal screen is unreadable but an external monitor is stable, use the external display to complete the backup. Confirm that several copied files open from the destination, then eject the drive safely. Do not begin a reset merely because the laptop has one flickering episode.
Use Recoverit Only When Windows Is Inaccessible and the Drive Is Readable

If Windows cannot start but the storage remains detectable and readable, Wondershare Recoverit for Windows provides a bootable-media workflow that may help copy recoverable files before reset or service. Use another working Windows computer to prepare the USB. Results depend on drive condition, encryption, overwriting, and whether the recovery environment can access the storage.
In this scenario, the relevant capabilities are:
- creating bootable recovery media from another working Windows computer;
- scanning a storage device that the recovery environment can detect;
- previewing found files where preview is available; and
- saving selected recoverable files to a separate destination.
Recoverit does not repair the Yoga screen, display cable, BIOS, GPU, or Windows installation. It cannot bypass BitLocker, guarantee recovery, reconstruct overwritten data, or scan a drive that neither the computer nor recovery environment can access. If the drive makes abnormal sounds, repeatedly disconnects, or is not detected, stop DIY scanning and consult a professional recovery service.
How to Recover Files From an Inaccessible Windows Installation
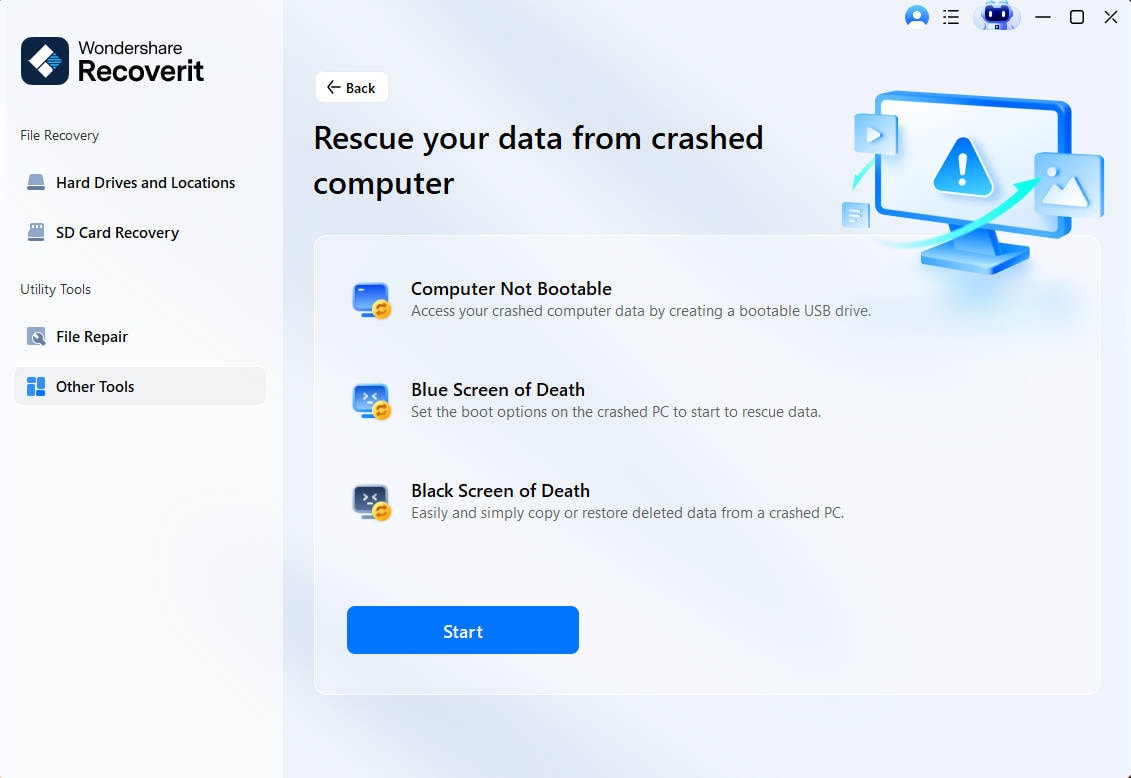
Step 1. Open the bootable recovery tool. Install and open Recoverit on a working Windows computer. Select Other Tools > Computer Not Bootable > Start. Labels can change by product version, so follow the current on-screen wording if it differs.
Step 2. Create the bootable USB. Connect a blank USB drive that meets the capacity shown by the software, select the correct device, and choose Start. Confirm the drive identity carefully: creating the media erases the selected USB.

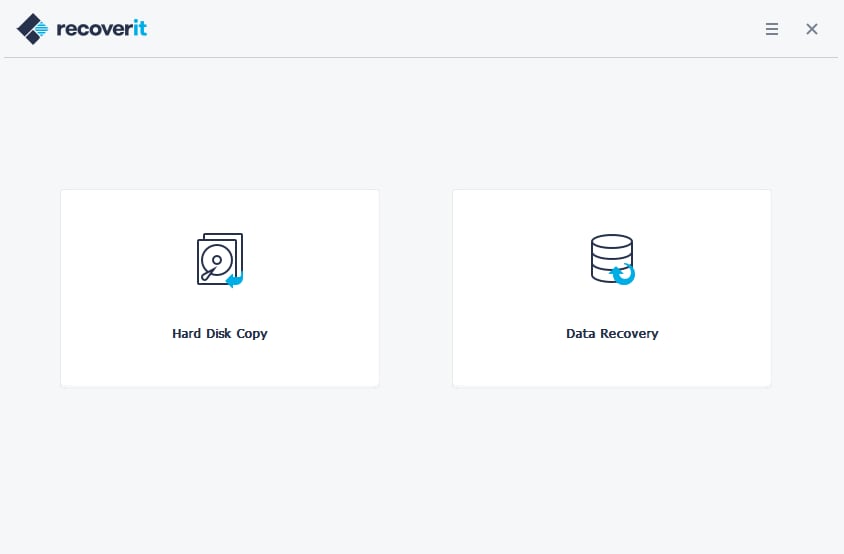
Step 3. Start the affected Yoga and recover to another drive. Use the exact model’s documented boot-device selection method to start from the Recoverit USB. Do not disable Secure Boot or change firmware settings unless the official instructions for that model and recovery media require it. In Recoverit, select Data Recovery, scan the readable source, preview important results, and save the selected files to a different physical drive.
Try Wondershare Recoverit to Perform Data Recovery
 Security Verified. Over 7,302,189 people have downloaded it.
Save Recovered Files to a Different Drive
Writing recovered files back to the source can overwrite other data that has not yet been recovered. Use a separate external drive with enough free space, then open representative files from that destination. If the source storage is unstable, minimize rescans and seek professional help when the data is valuable.
Reset or Reinstall Windows Only After Data Is Safe
A Windows reset or clean installation is a software repair step, not a fix for a flicker that already appears in BIOS or changes with hinge movement. Proceed only after verifying the backup or recovered copy. If software isolation already points to one driver or app, address that narrower cause instead of erasing the system.
Conclusion
A Lenovo Yoga screen flicker is easiest to solve when you classify it before applying fixes. Task Manager helps distinguish common driver and app paths; Safe Mode and clean boot refine the software diagnosis; an external monitor, BIOS, and gentle hinge-position test expose evidence that Windows cannot explain. Use only the features and drivers supported by the exact Yoga configuration, protect the BitLocker key and files before major work, and choose service when the symptom is physical or persists outside Windows.
FAQ
-
Why Is My Lenovo Yoga Screen Flickering Suddenly?
A recent graphics-driver update, application change, dock, display setting, or developing hardware fault can make flickering appear suddenly. Open Task Manager while the symptom is visible, note what changed recently, and compare the internal display with BIOS and an external monitor. The pattern is more useful than the timing alone. -
Why Does My Lenovo Yoga Screen Blink When I Move the Lid?
Flicker that repeats at particular lid angles makes the display cable, connector, panel, or hinge area more suspect. Move the lid gently only to confirm the relationship, then stop if the image worsens or the hinge feels damaged. A driver reinstall cannot repair a failing physical connection. -
Why Does My Lenovo Yoga Screen Flicker but an External Monitor Works Normally?
A stable external monitor increases the likelihood of a problem limited to the built-in display path, such as the internal panel, cable, connector, or an internal-display-specific setting. It does not prove that the panel is defective because the two displays may use different refresh, HDR, and signal paths. Combine this result with the hinge and BIOS tests. -
Can a Lenovo Yoga Graphics Driver Cause Screen Flickering?
Yes. A damaged, incompatible, or recently updated graphics driver can cause flicker. If Task Manager flickers with everything else, roll back a recent driver or install the Lenovo-validated package for the exact model. On dual-GPU configurations, check the drivers for both adapters.


