You can sometimes install Windows 11 on unsupported hardware, but passing Setup's checks is not the same as having a supported PC. An older processor, disabled TPM, or missing Secure Boot capability can block installation. Microsoft does not support installations on hardware that fails its requirements and does not guarantee updates, including security updates. Some older CPUs cannot run recent Windows 11 releases even if you bypass the installer.
Before changing anything, back up your files and save your BitLocker recovery key. You can then compare an ISO-based upgrade, a Rufus installation USB, and a manual Setup workaround. The right choice depends on your CPU, firmware, and whether you need to keep your existing apps and files.
In This Article
Part 1. Can You Install Windows 11 on Unsupported Hardware?
First identify why the computer failed the compatibility check. An unsupported processor model is different from a processor that lacks instructions Windows needs to start. Likewise, TPM 2.0 may be absent, or it may simply be disabled in firmware. If you are diagnosing the warning itself, see what to check when a PC does not meet Windows 11 requirements. Then choose an installation method below only after you understand the cause.
Windows 11 Requirements Versus CPU Instructions
Microsoft's Windows 11 specifications require a compatible 64-bit processor with at least two cores, 4 GB of RAM, 64 GB of storage, UEFI firmware with Secure Boot capability, and TPM 2.0. Graphics and display requirements also apply.
For Windows 11 version 24H2 and later on x64 PCs, the processor must also support POPCNT and SSE4.2. This is a functional CPU requirement, not just a name on Microsoft's supported-processor list. The Rufus project's FAQ confirms that bypassing Setup cannot add either missing instruction. If your CPU lacks one, stop rather than trying more installers.
Which Checks Can Be Bypassed?
Some installation tools and registry settings can bypass eligibility checks for TPM 2.0, Secure Boot, or an unsupported CPU model. They do not install missing firmware functions, supply CPU instructions, or guarantee drivers and feature updates. Before bypassing a missing TPM or Secure Boot message, check whether those features can be enabled normally.
| Requirement or problem | Possible next step | Important limit |
| TPM 2.0 disabled | Check Intel PTT or AMD fTPM in firmware | Enabling an existing TPM is safer than bypassing it; keep the BitLocker key |
| Unsupported CPU model | Consider a limited ISO upgrade or Rufus Setup bypass | Cannot overcome missing POPCNT or SSE4.2 instructions |
| TPM 1.2, not 2.0 | Some in-place ISO registry workflows may proceed | MoSetup does not remove the TPM 1.2 prerequisite |
| Secure Boot setup check | Enable UEFI/Secure Boot if supported or use a USB Setup bypass | Bypassing a check does not supply Secure Boot protection |
| Insufficient RAM or storage | Upgrade hardware rather than forcing a low-resource installation | A bypass cannot make the computer perform reliably |
Microsoft Support and Update Risks
Microsoft advises against unsupported installations. Such PCs are not entitled to official support or guaranteed updates, including security fixes. A system may receive some updates and still fail a later feature upgrade. You may also see an unsupported-hardware watermark and run into driver or stability problems.
If this is your main work computer, weigh those risks against using supported hardware. Windows 10's standard support ended on October 14, 2025; continuing to use an older operating system also requires a deliberate security plan.
Part 2. What to Do Before Installing Windows 11 on an Unsupported PC
Choose an installation path only after you know whether you have a usable backup, an accessible encryption key, and a CPU that can run the target Windows 11 release. These checks matter more than which bypass tool you use. If your computer already satisfies Microsoft's requirements, follow the standard Windows 11 upgrade guide instead of bypassing checks.
Back Up Files and Save BitLocker Recovery Keys
Copy your Desktop, Documents, Pictures, Downloads, and project folders to an external drive or another verified location. Open a few files in the backup to confirm they work. If you use OneDrive, confirm the files are actually synchronized and available on the web. For a computer you cannot back up, postpone an installation that might overwrite the drive.
Before changing TPM, UEFI, Secure Boot, partitions, or the operating system, locate your 48-digit BitLocker or device-encryption recovery key. Microsoft explains how to find a BitLocker recovery key. Check your Microsoft account, work or school account, printed copy, or saved backup. Recoverit cannot bypass BitLocker encryption if the legitimate unlock credentials are unavailable.
Choose an In-Place Upgrade or a USB Clean Install
An in-place upgrade is the only method here intended to preserve installed programs and personal files. A booted USB clean installation is different: depending on what you select or delete in Setup, it can remove the existing Windows installation and data. Use this table to choose deliberately.
| Your situation | Recommended path | What to expect |
| Windows 10 still starts; CPU has required instructions; TPM 1.2 or newer is present | Method 1: ISO-based in-place upgrade | May offer Keep personal files and apps, but compatibility checks can still stop it |
| You have a verified backup and want to start over | Method 2: Rufus USB | Booted clean installation; erase only a backed-up target disk |
| You already have a standard Microsoft installation USB | Method 3: manual LabConfig changes | Advanced USB clean-install workaround; version-dependent |
| CPU lacks POPCNT or SSE4.2, or drive is failing | Do not force installation | Use compatible hardware or resolve the storage problem first |
Download a Genuine ISO and Plan Your Rollback
Download Windows 11 from Microsoft's official download page, not a modified ISO from an unknown source. If Microsoft supplies a trusted SHA-256 hash for your specific image, you can compare it using Get-FileHash. Computing a hash without a trusted value to compare against does not prove authenticity.
Keep your backup and recovery media separate from the installation USB. Following an in-place upgrade, Go back is usually available for 10 days if the previous installation files remain. It is not a substitute for a backup, and a clean installation does not provide the same rollback option.
Part 3. How to Install Windows 11 on Unsupported Hardware
The following three methods address different installation routes. None makes your PC officially supported. If a screen differs from the instructions, stop to verify your Windows version rather than selecting an unfamiliar option that could erase data.
Method 1. Upgrade Windows 10 Using an ISO and Registry Editor
Use this when: Windows 10 still boots, the processor has the required CPU instructions, and the PC has at least TPM 1.2. The MoSetup registry setting is a community-documented workaround for certain CPU-model and TPM 2.0 checks; it is not an officially supported installation route. It may stop working with particular Windows releases.
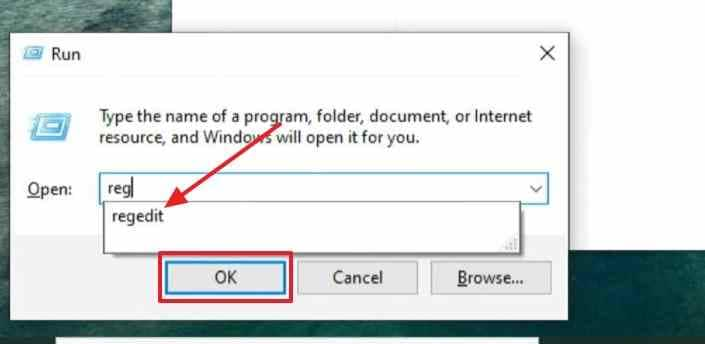
Step 1. Back up your files and BitLocker recovery key. Download an official Windows 11 ISO, then press Win + R, type regedit, and open Registry Editor with administrative permission.
Step 2. Go to HKEY_LOCAL_MACHINE\SYSTEM\Setup\MoSetup. If MoSetup is missing, create that key under Setup. Back up the relevant registry key before editing.
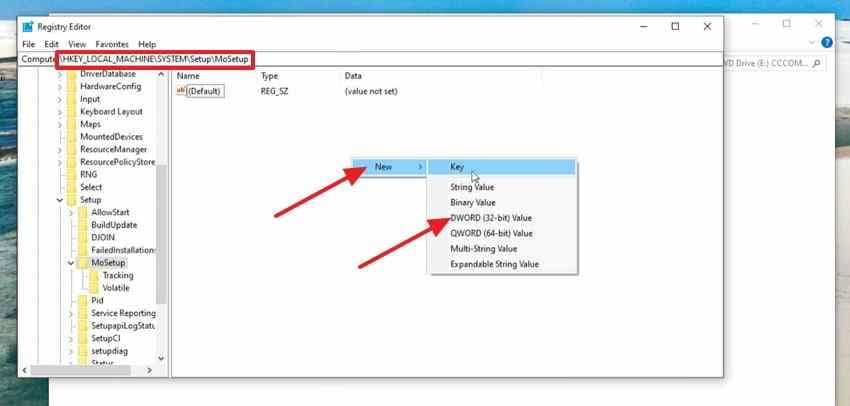
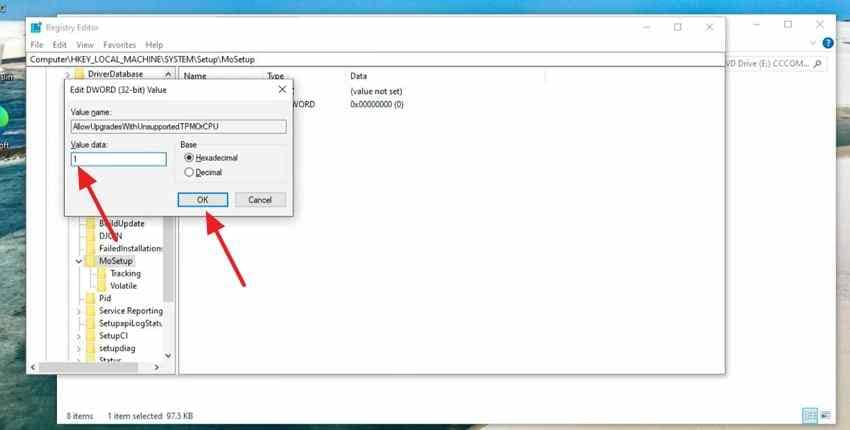
Step 3. Create a DWORD (32-bit) Value named AllowUpgradesWithUnsupportedTPMOrCPU. Set its value data to 1.
Step 4. Double-click the Windows 11 ISO to mount it. Open the mounted drive and run setup.exe from within Windows 10; do not boot the USB for this in-place path. Follow the prompts and review any compatibility warnings.
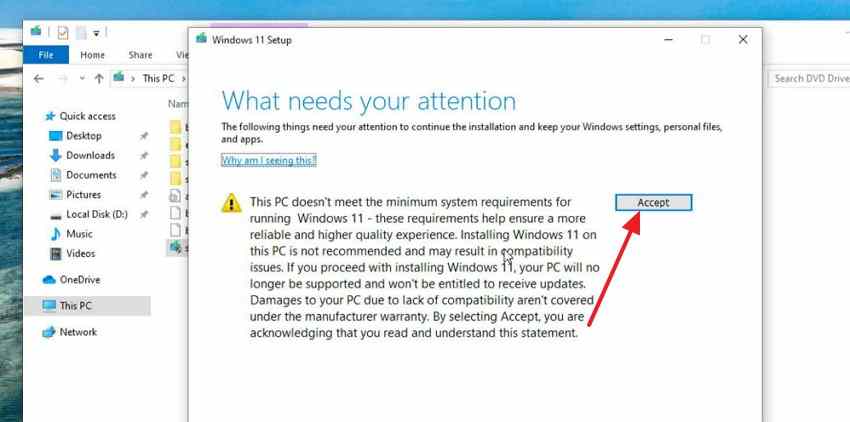
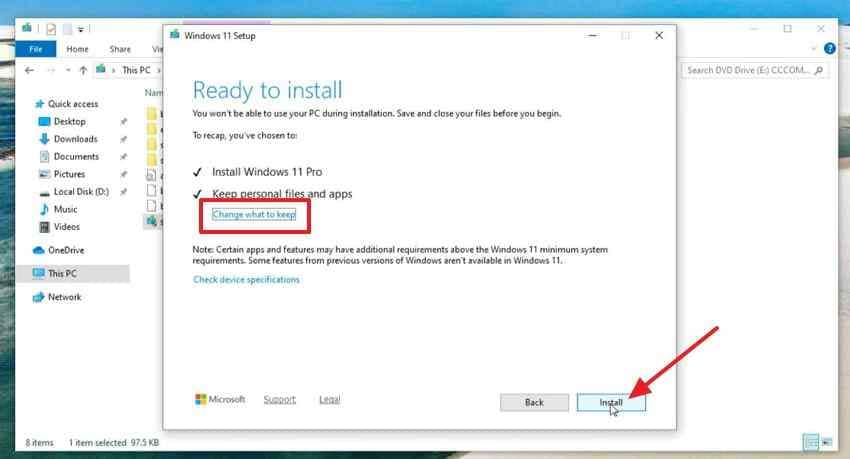
Step 5. At Ready to install, confirm that Keep personal files and apps is selected. If that option is missing, stop rather than accepting a different retention choice. Complete the upgrade only after confirming the backup and selection.
Check the result: Sign in, confirm your files and apps are present, and inspect the activation and driver status in Part 5. If Setup refuses to continue, use the exact error to troubleshoot; do not assume an unrelated bypass will preserve your installed apps.
Important: The older setup.exe /product server workaround is not included as a recommended method because its behavior and support can change. Do not treat an installer labeled Windows Server as evidence that a normal Windows 11 upgrade is safe.
Method 2. Create a Windows 11 Installation USB With Rufus
Use this when: You have a reliable backup and accept a possible clean installation. Rufus can create bootable media that removes selected Setup checks. The USB itself will be erased when Rufus writes the image.
Step 1. On a working Windows PC, download the official Windows 11 ISO and Rufus from its official site. Connect a USB drive with at least 8 GB of space and copy anything important off that USB first.
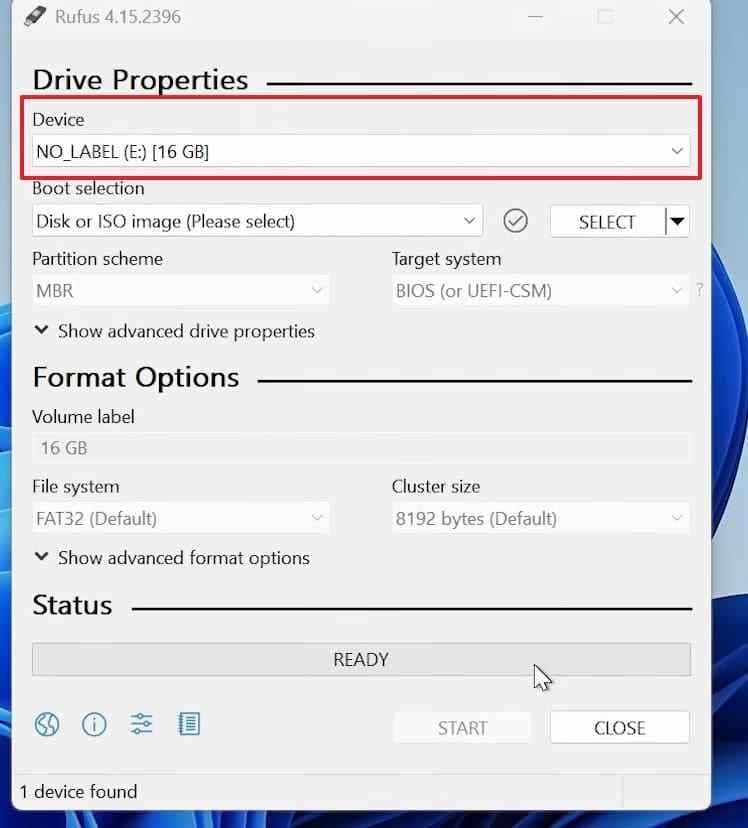
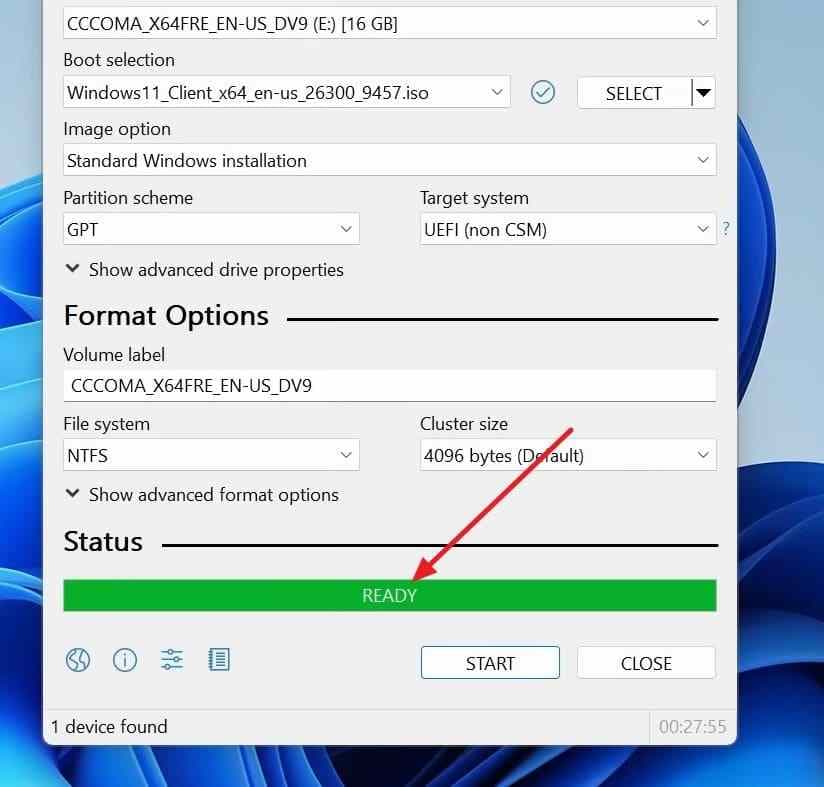
Step 2. Open Rufus. Under Device, select the USB drive you intend to erase. Choose SELECT and pick the Windows 11 ISO. Set Partition scheme and Target system for your PC's actual firmware mode; do not assume GPT/UEFI is suitable for every older computer.
Step 3. Click START. In the Windows User Experience window, select the hardware-check removal option that applies to your situation, such as Remove requirement for 4GB+ RAM, Secure Boot and TPM 2.0. Review every option before confirming. Wait for Rufus to show READY.
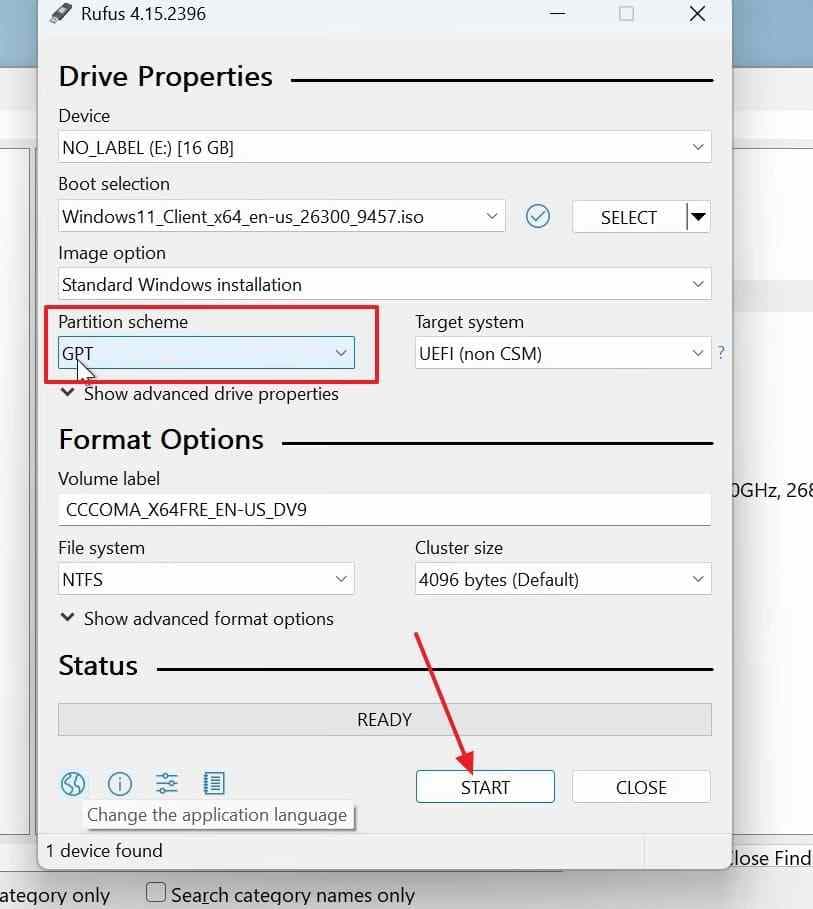
Wait for Rufus to report READY before ejecting the installer USB.
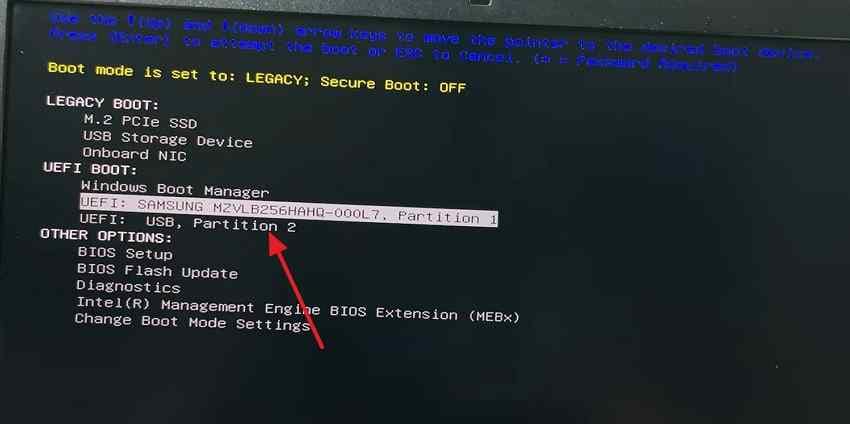
Step 4. Insert the USB into the target PC. Restart and open the manufacturer's one-time boot menu. Select the correct USB entry. If the media will not boot, check the firmware mode and Rufus target-system selection rather than changing unrelated partitions.
Step 5. Follow Windows Setup, select the edition matching your license, and choose the installation destination. Do not delete, format, or overwrite partitions until you have verified a separate backup and positively identified the target drive. If you are uncertain which disk is which, cancel Setup.
Check the result: After installation, confirm Windows starts, your network and storage drivers work, and activation is valid. If the installer still complains about hardware, see Fix 3. Rufus cannot make a CPU without POPCNT or SSE4.2 run a recent Windows 11 release.
Video tutorial: Installing Windows 11 on Unsupported Hardware. The ExplainingComputers walkthrough (April 2023) demonstrates a Rufus clean install starting around 5:07, followed by a Windows 10 upgrade using Registry Editor around 10:23. It predates recent Windows 11 releases, so use it to understand the workflow rather than treating every screen or bypass choice as current.
Method 3. Apply a Manual Setup Bypass From USB
Use this when: You already have a standard Windows 11 USB installer and are comfortable editing the temporary registry inside Windows Setup. This is an unofficial, version-dependent clean-install workaround, not a way to retain existing apps and files.
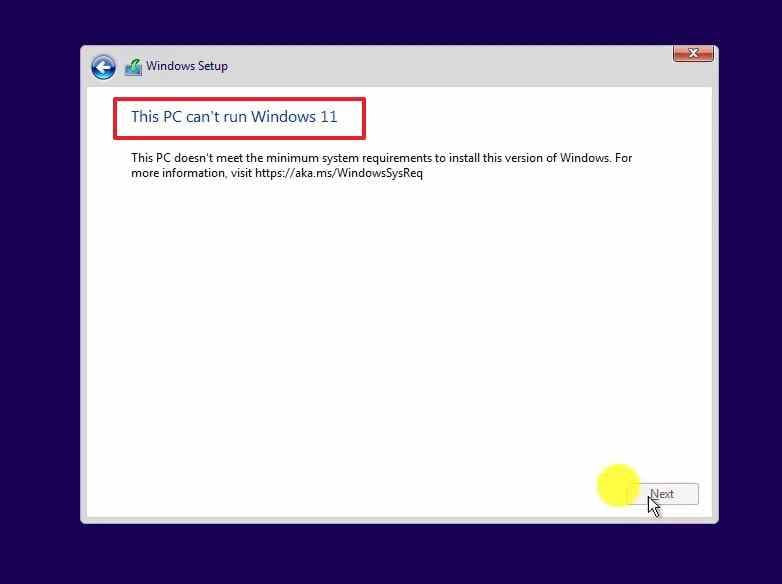
Step 1. Create the installation USB using Microsoft's tool, back up your data, and boot the target computer from that USB. If Setup reports that the PC cannot run Windows 11, press Shift + F10 (on some keyboards, Shift + Fn + F10).
Step 2. In Command Prompt, enter regedit. Navigate to HKEY_LOCAL_MACHINE\SYSTEM\Setup and create a key called LabConfig if it does not already exist.
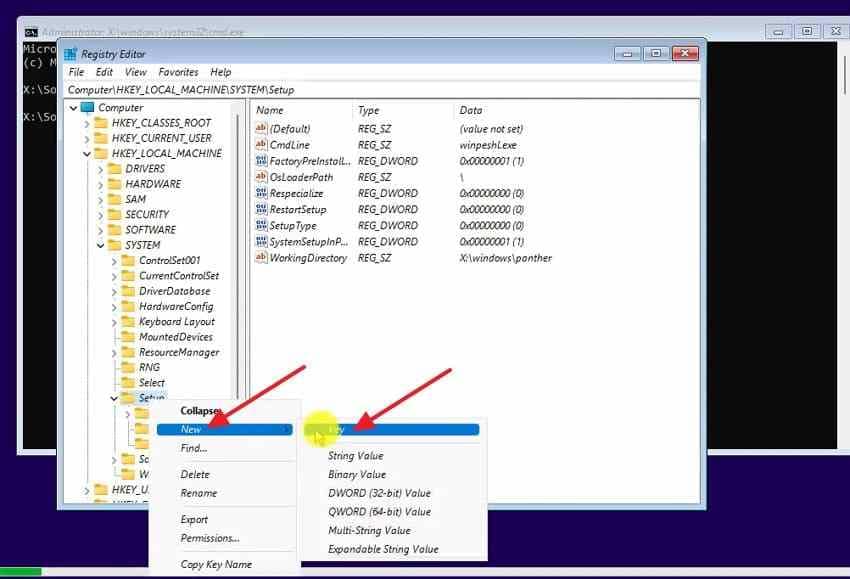
Step 3. Inside LabConfig, create DWORD (32-bit) Value entries named BypassTPMCheck and BypassSecureBootCheck, setting each needed entry to 1. Some installation media also recognize BypassRAMCheck; do not use it to hide a serious memory shortage. These values do not replace missing CPU instructions or hardware security.
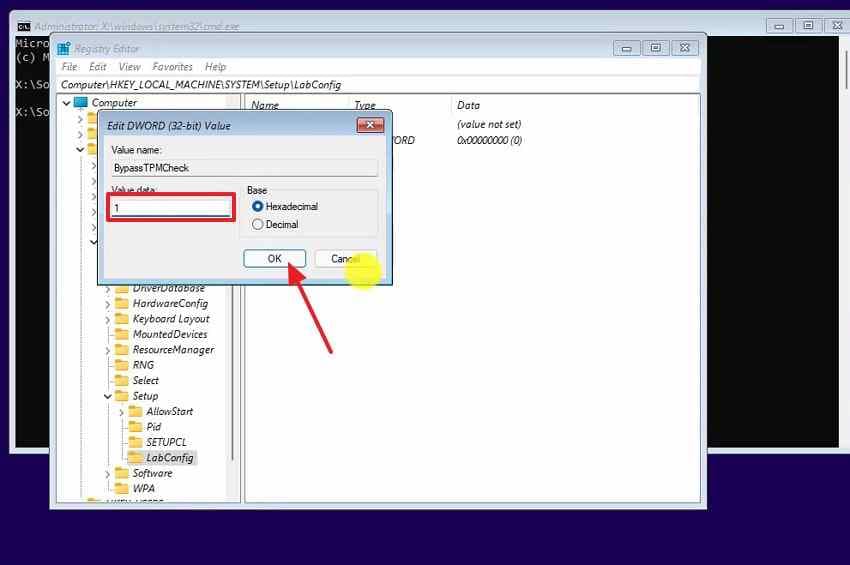
Step 4. Close Registry Editor and return to Setup. Navigate back and retry the eligibility check. If it still fails, stop and check the actual reason instead of adding arbitrary registry values.
Step 5. If Setup continues, verify the Windows edition and target disk before proceeding. Treat any formatting or partition-deletion choice as destructive. Keep other drives disconnected when practical so they cannot be selected by mistake.
Check the result: Windows must finish installing and boot successfully. A passed setup check alone does not prove long-term support, working security features, or future update eligibility.
Part 4. How to Fix Windows 11 Installation Errors on Unsupported Hardware
Do not apply every workaround to every error. First identify whether Setup is rejecting the CPU, a disabled security feature, the USB boot configuration, or a driver. The safest fix may be to enable a feature your PC already supports instead of bypassing it.
Fix 1. This Processor Is Unsupported for Windows 11
An unsupported CPU model and a missing CPU instruction are not the same issue. Use Microsoft's Sysinternals Coreinfo to inspect CPU features while Windows 10 is still running.
Step 1. Download Coreinfo from Microsoft, extract it, and open Command Prompt in that folder. Run Coreinfo64.exe -f on an x64 PC, using the executable supplied in your download.
Step 2. Check the output for POPCNT and SSE4.2. Coreinfo uses an asterisk to indicate support and a dash to indicate the feature is unavailable. Compare the result with the target Windows 11 build's requirements.
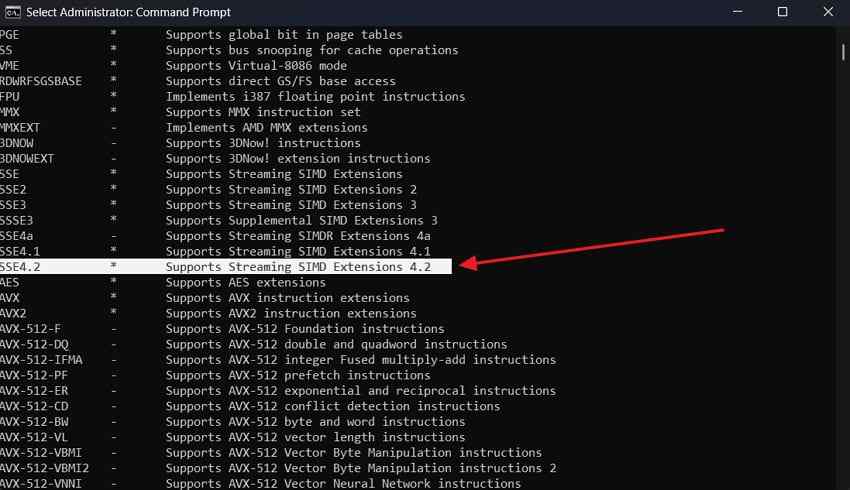
Step 3. If the CPU lacks a required instruction, stop. Neither Rufus nor a registry edit can add it. If the instructions exist but the model is not on Microsoft's eligibility list, a setup-check workaround may still be possible, with the support risks already explained.
Fix 2. This PC Must Support TPM 2.0 or Secure Boot
A TPM error may mean the feature is disabled, not missing. First press Win + R, run tpm.msc, and check the specification version. Then run msinfo32 and inspect BIOS Mode and Secure Boot State.
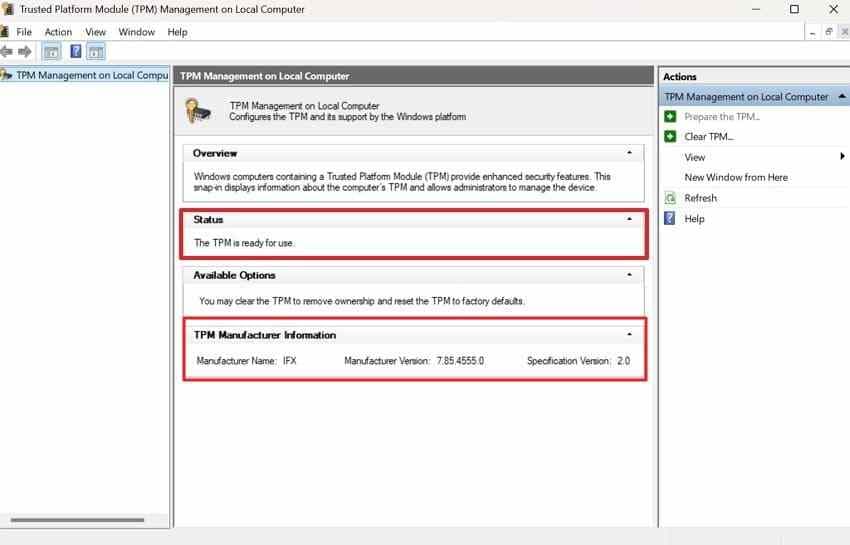
If the hardware supports TPM 2.0, follow your motherboard or PC manufacturer's instructions for enabling Intel PTT or AMD fTPM. Secure Boot requires UEFI capability; changing a system from legacy BIOS to UEFI may also require changes to its disk layout. Do not switch firmware boot mode, clear the TPM, or convert the system disk without a verified backup and BitLocker key. See Microsoft's TPM guidance.
Fix 3. Rufus USB Still Shows Unsupported Hardware
Reopen Rufus on a working PC and check that you selected the correct Windows ISO, the correct USB, and an appropriate target system. The hardware-check options appear when you click START; selecting the ISO alone does not apply them.
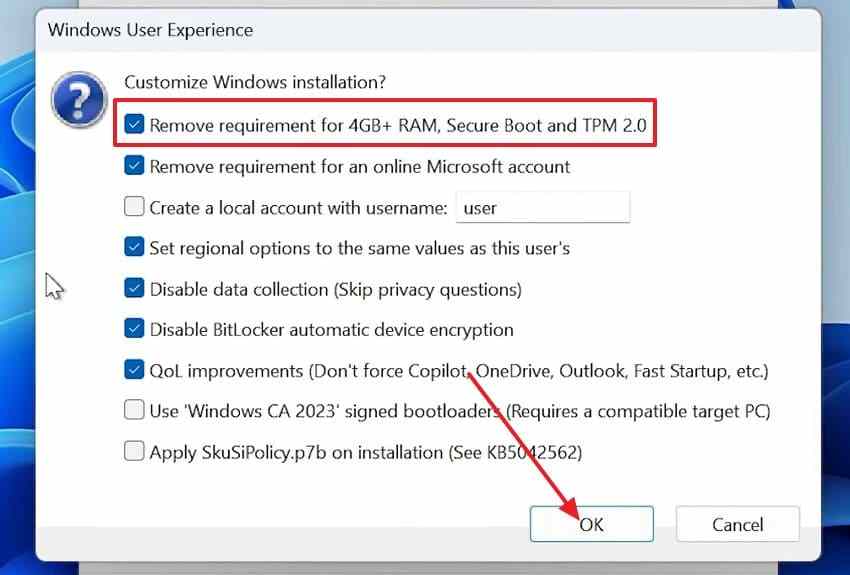
If you booted the Rufus-created USB, the selected setup bypasses should be applied for that booted installation. Running a different ISO's setup.exe from inside Windows is a separate in-place upgrade path and may trigger checks again. Rufus has documented special handling for some Windows 11 24H2 in-place upgrades, but it cannot remove the POPCNT/SSE4.2 limitation. Recreate the USB only after confirming the intended firmware and installation route.
Fix 4. Windows 11 Installation Fails or Gets Stuck
Disconnect nonessential external devices, check free space, and look for a driver-specific error rather than repeatedly forcing Setup. If an in-place upgrade rolls back, record the error code and check the installation logs.
Step 1. From a working Windows installation, download Microsoft's SetupDiag tool, which analyzes Windows Setup log files.
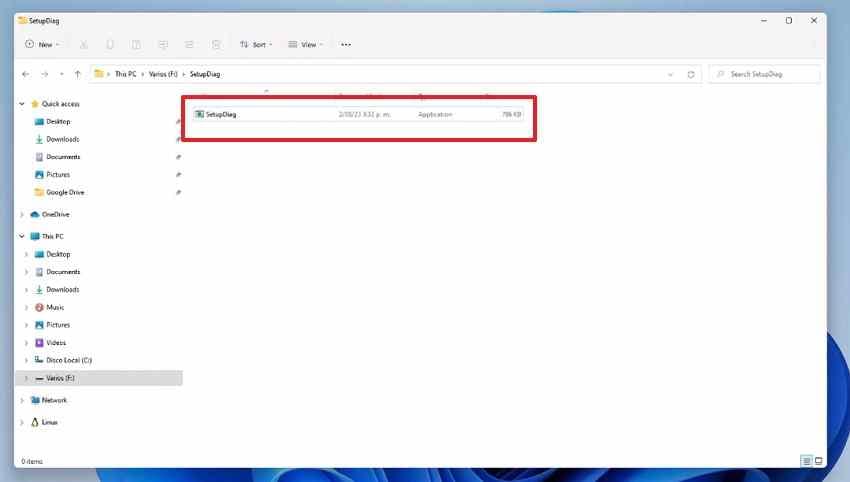
Step 2. Run SetupDiag with administrative permission, save its report to a known location, and review the rule name or error code. For example, the command SetupDiag.exe /Output:C:\SetupDiagResults.log writes a report to the C drive when the tool and permissions allow it.
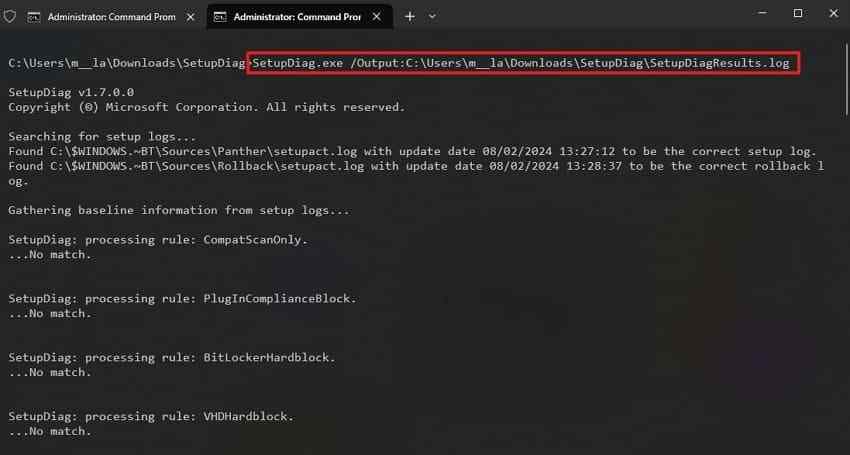
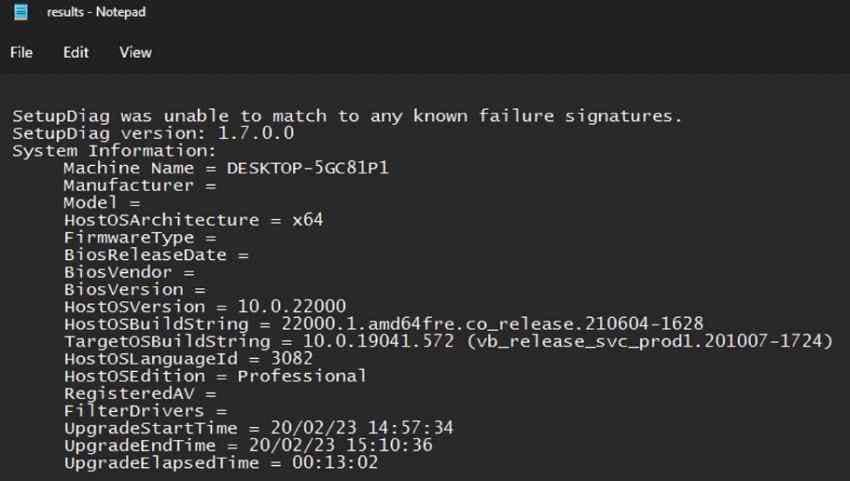
Step 3. Resolve the specific driver or application issue the report identifies, then retry only if the PC still meets the non-bypassable requirements. An error without a clear cause is a reason to stop and review the logs, not to delete the Windows partition.
Part 5. What to Check After Installing Windows 11
Booting successfully is only the first check. Make sure the installation is activated, essential devices work, and the update and rollback choices are clear before relying on the PC for important work.
Check Activation, Drivers, and Available Updates
Open Settings > System > Activation and confirm the activation status. In Device Manager, look for missing or failed drivers, especially network, display, and storage devices. Open Settings > Windows Update to review available quality updates and update history.
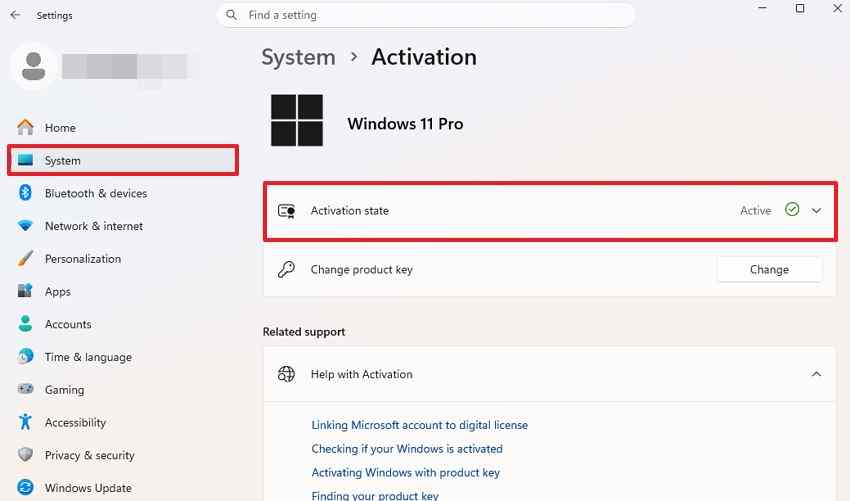
An update arriving today does not mean Microsoft guarantees the next one. Record the Windows edition and build using winver; keep current offline backups because a future feature release or driver update may stop working on this hardware.
Decide Whether to Roll Back or Replace the Hardware
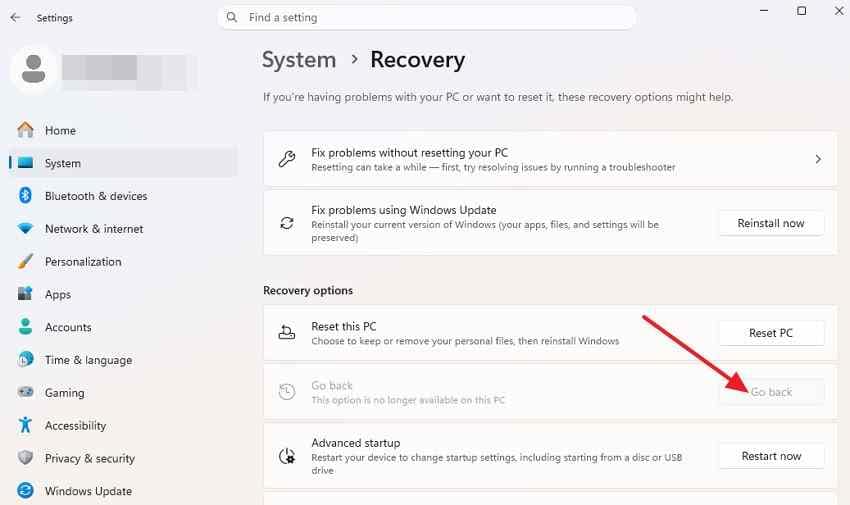
After an in-place upgrade, you can usually find Go back at Settings > System > Recovery for about 10 days, provided the previous Windows files are still present. Microsoft's rollback guide explains the restrictions. A USB clean install generally does not offer this rollback path.
If you have ongoing driver failures, missing security features, or no update entitlement, consider moving to supported hardware. Returning to Windows 10 is not by itself a long-term security solution now that standard Windows 10 support has ended.
Part 6. Recover Lost Files After Windows 11 Installation Using Recoverit
A Windows installation problem and a file-loss problem need different solutions. Wondershare Recoverit for Windows is a data recovery tool, not a Windows installer, compatibility bypass, or operating-system repair program. Consider a recovery scan only if files are genuinely missing and the original storage is still readable.
Check Existing Copies Before Running a Recovery Scan
First check the correct user account, Desktop, Documents, other folders under C:\Users, OneDrive, an external backup, and an existing Windows.old folder if your upgrade created one. Searching for a moved copy is safer than scanning for deleted data.
If important files still are not available, avoid installing new applications or writing large files to the affected disk. On SSDs, overwriting and TRIM can make deleted data unrecoverable; a clean install may already have replaced the old file data.
Scan Eligible Storage and Save Files Elsewhere
If the affected HDD, SSD, or external drive is still detected and accessible, Recoverit may help locate remaining recoverable documents, photos, and videos. Use a different Windows installation or a separate physical disk where possible to avoid writing to the source.
Step 1. Install and open Recoverit without writing to the drive containing missing files. In Hard Drives and Locations, select the affected readable drive or partition.
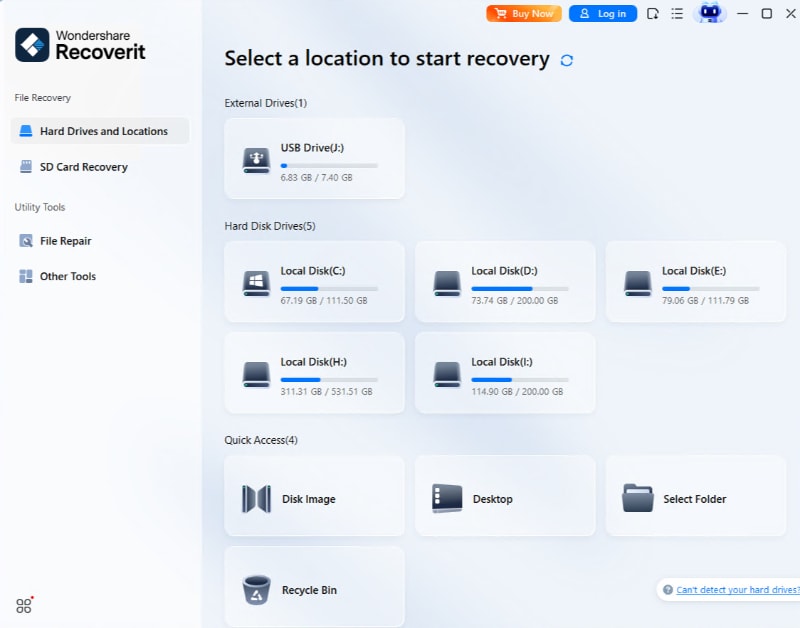
Step 2. Allow the scan to run. Use available file-type filters or search to narrow the results. A filename appearing in a scan does not guarantee the file will open correctly.
Step 3. Preview a candidate file when supported, select the items you want, and click Recover. Save them to a different healthy physical drive, not the disk you scanned. Open the recovered files to verify the output.

Know When Software Recovery Cannot Help
Recoverit cannot reverse Windows hardware restrictions, repair a failed motherboard, recover overwritten blocks, or decrypt BitLocker without valid authorization and keys. If the disk is not detected, repeatedly disconnects, makes unusual noises, or shows signs of physical failure, stop repeated scans and consider a professional recovery service. Recovery is uncertain even when the disk is readable.
Conclusion
You can sometimes install Windows 11 on unsupported hardware using an ISO-based upgrade, Rufus USB media, or manual Setup registry changes. First verify the CPU instructions, back up your files, and save your BitLocker recovery key. An ISO upgrade may retain apps and files; booted USB methods can lead to a destructive clean installation. Microsoft does not guarantee support or updates on unsupported PCs. If the installation causes actual file loss, Recoverit may help scan readable storage, but it cannot reverse overwritten data or fix hardware incompatibility.
FAQ
-
Can Windows 11 run on unsupported hardware without TPM 2.0?
Sometimes. Rufus and certain Setup registry workarounds can bypass TPM 2.0 eligibility checks during installation, but they do not provide the missing security hardware. The processor still needs the instructions required by the Windows 11 release, and Microsoft does not support the resulting installation. -
Will Windows 11 receive security updates on unsupported hardware?
Microsoft does not guarantee any updates, including security updates, for an unsupported installation. Some devices may receive updates for a time, but that does not establish entitlement or future compatibility. -
Can I upgrade Windows 10 to Windows 11 on an unsupported PC without losing files?
An ISO-based in-place upgrade may offer Keep personal files and apps if the required CPU instructions and other conditions are satisfied. This is not guaranteed. Back up your files before starting, and do not proceed if Setup cannot preserve the items you need. -
Can I install Windows 11 on an unsupported CPU using Rufus?
Rufus can bypass some CPU-model eligibility checks during a booted installation. It cannot add missing POPCNT or SSE4.2 instructions, which Windows 11 version 24H2 and later on x64 systems require. Check the CPU before creating installation media.


