If your Crucial SSD is not detected, the safest fix depends on where it disappears. A drive missing from BIOS/UEFI or macOS hardware information points toward a connection, compatibility, power, or hardware problem. If the physical disk appears but its files do not, check the partition and volume status before changing anything.
Start with cables and system detection, especially if the SSD once stored important files. Never initialize or format a used drive just to make it appear. This guide walks through 13 targeted Windows and Mac checks, explains when to stop, and shows when file recovery software is appropriate.
In This Article
-
- Fix 1. Check Crucial SSD Connections and Compatibility
- Fix 2. Check Crucial SSD Detection in BIOS/UEFI
- Fix 3. Assign a Drive Letter or Bring the SSD Online
- Fix 4. Initialize a New Crucial SSD in Disk Management
- Fix 5. Update or Reinstall Storage Drivers
- Fix 6. Check Intel RST or VMD Storage Controller Settings
- Fix 7. Update Crucial SSD Firmware and Motherboard BIOS
-
- Fix 1. Check Crucial SSD Connections, Cables, and USB Ports
- Fix 2. Allow External SSD Connections in macOS Privacy Settings
- Fix 3. Enable External Drive Visibility in Finder
- Fix 4. Find and Mount the Crucial SSD Using Disk Utility
- Fix 5. Repair Crucial SSD File System Errors Using First Aid
- Fix 6. Check Detection in System Information and macOS Safe Mode
Part 1. Why Is My Crucial SSD Not Detected?
A missing SSD is not one diagnosis. Identify which layer can still see the drive; that determines whether you should investigate hardware, a storage controller, an unmounted volume, or a missing drive letter.
| Where detection stops | What you can see | Likely next action |
| Hardware or firmware | No Crucial model in PC BIOS/UEFI; on a Mac, the external connection is absent from System Information and Disk Utility. | Check compatibility, seating, port, cable, enclosure and power. If consistently missing, stop repeated scans and seek hardware diagnosis. |
| Physical disk only | Disk Management lists the device as Offline, Not Initialized, RAW or Unallocated; Disk Utility shows the device but no mountable volume. | Identify whether it is truly new and empty. Preserve existing data before any repair, formatting or partition change. |
| Volume available but hidden | Healthy Windows data volume lacks a letter, or a mounted Mac volume is not shown in Finder. | Assign a letter to an eligible data volume or enable Finder visibility; do not change system or recovery partitions. |
A drive can also disappear intermittently after sleep or a restart because of an unstable cable, insufficient enclosure power, storage controller behavior, firmware, or a failing drive. A disappearing SSD is not proof of a specific software fault.
Part 2. What to Check Before Fixing a Crucial SSD That Is Not Showing Up
Before trying any of the fixes, establish whether the SSD is new or has a history of storing files. A new, empty SSD and a used SSD with missing partitions may look alike in Disk Management, but the safe next steps are completely different.
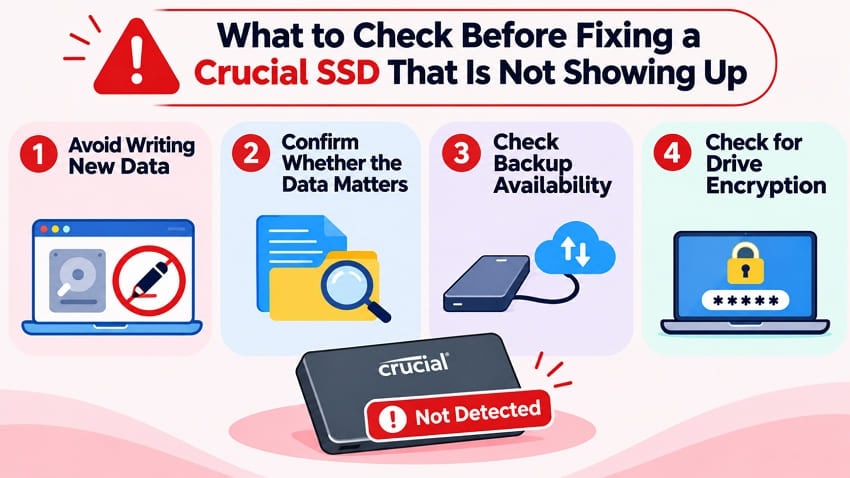
- Protect important files: If the SSD has needed data, stop copying, installing apps, formatting, initializing or creating partitions on it. If it is readable, back up or recover to another healthy drive.
- Inspect the simplest failure points: Check a known-good data-capable cable, suitable enclosure, available power, a compatible port and the SSD interface before changing system settings.
- Check encryption and backups: Preserve the BitLocker recovery key, FileVault credentials or other required passwords; check whether an independent backup exists.
- Stop on instability: Repeated disconnects, wrong or zero capacity, overheating, severe I/O errors or failure across known-good hosts call for professional diagnosis. SSDs have no spinning parts, so audible clicking may come from other hardware or an enclosure.
- Separate installation from repair: Creating a new volume is appropriate only after confirming a brand-new or disposable SSD contains no files that need to be saved.
If the drive is still under warranty, note its exact Crucial model and serial number. Micron announced that Crucial consumer-channel shipments would end in February 2026 but stated that warranty service and product support would continue. See Micron's announcement.

Part 3. How to Fix Crucial SSD Not Detected on Windows 11 and 10
The seven Windows checks below are arranged by what the system recognizes. Use the relevant branch and stop once the SSD is visible and your files are accessible. If the drive has existing data, the initialize-and-format method does not apply.
Fix 1. Check Crucial SSD Connections and Compatibility
Use this fix when the SSD is missing from BIOS/UEFI or the drive disappears unpredictably. The connection depends on whether you have a 2.5-inch SATA, M.2 SATA, M.2 NVMe, or external Crucial SSD.
- 2.5-inch SATA SSD: Shut down, disconnect power and reseat the SATA data and power leads. Try another known-good cable and an enabled motherboard port.
- Internal M.2 SSD: With the system off, check the motherboard manual for SATA-versus-NVMe slot support and shared SATA-port limitations. Reseat the module only if the system is designed for user service.
- External SSD: Use a compatible enclosure or original cable and a direct data-capable port. Confirm the enclosure supports the SSD interface; some M.2 housings are NVMe-only or SATA-only.
If the SSD appears after a cable or port change, copy important files off it before further tests. If the SSD still disappears on more than one compatible connection, skip invasive software fixes and investigate hardware health.
Fix 2. Check Crucial SSD Detection in BIOS/UEFI
Use firmware detection to separate physical recognition from Windows visibility. The BIOS menus and keys vary by computer model.
Step 1. Restart the PC and open BIOS/UEFI using the key documented by the manufacturer (often F2 or Delete).
Step 2. Look under SATA Configuration, NVMe Information, Storage or a similarly named page for the Crucial model. Do not change the current SATA, RAID, AHCI or VMD mode simply to test detection.
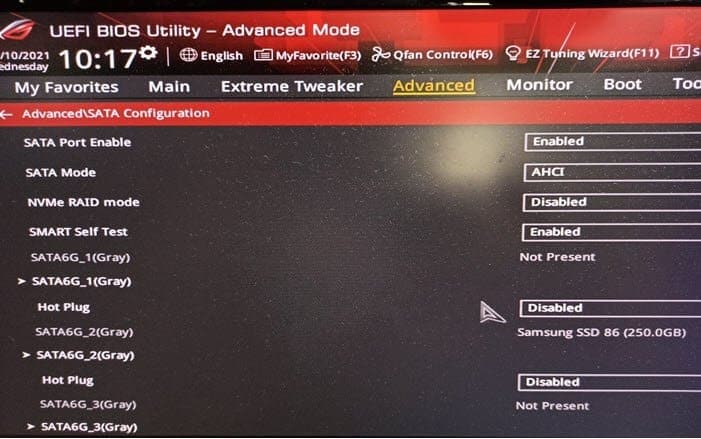
If the drive is listed in BIOS but not in Windows, continue with Disk Management and driver checks. If it is absent after known-good connection tests, consult Crucial or the PC manufacturer; a missing firmware listing cannot be fixed by assigning a Windows drive letter.
Fix 3. Assign a Drive Letter or Bring the SSD Online
Use this method only when Windows already identifies the correct physical SSD. Press Win + X, open Disk Management, and compare its capacity and volumes with the known Crucial model.
Step 1. If the correct disk is marked Offline, confirm it is not a shared disk or special system configuration, then right-click its disk label and select Online. Check whether an existing volume becomes accessible.
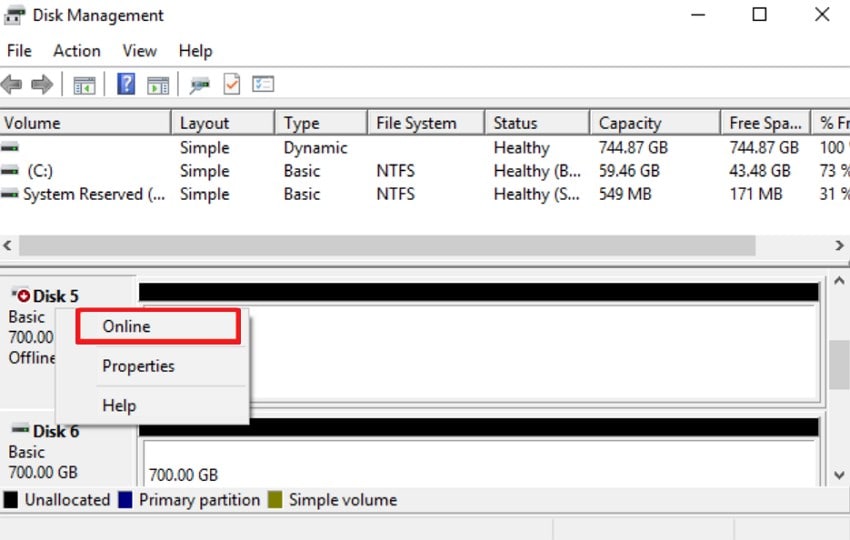
Step 2. For a normal healthy data volume that has no letter, right-click that volume, select Change Drive Letter and Paths > Add, choose an unused letter and confirm.
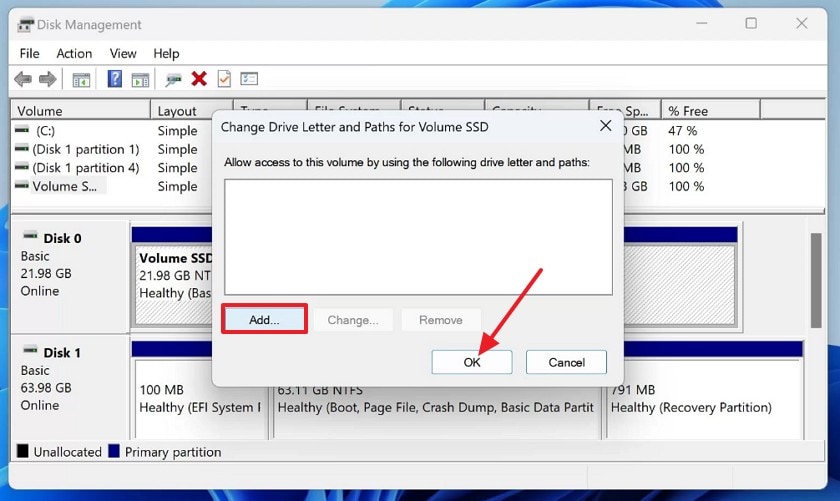
Verify the drive and open a known file in File Explorer. Do not assign drive letters to EFI, recovery or system-reserved partitions. If the disk instead shows RAW, Unallocated or Not Initialized and previously contained files, move to the data-preservation branch, not the new-disk wizard.
Fix 4. Initialize a New Crucial SSD in Disk Management
Important: NEW OR CONFIRMED-EMPTY SSD ONLY. Initialization and subsequent formatting are not recovery methods. Never follow this fix on a previously used SSD with data you want to keep. Microsoft documents the data-loss risk.
If you have just installed an unused Crucial SSD and confirmed that no files need to be preserved, you can set up its first partition in Disk Management.
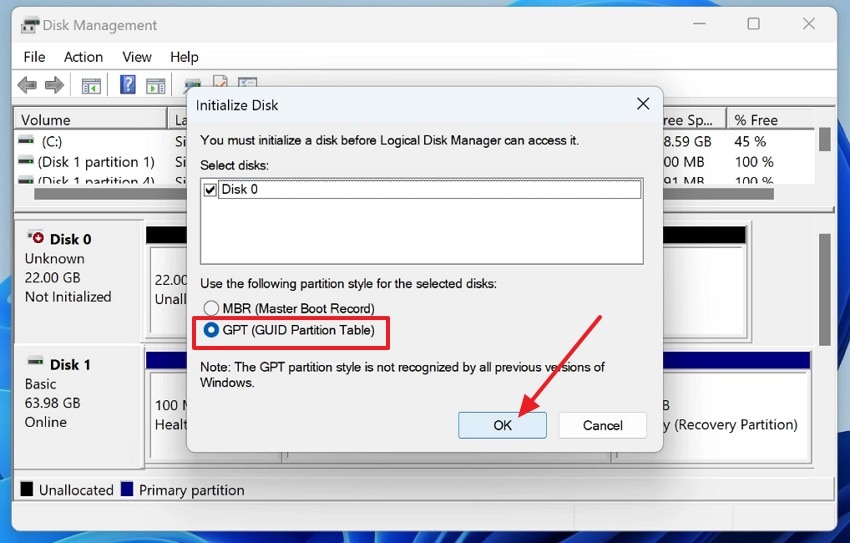
Step 1. Check the disk capacity and model carefully. Right-click the correct Not Initialized disk, select Initialize Disk and choose GPT for a modern Windows PC.
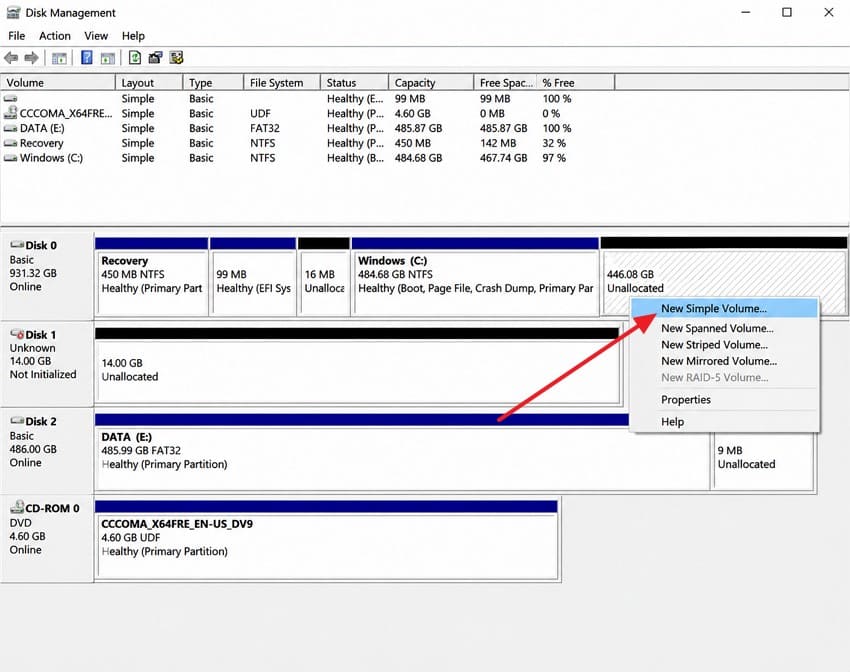
Step 2. Right-click the drive's Unallocated space and choose New Simple Volume. Specify the intended volume size.
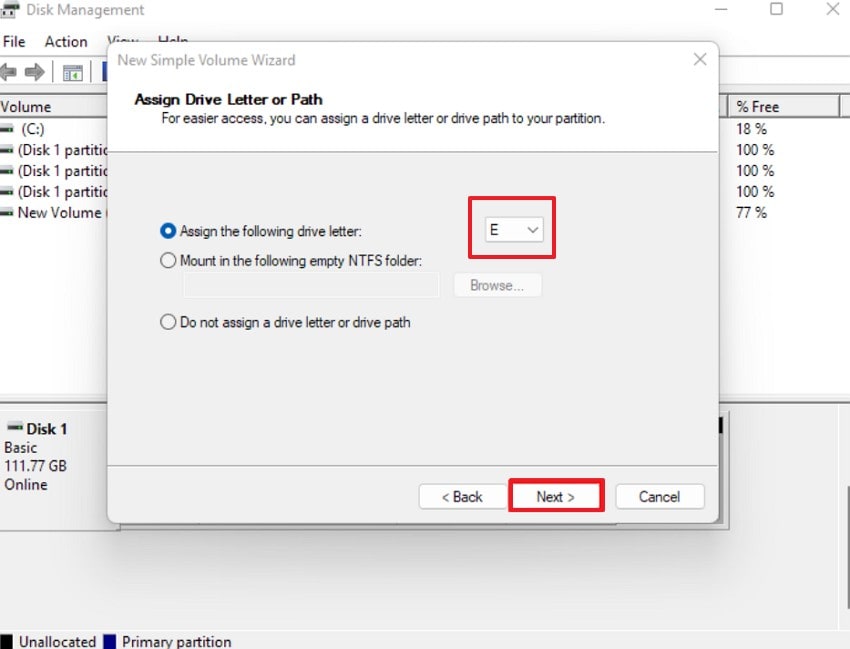
Step 3. Choose an available drive letter in the wizard.
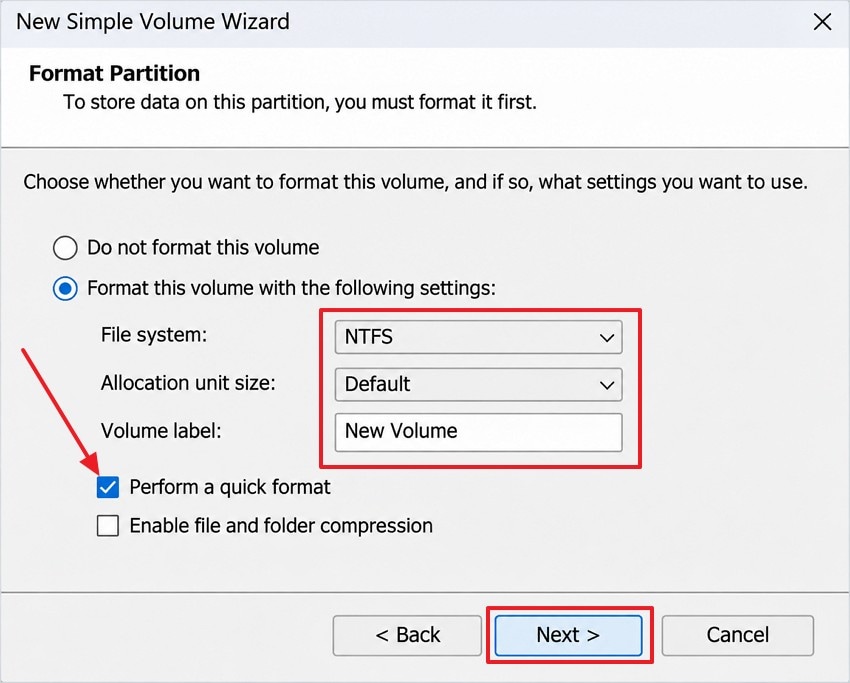
Step 4. For a standard Windows-only data volume, choose NTFS, the default allocation unit size and a recognizable volume label. Formatting creates a file system on the new volume.
Step 5. Review the disk and volume settings, click Finish, and wait for Disk Management to show the new healthy volume.
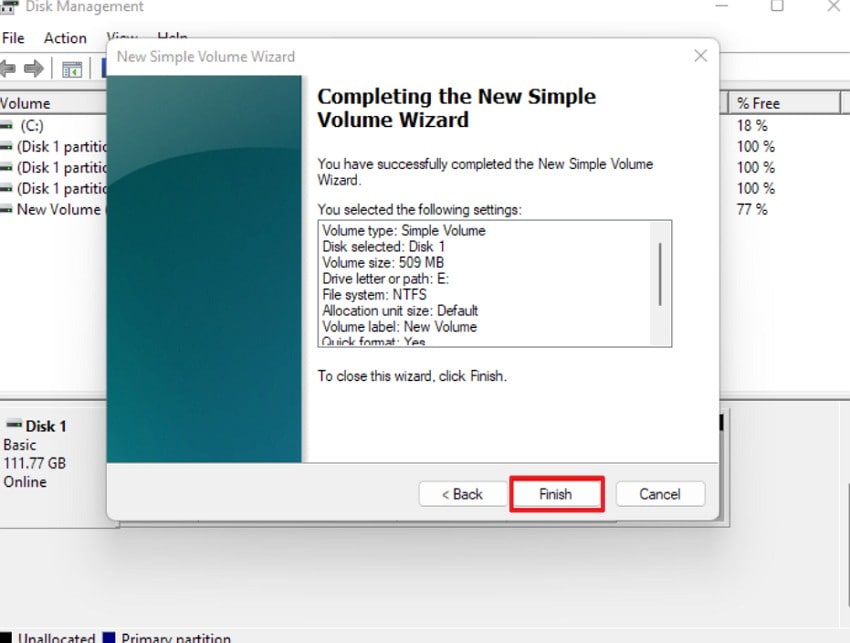
The new Crucial SSD should appear in File Explorer. If setup fails or Windows reports I/O errors, stop and investigate connections or device health rather than repeating initialization.
Fix 5. Update or Reinstall Storage Drivers
If firmware identifies the SSD but Windows does not list it consistently, check the PC manufacturer's chipset, NVMe and storage-controller drivers. Windows often uses built-in drivers for SSDs, so the relevant driver may be the controller rather than a Crucial-specific package.
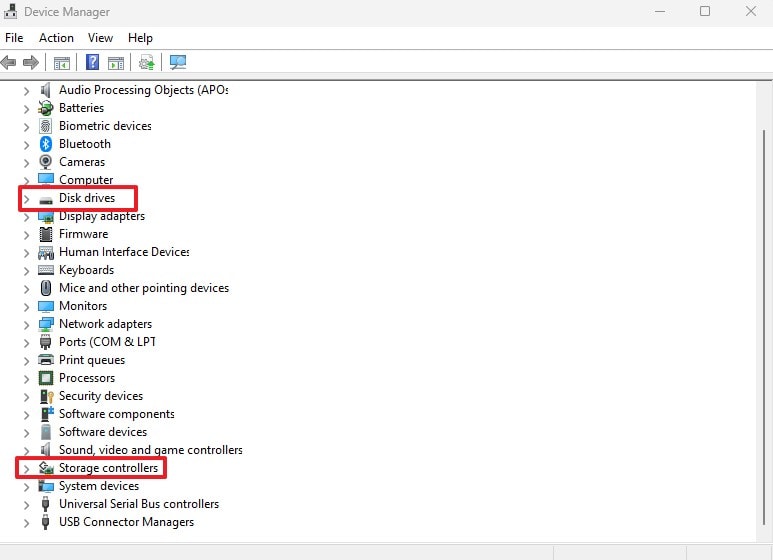
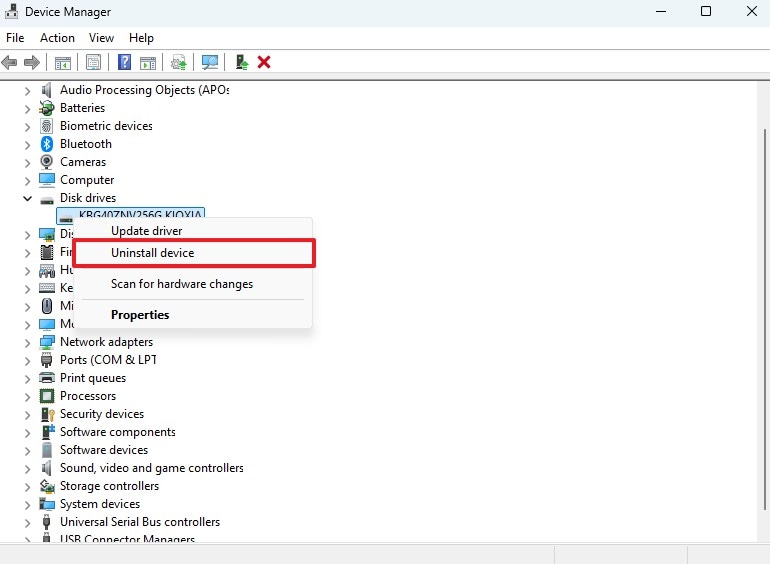
Step 1. Open Device Manager, then expand Disk drives and Storage controllers. Look for the Crucial model or a controller warning icon.
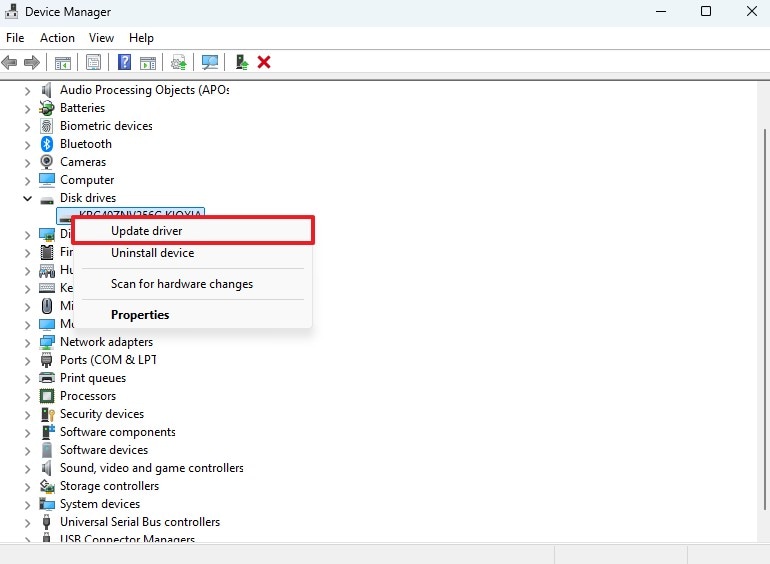
Step 2. Right-click the affected controller or drive and choose Update driver. If Windows cannot locate a compatible update, consult the PC or motherboard manufacturer's support page.
Step 3. If a device-specific driver appears damaged and you have the correct replacement driver available, use Uninstall device only after checking its role. Restart Windows to allow redetection; do not remove a controller critical to the boot drive without a recovery plan.
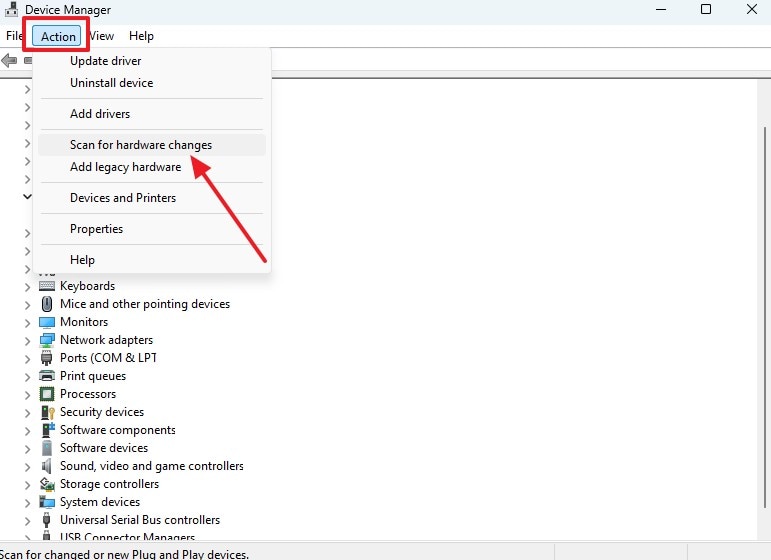
Step 4. Choose Action > Scan for hardware changes and recheck Disk Management.
If Windows still cannot see the physical drive, a missing disk-management entry is not resolved by formatting an unrelated disk. Proceed with the applicable storage-controller branch or hardware diagnosis.
Fix 6. Check Intel RST or VMD Storage Controller Settings
This fix applies to systems whose storage is managed by Intel Rapid Storage Technology (RST) or Volume Management Device (VMD). It is particularly useful when Windows Setup cannot find an SSD even though BIOS identifies it. It is not a general fix for every Crucial model.
Step 1. On another working computer, download the preinstallation Intel RST/VMD driver for your exact PC model from the PC maker. The OEM package is preferable to a generic driver.
Step 2. If your supplied Intel package is a supported SetupRST.exe installer, extract its driver files using the command below. Package names and extraction methods can differ by OEM.
.\SetupRST.exe -extractdrivers SetupRST_extracted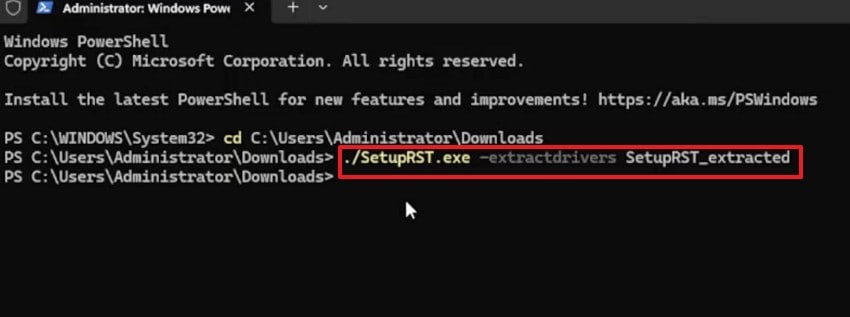
Step 3. Copy the correctly extracted controller-driver folder to a separate USB drive. Verify the package includes the expected INF, SYS and CAT files.
Step 4. At the Windows Setup disk-selection screen, select Load driver > Browse and choose the appropriate driver folder.
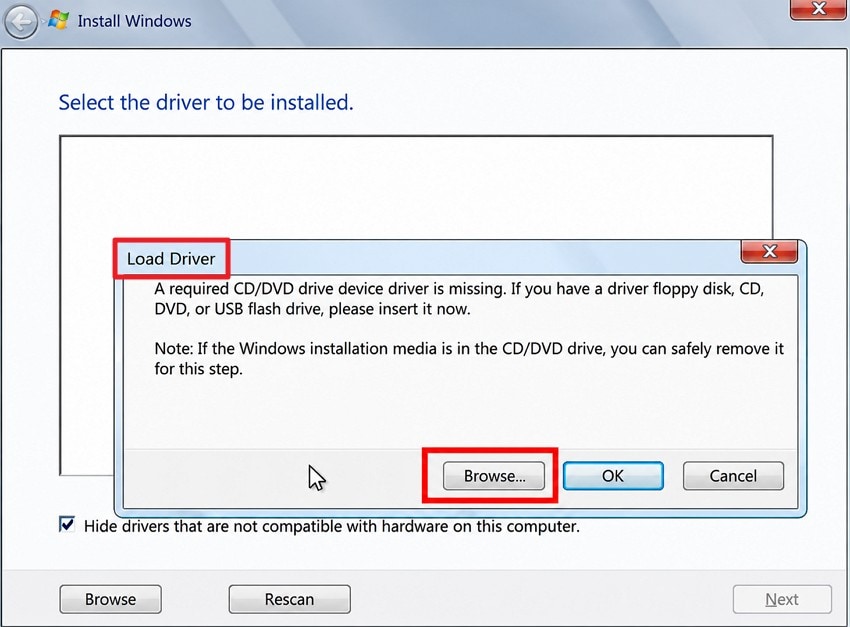
Step 5. Select the matching Intel RST/VMD controller driver if one is offered, then return to the installation disk list. The SSD should appear if the missing compatible driver was the cause.
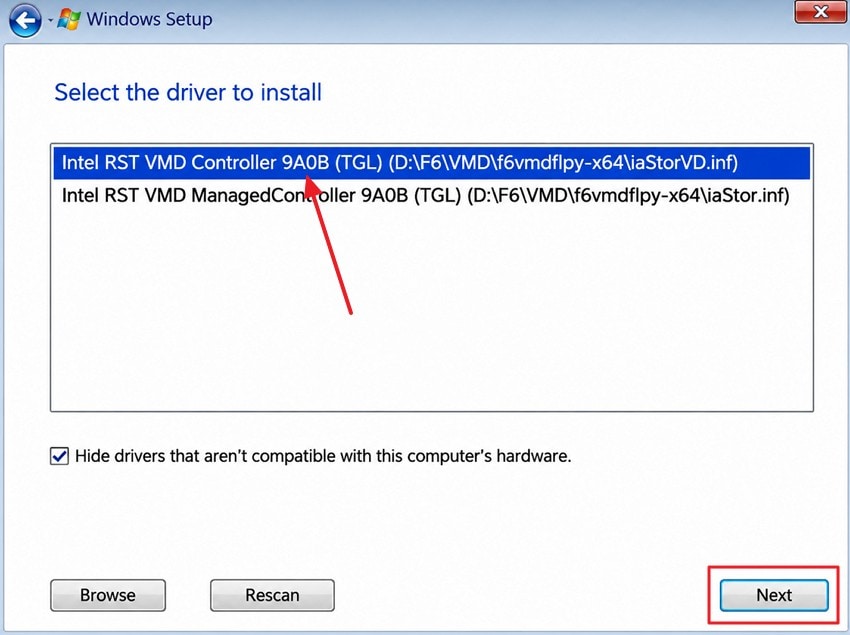
Important: If Windows already boots from a storage controller, do not toggle RAID, RST, VMD or AHCI modes casually. Such changes can make Windows unbootable. Loading a compatible setup driver does not require erasing existing partitions.
See Intel's platform-specific guidance and your OEM support page for the applicable driver workflow.
Fix 7. Update Crucial SSD Firmware and Motherboard BIOS
Only consider firmware after you have ruled out cables, incompatible slots and ordinary driver issues. The SSD must be stable enough to back up data and complete an update; firmware updates do not repair failed hardware.
Step 1. Identify the exact SSD model and firmware revision. On a supported Windows PC, check whether Crucial Storage Executive recognizes that model and offers an update.
Step 2. Back up important files to another disk, use reliable power, read the exact model's release notes and follow the official update procedure. Do not flash a package for another Crucial model.
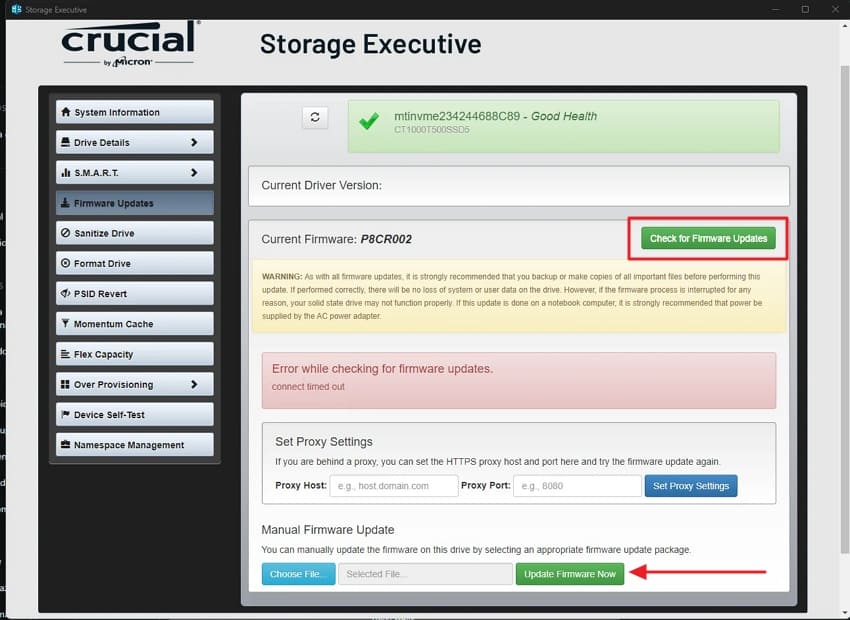
Check the motherboard maker's BIOS release notes separately if there is a documented SSD-compatibility issue. Avoid updating BIOS or SSD firmware on an intermittently disconnecting drive with irreplaceable data; seek technical support first.
Part 4. How to Fix a Crucial SSD Not Showing Up on Mac
These Mac checks primarily apply to an external Crucial SSD or a Crucial SSD installed in a compatible enclosure. Macs with Apple silicon generally do not allow user replacement of internal storage. Start with physical connection and Finder settings before considering disk repair.
Fix 1. Check Crucial SSD Connections, Cables, and USB Ports
- Try a different data-capable cable and port. Charging-only USB-C cables do not reliably carry storage data.
- Check enclosure compatibility. M.2 NVMe and M.2 SATA drives need matching enclosures; a Thunderbolt-only enclosure also has its own compatibility requirements.
- Test power and another computer. Connect directly rather than through an underpowered hub. If the SSD disappears repeatedly on multiple compatible hosts, stop repeated testing to protect recoverable data.
If another compatible computer can read the volume, back up important files immediately. A drive that is invisible to every host is a hardware-diagnosis case, not a Finder-setting problem.
Fix 2. Allow External SSD Connections in macOS Privacy Settings
On supported Apple silicon Mac laptops, newly connected USB, Thunderbolt and certain other accessories may require approval. This setting does not apply universally to Intel Macs or desktop Macs.
Step 1. Unlock the Mac laptop. Open System Settings > Privacy & Security and, if available, scroll to the Accessories section.
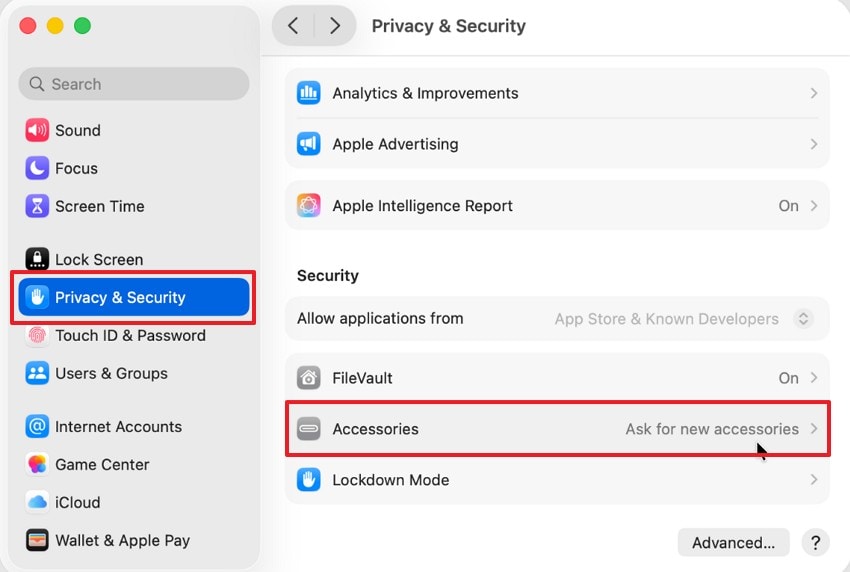
Step 2. Choose an appropriate option under Allow accessories to connect such as Ask for new accessories. Reconnect the SSD and approve the prompt when it appears.
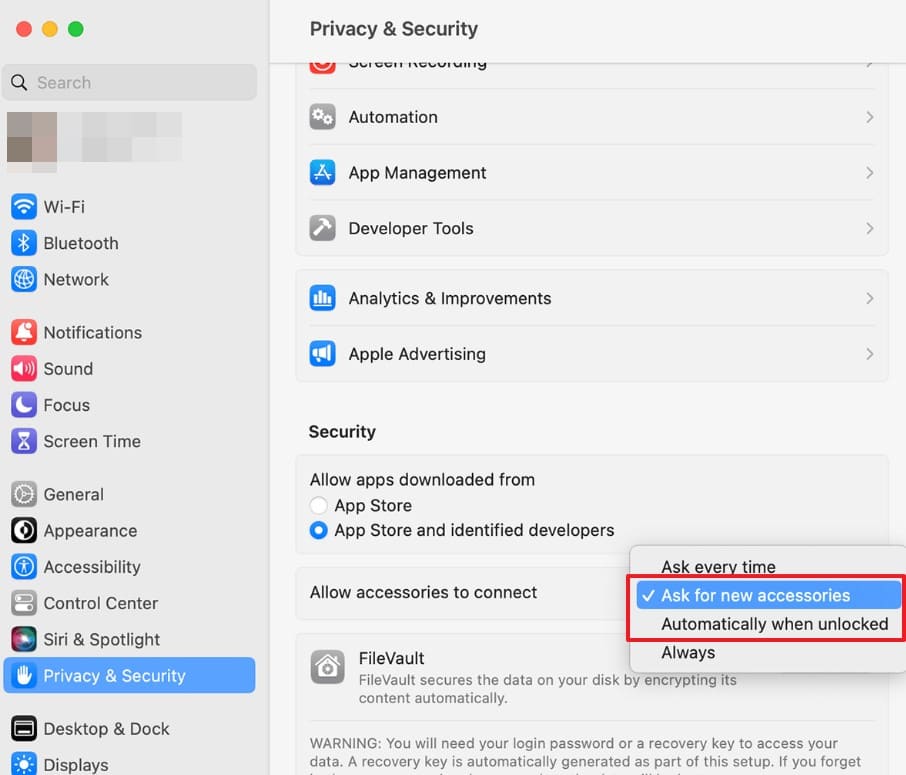
If this section is missing, your Mac may not support that setting; continue with Finder and Disk Utility instead. Apple explains supported accessory approval.
Fix 3. Enable External Drive Visibility in Finder
If Disk Utility shows a mounted SSD but Finder does not display it, Finder visibility settings may be the only issue.
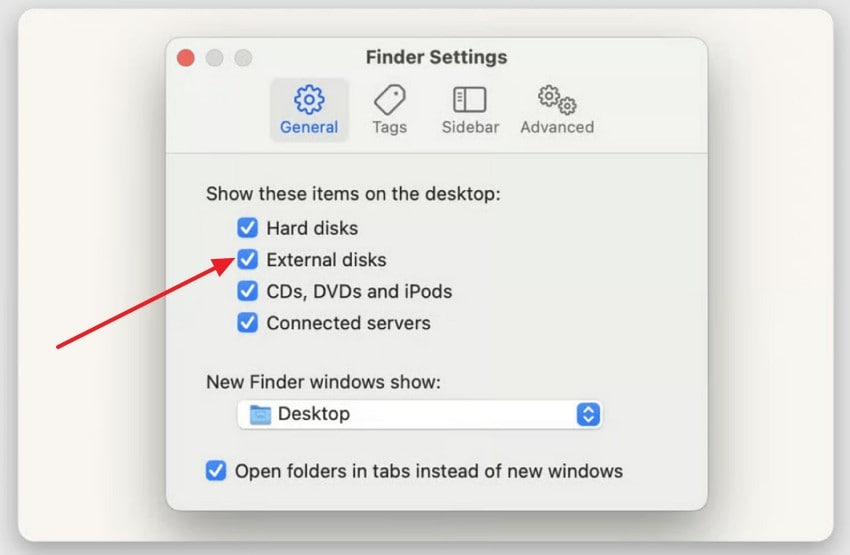
Step 1. Open Finder > Settings > General and enable External disks for desktop icons.
Step 2. Open Finder > Settings > Sidebar and enable External disks under Locations.
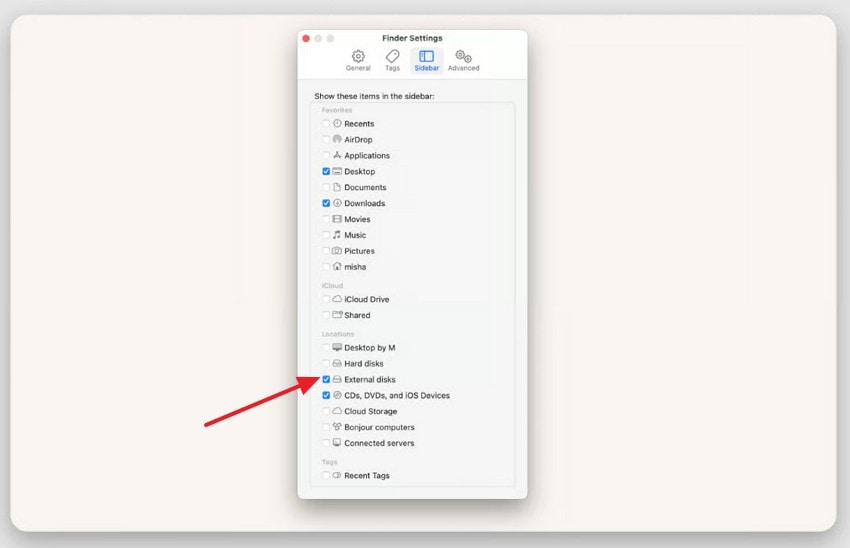
Check the Finder sidebar and desktop again. These settings only change visibility; they cannot make an unrecognized physical SSD detectable.
Fix 4. Find and Mount the Crucial SSD Using Disk Utility
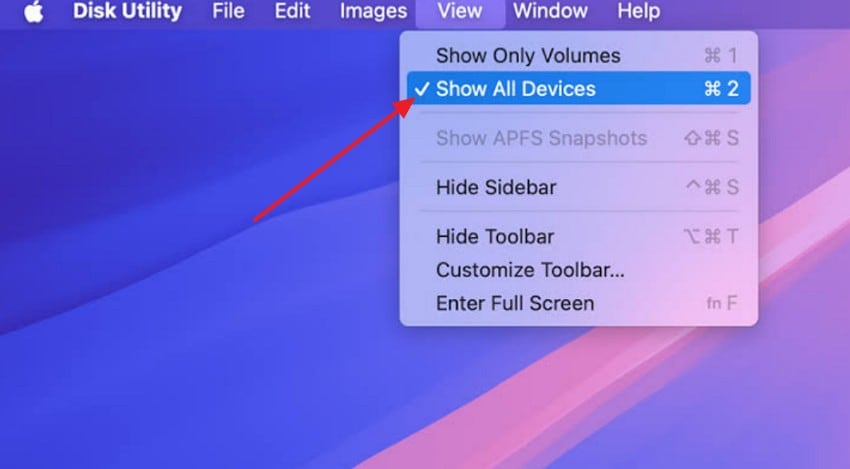
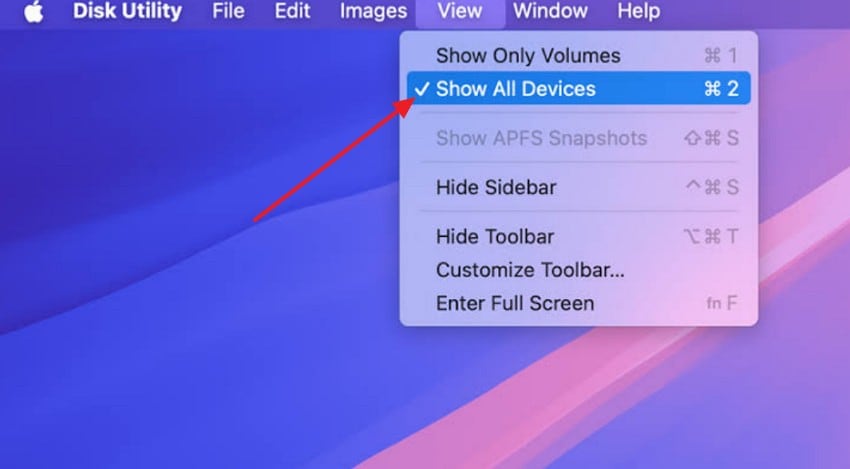
Open Disk Utility from Applications > Utilities (or Spotlight). The View > Show All Devices option reveals the physical disk, containers and volumes separately, helping you avoid confusing an unmounted volume with missing hardware.
Step 1. Select View > Show All Devices. Look for the Crucial physical device and any volumes below it.
Step 2. If the correct volume is present but unmounted, select the volume and click Mount. If an encryption prompt appears, provide the legitimate password or recovery key.
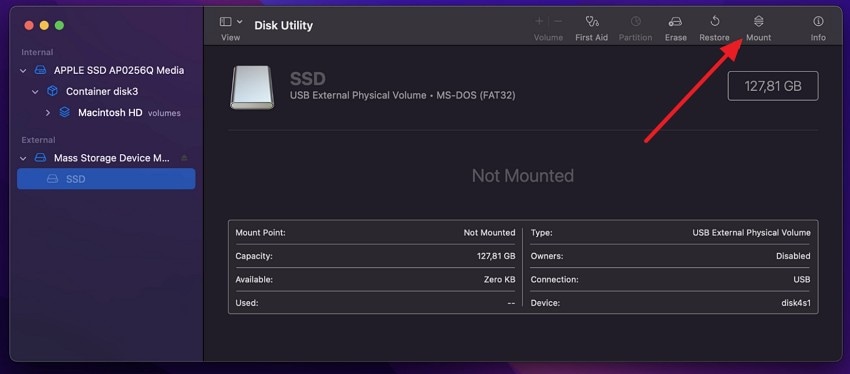
If the device is listed but no mountable volume exists, do not erase or repartition a used SSD just to make a volume appear. If the entire physical device is absent, return to cable and hardware checks.
Fix 5. Repair Crucial SSD File System Errors Using First Aid
Important: First Aid is a file-system repair tool, not a hardware repair or guaranteed data recovery feature. It can modify disk structures. Back up or recover accessible important files before running it; for unstable SSDs, seek professional guidance.
Use First Aid only for a detected, reasonably stable device with suspected file-system problems, after protecting important data.
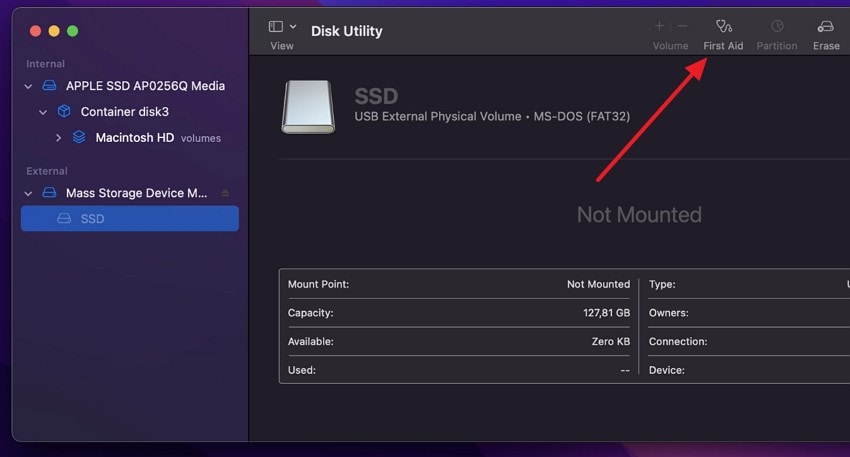
Step 1. In Disk Utility choose View > Show All Devices. Select the lowest volume under the Crucial SSD first.
Step 2. Click First Aid > Run. Once it finishes, repeat on other volumes, then the container if present, then the physical device, following Apple's recommended order.
If the repair reports errors it cannot fix or the SSD disconnects during access, stop and avoid repeated write-based repair attempts. Apple's Disk Utility guidance explains the scope of First Aid.
Fix 6. Check Detection in System Information and macOS Safe Mode
If Disk Utility does not list the SSD, System Information can help distinguish USB/Thunderbolt connection detection from volume recognition. Safe Mode is a later software-isolation check, not proof that the SSD hardware is healthy.
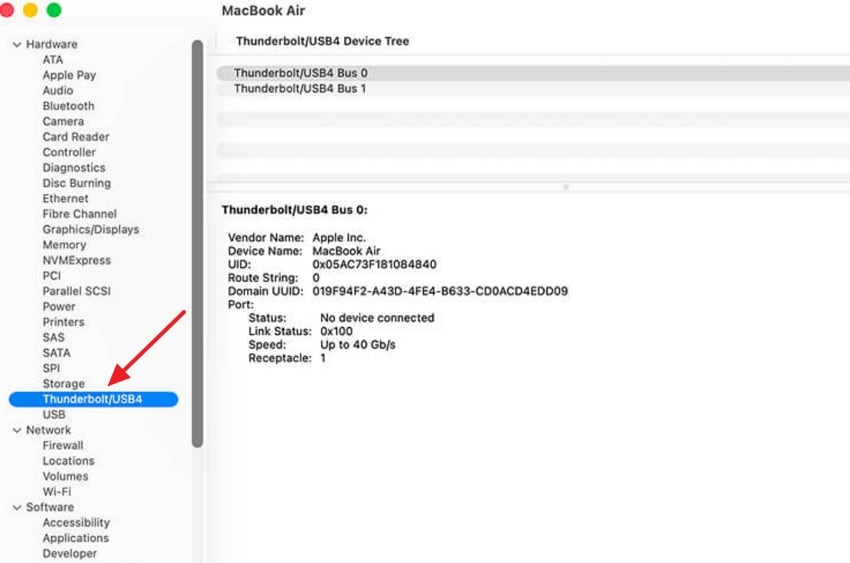
Step 1. Hold Option, choose Apple menu > System Information, and inspect USB or Thunderbolt/USB4. An enclosure may appear without the SSD itself being readable.
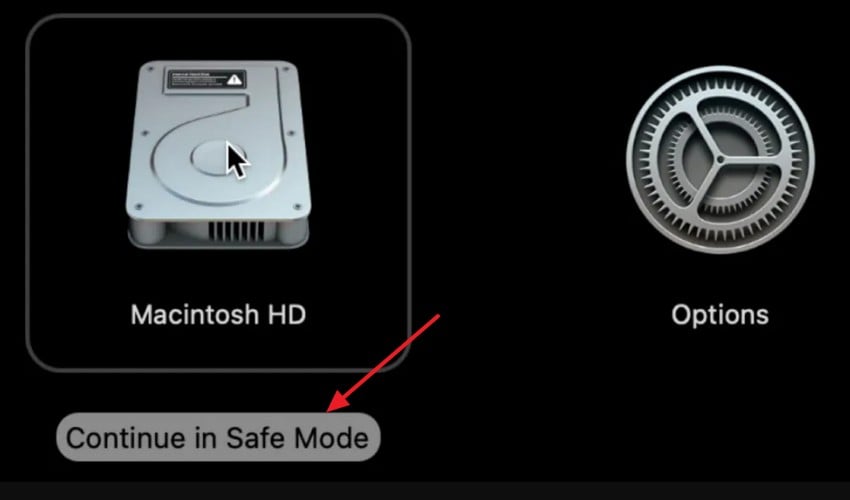
Step 2. For an Intel Mac, restart and hold Shift until login. For an Apple silicon Mac, shut down, hold the power button until startup options appear, select the startup disk, hold Shift and choose Continue in Safe Mode.
Step 3. If the SSD is detectable in Safe Mode, restart normally and check System Settings > General > Login Items & Extensions for storage-related third-party software or extensions that may affect access.
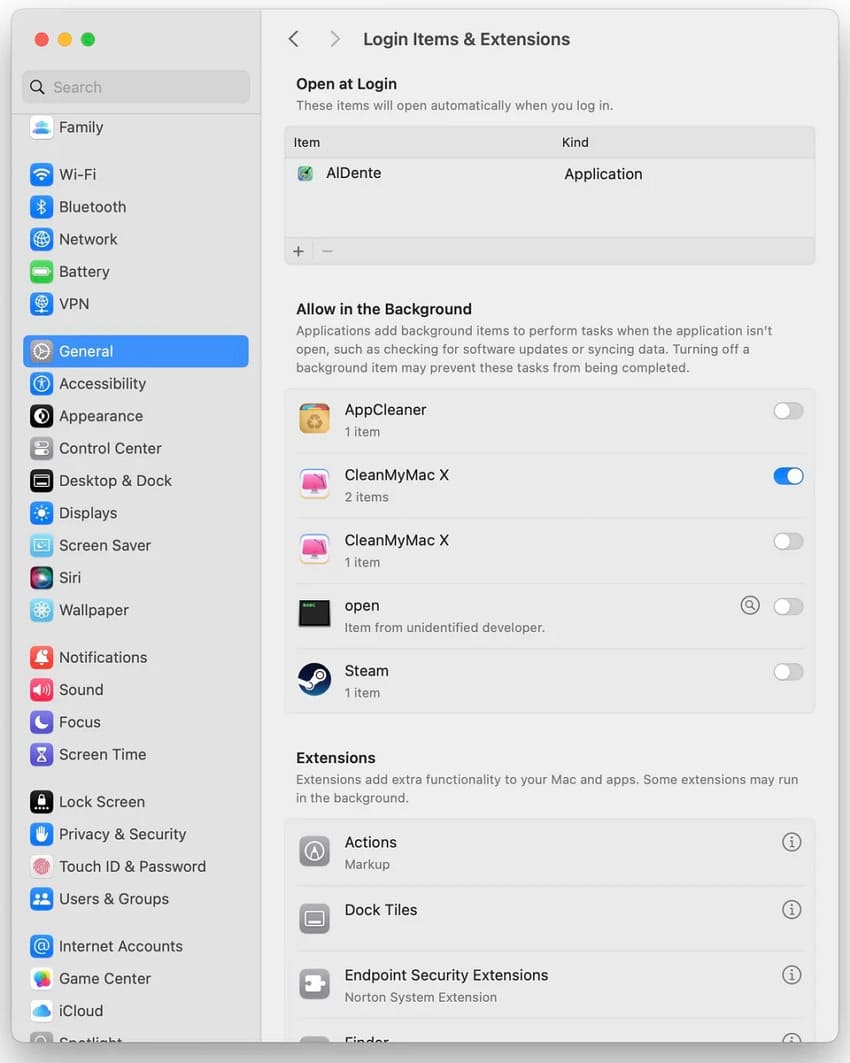
If System Information shows nothing even with a known-good compatible enclosure, focus on physical connection and hardware support instead. Apple provides separate Safe Mode instructions for Intel and Apple silicon.
Part 5. What If Your Crucial SSD Is Still Not Detected?
If the SSD is absent from BIOS/UEFI on a PC or from hardware detection tools on a Mac after checking a compatible connection, software cannot read the drive or recover its files. Contact Crucial support or a qualified data recovery lab if valuable data is at risk. Repeated power cycling, firmware flashing or scanning of an unstable drive may make matters worse.
If the physical SSD is recognized, reports a plausible capacity and can be read, but files or partitions are missing, a file recovery scan may be an option before repair. Recovery of deleted SSD data is especially uncertain because TRIM and background flash management may have removed the deleted blocks. Encryption can impose additional limits.
Recover Files from a Detectable Crucial SSD with Recoverit
For logical loss on an accessible Crucial SSD, Wondershare Recoverit hard drive recovery can scan supported storage for recoverable files, let you preview some results, and save selected files to a separate healthy destination. It cannot restore power, repair a dead controller or make a physically absent SSD reappear.
If the Crucial SSD is readable and you need files from it, use these steps without installing new software on the affected disk:
Step 1. Install and open Recoverit on a separate healthy drive. Under Hard Drives and Locations, select the detectable Crucial SSD or the eligible lost-file location. Confirm the reported capacity matches your drive.
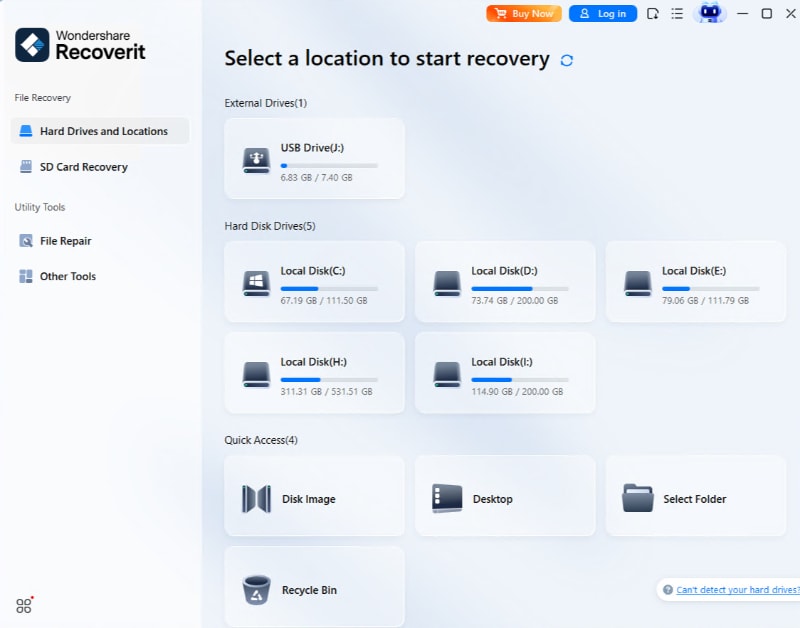
Step 2. Allow Recoverit to scan. Browse file types or use the available search and filters to narrow the results. Stop if the SSD begins disconnecting or produces severe read errors.

Step 3. Preview available files where supported. Select what you need, click Recover and save to another physical storage device, never back onto the Crucial source SSD.

If the scan cannot access the drive or returns no usable files, do not assume more scanning will help. Check independent backups, or ask a recovery specialist about hardware and TRIM-related limitations. See also our Crucial SSD data recovery overview for the difference between logical and physical failure.
Conclusion
A Crucial SSD that does not appear in File Explorer or Finder may still be visible to the operating system. Check the cable, slot or enclosure first; then use BIOS/UEFI, Disk Management or Disk Utility to locate the point of failure. Only initialize an SSD when it is genuinely new and empty. For a used drive with missing files, preserve the data before repairs. If the physical drive remains absent or unstable, seek hardware support rather than forcing recovery scans.
FAQ
-
Why does my Crucial SSD keep disappearing after sleep or restart?
Intermittent disconnections can come from a loose or inadequate cable, enclosure power management, controller compatibility, firmware or an SSD fault. Check whether the drive disappears from BIOS/UEFI or System Information, test a known-good connection and copy important files while it remains accessible. Avoid blindly changing Windows storage modes or assuming that one power-management setting fits all SSDs. -
Does Crucial Storage Executive work on Mac?
Crucial Storage Executive is a Windows utility for supported Crucial SSDs, not a macOS application. On a Mac, use Disk Utility and System Information to inspect detection. For firmware updates, verify the exact model and official supported update method; a compatible Windows PC may be required. Back up important files before updating firmware. -
Can I recover data if my Crucial SSD is not detected in BIOS or Disk Utility?
Not with ordinary file recovery software while the physical SSD is absent from the hardware and operating-system storage lists. Recheck compatible cables, ports and enclosures. If the drive still reports no usable capacity or fails across known-good systems, stop DIY attempts and consult a specialist. A recognizable physical disk with a missing partition is a different situation and may permit software recovery. -
How can I tell whether a Crucial SSD is physically damaged?
Repeated disappearance from firmware or hardware views, incorrect or zero reported capacity, severe read errors and overheating can indicate a hardware, interface or power fault. Check the cable and enclosure first and use official diagnostics only if the drive is stable and detected. SMART information can be useful when supported, but an unavailable SMART reading or one normal result does not rule out SSD failure.


