If Windows Setup displays "No device drivers were found," the installer may be unable to read its USB installation files, or it may not have a compatible driver for the storage controller. Those are different problems. First, note when the message appears, check whether BIOS/UEFI detects your SSD or HDD, and see whether the disk is listed in Windows Setup. Do not delete or format a disk that may still contain files.
Start with the installation USB and the manufacturer's exact storage driver. These checks apply to Windows 11 and Windows 10; Windows 7 needs a separate legacy workflow because of its older USB and NVMe support. If this is an existing Windows installation, preserve accessible files before taking any action that could change the disk or its firmware configuration.
In This Article
-
- Use Official Microsoft Installation Media and an OEM-Supported Storage Driver
- Verify the Intended Disk and Partitions Before Selecting Any Install Target
- Fix 1. Change the Windows Installation USB Port
- Fix 2. Recreate the Windows Installation USB
- Fix 3. Check SSD or HDD Detection in BIOS/UEFI
- Fix 4. Load the Correct Intel RST, VMD, or AMD RAID Driver
- Fix 5. Resolve the No Signed Device Drivers Were Found Error
- Fix 6. Check Intel VMD, RAID, and AHCI Settings Only If the OEM Requires It
- When Windows Setup Still Cannot See a Disk: BIOS-Invisible Hardware vs. Missing Drivers
- Protect Accessible Local Files Before Any Repartition or Clean Install
-
- Windows 7 Is Out of Support: Use These Steps Only for Legacy Hardware
- Fix 1. Use a USB 2.0 Port for Windows 7 Installation
- Fix 2. Integrate Compatible USB 3.0 Drivers Into Windows 7 Installation Media
- Fix 3. Add Compatible SATA or NVMe Drivers to Windows 7 Setup
- When Windows 7 USB 3.0 or NVMe Driver Integration Will Not Help
- Prefer a Supported Windows Release on Compatible Hardware
Part 1. Identify Whether Windows Setup Is Missing USB, Storage Drivers, or the Disk
The wording of the message and the screen on which it appears matter more than the drive brand. A healthy SSD may not appear to Setup if the controller needs a driver, while a damaged or unreadable installer can trigger a similar prompt.
Check the Exact Windows Setup Error and When It Appears
- "A media driver your computer needs is missing": Often appears early in Setup. Check the installation USB and its connection before assuming that the internal SSD is faulty.
- "No device drivers were found": May appear after you click Load Driver or when Setup cannot locate an appropriate driver. Confirm you are browsing the extracted driver files for the actual storage controller.
- "No signed device drivers were found": The selected folder offers no driver that Setup accepts as a compatible signed driver. An unextracted package, wrong architecture, unrelated controller, or unavailable/invalid signing may be involved.
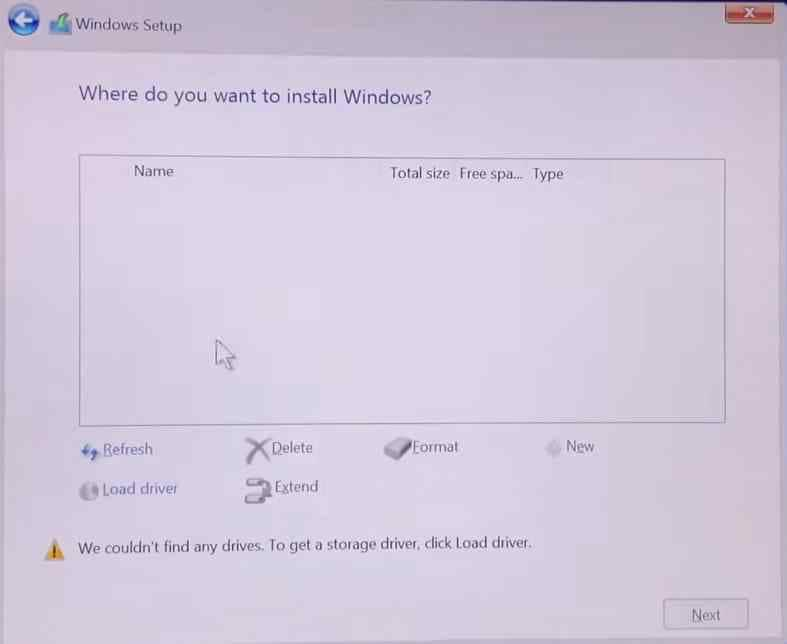
- "We couldn't find any drives": The disk-selection screen is empty. This is a storage visibility problem rather than proof that the USB installer is unreadable; follow the targeted guide to drives missing during Windows installation if that is your main symptom.
Note: The text and layout vary among Windows Setup versions. A driver prompt does not establish that the drive itself has failed.
Decision Table: USB Installer Not Readable vs. Drive Missing from Windows Setup
| What you observe | Most useful first check | What to do next |
| Setup has trouble reading installation files or repeatedly requests media drivers | Try a direct USB port and a different known-good installer | Recreate official media; retest before downloading storage drivers |
| Setup opens normally, but no internal SSD/HDD is listed | Look for the disk model under BIOS/UEFI storage or NVMe information | If detected, obtain the OEM storage-controller F6 driver; if absent, check hardware |
| Load Driver shows "No signed device drivers were found" | Confirm the folder contains an extracted, compatible, signed x64 INF driver | Use the exact manufacturer package; do not disable signature enforcement |
| Firmware does not detect the drive | Check the correct storage page, not just boot priority | Stop generic Windows driver attempts; inspect connections and diagnostics safely |
| The computer reports "No boot device" before Windows Setup starts | Confirm whether it is a boot-order/bootloader or disk-detection failure | Use a separate boot troubleshooting path, not this Setup driver fix |
Before You Change BIOS Settings: Is There Important Data on the Target Disk?
If the target disk has an existing Windows installation, photos, or work files, treat it as a data-preservation task first. Loading a compatible driver does not require partition deletion; changing RAID/VMD/AHCI modes, formatting, or installing to the wrong partition can make files unavailable or overwrite them.
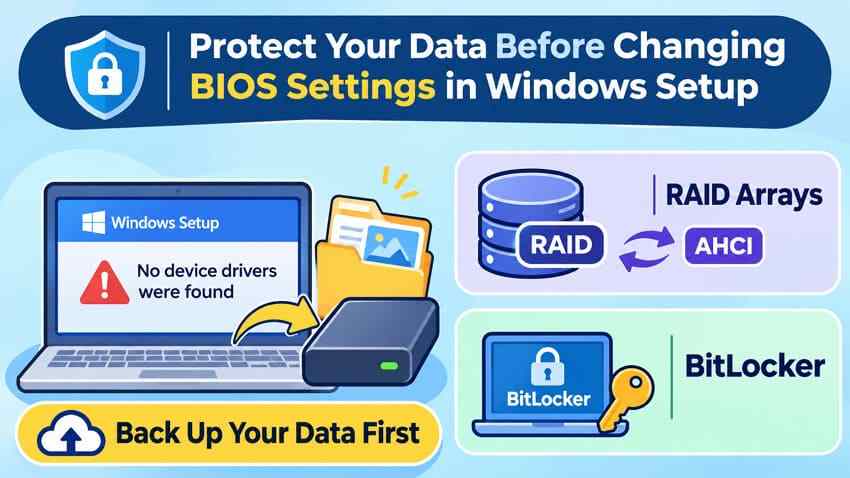
- Existing installation or RAID: Photograph the original controller settings. Do not switch a working system between RAID, AHCI, or Intel VMD merely to make Setup list a disk.
- BitLocker or device encryption: Locate the legitimate recovery key before firmware or storage changes. Microsoft explains that such changes can trigger recovery mode.
- Unstable or undetected drive: Do not repeatedly restart it, initialize it, or run destructive repair commands. A failing disk may require a technician or professional data recovery service.
Part 2. Fix No Device Drivers Were Found in Windows 11 and Windows 10 Setup
Work through the least disruptive fixes first. If your only error is an empty disk-selection screen, the dedicated Recoverit article on missing drives during Setup goes deeper into that branch; the steps below focus on the driver prompt and checking the right installer or OEM driver package.
Use Official Microsoft Installation Media and an OEM-Supported Storage Driver
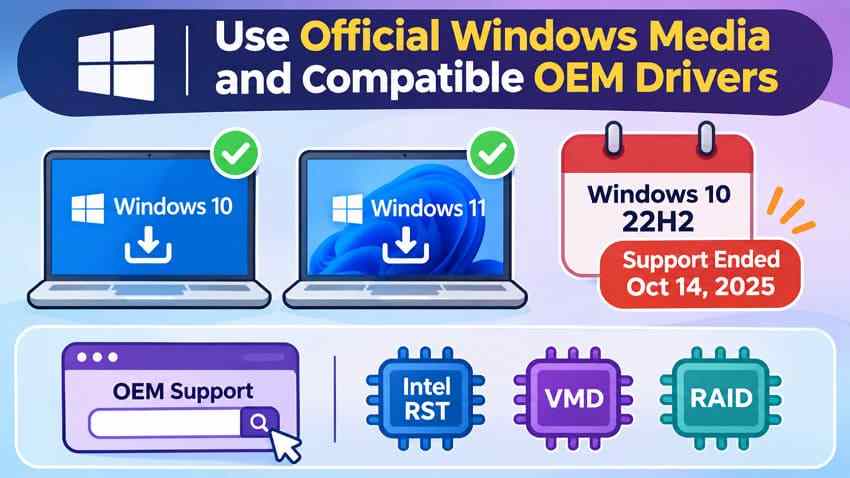
Create installation media from Microsoft's Windows 11 download page or, for a justified legacy reinstall, Microsoft's Windows 10 download page. Windows 10 reached end of normal support on October 14, 2025; check whether Windows 11 is supported for your computer instead of assuming Windows 10 is still a fully supported option.
When the disk is hidden behind Intel RST/VMD or an AMD RAID controller, download the preinstallation (F6) storage driver for the exact PC or motherboard model and controller from its official support page. Do not choose drivers solely by the SSD manufacturer. See the Dell Intel RST/VMD guide and ASUS model-specific notes for concrete examples of hardware-dependent installation paths.
Verify the Intended Disk and Partitions Before Selecting Any Install Target
When disks appear in Windows Setup, compare their sizes with the target drive shown in BIOS/UEFI and any known model details. Disk 0 and Disk 1 labels can change after USB devices or other drives are connected. Disconnect unrelated external storage if doing so is safe, and do not select a partition until you are sure which disk you intend to use.
Note: Seeing the disk in Setup only confirms that the installer can enumerate it. It does not confirm which partition is safe to erase, whether existing data is backed up, or whether the disk is healthy.
Fix 1. Change the Windows Installation USB Port
Try this first if the error appears early in Setup, the installer intermittently disappears, or you used a hub or dock. A direct USB port rules out some accessory and connection issues without changing disk contents.
Step 1. Shut down the computer. Plug the installation USB directly into a motherboard or built-in laptop port, without a hub, dock, or adapter where possible. On older hardware, try a genuine USB 2.0 port if one exists.
Step 2. Use your device's one-time boot menu to select the installer and restart Windows Setup. If Setup proceeds to the disk-selection screen, check the target disk carefully. If the same media-related prompt returns, continue with Fix 2.
Fix 2. Recreate the Windows Installation USB
A damaged flash drive, incomplete image, or unofficial modified installer can cause repeated requests for drivers. Re-create the media on a separate, known-good USB flash drive using the official Microsoft tool on a working PC. Microsoft recommends a blank USB drive of at least 8 GB; creating the media erases its contents.
Step 1. On another computer, copy any files off the USB you plan to use. Open the official Microsoft download page for the intended Windows version.
Step 2. Download and run the Media Creation Tool for a supported x64 Windows installation. Accept the license terms and choose to create installation media for another PC, if offered.
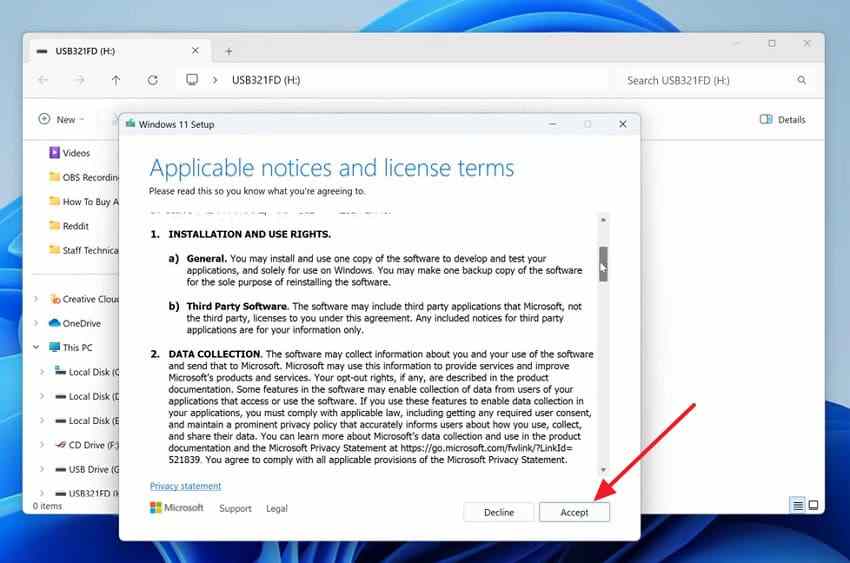
Step 3. Choose the appropriate language, edition, and architecture. Select USB flash drive, verify the intended removable drive, and follow the on-screen instructions until creation finishes.
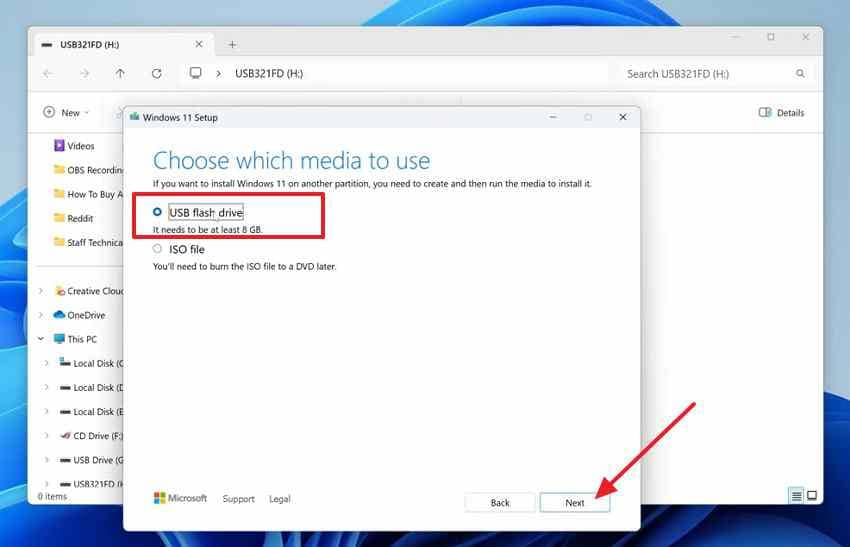
Step 4. Boot the affected PC from the newly created installer. If the initial driver prompt disappears, the old media or connection was likely involved. If only the internal drive is missing, move to the storage-controller checks below.
Note: Illustrations from older Media Creation Tool releases may look different from the latest version. For Windows 11 on ARM-based devices, use the manufacturer's supported installation method rather than the standard x64 Media Creation Tool.
Fix 3. Check SSD or HDD Detection in BIOS/UEFI
If Windows Setup starts normally but does not list the internal drive, check whether firmware can see it. This determines whether a Windows storage driver is a plausible next step.
Step 1. Restart and enter BIOS/UEFI with the key specified by your manufacturer (often F2, Delete, or Esc). Find Storage, NVMe Information, or the equivalent hardware-inventory page.
Step 2. Record the drive model and capacity if available. Also record whether the storage controller is configured for AHCI, RAID, or Intel VMD. Do not change those settings yet.
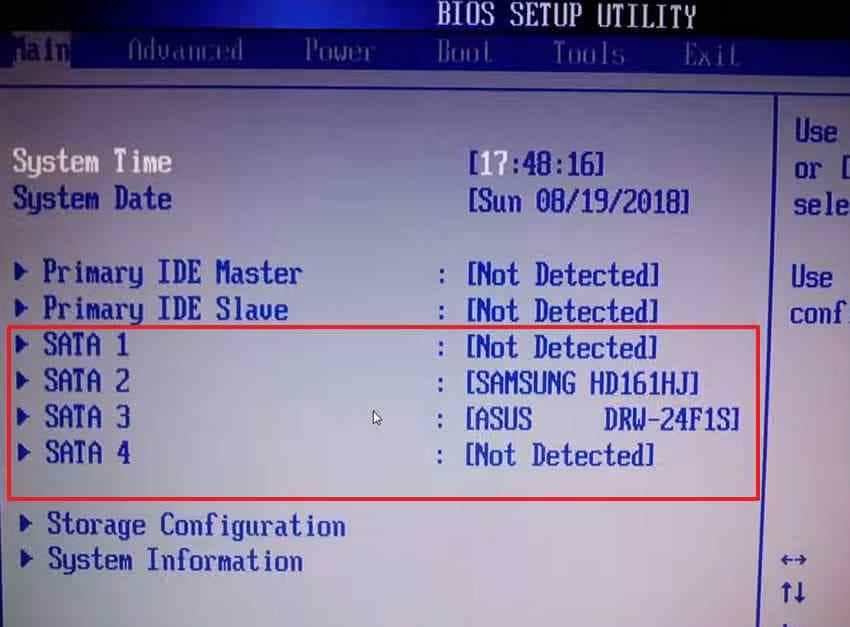
If the disk appears in firmware but not Setup, continue to the correct OEM F6 driver. If it is missing from firmware too, a Windows installer driver is unlikely to solve the underlying detection problem; review the hardware decision section below.
Fix 4. Load the Correct Intel RST, VMD, or AMD RAID Driver
Use this fix when BIOS/UEFI detects the drive but Windows Setup cannot access the configured storage controller. Dell documents Intel RST/VMD cases on certain 11th- through 14th-generation Intel systems; ASUS notes that requirements vary by platform and installer version. Not every Intel PC needs VMD, and AMD RAID drivers apply only to relevant AMD RAID configurations.
Step 1. On another PC, search the official support page for your exact computer or motherboard model. Download the storage-controller F6 / preinstallation driver compatible with the intended Windows architecture. Extract it, then copy the complete driver folder (including its INF, SYS, and CAT files) to a separate USB drive.
Step 2. If your manufacturer supplies a supported SetupRST.exe instead of an extracted F6 folder, follow its readme. Intel documents this example command in a terminal opened in the folder containing the installer:
.\SetupRST.exe -extractdrivers SetupRST_extracted
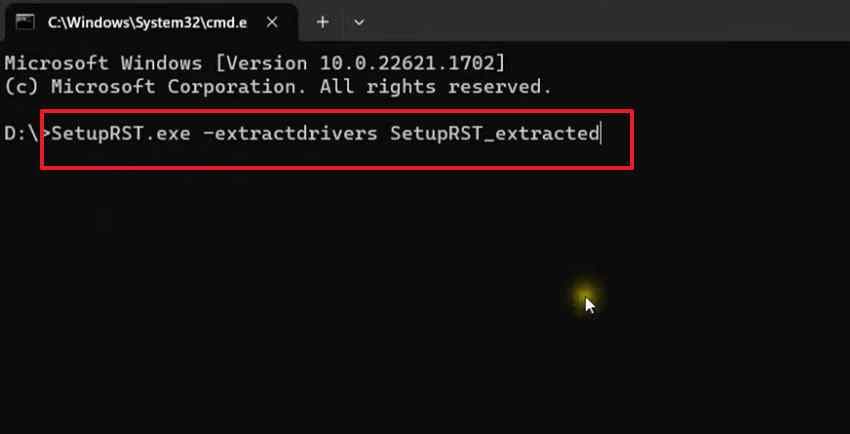
Note: The command is for compatible Intel SetupRST packages only. If your OEM offers a pre-extracted F6 folder, use that instead. The output folder name and structure may vary by package version.
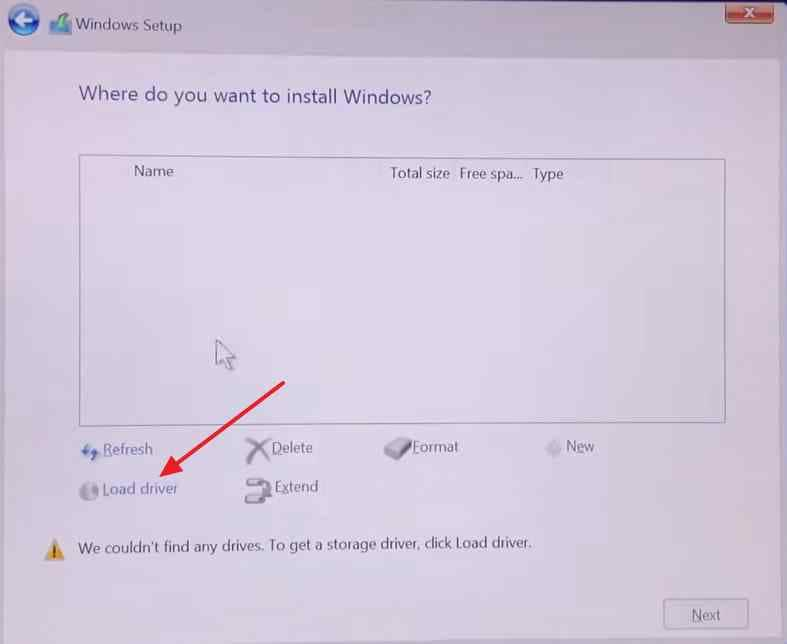
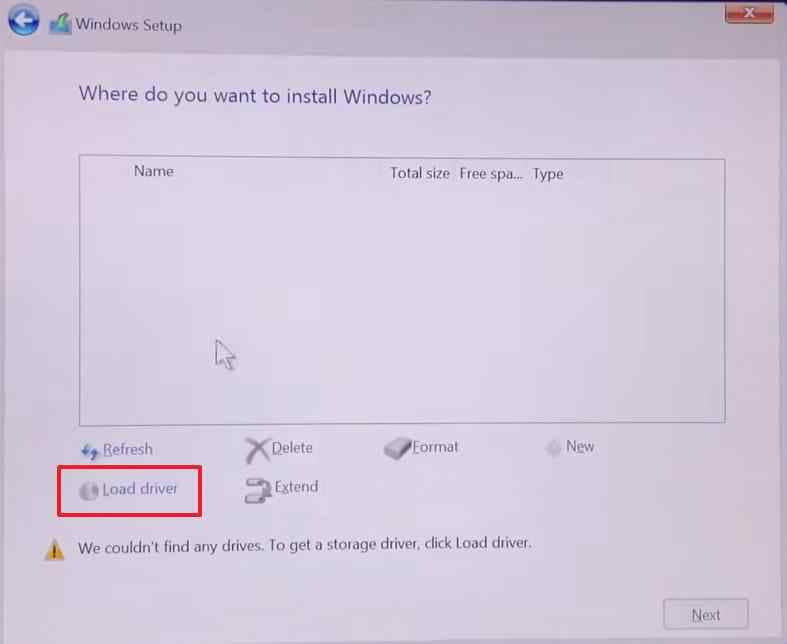
Step 3. Boot into Windows Setup. At the empty drive-selection screen or relevant driver prompt, click Load Driver, then Browse to the extracted folder.
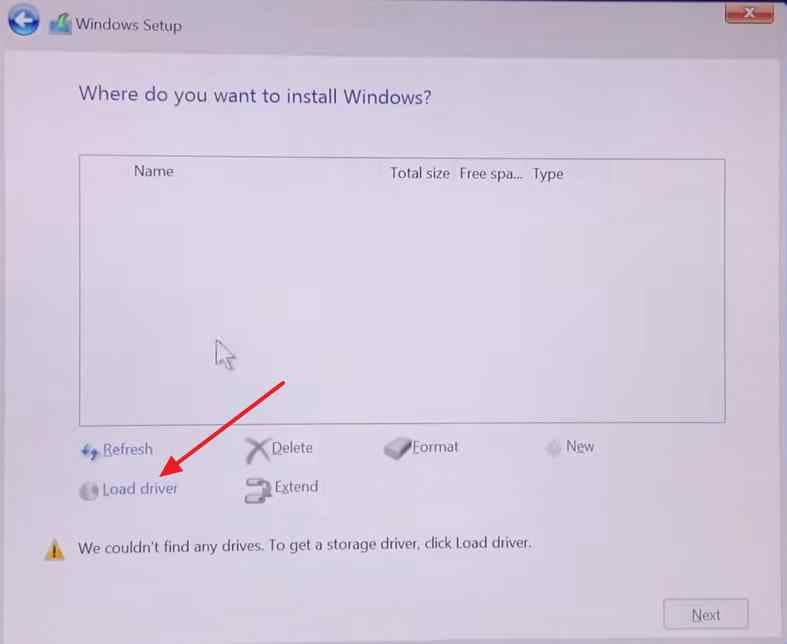
Step 4. For an Intel VMD configuration, choose the compatible Intel RST VMD controller INF in the extracted folder. The folder and displayed controller name depend on the OEM package. For an AMD RAID array, use your motherboard's driver-loading order; AMD documents the rcbottom, rcraid, and rccfg components, but do not apply an arbitrary generic sequence to every platform.
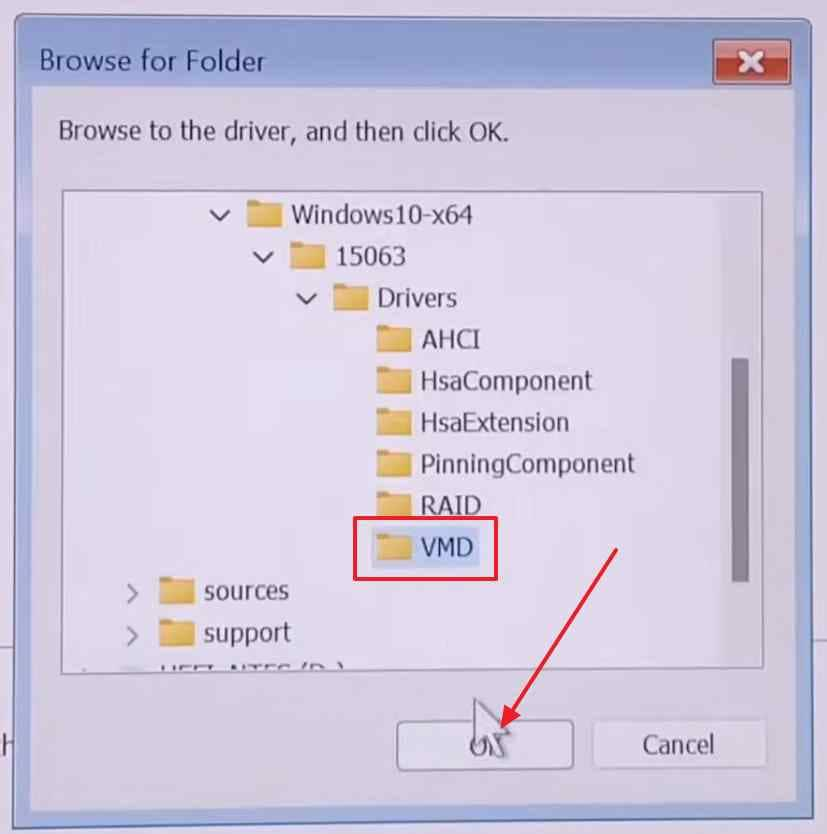
Step 5. Proceed only if Setup recognizes a compatible driver. Return to the disk-selection screen and verify the target disk model or capacity and any existing partitions. If no disk appears, record the error and recheck the exact storage-controller model before trying another package.
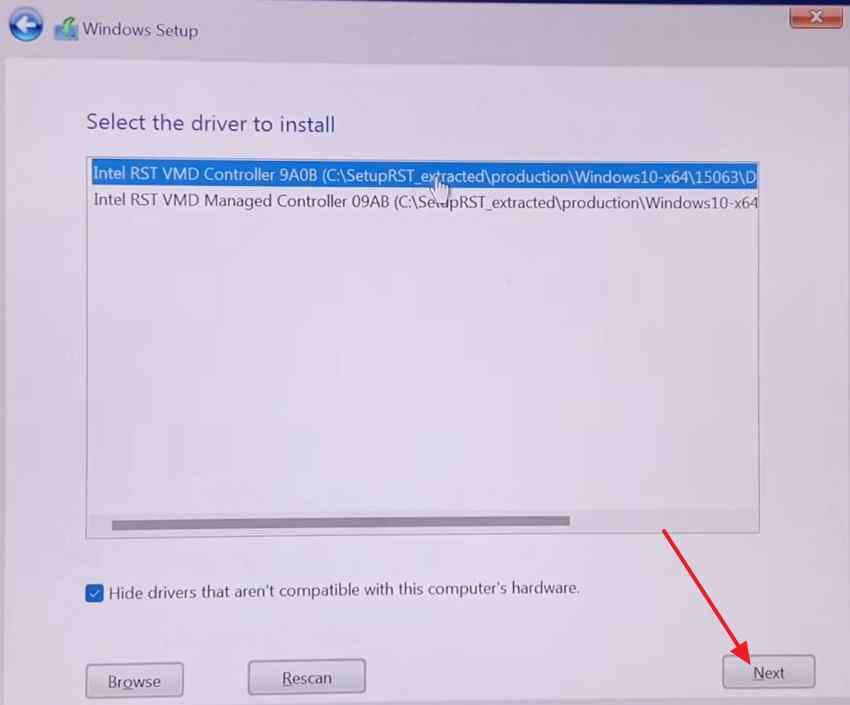
For reference, see Intel's official SetupRST extraction guidance and the AMD RAID user guide. A normal SSD utility or graphics driver is not a substitute for an installation-time storage-controller driver.
Fix 5. Resolve the No Signed Device Drivers Were Found Error
The wording "No signed device drivers were found" does not automatically mean a valid driver has a broken signature. Setup may simply find no hardware-compatible signed driver in the folder you selected. Treat it as a driver-package selection problem first, not a reason to disable signature protection.
Step 1. Confirm the manufacturer supplied drivers for your specific machine, controller, and Windows version. For Windows 11, use the appropriate x64 package on an x64 PC. Do not browse to an unextracted EXE file or unrelated management software.
Step 2. Extract the downloaded package on a working PC and copy the full folder to a USB drive. In Setup, choose Load Driver and browse to the folder containing the INF files, not merely the parent folder with the setup executable.
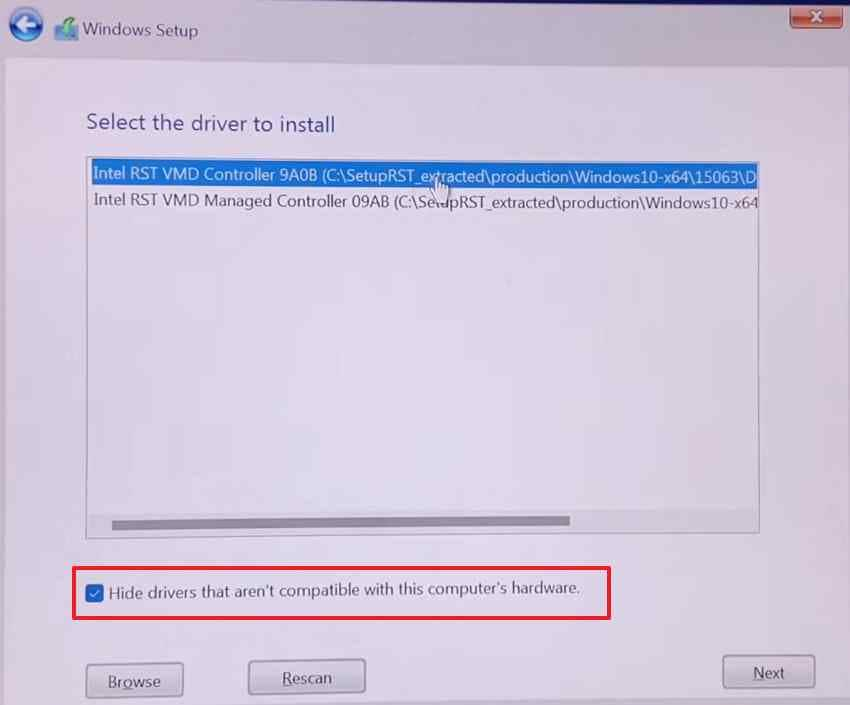
Step 3. Keep Hide drivers that are not compatible with this computer's hardware enabled if that option appears. Select the signed controller driver that Setup identifies as compatible. If the list remains empty, recheck the controller, architecture, and package source; do not force an unrelated driver.
Note: Do not disable Secure Boot or Windows driver-signature enforcement solely to suppress this error. If the OEM cannot supply a compatible signed driver, stop and ask its support team for a supported installation path.
Fix 6. Check Intel VMD, RAID, and AHCI Settings Only If the OEM Requires It
Changing a storage mode can make an existing Windows installation unbootable or hide RAID volumes. For a disk that contains a working OS or important files, use the OEM's documented migration procedure and verified backup; otherwise, leave the configuration unchanged. Loading a compatible driver is usually the less invasive choice.
Step 1. Check whether your manufacturer explicitly supports a different mode for this PC and installation scenario. Record the original setting and confirm that there is no RAID array or encrypted data at risk.
Step 2. Only for a confirmed new installation on an empty, non-RAID disk, and only if the OEM approves, change the relevant VMD/AHCI option. Restart Setup and look for the disk.
Step 3. If the change does not help, restore the exact recorded settings. Do not continue toggling storage modes or create partitions simply to make an invisible disk appear.
The safer route is to match the installation image and F6 driver to the current controller, as shown in ASUS's current setup guidance.
When Windows Setup Still Cannot See a Disk: BIOS-Invisible Hardware vs. Missing Drivers
If the SSD or HDD is missing from the firmware's storage inventory as well as Windows Setup, the problem is no longer just an install-time driver prompt. A missing boot entry, however, is not the same as firmware failing to detect a disk; inspect the actual storage information page.
| Firmware finding | Possible issue | Safer next move |
| Drive model and capacity visible | Setup may lack the configured controller driver | Load the matching OEM F6 driver; avoid repartitioning |
| SATA drive absent in firmware | Loose data/power cable, disabled port, or drive fault | Power off; check only user-serviceable cables per the manufacturer |
| M.2 drive absent in firmware | Slot/interface mismatch, lane-sharing restriction, or hardware problem | Check motherboard documentation; seek technical help when data matters |
| Intermittent detection or unusual drive noises | Possible physical instability or failure | Stop repeated boots and scans; consult qualified support or data recovery specialists |
If the PC fails with a boot message before reaching Setup, see the separate Recoverit no bootable devices found guide. Do not assume a bootloader problem can be solved by changing the installation-time F6 driver.
Protect Accessible Local Files Before Any Repartition or Clean Install
A missing-driver prompt does not itself delete files. If the disk is readable and contains important data, leave existing partitions intact and copy the files to separate storage before proceeding. If you need to move a protected disk to another computer, have the legitimate BitLocker recovery key available. Never choose Delete, Format, New, or a clean installation target until you have confirmed the backup and disk identity.
If data was already lost because a partition was accidentally deleted or formatted, stop further writes to that drive. Wondershare Recoverit Windows System Recovery describes a bootable recovery workflow for a Windows PC that will not start, provided the original storage is detectable and sufficiently readable. Recovery is not guaranteed; save any recovered files to a separate healthy drive. Recoverit does not install missing drivers, repair firmware, or make physically undetected storage readable.
Part 3. Legacy: Fix No Device Drivers Were Found During Windows 7 Installation
Windows 7 installation media predates many USB 3.0/xHCI and NVMe controllers. These methods are for maintaining older, licensed hardware or retrieving files from legacy systems, not for recommending Windows 7 as a current internet-connected OS.
Windows 7 Is Out of Support: Use These Steps Only for Legacy Hardware
Microsoft ended Windows 7 support on January 14, 2020, and Windows 10 standard support ended on October 14, 2025. If the hardware meets Windows 11 requirements, that supported version is usually a better choice. For an essential legacy deployment, obtain drivers and media through authorized sources and verify that the target motherboard actually supports Windows 7.
Fix 1. Use a USB 2.0 Port for Windows 7 Installation
A Windows 7 installer may not include the USB 3.0/xHCI driver needed to keep reading the installation media. On compatible older hardware, a genuine USB 2.0 controller port can avoid that dependency. A connector's color alone is not a reliable controller identifier.
Step 1. Turn off the computer and connect the installation USB directly to a manufacturer-documented USB 2.0 port, when available. Avoid hubs and adapters.
Step 2. If the legacy motherboard offers a supported Windows 7 USB mode or xHCI hand-off setting, consult its manual before making any changes. Record the original value.
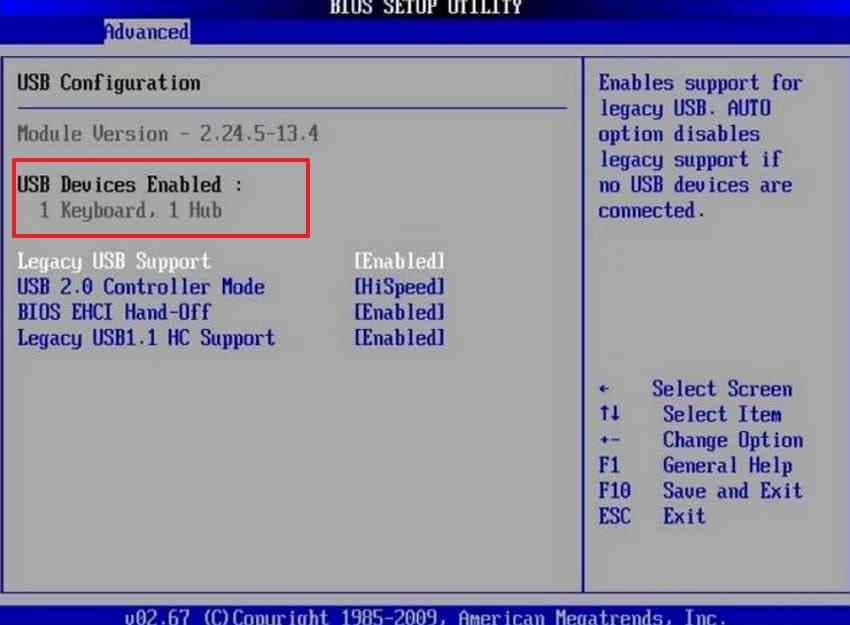
Step 3. Restart Windows 7 Setup. If it can now read its files, continue only after verifying the intended target disk. If the prompt persists and supported USB drivers exist, proceed to the next method.
Fix 2. Integrate Compatible USB 3.0 Drivers Into Windows 7 Installation Media
If there is no usable USB 2.0 port, a technician can inject compatible Windows 7 USB 3.0/xHCI INF drivers into the installation image. Microsoft documents offline driver servicing with DISM, and Intel publishes a legacy Windows 7 USB 3.0 example. This is an advanced image-preparation process, not a repair to the original SSD. Use a separate technician PC and copies of legitimate installation media.
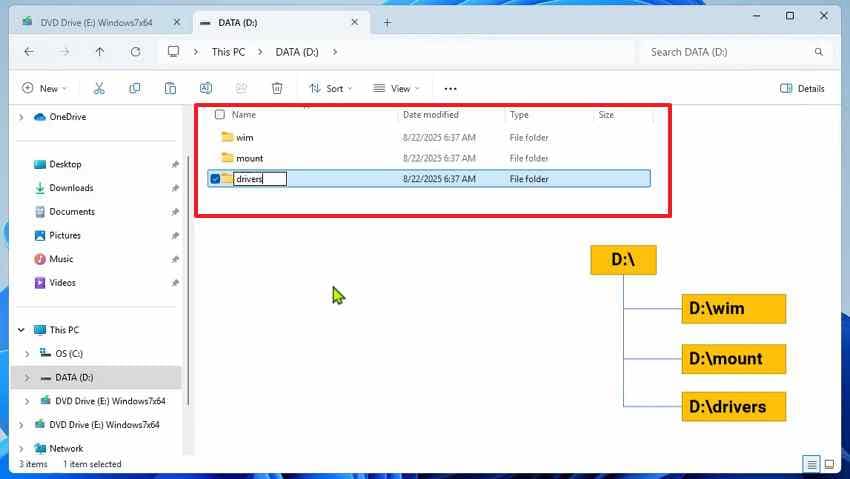
Step 1. Prepare a Windows 7 SP1 image and the correct signed Windows 7 x86/x64 USB controller drivers from the hardware maker. Create working folders such as D:\wim, D:\mount, and D:\drivers on the technician PC.
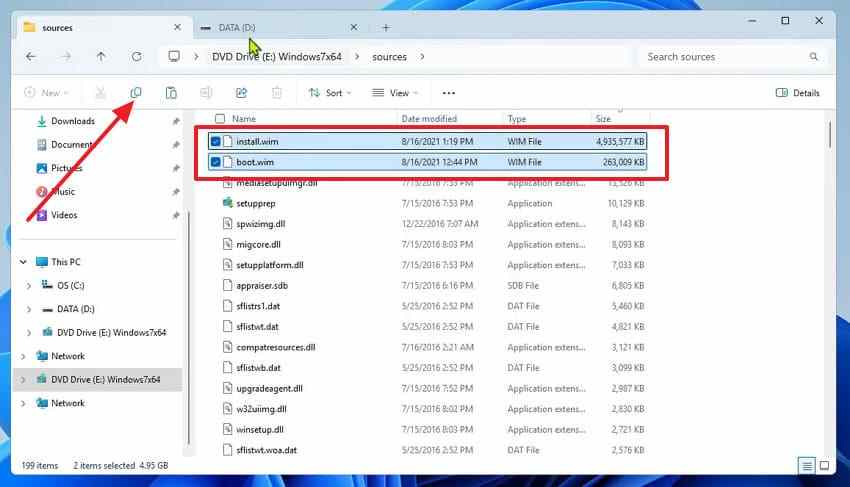
Step 2. Copy boot.wim and install.wim from the installation media to D:\wim. Extract the USB 3.0/xHCI INF driver package to D:\drivers, retaining its subfolders.
Step 3. From an elevated deployment command environment, inspect the image indexes before editing anything:
Dism /Get-WimInfo /WimFile:D:\wim\boot.wim
Dism /Get-WimInfo /WimFile:D:\wim\install.wim
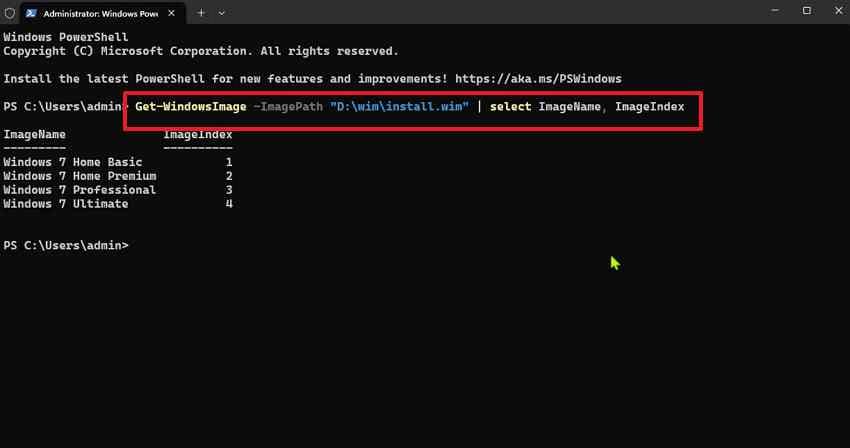
Identify the Windows Setup index in boot.wim and the intended Windows 7 edition index in install.wim. Do not blindly assume a number; indexes vary by image. The Setup image is commonly index 2 on original Windows 7 media, but you must confirm it.
Step 4. Mount only the verified Setup index of the copied boot.wim, add the matching extracted drivers, and commit the image. Replace BOOT_INDEX with the numeric value shown by DISM:
Dism /Mount-Image /ImageFile:D:\wim\boot.wim /Index:BOOT_INDEX /MountDir:D:\mount
Dism /Image:D:\mount /Add-Driver /Driver:D:\drivers /Recurse
Dism /Unmount-Image /MountDir:D:\mount /Commit
Then mount the verified edition index of the copied install.wim and repeat. Use an empty mount directory each time:
Dism /Mount-Image /ImageFile:D:\wim\install.wim /Index:INSTALL_INDEX /MountDir:D:\mount
Dism /Image:D:\mount /Add-Driver /Driver:D:\drivers /Recurse
Dism /Unmount-Image /MountDir:D:\mount /Commit
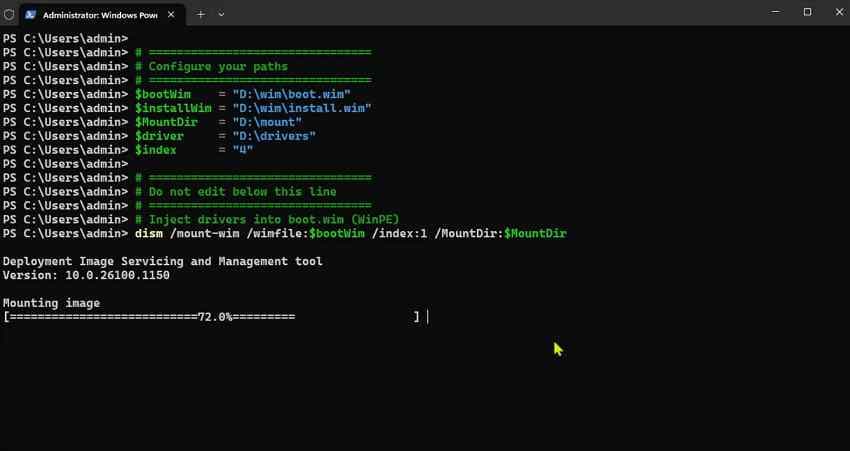
Step 5. Confirm DISM returned successful results and preserve the untouched originals. Rebuild the authorized bootable Windows 7 installer using the modified images; replace the relevant sources files in the copy. If an updated WIM exceeds the USB file system's size limit, use a Microsoft-supported split-image workflow rather than forcing an oversized file onto FAT32.
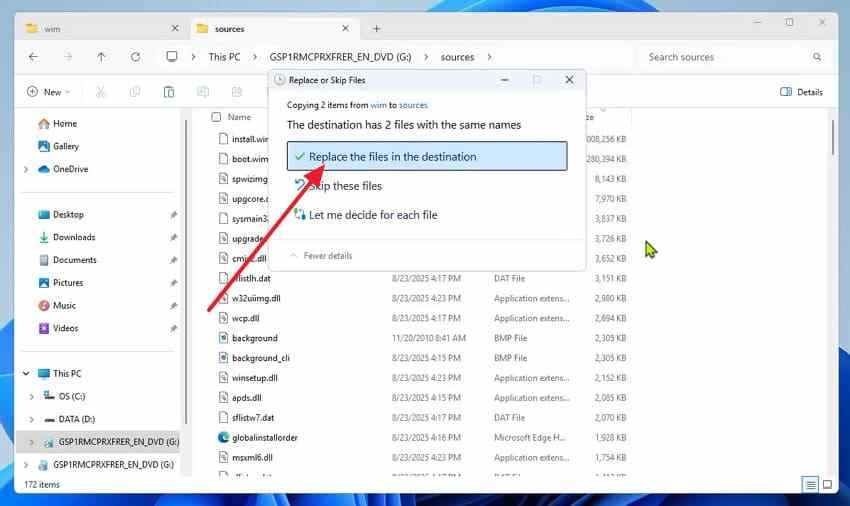
Note: Test this procedure only with compatible Windows 7 hardware and drivers. Some modern servicing hosts, tool versions, or firmware configurations will not work with old images. Stop if driver signature or servicing validation fails; do not use unsigned drivers as a blanket workaround.
Fix 3. Add Compatible SATA or NVMe Drivers to Windows 7 Setup
Windows 7 SP1 originally lacked general native NVMe support. Historical Microsoft hotfixes KB2990941 and KB3087873 and OEM-specific storage drivers were used on some supported legacy systems, as documented in HP's Windows 7 NVMe installation guide. Availability and compatibility of old packages must be confirmed; do not assume they are still downloadable or appropriate for modern controllers.
Step 1. Identify the exact SATA/RAID/NVMe controller, Windows 7 architecture, and legacy motherboard support. Obtain only matching manufacturer-supplied INF drivers or officially documented update packages.
Step 2. For a supported F6 controller driver, choose Load Driver in Windows 7 Setup and browse to the extracted INF files. Verify that the correct disk or RAID volume becomes visible without deleting any partitions.
Step 3. If historical NVMe support packages are required, follow a vendor-documented image servicing procedure for the correct edition and boot image. DISM /Add-Driver is for INF drivers; /Add-Package is for applicable Windows update packages. They are not interchangeable.
When Windows 7 USB 3.0 or NVMe Driver Integration Will Not Help
- No compatible vendor driver: Many modern USB, chipset, network, and storage controllers never received Windows 7 drivers.
- UEFI-only or unsupported platform: Injecting drivers cannot add missing firmware compatibility or override an unsupported boot architecture.
- SSD absent in BIOS/UEFI: Installation image changes do not repair a physical device or connector failure.
- Damaged or encrypted source storage: Preserve the original media and its legitimate access credentials; do not install Windows 7 onto it to attempt recovery.
Prefer a Supported Windows Release on Compatible Hardware
For current use, install Windows 11 on a device that meets Microsoft's hardware requirements. Windows 10 and Windows 7 are outside their normal support periods; limited extended-security arrangements do not make them equivalent to a normally supported release. If a legacy system must stay offline for a specialized task, restrict its exposure, maintain backups, and keep a documented support plan. See Microsoft's Windows end-of-support information.
Conclusion
When Windows Setup says "No device drivers were found," identify where the prompt appears before changing anything. A media-related error calls for a better USB port or a fresh Microsoft installer; a disk that firmware detects but Setup does not may need the exact OEM Intel RST/VMD or AMD RAID F6 driver. "No signed device drivers were found" is a reason to check the extracted driver package and controller compatibility, not to disable protection.
If firmware cannot see the disk, investigate hardware rather than generic Windows drivers. Verify the correct installation target and back up accessible files before partitions or storage settings are changed. Use Windows 7 instructions only where a legacy device genuinely requires them.
FAQ
-
Why does Windows Setup show "No device drivers were found" even though the SSD works?
The error can appear because Setup cannot read the installation USB or cannot find a driver for the storage controller. A working SSD behind Intel VMD or a supported AMD RAID controller may be hidden until Setup loads the correct OEM F6 driver. First check that firmware sees the SSD and identify exactly where the prompt appears. -
Which Intel RST or VMD driver should I load during installation?
Use the preinstallation/F6 driver specified by your PC or motherboard manufacturer for the exact model, controller mode, Windows release, and architecture. For VMD-enabled hardware, choose the compatible Intel RST VMD controller entry from the extracted INF package. Not every Intel system requires VMD. -
Why does a Windows 10 or 11 installation USB keep asking for drivers?
The installer may be unreadable because of a USB-port, flash-drive, or installation-media problem. Try a direct USB connection and recreate the media with Microsoft's official tool. If the installer starts but your internal disk is missing, check firmware detection and the appropriate OEM storage-controller driver. -
Can I fix missing drivers without deleting files on the target disk?
Usually yes. Changing the installer USB or loading a compatible storage controller driver does not require formatting the internal disk. Do not delete partitions, run DiskPart clean, or switch RAID/VMD/AHCI modes on an existing installation without backups and a manufacturer-supported procedure. Protect important files before any clean installation.


