How to Create a Bootable Drive for MacOS
Creating a bootable drive for your Mac certainly seems to be a wise decision to make. Even though the macOS recovery partition can take care of all your recovery requirements in times of need, it’s still worthwhile to have a bootable installer.
Why Do You Need to Create A Bootable Drive For Your Mac?
- The Mac installer gets deleted as soon as you download it and use it by installing the Mac operating system. Once the installer gets deleted, it means that you can no longer use it to install the macOS on another Mac device. You will have to again download the installer on the latter Mac to install the macOS. This can take a lot of time and become inefficient if you have multiple Macs.
- Clean installs can be performed by installers which are very helpful in overwriting your start-up drive. You can also use this function for other troubleshooting issues as well.
- When you have a bootable installer, it ensures that you are well guarded in an emergency scenario by making use of some of its helpful utilities.
- A bootable installer can allow you to install an earlier version of macOS and also let you temporarily boot into the previous version of the macOS, as well as the lattest macOS Monterey.
What Do You Need Before Creating Your Bootable Drive?
Before you begin the process, you will need the following:
- USB Stick / External Hard Drive: If you are planning to use a USB for downloading the bootable version of the installer, make sure that it is 8GB in size or larger than that. In the case of Sierra, 12GB is recommended as the minimum requirement. Ideally, 32GB to 64GB is a good size to have as it is not only cost-effective but also gives a better performance. In the case of an external drive, you can use any spare one that you are not going to use for any other work.
- Download macOS High Sierra Installer: It is important to note that once you have downloaded the installer, it will begin with the installation process on its own. You can close the installer just like you quit any Mac app. In the case of the macOS version being older than the current one, you can click on ‘ok’ once the message flashes that the version is too old to install. You can find the old installer file in your ‘Application Folder’. Don’t forget to take a backup of your Mac to be on a safe side.
Part 1. How to Create a Bootable Drive Using Terminal
There are two ways of creating a bootable copy of the installer. You can either use Terminal or get the job done through a free software like Recoverit to do it for you. First, let us look at how to create a bootable drive using Terminal.
Steps to create a macOS Siera beta boot disk:
- The first step in the process is to connect your external hard drive to your Mac. You need to name your external drive ‘untitled’ for the Terminal command to work.
- Launch Terminal. You can find this in the 'Utilities' folder of your Applications folder.
- Copy the following instructions now:
sudo /Applications/Install\ macOS\ Sierra.app/Contents/Resources/createinstallmedia --volume /Volumes/Untitled --applicationpath /Applications/Install\ macOS\ Sierra.app
- In this step, you have to paste the copied instruction on the screen by going back to the Terminal.
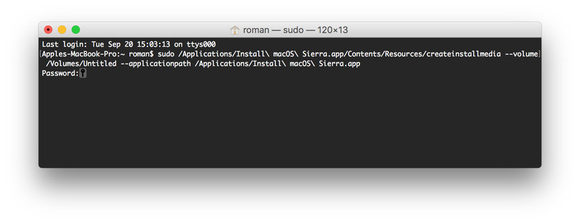
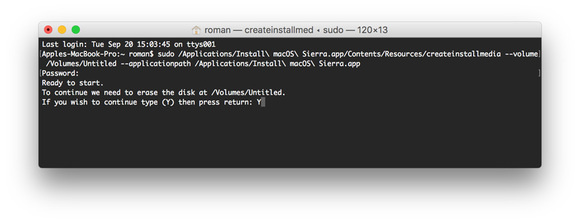
- You will be required to feed in your user password now and then hit ‘Return’.
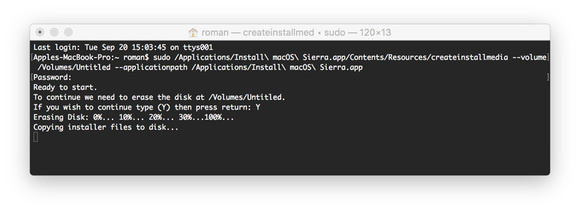
- Now, the Terminal will ask for your permission to erase the drive. To continue, type ‘Y’ and again hit return.
- After the Terminal has erased your drive, your Mac will prompt you if you wish to use the drive for Time Machine. Click ‘Don’t Use’.
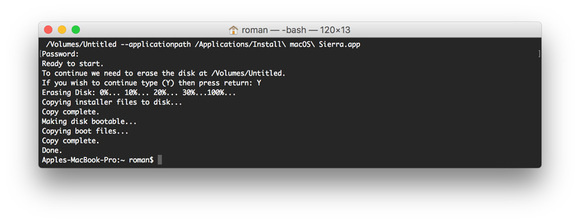
- Next, the installer file will be copied by the Terminal to your drive. This might take some time, so be patient.
- Once the copying is completed, a ‘Copy complete’ message will be displayed on your screen. You can now quit the Terminal and use your drive.
Read More:
Creating Bootable MacOS USB
Create macOS Bootable USB on Windows 10
Part 2. How to Create Bootable Media for Mac with Recoverit Mac Data Recovery
Recoverit Mac data recovery software is one of the most impressive and easy-to-use data recovery software in the market, and it has lots to offer with its varied utilities and functions. With Recoverit to create bootable media, you can access your system easily without the need to reinstall the macOS to recover your lost data.
Step 1 Launch Recoverit and get to select "Computer Crash Recovery". Click "Start".

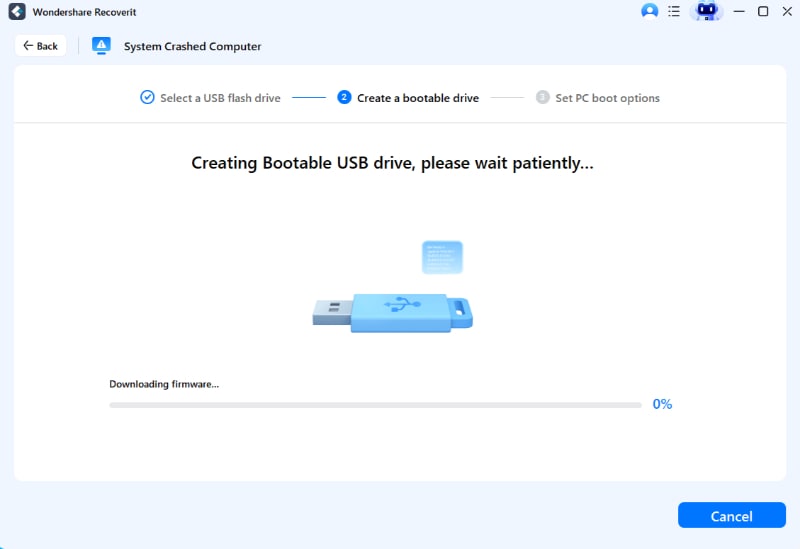
Step 2 Choose your connected external hard drive as the bootable media, and click "Start". You will receive a requirement of formatting the device. Before the formatting, remember to back your drive data up.

Step 3 Wait for a while, and Recoverit will format your drive and start creating the bootable media.
Step 4 Once it finishes, follow the next steps to restore data.
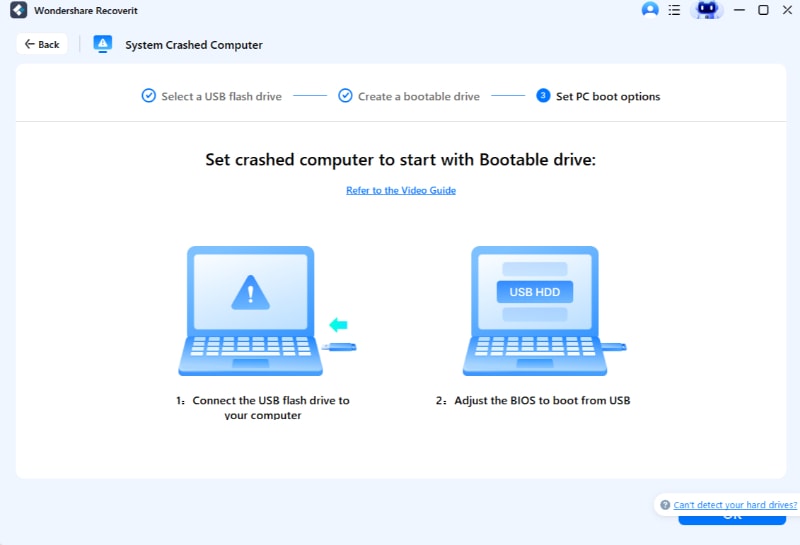
Part 3. How to Set the Computer Boot from the Bootable Media
Step 1 Connect your external drive to your unbootable Mac.
Step 2 Press down on the ‘Option’ key after restarting your Mac.
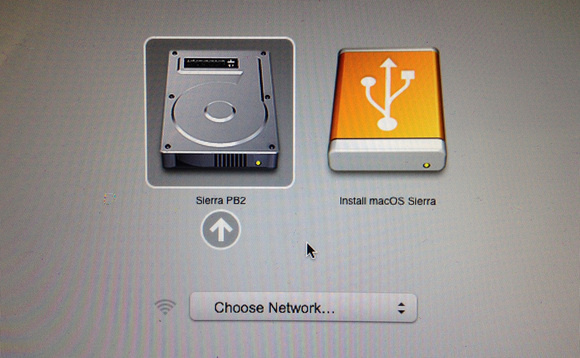
Step 3 Once the booting has finished, your Mac will display the Startup Manager to show you the available boot drives. Select your external hard drive and hit ‘Return’.
Step 4 If you want to install Sierra but keep your data untouched, you can select 'Install OS X'. However, if you wish to delete all your data, then you can select Disk Utility to format the entire drive and wipe away all your data to reformat the internal drive first and then install macOS Sierra.
You now have a bootable copy of the macOS Sierra installer, and you can use it on multiple Macs to install the Mac OS. If you are familiar with the command line, you can opt to create a bootable drive using Terminal. For others, you can simply opt for reliable Mac hard drive recovery software like Recoverit and assist you in recovering your data as well from crashed systems in case of emergencies.
What's Wrong with Mac
- Recover Your Mac
- Fix Your Mac
- Delete Your Mac
- Learn Mac Hacks


Sue Wayne
staff Editor