

 TL;DR:
To create a macOS bootable USB, download the specific macOS installer from the Mac App Store, format a blank USB drive with at least 14GB of storage, and execute the corresponding `createinstallmedia` command in Terminal.
● Simply copying the macOS installer to the drive will not work; the USB must be formatted as Mac OS Extended (Journaled) with a GUID partition map before running the Terminal command to finalize the bootable media.
● Booting procedures differ by hardware: Apple Silicon (M1) Macs require holding the Power button to access Startup Options, while Intel-based Macs require holding the Option key and having the "External Boot" setting enabled in the Startup Security Utility.
● If you only need to extract files from an unbootable Mac, you can bypass OS reinstallation by using a separate working Mac and an 8-16GB blank USB to create a bootable recovery drive via Wondershare Recoverit.
Ask AI for a summary
 ChatGPT
 Perplexity
 Gemini
 Claude
 Grok
Grok
Are you having trouble starting your Mac? Do you want to create a bootable USB on macOS to resolve the problem with your system? You've come to the right place.
A bootable USB drive can help you install or reinstall OS X on your Mac or even run a diagnostic tool without any internet connection or access to the Mac App Store.
In this article, we'll discuss how to create a bootable USB on macOS, what its requirements are, and how you can get macOS installer files. We'll also explore how to use Terminal to create a USB installer and boot your Mac using the created installer.
Part 1. What Do You Need to Create a Bootable Installer
To create a bootable macOS USB, you'll need a few things to get started:
- Mac OS X File: A downloaded installer for macOS Catalina, Big Sur, High Sierra, or El Capitan. You can get the OS installation file from Software Update in System Preferences or Mac App Store.
- A USB flash drive: You need to use a blank USB flash drive with at least 14GB of storage space. However, you can also use any other secondary volume formatted as Mac OS Extended.
- Back-Up Your Data: Make sure to back up your data on the USB drive before starting the process. So that when it is formatted, you don't lose any data.
How to Get macOS Installer Files
To create a bootable installer, you need to download the files from the Apple website. Afterward, follow the steps below to get the installer files you need for a different macOS.
- Select the required macOS from the table below:
- You will be directed to Apple's website. Click "View in Mac App Store" and select the "Open App Store" option from the prompt.

- In the Mac App Store, click the "Get" button to download the macOS Installer. Once the downloading process is complete, the installer file will be stored in the Application folder as an app named Install macOS X (X here will be replaced with the OS you've downloaded).

Use Terminal to Create the USB Installer
Please follow the steps below to create the USB installer:
- Connect the USB drive to your Mac system. Press the Command key + Space bar, type Disk Utility, and launch it.
- If you are using High Sierra or later macOS versions, click the "View" option on the top left side of the screen, and from the drop-down menu, choose Show All Devices.

- In the sidebar, choose the USB drive or any other external drive you are using. Make sure to select the root drive. Now, click "Erase," and in the Erase prompt window, choose Mac OS Extended (Journaled) as the format. Next, select GUID partition map as the scheme and click "Erase." You can also rename the USB drive if needed.

- Wait for the Disk Utility to create the partition and set up the USB drive. Click the "Done" option.

- Head to Applications > Utilities and launch the Terminal. You can also press Command + Spacebar and type Terminal to find and open it.

- Now, copy the createinstallmedia command that corresponds to the macOS version you want to install, replace "My Volume" with the USB drive name and press the "Enter/Return" key.

| macOS Version | createinstallmedia command |
| For macOS Sonoma | sudo /Applications/Install\ macOS\ Sonoma.app/Contents/Resources/createinstallmedia --volume /Volumes/MyVolume |
| For macOS Ventura | sudo /Applications/Install\ macOS\ Ventura.app/Contents/Resources/createinstallmedia --volume /Volumes/MyVolume |
| For macOS Monterey | sudo /Applications/Install\ macOS\ Monterey.app/Contents/Resources/createinstallmedia --volume /Volumes/MyVolume |
| For macOS Catalina | sudo /Applications/Install\ macOS\ Catalina.app/Contents/Resources/createinstallmedia --volume /Volumes/MyVolume |
| For macOS Big Sur | sudo /Applications/Install\ macOS\ Big\ Sur.app/Contents/Resources/createinstallmedia --volume /Volumes/MyVolume |
| For macOS High Sierra | sudo /Applications/Install\ macOS\ High\ Sierra.app/Contents/Resources/createinstallmedia --volume /Volumes/MyVolume |
| For macOS Mojave | sudo /Applications/Install\ macOS\ Mojave.app/Contents/Resources/createinstallmedia --volume /Volumes/MyVolume |
- Afterward, type the Admin password and hit the "Enter/Return" key. You will see this message appear: "To continue we need to erase the volume at /Volume/Untitled," press Y and press Enter. Wait for the process to show 100%.
- The Terminal will start copying the macOS installer file on your USB after formatting everything on it. Once the copying process is complete and Done appears in the Terminal panel, close the Terminal.
Your bootable USB drive is all set, and you can use it to install macOS on any Mac system.
How to Boot the Mac Using the Created Bootable USB Drive?
Before booting your Mac system with a bootable USB drive, check whether you are using a Mac with an Apple Silicon chip or an Intel processor. Afterward, follow these instructions in sequence:
For Mac with The M1 Apple Silicon Chip
- Plugin the bootable USB flash drive into the USB port on your Mac system.
- Press and hold the Power button on your Mac until the Startup Option displaying bootable volumes appears on the screen.
- Choose the bootable USB drive and click the "Continue" option. Afterward, follow the on-screen instructions in the macOS installer window.
For Intel-Based Mac Systems
- Plugin the bootable USB drive into the USB port of your Mac system.
- On your Mac laptop, press the Power button and hold the Option key until the screen displaying bootable volume options appears.
- Choose the bootable USB installer drive volume and click the "Return".
- Select "Install macOS or OS X" from the Utility window and click "Continue."
- Follow the on-screen instructions to complete the booting process.
Use Disk Utility to Create the USB Installer
If the Terminal method doesn’t work for you, you can manually prepare the USB drive and then make it bootable using the createinstallmedia command later.
- Press Command + Space to launch the Search box. Type "Disk Utility" and press Return to launch it.
- Insert your USB drive (minimum 16GB recommended).
- In Disk Utility, select the USB drive from the sidebar. Click "Erase" and configure the settings: Name, Format, and Scheme. Then, click "Erase" to format the drive.
- After formatting, manually drag the macOS installer (downloaded from the App Store) to the USB drive.
How to Boot Mac from the USB Installer?
- Once the bootable USB is ready, shut down your Mac.
- Reboot your Mac while holding the Option key to access the startup menu.
- Select the USB installer from the list and follow the on-screen instructions to boot your Mac.
For Intel Macs(Recovery Mode):
Hold Command + R during startup to enter macOS Recovery.
How To Recover Data from Unbootable Mac?
If you don't want to or can't reinstall the operating system on your unbootable Mac, you can use recovery software to retrieve your files.
Recoverit is a reliable and effective data recovery program that can help you recover lost or deleted files from your unbootable Mac in the following way:
- A blank USB with at least 8 -16 GB of storage space or more.
- Another working Mac computer.
- Recoverit software installed on your working computer.
Effortlessly retrieves all deleted Mac files!
Steps to Recover the Lost Data
Once you have all the things in hand, follow these steps in sequence to recover data from an unbootable Mac.
- Download the Recoverit software on your working Mac computer/laptop and install it. Once installed, The first step is to launch the data recovery software on the new computer and choose "Recover from Crash Computer" under the last tab. Click "Start" to go on.
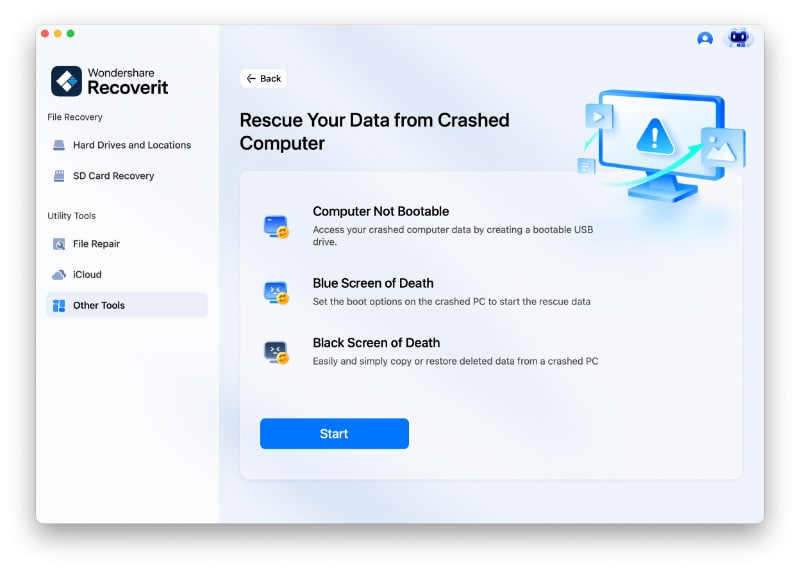
Recoverit can be used to create a bootable media to help you extract data from a crashed system.
Please insert a USB drive to create a bootable media drive. Once you connect it to your working computer, it will show in the drop-down box. Insert more than one external drive? Click the arrow to view the drop-down menu and choose a blank one. Click "Start" to go on.
To ensure enough space on the USB drive, it will be formatted, and thus, all the data present on it will be wiped. So back up important files in advance.
Click "Format" and the next interface will show you the procedure for formatting the USB drive.

- Plugin the bootable USB drive into your crashed Mac, press the Power button to turn the laptop on, and press the Option key. Select the Wondershare Recoverit Bootable Media Drive on the screen.
- Afterward, select the copy of the files and plug in an external hard drive into your unbootable Mac. Select the hard drive as the destination and click "Start Copy" to move the file to the connected drive.
Once the copying process is completed, you will get all your data on the external hard drive you've connected to your Mac system.
- Recovers data from all external hard drive brands, including LaCie, WD, Samsung, SanDisk, etc.
- Manages over 500 data loss situations, such as deletion, formatting, and disk corruption.
- The user-friendly interface allows you to recover data in just a few clicks.

Closing Words
In this comprehensive guide, we've discussed how to create a macOS bootable USB using the Terminal with simple instructions. We also explored how to get the macOS installer file from the Mac App Store and boot the Mac using the created bootable USB drive. Furthermore, we've provided a step-by-step solution for recovering your data from an unbootable Mac system.
Hopefully, you find this guide helpful and can now create a USB installer without much effort.
FAQ
-
How can I recover deleted files during the macOS update?
If you have Time Machine set up, utilize it to recover deleted files during the macOS update. To restore the lost files, open Time Machine and choose the date before the update. You can also retrieve your deleted files by using trustworthy data recovery software. -
What should I do if I can't find my files after the update?
Check the Trash first if, following the update, you are unable to locate your files. Use data recovery software such as Wondershare Recoverit if the files are missing. With the use of this software, you may effectively recover any lost or unreachable files by scanning your system. -
How can I prevent missing data after the macOS Sequoia update?
To prevent missing data after the macOS Sequoia update, regularly backup your files using Time Machine or an external hard drive. Make sure your data is safe and quickly recoverable if necessary by turning on iCloud Drive to automatically sync documents.


