


 TL;DR:
You can create a macOS bootable USB drive on a Windows 11 or 10 PC to repair an unbootable Mac by burning a macOS DMG file using specialized software like UUByte DMG Editor.
● The USB drive must be manually converted to a GPT partition via the Windows Command Prompt before burning, because the default FAT32 format will not boot on macOS hardware.
● The required USB capacity depends strictly on the macOS version, requiring 32 GB for Sequoia and Sonoma, 16 GB for Monterey through Catalina, and 8 GB for legacy OS X versions.
● To trigger the boot process, hold the Power button on Apple Silicon Macs or the Option key on Intel Macs, though Macs equipped with a T2 Security Chip must first have "Allow booting from external media" enabled.
Ask AI for a summary
 ChatGPT
 Perplexity
 Gemini
 Claude
 Grok
Grok
How can I create a macOS bootable usb on Windows 10? - posted by Bauer2260 in Microsoft Community
Are you trying to start up your Mac, only to find it refusing to boot? This frustrating issue can stem from software update glitches, corrupted system files, or drive errors. When this happens, your best hope is often a reinstall. However, if your Mac is down, you might be wondering if it is possible to create Mac bootable USB from Windows.
The answer is yes. Even if your only functioning device is a PC, you don't need to despair. You can easily create Mac bootable USB from Windows 11 or 10 to rescue your computer. With tools like UUByte DMG Editor, you can burn a macOS image directly on your PC, allowing you to bypass the startup error and repair your system quickly.
In this article
How to Create Mac Bootable USB on Windows?
Step 1. Prepare for Creating Mac Bootable USB
Before we look into the detailed steps to create macOS bootable USB from Windows, let’s check the list of the prerequisites:
- A copy of the macOS installer (DMG file). You will find how to download macOS Or Mac OS X DMG File in the later part.
- UUByte software to create a bootable USB drive. The software is available for both Windows as well as Mac. Download link: https://www.uubyte.com/iso-editor.html
- A high-quality USB flash drive with at least 6 to 8GB of free space.
| macOS Version | Minimum USB Size | Compatible Mac Hardware |
| macOS Sequoia / Sonoma | 32 GB | Apple Silicon (M-Series) & Intel (2018+) |
| macOS Monterey / Ventura | 16 GB | Intel (2015+) & Apple Silicon |
| macOS Catalina / Big Sur | 16 GB | Intel Macs (2012-2019) |
| OS X El Capitan / Yosemite | 8 GB | Legacy Intel Macs (Pre-2012) |
Step 2. Download macOS Or Mac OS X DMG File
DMG files are a type of disk image that are used to store data on a Mac OS X computer. They are typically used to create bootable USB drives or other disk images that you can use to install macOS on a Mac.
You can get macOS versions from the Apple download portal or Mac App Store. But since you are creating a bootable USB on your Windows computer, you will need to use a DMG file in order to do so. This is because Windows can't read the file format that macOS uses.
You can get a DMG file onto a Windows computer using different direct links for the various versions of Mac OS X, for instance, Monterey, Big Sur, Catalina, Mojave, High Sierra, and EI Capitan.
Step 3. Create a GPT Partition
While trying to create a macOS bootable USB on Windows using the UUByte tool, your USB drive might not work with the software due to a partition issue. This is because the USB drive is formatted to FAT32 by default. Unfortunately, FAT32 only supports OS with legacy BIOS.
To avoid this problem, you need to create a GPT partition on the USB flash drive using the Windows Management Tool or Command Prompt.
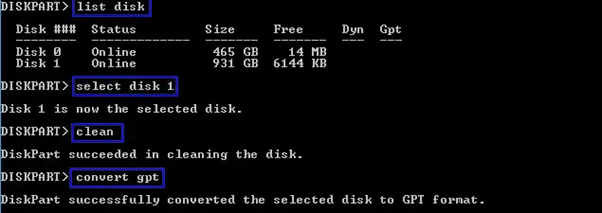
To create a GPT partition on a USB drive using Command Prompt, follow the steps below:
- Press the Windows key + R, type cmd in the box, and click "OK."
- Type the following commands and press Enter after each line.
Diskpart
List disk
Select Disk X (X = USB flash drive name)
Clean
Convert GPT
Create partition primary
Once done, the GPT partition will be created on your USB drive, and you can now use it to create a bootable USB using the UUBytes software.
Step 4. Create MacOS Bootable USB Installation Media
After all the preparation work is done, let’s look into the steps to create a macOS bootable USB on Windows 11/10 via UUByte.
Usually, it is required to format the previously prepared USB firstly to make the USB recognizable to the computer. However, the latest version of the software can format your USB drive automatically before creating a bootable drive. Therefore, you can start the process directly.
To create macOS bootable USB installation media using UUByte DMG Editor on Windows, follow these steps in sequence:
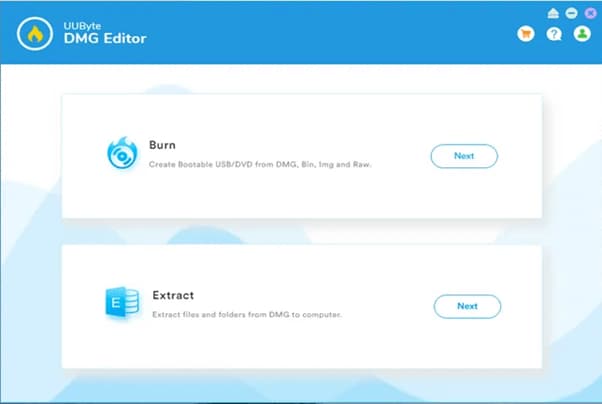
- Download the UUBytes DMG Editor software on your Windows PC and install it. Right-click on the UUBytes application and select "Run as Administrator." Click "Yes" when prompted.
- Plug in your USB drive on your PC and click "Burn" on the software's home screen.
- Now, click "Browse" and import the DMG file you downloaded earlier. Next, choose the USB drive and set its volume label.
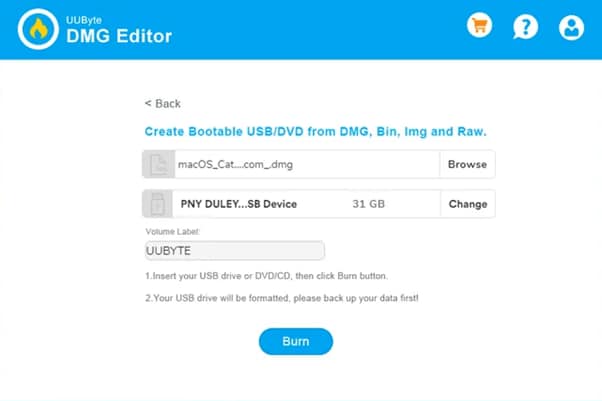
- Click the "Burn" option at the bottom of the screen to start creating a bootable USB drive. An indicator will show you the progress.
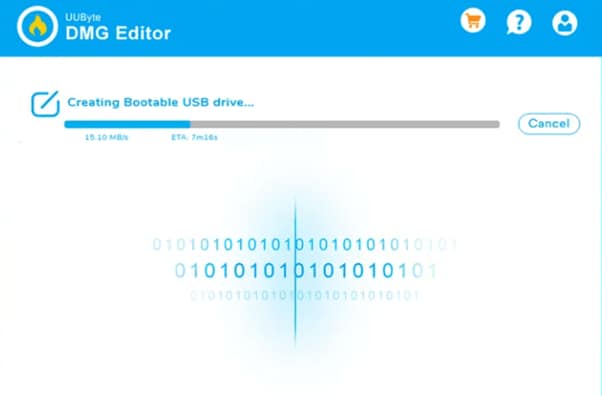
- Once the progress bar reaches 100%, a macOS bootable USB drive will be successfully created, and you can use it to install Mac OS X on your Mac system.
Possible Trouble while Creating the Bootable USB
When you are using UUbyte to create a bootable USB, there are a few potential troubles that users may experience while trying to download UUbyte or create a USB. We have listed three main common issues and provided solutions:
- Flashing Error: At the end of the burning process, you might see a quick flash of an error message. Don't worry about it, as this error can safely be ignored. Your USB will become a bootable disk that you can use to install macOS, even if this error appears.
- About Official EI Capitan DMG: There is a bug in the official release of OS X El Capitan that affects .pkg installers. The burning process will fail if you try to use one of these installers.
- Registration Failed: Before you begin the registration process, double-check that your computer is connected to the Internet and that there is no proxy or VPB settings enabled.
Bonus Tip: Recover Data from Unbootable Mac
Above we have explored how to use UUbyte and the possible issues you may discounter. We hope, you can create a bootable USB on Windows successfully with this guidance. However, we would like to recommend another good option to you when you face an unbootable Mac and try to recover your precious data on it – Recoverit.
Recoverit is a popular and powerful data recovery tool that can help you retrieve lost or deleted files from unbootable Macs in just a few simple steps. To know how to use it, please read the guidance below.
Preparations
- A blank USB with 8 to 16 GB of storage space.
- Another working Windows 10 PC.
- Recoverit installed on your working computer.
How to Recover Data Using Wondershare Recoverit?
Here's how you can use Recoverit to retrieve your data from your unbootable or crashed Mac:
- On your working Windows PC, download and install the Recoverit software and launch it. Next, insert a blank USB drive into your computer and go to "System Crashed Computer" from the left-hand side menu. Next, click "Start" to begin the recovery process.

- Now, select the drive or USB name and click "Start" On the next screen, you will get a warning message while asking to format the USB drive. Click "Format" to start creating a bootable USB drive.

- Once the bootable USB drive is created, unplug it from your working PC and insert it into the USB port on your unbootable Mac. Next, press and hold the Option key and simultaneously press the Power button to start your crashed Mac.
- Choose the Wondershare Recoverit Bootable Media Drive when it appears on the screen.
- Plug in an external hard disk to your crashed Mac and select a copy of your files in the Wondershare Recoverit Bootable Drive Window. Next, choose the external hard drive as the destination and click the "Start Copy" button.
- Wait for the process to complete, and you will successfully retrieve your data on the connected external hard drive from your Mac.
More Tip: How to Create a Bootable USB Installer on Mac?
Now you have equipped with the knowledge to create a macOS bootable USB Installer on Windows 10 and know what to do if you hope to recover your data from an unbootable macOS directly. However, you may also wonder how to create a bootable USB on macOS, which is less complicated than on a Windows 10 PC. Here, we have provided the guidance to make a macOS bootable USB and you can check it if you need.
Intel vs. Apple Silicon Boot Keys
| Mac Processor Type | How to Trigger USB Boot |
| Apple Silicon (M1/M2/M3/M4) | Press and Hold Power Button until "Loading Startup Options" appears. |
| Intel-Based Mac | Press and Hold Option (Alt) Key immediately after hearing the startup chime. |
| T2 Security Chip Macs | Must enable "Allow booting from external media" in Startup Security Utility first. |
Video Tutorial- How to Create a Bootable USB Drive on Windows
| Goal | Tool Needed | Success Rate |
| Repair System / Reinstall | UUByte DMG Editor | 95% |
| Emergency Data Rescue | Wondershare Recoverit | 99.5% |
| Legacy OS X Support | TransMac / UUByte | 85% |
| Partition Management | Diskpart (Windows CMD) | 100% |
The Bottom Line
In this article, we've walked you through the step-by-step process to help you create macOS bootable USB from Windows. We also explored how to download the DMG file and create a GPT partition on your USB drive in case the process is not working.
Furthermore, we discussed some possible issues you might encounter while creating a bootable media drive using the UUBytes tool. Afterward, we showed you how to use software to recover your lost data from your crashed or unbootable Mac.
Hopefully, you find the above information helpful and can now install macOS on your unbootable Mac without any problem.
FAQ
-
Can I use a standard Windows tool to burn the Mac installer?
No, standard Windows tools like Rufus often fail with Mac images. To successfully create Mac bootable USB from Windows, you need specialized software like UUByte or BalenaEtcher that can handle the specific file system structures required by macOS installers. -
Why is my USB drive not showing up on my Mac after creating it?
This usually happens if the partition scheme is incorrect. When you create bootable USB, ensure you select GPT (GUID Partition Table) instead of MBR. Mac firmware requires GPT to detect the external drive as a valid startup disk. -
Where can I get the macOS installation file on a PC?
To create Mac bootable USB from Windows, you first need the installer, usually in .dmg or .iso format. You can download these legitimate macOS versions (like Sonoma, Ventura, or Monterey) from the Apple support site or trusted tech archives. -
Is it free to create a bootable Mac drive on a PC?
Many tools used to create Mac bootable USB from Windows offer free trials or are open-source. While some premium features exist, basic functionality to burn the image and rescue your system is often accessible without payment. -
What size USB flash drive do I need for the installer?
Modern macOS versions are large. To create bootable USB installers for recent systems like macOS Sonoma, you need a flash drive with at least 16GB of storage. Ensure the drive is empty, as the process will erase all existing data.


