How to Format Memory Card on Mac
"Case: How do I format a Sandisk SD card on a Mac? This morning while I was trying to access my Sandisk SD card, I found that it was not working smoothly like before. It became completely unresponsive and I was wondering about fixing it by formatting the card. So, can anyone guide me on how to format memory card on Mac?"
Sound familiar to you? Well, there is no denying that if you want to extend the storage space of your devices than SD cards are of great help. But certain issues sometimes call for SD card formatting. Even if you have bought a new card, it is recommended to format it before using it. Read on to understand how to format memory card on Mac and recover the formatted data from it.
Part 1- Situations When Formatting Memory Card on Mac
Formatting an SD card on Mac is easy. All thanks to the in-built Disk Utility application. It leads to the deletion of all the saved content on the memory card, including the protected files, and more. Once Mac completes the formatting, new directories, and file systems are created and the performance of SD cards like its functioning and speed also improves with it.
Various reasons are there for which a user wants to format a memory card on mac:
- For quickly removing all information
- To reuse memory card
- Permanently deleting data before selling or disposing of it
- Format it to a new file system
- For solving errors, crash, virus issues, or other troublesome issues
After formatting, none of the files are left on the SD card. So it is recommended to take back up before initiating the formatting of memory card. This helps in restoring essential files to the SD card.
Part 2- How to Format Memory Card on Mac Safely
Some of the Mac systems have an in-built SD card slot; here you can directly insert an SD card to access it from Mac. If the SD card slot is missing in your Mac, then you can also use a USB card reader. For micro SD cards use SD adapter cartridge to put the card into the slot of Mac. Once you are ready with your SD card for formatting, follow these easy steps to format and make it reusable.
Step 1- Connect SD card with Mac
Insert the card into the SD card slot or connect it with a USB card reader.
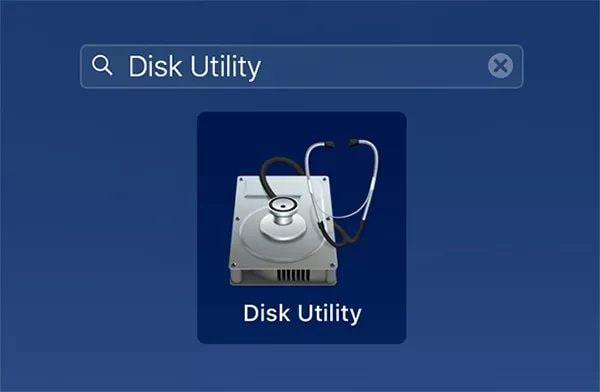
Step 2- Open Disk Utility
Disk utility is in-built in Mac. Use the spotlight or follow the following path to reach "Disk Utility" Applications > Utilities > Disk Utility
Step 3- Locate SD Card
Find your SD card from the left sidebar of Disk Utility. It shows the Mac's internal as well as external drives. You can see your SD card in the external section. If your card is never formatted before it shows up as "Untitled" or "No Name."
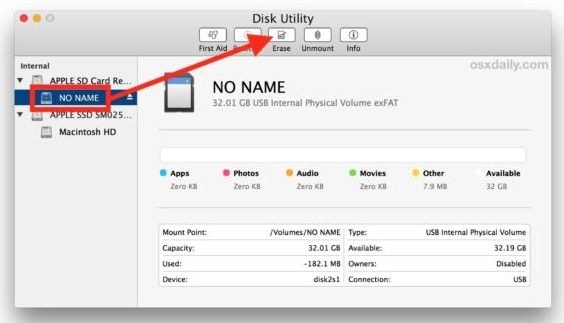
While selecting the memory card, double-check it that you are choosing the right Drive from the list. Click on it to view the storage space and ensure that your inserted SD card's memory matches the one that is showing up. If you see some mismatch then probably you have selected the wrong drive. Carefully make the selection again in this case.
Step 4- Click on Erase Tab
Select the "Erase" label located at the top in the menu bar of Disk Utility. When you click on it a pop-up will appear to warn you that you are going to delete all the files saved on your card.
Step 5- Write SD Card Name
Name the SD card as shown in the image below and select the format of the file system. The ExFat format is generally compatible with SD cards.
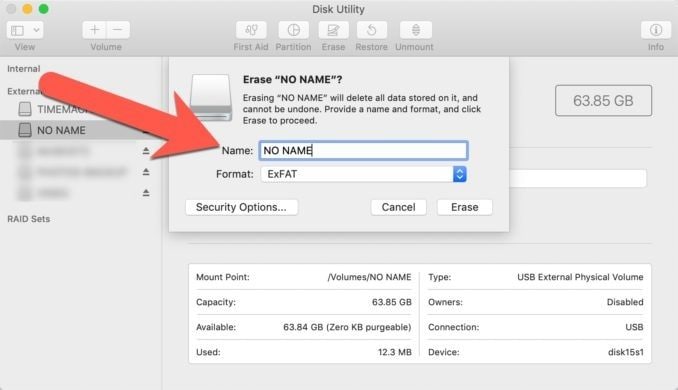
It's not mandatory to name the SD card here; you can leave it as "No Name" or "Untitled." Naming it will only act as a convenience to you at a later stage when you view it in "Finder" or while importing things.
The file system here is dependent on the size of the card. Like if its storage capacity is 64GB or more than that, select ExFat and if it's 32 GB or lesser than select FAT32.
Step 6- Click Erase
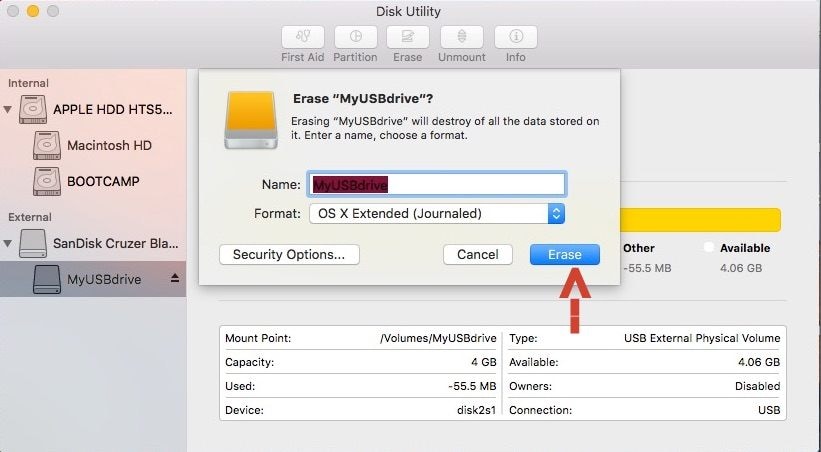
After naming and selecting the format of the SD card, click on the button displaying "Erase."
Step 7: Click Done When "Erase" Completes
When the formatting completes a message saying the process is complete, display on the screen.
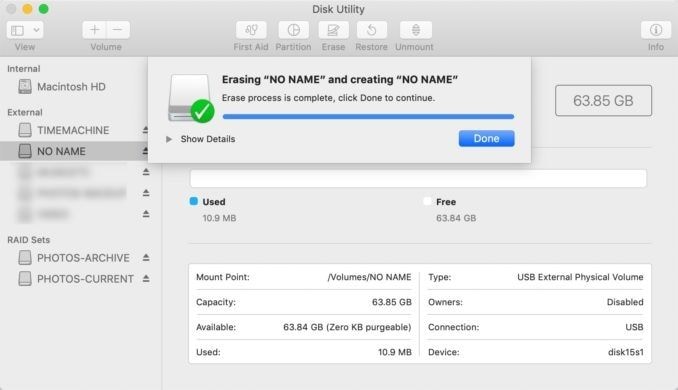
Once the format completes, the SD card is visible in the Disk Utility drive list and also in the Finder menu. Eject the SD card and use it in your device.
Video Tutorial on How to Format a USB Flash Drive on Mac
Part 3- How to Recover Formatted Memory Card on Mac
The formatting memory card will erase all data. But, don't worry as it is recoverable even after formatting. If you want to recover formatted data, use Recoverit Mac Data Recovery – the best data recovery software.
Step 1 - Select Location
Download Recoverit by confirming the computer version. Install it on Mac and launch it. Select the disk drive from where data is lost and click on "Start" to begin the scan.

Step 2 - Scan Location
It starts on Mac with an all-around scan. You can preview files when the scan completes. While the scanning is in progress, you can make selections and filters. You can search lost files from file type or file path. If you find your lost data in between the scanning, you can even pause or stop the scan.

Step 3 - Recover files
Recoverit also provides the facility of previewing files before recovery step proceeds. Go through all the files that recovery software has found while scanning. Select the files for which you have run the scanning. Click on "recover," once you are done with the selection of the files that you were looking for.

You are done with the recovery of the files when the above step completes.
Here one thing needs to be discussed. When you are saving the files in your Mac after recovering, don't save them on the previous path. The selected drive should vary from the one from where you lost your vital data.
Follow the above steps carefully. With this, your system is up with all the data that you have lost during the formatting of the SD card.
Part 4- Tips for Formatting and Format Recovery on Mac
When you think of formatting the SD card on Mac, you need to recheck certain things to avoid any data loss.
- Think multiple times before formatting the SD card as everything that is saved on the card is ultimately going to delete. Always ensure to take back up of the SD card before formatting it. Backup assures that you can regain access to the important files that are getting deleted during the process of formatting.
- Ensure the SD card is in the "unlock" state before you begin with the formatting or reformatting of the SD card. If the card is in the "lock" state, Mac can't proceed with formatting.
- Keep your SD cards healthy to avoid formatting. To maintain them, start using the SD card after formatting it once and never let them completely filled. Prefer using only branded cards and don't turn off the device while it is writing data; this can damage the card.
- Go for reformatting the card over deleting the content from the card. If you go with reformatting, it keeps SD card in good working conditions for extended times. It is advisable to erase or format unwanted files by using Mac.
- Don't interrupt the process, when formatting is in progress. As interrupting it in between can compromise SD card. So proceed with the process carefully because if damage occurs, the repair is difficult.
- Use Recoverit to ensure you get back your formatted or lost data. The data recovery software with the highest recovery rate lets you recover files hassle-free with its easy steps.
Part 5- How to Fix Memory Card Format Errors
Sometimes when you connect SD card with Mac, it shows up certain error messages like - SD is not formatted or not accessible. During such conditions, if you continue with the formatting, you are going to lose your important data saved on the SD card.
Abrupt shut down while reading and writing on the card, removing cards wrongly from the device, using the card in more than one system are some of the possible reasons that lead to memory card format errors. Don't tamper the card when it shows such errors; it can lead to loss of data permanently. Fix the formatted errors with these solutions:
1. Check connection
Firstly you need to ensure that the SD card is properly inserted. Test it on a different USB port or with a card reader. If the problem persists, follow the below solution as the card is damaged.
2. Set SD Card To Be Visible On Desktop
The possibility is there that memory card shows up in "Disk Utility" if it is not showing up in "Finder."
Step 1- Check "External Disks" Option Is Enabled
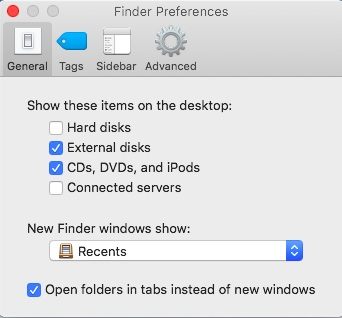
Follow the path: Finder -> Preferences - > General
Check here whether "External disks" is ticked. If not enable it so that the SD card can show up on the desktop.
Step 2- Check "External Disks" Is Enabled In Locations
Click at the sidebar from the top and ensure it is checked under "Locations" also.
3. Check Mount status in Disk Utility
If SD card doesn't show up even after setting preferences, then go with the following steps:
Step 1- Check whether SD card is listed in "Disk Utility"
Step 2- Select the mount option, if the card is visible but is in the unmounted state.
Now it is mounted in Finder and on desktop also.
4. Repair SD card with First Aid
Step 1- Go to "Disk Utilities"
Read with this path: Applications -> Utilities -> Disk Utilities
Step 2- Click First-Aid
Select the unmountable card and click on First Aid. Wait until repair finishes.
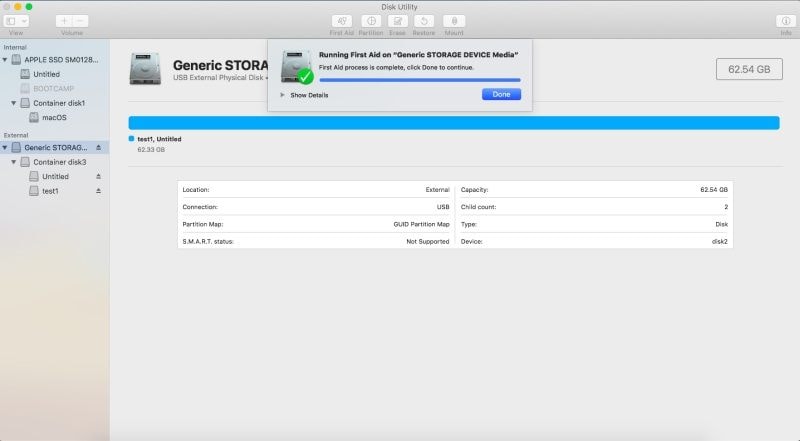
Unfortunately, if the problem is still not fixed, reformat it and restore your files with Recoverit.
Closing Words
Memory Card is the best medium for extending the storage space of your device. But these cards are prone to damages. A virus, improper handling, abrupt removal, and various other factors can corrupt it. To fix the issue, formatting is the best solution. If you also come across such a situation, follow the complete procedure step by step for formatting the memory card as discussed in the article. You can also recover your lost and formatted data with Recoverit.
What's Wrong with Mac
- Recover Your Mac
- Fix Your Mac
- Delete Your Mac
- Learn Mac Hacks


Sue Wayne
staff Editor