

 TL;DR:
For current Macs, skip creating a separate recovery disk and directly access the built-in macOS Recovery by holding the power button until startup options appear on Apple silicon models, or pressing Command-R at startup on Intel-based Macs.
● Create a bootable macOS installer on an erasable 16GB to 32GB USB drive using the Terminal createinstallmedia command if you specifically need external installation media, reserving the OS X Recovery Disk Assistant strictly for legacy OS X Lion or Mountain Lion systems with an existing Recovery HD.
● Force Internet Recovery on an Intel-based Mac using Option-Command-R or Shift-Option-Command-R as a fallback when the local system fails to boot, which requires a working network connection to download the recovery environment.
● Back up accessible files to a different healthy drive or retrieve inaccessible data before troubleshooting, because while choosing Reinstall macOS does not inherently erase personal data, running Disk Utility First Aid or erase operations on an unstable disk risks permanent data loss.
Ask AI for a summary
 ChatGPT
 Perplexity
 Gemini
 Claude
 Grok
Grok
If you are searching for a Mac OS X recovery disk, the right tool depends on your Mac and what you are trying to fix. On a current Mac, Apple's built-in macOS Recovery is normally the first choice: Apple silicon Macs enter it by holding the power button until startup options appear, while Intel-based Macs use Command-R at startup. If you specifically need external recovery media, create a modern bootable macOS installer. Apple's old OS X Recovery Disk Assistant is a legacy tool for Lion and Mountain Lion, not a current recovery-disk workflow.
Before you repair, erase, or reinstall: if important files are missing or the startup disk is unstable, protect the data first. Copy accessible files to another drive or recover inaccessible files before running repair or erase operations that may modify the source.
In This Article
Part 1. Mac OS X Recovery Disk, Recovery Mode, and Bootable USB
The phrase Mac OS X Recovery comes from the Lion and Mountain Lion era. Apple now calls the current built-in environment macOS Recovery. That naming change matters because four different recovery routes are often mixed together in older tutorials.
| Recovery Option | Use It When | Current Scope | What You Need |
| macOS Recovery | You need Disk Utility, Time Machine restore, Terminal, or macOS reinstall tools. | Current Apple silicon and Intel Macs, with different startup steps. | No separate recovery disk. |
| Internet Recovery | An Intel Mac cannot start from its built-in Recovery system. | Intel-based Mac fallback. Apple may show a spinning globe. | A working internet connection. |
| Bootable macOS installer | Normal reinstall methods fail, or you need reusable external installation media. | Modern external installer workflow. | A USB or secondary volume that can be erased, plus the full macOS installer. |
| OS X Recovery Disk Assistant | You are intentionally maintaining an old Lion or Mountain Lion Mac. | Legacy only: OS X Lion or Mountain Lion with an existing Recovery HD. | An external USB drive with at least 1GB free. |
Decision rule: for a current Mac, start with macOS Recovery. Use a bootable installer only when you genuinely need external installation media. Use the old Recovery Disk Assistant only for the legacy systems Apple lists as supported. For a dedicated overview of Recovery Mode itself, see Recoverit's Mac Recovery Mode guide.
Part 2. How to Start Recovery Mode on a Mac
Do not use the same startup shortcut on every Mac. The correct Mac OS X Recovery Mode entry method depends on whether the Mac uses Apple silicon or an Intel processor.
Start Recovery on a Mac With Apple Silicon
Step 1. Shut down the Mac. If it will not shut down normally, press and hold the power button until it turns off.
Step 2. Press and hold the power button again. Keep holding it until you see "Loading startup options" or the Options icon.
Step 3. Select "Options", then click "Continue".

Step 4. If asked, choose the startup disk and a user account, then enter the login password. Recovery will open its utilities window.
Verify the result: you should see recovery tools such as Restore from Time Machine, Reinstall macOS, and Disk Utility. These are the built-in recovery tools; you do not need a separate recovery disk just to reach them.
Start Recovery on an Intel-Based Mac
Step 1. Shut down the Mac.
Step 2. Turn it on and immediately press and hold "Command-R". Keep holding the keys until you see an Apple logo or a spinning globe.
Step 3. Connect to a network if prompted, then select the startup disk or user account if Recovery asks for one.
Step 4. When the utilities window appears, choose the tool that matches your task.

Important: Command-R is the Intel startup shortcut. Do not treat it as the primary startup method for Apple silicon Macs.
Use Internet Recovery When Intel Recovery Fails
If an Intel Mac cannot start from its built-in Recovery system, Apple says it can try Recovery over the internet. You can also force Internet Recovery with "Option-Command-R" or "Shift-Option-Command-R". The combination can affect which macOS version is offered for reinstall.
If Internet Recovery fails, Apple may show a globe with a warning symbol. That usually points to a network or internet connection problem, so try another connection, use Ethernet if available, or retry later.

For the full Internet Recovery decision path, use Recoverit's separate Mac Internet Recovery guide rather than expanding this recovery-disk page into a duplicate article.
Part 3. Protect Your Files Before Repair or Reinstall
Recovery Mode contains powerful tools, but the safest next action depends on the state of your files. If the Mac still starts and your files are accessible, make a current backup or copy important files to another healthy drive before troubleshooting. If files are already missing or inaccessible, avoid erasing the disk and avoid unnecessary write activity until you have assessed recovery options.
| Your Situation | Safest Next Step | Do Not Rush Into |
| Mac starts and important files are accessible | Back up or copy the files first. | Erase, repartition, or a clean install. |
| Mac does not start, but the disk is visible and data matters | Protect or recover the data before destructive repair. | Erase or repeated repair attempts before the data is safe. |
| You have a current backup and suspect file-system errors | Run Disk Utility First Aid from Recovery. | Erasing the whole disk unless repair fails and you have a recovery plan. |
| macOS system files are damaged but the disk is otherwise usable | Use Reinstall macOS after making a backup if possible. | Assuming reinstall is the same as erase. |
| The disk is physically failing, disappears repeatedly, or has hardware symptoms | Stop stressing the device and seek professional service or data recovery. | Repeated software scans or repair cycles. |
Run Disk Utility First Aid After Data Is Safe
Apple recommends having a current backup before using Disk Utility to repair a storage device. If the startup disk needs repair, start from Recovery and open "Disk Utility".
Step 1. In Disk Utility, choose "View > Show All Devices" so the sidebar shows devices, containers, volume groups, and volumes.

Step 2. Start with the last volume on the device, run "First Aid", then move upward through the remaining volumes and volume groups, containers, and finally the physical device.

Step 3. When First Aid finishes, quit Disk Utility and restart the Mac. If Disk Utility cannot see the device at all, Apple recommends checking connections for external storage and considering service when the Mac or internal storage may have a hardware problem.
Reinstall the System Without Erasing the Disk
Apple states that reinstalling macOS from Recovery does not remove your apps or personal data, although you should still back up first. This is different from erasing the startup disk.
Step 1. Start macOS Recovery using the correct Apple silicon or Intel method.
Step 2. Choose "Reinstall macOS", click "Continue", and follow the onscreen instructions.

Step 3. If the installer offers "Macintosh HD" and "Macintosh HD - Data", Apple says to choose Macintosh HD.
Data-loss boundary: reinstalling is not the same as a clean erase, but it still writes system data. If you are trying to recover already-deleted or inaccessible files, protect those files first instead of using reinstall as a file-recovery method.
Part 4. How to Create a Modern Mac Recovery USB
If by "Mac OS X recovery disk" you mean an external USB you can boot from, the current Apple workflow is a bootable macOS installer. Apple says you do not need one for a normal upgrade or reinstall, but it can be useful when standard installation methods fail or when installing macOS on multiple Macs.
Before you begin: creating the bootable installer erases the USB or secondary volume. Apple says a 32GB flash drive has enough space for any macOS installer, while 16GB is enough for most earlier versions.
Step 1. Download the full macOS installer on a compatible Mac. Keep the installer in the Applications folder and quit it if it opens automatically.
Step 2. Connect the USB directly to the Mac and rename it "MyVolume". Back up anything on that USB first because the createinstallmedia process erases it.
Step 3. Use the command that matches the installer you downloaded.
| macOS Version | createinstallmedia Command |
| macOS 27 Golden Gate | sudo /Applications/Install\ macOS\ 27\ Golden\ Gate.app/Contents/Resources/createinstallmedia --volume /Volumes/MyVolume |
| macOS Tahoe 26 | sudo /Applications/Install\ macOS\ Tahoe.app/Contents/Resources/createinstallmedia --volume /Volumes/MyVolume |
| macOS Sequoia 15 | sudo /Applications/Install\ macOS\ Sequoia.app/Contents/Resources/createinstallmedia --volume /Volumes/MyVolume |
Step 4. Open Terminal, paste the command, press Return, enter the administrator password, and type "Y" when Terminal asks to erase the volume. The official Apple screenshot below shows the same createinstallmedia workflow with a Ventura installer; use the command from the current table above for your selected macOS version.
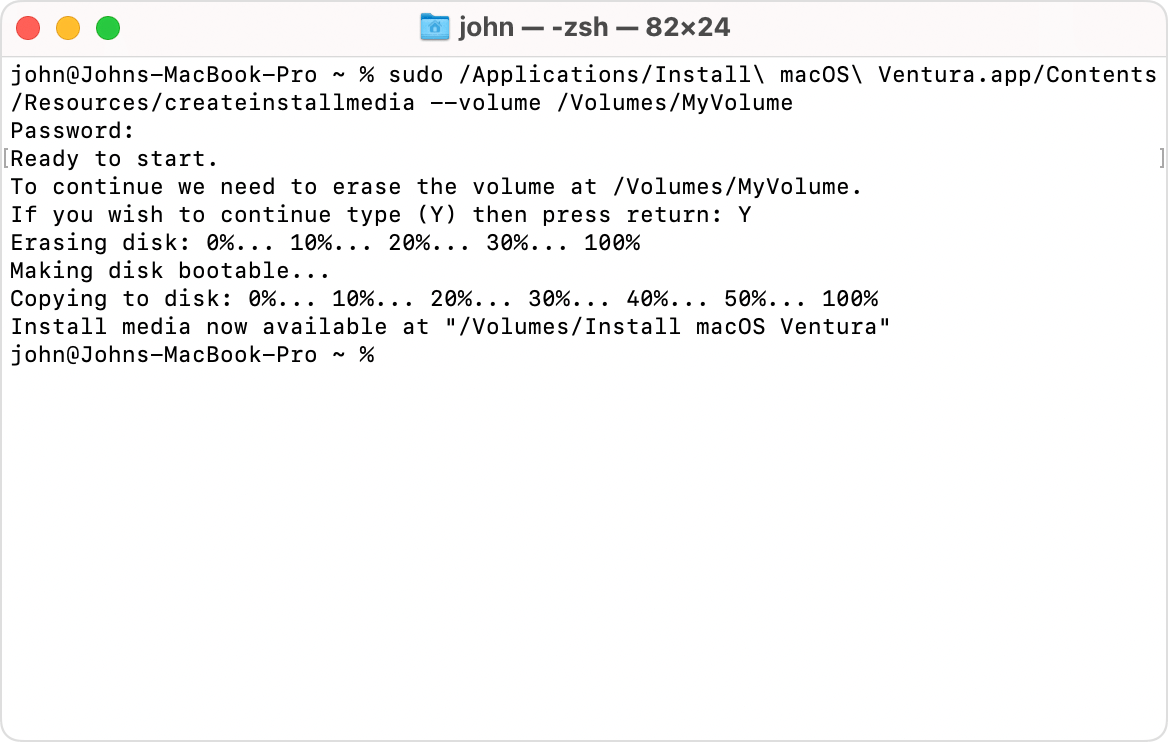
Step 5. When Terminal reports that the install media is available, eject the USB. To boot it on Apple silicon, shut down the Mac, connect the installer, hold the power button until startup options appear, select the installer, and click Continue. On an Intel-based Mac, turn it on while holding Option, then select the bootable installer. Apple notes that the Mac still needs an internet connection so the installer can obtain firmware and model-specific information.
If your task is specifically booting from external media rather than understanding recovery-disk options, keep that intent on Recoverit's dedicated Mac boot-from-USB guide.
Part 5. When to Use the Legacy OS X Recovery Disk Assistant
Apple still hosts OS X Recovery Disk Assistant v1.0, but its official requirements are narrow: OS X Lion or Mountain Lion, a Mac with an existing Recovery HD, and an external USB drive with at least 1GB free. Apple also says the utility is not compatible with CoreStorage disks, including FileVault 2 and Fusion Drive configurations listed on the support page.
For those legacy systems, the Assistant can copy OS X Recovery to an external drive. After creation, the recovery partition is not shown normally in Finder or Disk Utility; Apple instructs users to restart while holding Option and select Recovery HD from Startup Manager.
Do not use this legacy workflow as the default for macOS Tahoe, macOS 27 Golden Gate, or other current systems. For a current Mac, use built-in macOS Recovery or a modern bootable installer instead.
Part 6. Recover Mac Hard Drive Files Before Risky Repairs
If your real goal is OSX hard drive recovery because files were deleted, formatted, or became inaccessible, system Recovery and file recovery are different jobs. macOS Recovery can restore a Time Machine backup or reinstall the operating system, but it is not a general undelete tool for individual files that are missing without a backup.
When the storage device is logically accessible and detectable, Recoverit for Mac can scan for deleted, formatted, or inaccessible files. Stop using the affected source as much as possible, and recover files to a different healthy location.

Step 1. Select the source location. In Recoverit, choose the Mac drive or location where the files were lost.
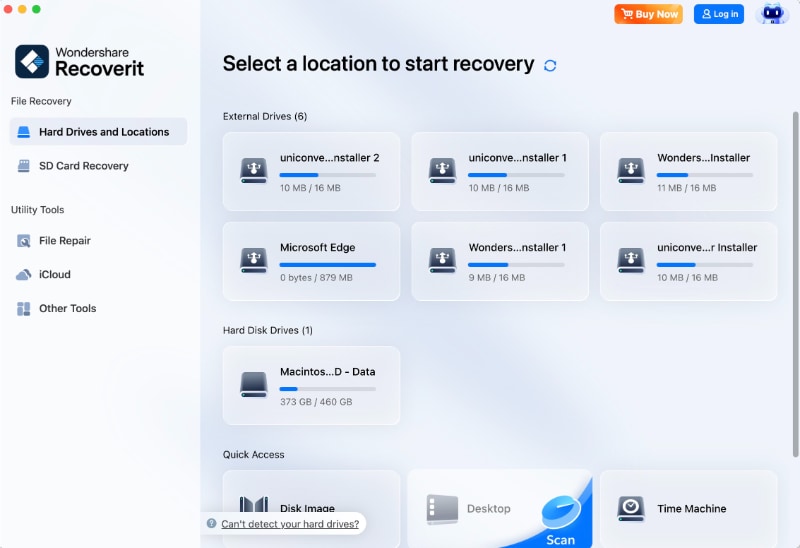
Step 2. Scan the location. Start the scan and let Recoverit search the selected source. You can pause or stop after the files you need appear.

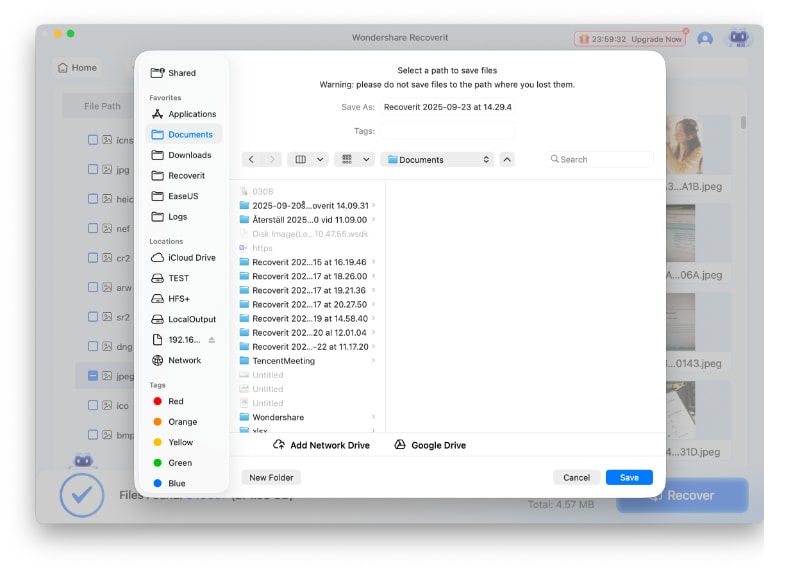
Step 3. Preview and recover. Preview the files you need, select them, and choose Recover.

Step 4. Save to another healthy location. Do not save recovered files back to the drive where they were lost, because new writes can overwrite remaining recoverable data.
Limits: Recoverit's current Mac guide states that software recovery does not support physically damaged storage devices or files that have already been overwritten. If a drive has hardware failure or cannot be made available to the operating system or recovery environment, use professional data recovery or Apple service instead of repeatedly scanning it.
Recover Mac Hard Drive Files Before Risky Repairs
 Security Verified. Over 7,302,189 people have downloaded it.
Part 7. What to Do When Recovery Mode or Recovery Media Fails
| What You See | What It Usually Means | Next Safe Step |
| Apple silicon Mac never shows Options | The Mac may not have been fully shut down, or the power-button sequence was not held long enough. | Shut down fully, then press and hold the power button until startup options load. If the Mac starts to a different warning screen, use Apple's startup troubleshooting. |
| Intel Mac ignores Command-R | The keyboard may not be recognized early enough, or local Recovery may be unavailable. | Use the built-in keyboard on a Mac laptop or a wired keyboard, then try Internet Recovery. |
| Internet Recovery shows a globe with a warning symbol | Apple says this is commonly related to network or internet connection problems. | Try Ethernet or another network, then retry the appropriate Recovery key combination. |
| Startup disk is missing in Disk Utility | The disk may not be detected, or the Mac/storage device may need service. | For external storage, check cable, power, and direct connection. For internal storage, avoid erasing blindly and consider service or professional data recovery if files matter. |
| Bootable installer does not appear | The installer may not be connected correctly, or an Intel Mac with a T2 Security Chip may block external boot. | Connect the installer directly. On a T2 Mac, verify Startup Security Utility permits external or removable media. |
| Reinstall macOS cannot see the target disk | The disk may need Disk Utility attention or hardware service. | If data is already safe, use Disk Utility. Do not erase an irreplaceable disk just to make the installer continue. |
If the main problem is that Recovery Mode itself will not start, use Recoverit's dedicated Mac won't boot into Recovery Mode guide for the broader troubleshooting branch. Keep this page focused on the difference between Recovery, external recovery media, and file protection.
Conclusion
A Mac OS X recovery disk is no longer one universal thing. On current Macs, use built-in macOS Recovery first: hold the power button for Apple silicon or use Command-R on Intel. If you truly need external installation media, create a bootable macOS installer. Reserve Apple's old OS X Recovery Disk Assistant for Lion and Mountain Lion. Most importantly, if important files are already missing or the disk is unstable, protect or recover the data before repair, erase, or clean installation.
FAQ
-
Is Mac OS X Recovery the same as macOS Recovery?
They refer to the same general recovery concept across different naming eras, but current Apple documentation calls the built-in system macOS Recovery. The startup steps now differ between Apple silicon and Intel Macs. -
Does Command-R work on an Apple silicon Mac?
Command-R is the standard Intel Recovery startup shortcut. On Apple silicon, shut down the Mac, then press and hold the power button until startup options appear. Select Options and click Continue. -
Can I create an OS X Recovery Disk for macOS Tahoe or macOS 27 Golden Gate?
Do not use the legacy OS X Recovery Disk Assistant for current macOS versions. Use built-in macOS Recovery or create a bootable macOS installer with Apple's current createinstallmedia workflow. -
Does reinstalling macOS from Recovery erase my files?
Apple states that reinstalling macOS from Recovery does not remove your apps or personal data, but Apple still recommends backing up first. Erasing the startup disk is a separate operation and is destructive. -
How large should a USB be for a bootable macOS installer?
Apple says a 32GB flash drive has more than enough space for any macOS installer, while 16GB is enough for most earlier versions. The USB is erased when the bootable installer is created. -
Can macOS Recovery recover individual deleted files?
Recovery can restore from a Time Machine backup, but it is not a general undelete tool for individual files that are missing without a backup. If the storage is detectable and logically accessible, file-recovery software may be appropriate before destructive repair. -
What if Disk Utility cannot see my startup disk?
Apple says a storage device that does not appear in Disk Utility may require connection checks or service. If the missing data is important, avoid erasing or repeated stress on a potentially failing device and consider professional recovery.


