

 TL;DR:
To start your Mac in Recovery Mode for system troubleshooting or OS reinstallation, Intel Mac users must hold Command + R during restart, whereas Apple Silicon users must shut down and press and hold the Power button until the startup options screen appears.
● Intel Macs support alternative internet recovery shortcuts, where holding Option + Command + R installs the latest compatible macOS version and Option + Shift + Command + R reinstalls the factory default version.
● Recovery Mode utilities can repair disks or restore entire systems, but the built-in tools cannot directly recover individual deleted files without a pre-existing Time Machine backup.
● If a Time Machine system restore freezes while operating in Recovery Mode, users must force a shutdown and run First Aid on both the internal and backup drives via Disk Utility before attempting the restore again.
Ask AI for a summary
 ChatGPT
 Perplexity
 Gemini
 Claude
 Grok
Grok
When your Mac encounters a serious system error, fails to start up, or requires a clean installation of macOS, Recovery Mode is your most powerful built-in tool. This special mode allows you to perform essential troubleshooting and recovery tasks without loading the full operating system.
This guide will provide clear, easy-to-follow instructions on how to start your Mac in Recovery Mode, covering the different methods for both Intel-based and Apple Silicon Macs. We'll also explain the essential tools it provides, such as Disk Utility and the option to reinstall macOS.
Table of Content
What Is Mac Recovery Mode?
The Mac recovery mode is a special program utility used to help MacBook or iMac users troubleshoot system errors and fix usage issues. Restarting your Mac in recovery mode leads you to a menu where you can access various utilities to help you fix your computer issues.
The Mac built-in utility toolkit loads from a specific system partition that stores the backup OS installation wizard with a recovery disk image. You can use this recovery image to start and recover your macOS when all other methods fail.
The recovery mode will diagnose your system to identify disk problems and suggest the best solutions to restore your system, data, files, and more. Thanks to the recovery mode, you can fix your hard disk, recover data from hard drive, reinstall macOS, and more.
Uses of macOS Recovery Mode
You can use the Mac recovery mode to perform various tasks on your Mac computer.
These include:
- Reinstalling your operating system on a Mac;
- Troubleshooting internet connection problems;
- Accessing the official Apple Support to get help online;
- Reinstalling, installing, or deleting the default macOS version;
- Using the Time Machine data backup to restore your macOS, system data, private files, and more;
- Repairing, erasing, verifying, and scanning the internal and external hard drives and disks;
- Viewing the macOS recovery logs;
- Setting secure boot options;
- Setting a firmware password to ensure your macOS only boots from the startup disk;
- Backing up and restoring accidentally deleted data and unintentionally formatted hard disks;
- Repairing your internal storage devices;
- Setting and changing Wi-Fi connection settings;
- Creating a recovery file (for reporting system errors to Apple Support).
Now, let's delve deeper into different ways to access the Mac recovery menu and settings.
You may be also interested in: What is Recovery Mode on iPhone and Android?
How To Start Recovery Mode on an Intel-based Mac
Starting the Recovery mode on an Intel-based Mac requires the following steps:
- Press and hold the Command and R keys and restart your computer;

- Keep holding the keys until the Apple logo or a spinning globe appears on the screen;
- Enter the Utility Window and type your password (if you see a lock).
Note: You can also access the Mac Recovery Mode by pressing and holding:
- Option + Command + R - boot your macOS over the internet, check for the latest macOS version, reinstall the latest macOS, and more;
- Option + Shift + Command + R - reinstall the factory macOS version or the closest version available.
How To Start Recovery Mode on a Mac With Apple Silicon
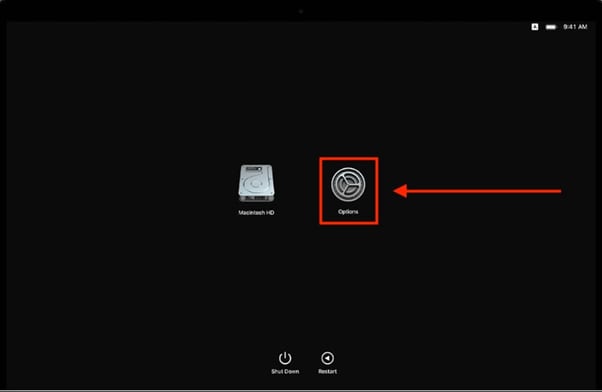
If you're using a Mac with Apple Silicon, follow these steps to start the recovery mode:
- Navigate to the Apple Menu and select Shut Down;
- Press and hold the Power button to power your Mac back on;
- When the Loading Startup Options screen appears, select Options and click Continue.
- Your Mac will now start in recovery mode, and you can access the utilities you need to troubleshoot or restore your system.
Now, let's see what options you can find in the recovery menu.
Available Tools in macOS Recovery Mode
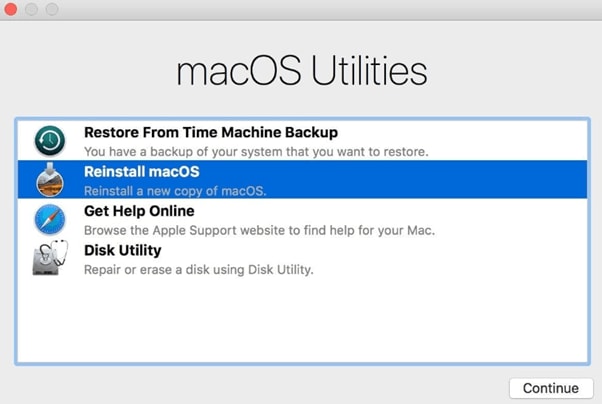
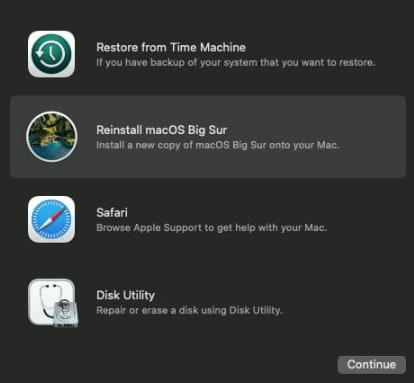
Available tools in macOS recovery mode vary from model to model. The M1 Mac recovery mode provides the following utilities:
- Recovery - access recovery apps and tools to recover your Mac and data;
- Restore from Time Machine - restore your macOS using the Time Machine data backup;
- Reinstall - reinstall the operating system on your Mac to restore your system settings, apps, data, and more;
- Safari –use the Safari browser to access the Apple Support website and get useful information;
- Disk Utility - reset or repair your macOS;
- Startup Security Utility - check and modify your Mac security settings;
- Terminal - use the Terminal command line to diagnose system issues, fix errors, change settings, etc.;
- Share Disk - share the disk of a Mac booted into recovery mode;
- Startup Disk - access disk setup settings for macOS startup.
Here's a list of recovery mode utilities on Intel Macs:
- Recovery - access apps for macOS recovery;
- Time Machine System Restore - restore your data, files, docs, and more from a Time Machine data backup;
- Install macOS - reinstall the operating system on your Mac;
- Safari - get support information from the Apple Support website;
- Disk Utility - erase or repair the hard disk on your Mac;
- Startup Security Utility - check, change, or set the macOS security policies;
- Startup Disk - set the macOS startup disk for your computer;
- Terminal - change, modify, and reset various system settings, detect and fix system bugs, file system errors, and more.
Things You Can Do if Your Mac Won't Start in Recovery Mode
If you can't boot your Mac into Recovery Mode, you can take some steps to try to fix this issue. First, press the Command and R keys to boot into recovery mode. If the Mac Command + R doesn't work, check the connection between your Mac and keyboard.
You can also try a different keyboard shortcut:
- Option + Command + R;
- Option + Shift + Command + R.
If the problem persists, refer to our comprehensive guide on how to fix a Mac that can't boot into Recovery Mode.
Conclusion
This guide should help you learn to use the Mac Recovery Mode, including its features, tools, and utilities, to fix various macOS issues, including the macOS Recovery Doesn't Work problem. If the solutions we provided here don't help you start your Mac in Recovery mode, use the Wondershare Recoverit data recovery tool to retrieve your Mac files and contact Apple Support to repair your macOS.
- Recover lost or deleted files, photos, audio, music, and emails from any storage device effectively, safely, and completely.
- Supports data recovery from Windows/Mac/Linux computer, external hard drives, memory card, flash drive, and more.
- Supports recovery of data for sudden deletion, formatting, hard drive corruption, virus attack, and system crash under different situations.

FAQs about Starting a Mac in Recovery Mode
-
I'm trying to start my Mac in Recovery Mode, but it just boots normally. What's wrong?
The most common issue is timing. For Intel Macs, you must press and hold Command (⌘) + R immediately after pressing the power button. For Apple Silicon Macs, you press and hold the power button until the startup options appear. If the computer startup recovery fails, ensure your keyboard is working correctly. -
What do I do if my Mac gets stuck while trying to restore from a Time Machine backup?
If a restore process freezes, a Mac computer recovery failure can occur. First, wait for a significant amount of time, as large restores can be very slow. If it's truly stuck, you may have to force a shutdown. Upon restarting, try running "First Aid" on both your internal drive and the Time Machine drive to check for errors before attempting the restore again. -
Can I use Recovery Mode to recover deleted files?
No, Recovery Mode itself does not have a file recovery tool. Its primary function is to restore your entire Mac from a Time Machine backup or reinstall macOS. To recover individual deleted files, you would need to have a backup or use third-party data recovery software from a separate bootable drive. -
Is there a difference between Recovery Mode on Intel and Apple Silicon Macs?
Yes, the method to enter is different. Intel Macs use key combinations like Command (⌘) + R. Apple Silicon (M1/M2/M3) Macs require you to press and hold the power button to access the startup options. The available tools are largely the same, but the underlying system architecture is different.


