How to Fix Slow Wi-Fi after MAC OS Sierra Upgrade
To fix slow Wi-Fi or continuous disconnections after a Mac OS Sierra upgrade, clear outdated network configurations by resetting system preference files or establishing a new network location with optimized DNS and MTU settings.
● Navigate to /Library/Preferences/SystemConfiguration/ to force a network factory reset by either renaming preferences.plist to preferences.plist.bak or deleting the five specific Apple network .plist files after creating a desktop backup.
● Create a new network location via System Preferences, renew the DHCP lease, input OpenDNS (208.67.222.222, 208.67.220.220) or Google DNS (8.8.8.8, 8.8.4.4), and manually change the hardware MTU setting to 1453.
● Using the physical reset button on your Wi-Fi router serves as a fallback method but will completely erase your existing broadcast network name and password, requiring manual reconfiguration to restore access.
Ask AI for a summary
With new things sometimes there are new problems that tend to drive a punch in the face while enjoying a new package like Mac OS Sierra Upgrade. With smart top features like Auto-Unlock and Universal Clipboard, the Mac OS Sierra Upgrade is undoubtedly one of the best upgrades to the Mac OS. Well, it is difficult not to love such beauty for its top-class features and improved interface.
However, it has been discovered that MacBook tends to make the speed of your wireless router unnecessarily slow. Also, the mobile hotspot or public Wi-Fi network keeps disconnecting at unspecific and continuous intervals. This problem has also been discovered to occur after a successful upgrade to the Mac OS Sierra. This leads us to the need to know how to fix slow Wi-Fi after Mac OS Sierra Upgrade. We shall be looking into many ways to deal with and conquer this recurring problem.
Solution 1: Reset Wi-Fi Router and Restart Mac Wi-Fi Connection
One of the first solutions to slow Mac Wi-Fi is to first restart your Mac’s Wi-Fi connection. This can be easily done by disconnecting it from the wireless network.
To do this, click on Wi-Fi menu bar > select Turn Wi-Fi Off > Turn off Bluetooth adapters on your MacBook > Restart your MacBook and try to reconnect.
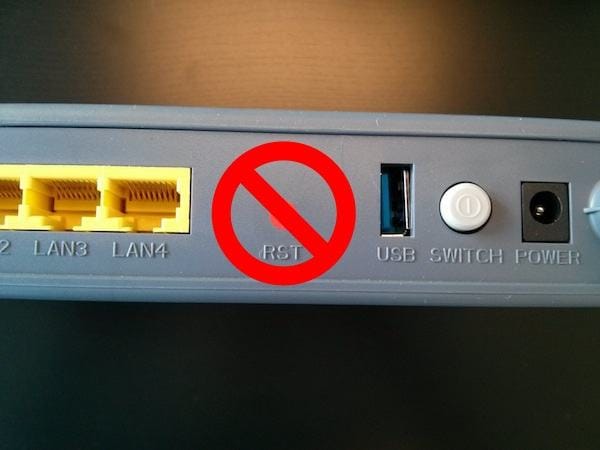
If the problem remains unsolved, you should consider either rebooting or resetting your W-Fi router. This is because though the slow Wi-Fi on Mac has been pinned to occur after an upgrade to Sierra OS, it does not necessarily mean that it would be the sole cause of a slow Wi-Fi. The fault might also be from the Wireless router supplying Internet access. Hence, it is advisable to first reboot your router by simply unplugging the adapter for a few minutes and plug it back. If the problem persists, you can then opt to reset your Router by locating a red “reset” button usually located at the rear end of the router and pushing the button.
Note: By resetting your router, your router’s password and network name would be restored to default. Therefore, you have to change the password and broadcast the network name again to your desired combinations.
Solution 2. Remove Existing Wi-Fi Preferences in Mac OS Sierra
Another way to fix slow Mac Wi-Fi is to delete or remove the previously existing Wi-Fi preferences in the Mac OS Sierra. This method requires maximum attention to executing successfully, so please follow the steps carefully.
1. First of all, disconnect all applications that could be making use of the Wi-Fi network. Turn off your Wi-Fi adapter.
2. Now, on your MacBook desktop, create a new folder to save the backup and name it “Preferences Backup” or any other desired name of your choice.
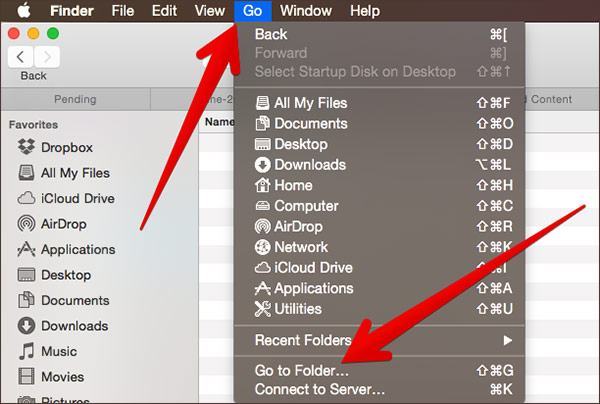
3. Click on the “Finder” icon and select “Go to Folder” or simply press the shortcut keys Command+Shift+G on your keyboard.
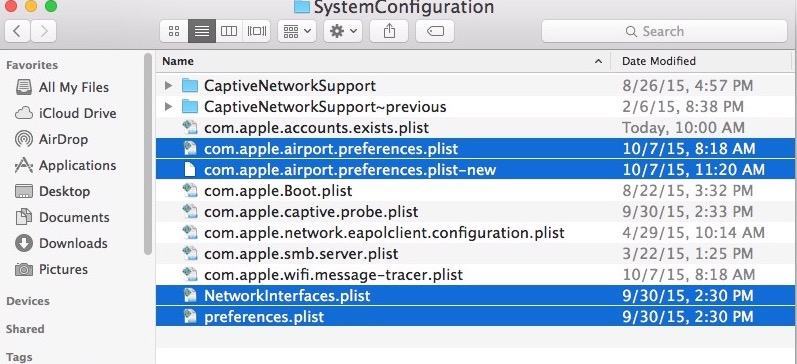
4. On the pop-up window, carefully enter this folder path /Library/Preferences/SystemConfiguration/and then hit Enter on your keyboard or click “Go”.

5. Now copy everything in that folder to the backup folder you initially created on your desktop. This is to back it up in case anything goes wrong.
6. Now locate these five files below in the folder to be deleted:
- com.apple.airport.preferences.plist
- com.apple.network.eapolclient.configuration.plist
- com.apple.wifi.message-tracer.plist
- NetworkInterfaces.plist
- preferences.plist

7. You can now delete the matching files with the list above. Reboot your Mac and turn on Wi-Fi to check if it now works perfectly.
Solution 3: Reset Network to Default
About how to fix slow Wi-Fi after Mac OS Sierra upgrade, you could also reset the network on the MacBook to default. This can help fix slow Mac Wi-Fi. To reset Network, follow these simple steps:
1. First, turn off your MacBook’s Wi-Fi connection and disconnect from all previously established wireless connection.
2. Click on the Finder icon on your Mac OS Sierra. Then Click on “Go the Folder” and type this folder path /Library/Preferences/SystemConfiguration.
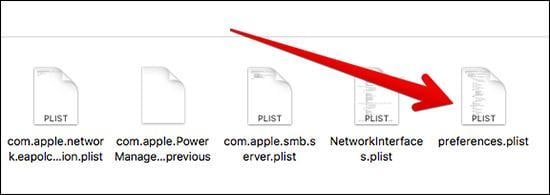
3. Now you have to search and locate a file with the name preferences.plist. After locating the file, you need to rename it.
- preferences.plist.bak
4. After renaming the file, close the folder and reboot your Mac. Now turn on your Wi-Fi back and try to reconnect it.
5. If you check the previous folder again, you will see that a new preference .plist file has been created and the network has been successfully restored to default factory settings.
You should now be able to enjoy a seamless Wi-Fi connection.
Solution 4. Remove existing Wi-Fi preferences
If all efforts to curb this nightmare prove abortive, there is still another trick in the book to be played to fix slow Mac Wi-Fi. This involves heading to the preference settings of the system.
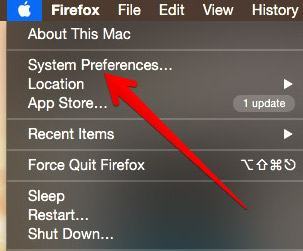
1. Click on “System preferences” from the Mac Menu.
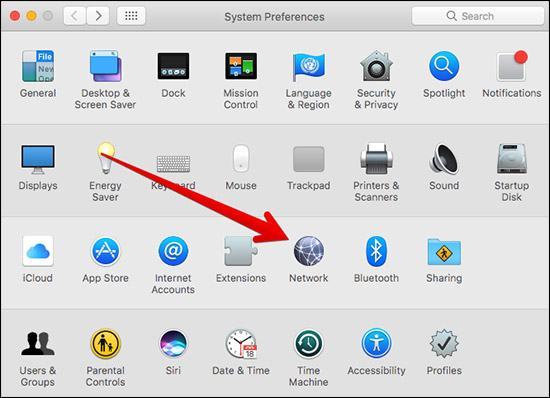
2. Among the System preference icons, locate and select the “Network” Icon.
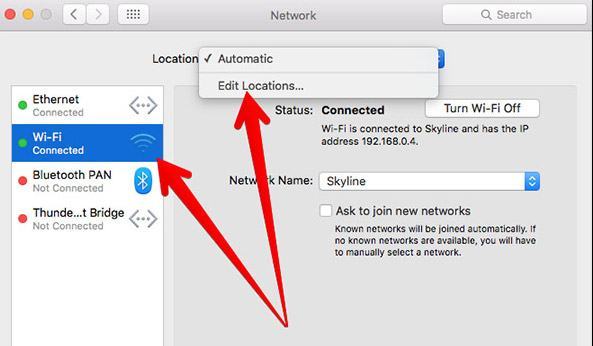
3. On the left side pane, select the network you wish to connect to. At the top of the page, under the “Location” drop-down menu, select “Edit Location”.
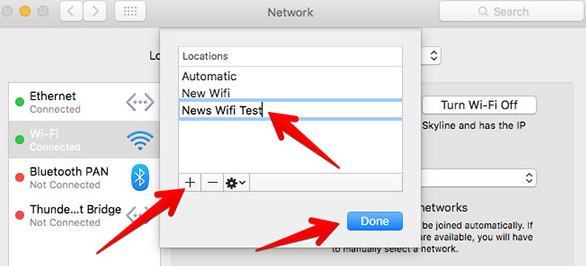
4. On the new window, click on the plus (+) sign to create a new location. Add a suitable Wi-Fi network name and click on Done.
5. You can now join the Network under the network name and type in the password of the network as usual. Now click on the Advanced option and select the TCP/IP tab. Click on the Renew “DCPH Lease” button and tap Apply when done.
6. Now on the Network Screen, click on the DNS button. On the DNS servers Column, click on the plus (+) button below. You can now add OpenDNS (208.67.222.222 and 208.67.220.220) or Google DNS (8.8.8.8 and 8.8.4.4);
7. You may now click on the “Hardware” tab. Change the Configure option manually. Change the MTU option to custom and edit the number to be 1453. You may now click OK at the button of the window to complete the setup and finish creating a Wi-Fi network.
A Guide on Recovering Files from Mac
Conclusion
One might have to try more than one solution on how to fix slow Wi-Fi after Mac OS Sierra upgrade until you are able to successfully fix the issue. The fact remains that the Mac OS Sierra Upgrade is a masterpiece of Apple OS upgrade that has its perks and bugs just like any other software. Just patiently go through the steps in this article and you would be able to fix slow Mac Wi-Fi.
No matter when and how your data disappears, Recoverit Data Recovery is the most professional software to help you
retrieve Mac files.
What's Wrong with Mac
- Recover Your Mac
- Fix Your Mac
- Delete Your Mac
- Learn Mac Hacks


 ChatGPT
 Perplexity
 Gemini
 Claude
 Grok
Grok


Sue Wayne
staff Editor