Losing this data can be really upsetting, especially if it happens because of accidentally deleting them, a phone crash, or a mistake during a factory reset.
FoneLab for Android is a well-known tool for recovering lost data from Android phones. It claims to be able to get back lost data from Android devices. But does it really work? In this detailed review, we'll look closely at FoneLab for Android data recovery, discussing its features, advantages, and disadvantages.
Apart from FoneLab Android data recovery, we'll also show you some other strong options that could help you get your important data back.
In this article
What Does FoneLab Do?
FoneLab for Android is a specialized software designed to recover lost or deleted data from Android devices. Developed by Aiseesoft Studio, this tool aims to be a one-stop solution for Android users facing data loss issues. FoneLab android data recovery supports a wide range of Android devices and can retrieve various types of data, including contacts, messages, photos, videos, and more.
The software operates by scanning your Android device thoroughly, identifying recoverable data, and allowing you to preview and selectively restore the items you need. FoneLab for Android boasts a user-friendly interface, making it accessible even to those who aren't particularly tech-savvy. It's designed to work with both rooted and non-rooted devices, although root access can enhance its recovery capabilities.
Here's a table summarizing the key features, pros, and cons of FoneLab for Android:
| Features | Pros | Cons |
| - Recovers multiple data types (photos, videos, contacts, messages, etc.) | - User-friendly interface | - Recovery not guaranteed for all data |
| - Compatible with both devices that have been modified to allow more control (rooted) and those that haven't (non-rooted) | - Works with many different types of Android phones and tablets | - Some features require root access |
| - Preview function before recovery | - Allows selective recovery | - Can be slower on older devices |
| - Backup and restore functionality | - Regular updates for compatibility | - Relatively expensive compared to some alternatives |
| - SD card recovery | - Comprehensive scanning options | - Limited free trial |
| - WhatsApp data recovery | - Good customer support |
Main Reasons for Data Loss on Android Phone
Understanding the common causes of data loss can help you prevent such incidents in the future. Here are the primary reasons why you might need to use FoneLab data recovery or similar tools:
- Accidental deletion: Mistakenly deleting files, photos, or messages
- Factory reset: Performing a factory reset without backing up data
- System crash: Android system crashes or freezes leading to data loss
- Virus attack: Malware or viruses corrupting or deleting data
- Physical damage: Water damage, screen cracks, or other physical harm to the device
- Rooting gone wrong: Unsuccessful rooting attempts can lead to data loss
- Software updates: Incomplete or interrupted software updates
- App malfunctions: Bugs in apps causing data to disappear
- Storage issues: Corrupted SD card or internal storage problems
- Forgotten pattern/PIN: Being locked out of your device and having to reset it
How to Use FoneLab to Recover Deleted Data
If you find yourself in need of Android data recovery, FoneLab can be a helpful tool. Here's a step-by-step guide on how to use FoneLab for Android to recover your lost data:
Step 1: Visit the official FoneLab website and download the appropriate version for your computer (Windows or Mac). Install the software following the on-screen instructions. Open FoneLab on your computer. Connect your Android device to the computer with a USB cable. In the FoneLab interface, choose "Android Data Recovery" from the available options.

Step 2: FoneLab will display a list of data types it can recover. Select the types of data you want to retrieve (e.g., contacts, messages, photos, etc.). Click "Next" to proceed.

Step 3: Once the scan is complete, FoneLab will display all the recoverable data it has found. You can preview the items and select which ones you want to recover. After selecting the data you want to recover, click on the "Recover" button. Choose a location on your computer where you want to save the recovered data. FoneLab will then start the recovery process.

By following these steps, you can use FoneLab android data recovery to retrieve your lost data. Remember, the success rate of recovery can vary depending on factors such as how long ago the data was deleted and whether the storage space has been overwritten.
Another Option for Android Data Recovery—Dr.Fone
While FoneLab is a popular choice for Android data recovery, it's not the only option available. Dr.Fone, developed by Wondershare, is another powerful tool that offers comprehensive data recovery capabilities for Android devices. Let's explore how Dr.Fone works and what sets it apart.
Dr.Fone is an all-in-one mobile device management tool that includes a robust Android data recovery module. It's designed to recover various types of data from Android devices, including those that have been accidentally deleted, lost due to system crashes, or even from devices with broken screens.
Here's a table displaying the advanced phone data recovery capabilities of Dr.Fone:
| Feature | Description |
| Wide Compatibility | Works with more than 6000+ Android phones from different companies. |
| Multiple Data Types | Can restore pictures, videos, contacts, text messages, call history, WhatsApp information, and more. |
| Broken Android Recovery | Can recover data from devices with broken screens or system issues |
| Root and Non-root Support | Works with both rooted and non-rooted devices |
| Preview Before Recovery | Allows users to preview recoverable data before final recovery |
| Selective Recovery | Users can choose specific items to recover, saving time and space |
| High Success Rate | Advanced algorithms ensure a high recovery success rate |
| User-Friendly Interface | Intuitive design makes it easy for non-technical users |
| Frequent Updates | Regular updates ensure compatibility with the latest Android versions |
| Secure Recovery | Guarantees the privacy and security of your data during the recovery process |
Step-by-step guide to using Dr.Fone for Android data recovery:
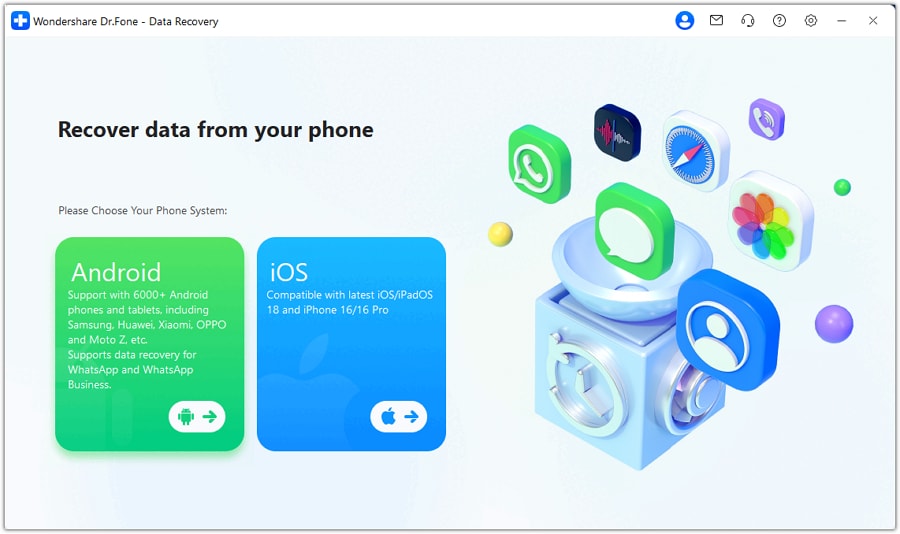
Step 1: Visit the official Wondershare website and download Dr.Fone. Install it on your computer.
Open Dr.Fone and select "Data Recovery" from the main interface. Connect your Android device to the computer using a USB cable.

Step 2: Select the "Android" OS option to recover data.

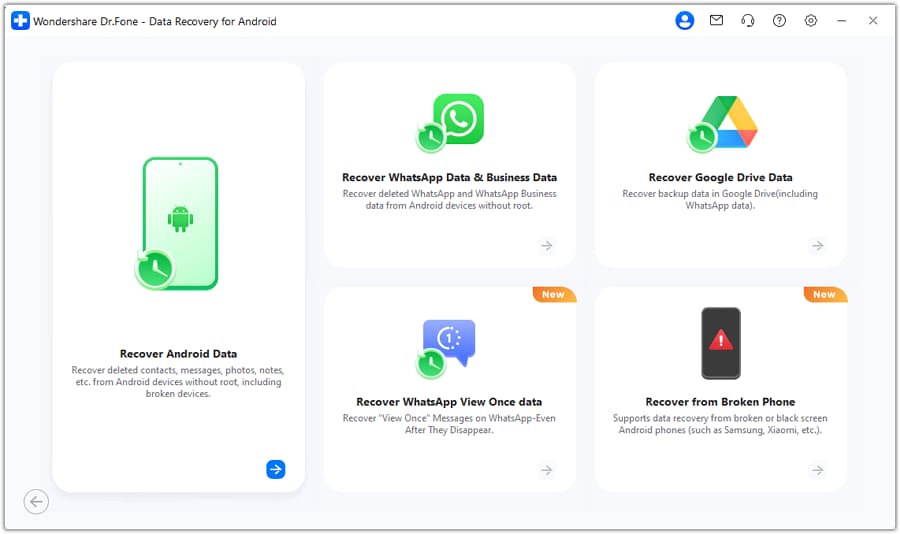
Step 3: Now, choose the "Recover Android Data" option.

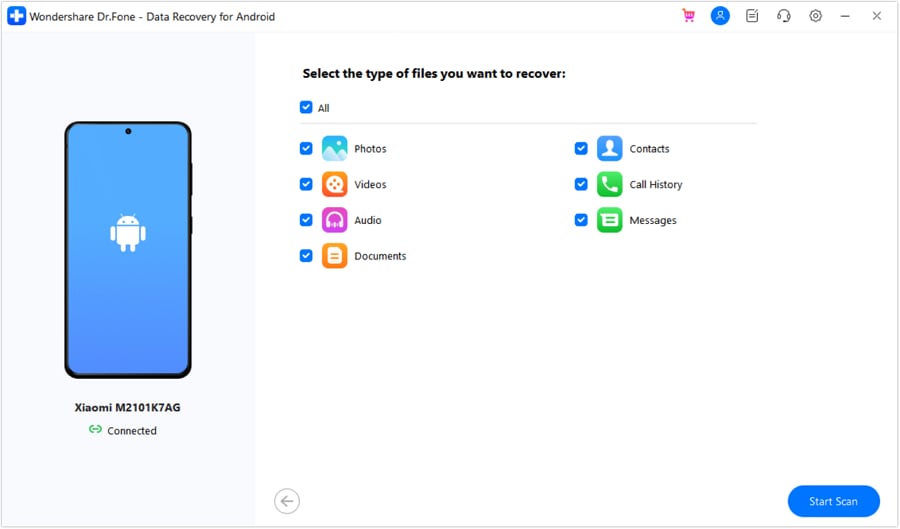
Step 4: Connect your Android phone to PC with the help of a USB cable. Choose the types of files you want to recover. Dr.Fone allows you to select multiple file types simultaneously.

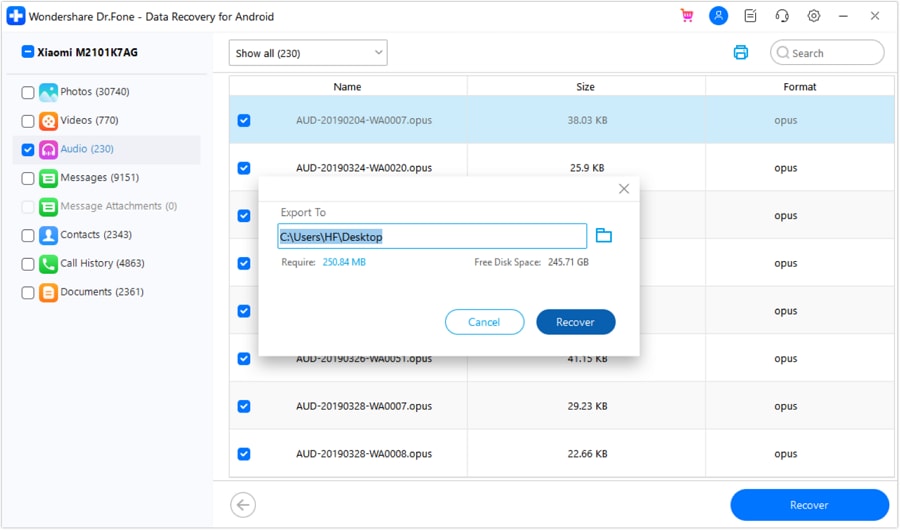
Step 5: Preview the recoverable files. Select the items you wish to recover. Click on the "Recover" button to start the recovery process. Choose a location on your computer to save the recovered files.

Dr.Fone offers a user-friendly alternative to FoneLab, with some unique features that might make it a better choice for certain users. Its ability to recover data from broken devices and its wide compatibility range are particularly noteworthy.
Bonus Tip: Recover Deleted Data from Android Phone with Computer—Using Recoverit
While FoneLab for Android and Dr.Fone are excellent options for android data recovery directly from the device, sometimes you might need to recover data from your Android phone using a computer.
This is where Recoverit Data Recovery Software comes in handy, especially if you've backed up your Android data to your computer or if you're dealing with a completely unresponsive device.
Recoverit, also developed by Wondershare, is primarily designed for computer data recovery but can be a powerful tool for recovering Android data that has been backed up or transferred to a computer. Here's a table displaying its advanced data recovery capabilities:
Here's a table displaying its advanced data recovery capabilities:
| Feature | Description |
| All-in-One Recovery | Recovers over 1000+ file types including documents, photos, videos, and more |
| Multiple Recovery Modes | Offers different recovery modes for various data loss scenarios |
| Deep Scan | Performs thorough scans to find deeply hidden or long-lost files |
| Preview Function | Allows users to preview recoverable files before recovery |
| Selective Recovery | Users can choose specific files to recover |
| High Success Rate | The advanced algorithm ensures a high data recovery success rate of up to 99.5% |
| User-Friendly Interface | Easy-to-use interface suitable for all user levels |
| Wide Compatibility | Works with various storage devices including HDDs, SSDs, USB drives, etc. |
| Secure Recovery | Ensures the safety and privacy of your data during recovery |
| Regular Updates | Frequently updated to improve performance and compatibility |
Here's a step-by-step guide on how to use Recoverit to recover Android data from your computer:
Step 1: Visit the Wondershare website and download Recoverit. Install it on your computer. Open the Recoverit software on your computer. Choose the location on your computer where your Android data was last stored or backed up. This could be a specific folder or an entire drive. Click on "Start".

Step 2: The scanning process may take some time depending on the size of the selected location and the amount of data.

Step 3: Once the scan is complete, you can preview the recoverable files. Select the Android data files you want to recover.

Step 4: Click on the "Recover" button and choose a location on your computer to save the recovered files. Make sure to select a different location from the original one to avoid overwriting.
While Recoverit isn't specifically designed for Android data recovery like FoneLab or Dr.Fone, it can be an invaluable tool if you've lost Android data that was stored on your computer. It's particularly useful for recovering backed-up photos, videos, and documents from your Android device.
Tips & Notes for Android Data Recovery
Whether you're using FoneLab android data recovery, Dr.Fone, Recoverit, or any other data recovery tool, keep these important tips in mind:
- Stop Using the Device: Once you realize data has been lost, stop using the device to prevent overwriting the lost data.
- Keep Your Device Charged: Ensure your Android device has sufficient battery life during the recovery process.
- Backup Regularly: The best way to prevent data loss is to maintain regular backups of your Android device.
- Be Cautious with Free Software: While tempting, free android data recovery tools may not be as effective or secure as paid options.
- Root with Caution: While rooting can enhance recovery capabilities, it can also lead to data loss if not done correctly.
Conclusion
When it comes to recovering lost data on Android devices, FoneLab for Android is a dependable choice, known for its easy-to-use interface and thorough recovery features. But other options like Dr.Fone and Recoverit also have special features that could be more suitable for specific situations. No matter which tool you pick, making regular backups and being careful with your device are the most effective ways to prevent data loss.
FAQ
Q: Can FoneLab recover data from a broken Android phone?
FoneLab can recover data from some broken Android phones, but its capabilities may be limited depending on the extent of the damage. For severely damaged devices, professional data recovery services might be necessary.Q: Is root access required to use FoneLab for android data recovery?
Root access is not required for basic FoneLab android data recovery functions. However, root access can enhance the software's recovery capabilities, allowing it to recover more types of data and potentially increasing the success rate.Q: How does FoneLab data recovery compare to Dr.Fone in terms of success rate?
Both FoneLab and Dr.Fone offer high success rates for android data recovery. The actual success rate can vary depending on factors such as the specific device, the type of data lost, and how long ago the data was deleted. It's often worth trying both tools if one doesn't yield the desired results.


 ChatGPT
 Perplexity
 Google AI Mode
 Grok
Grok


