 TL;DR:
To recover deleted videos on Windows 11 or 10, restore them directly from the local Recycle Bin if still listed; if emptied, immediately stop using the source drive and retrieve your files via File History, OneDrive, Wondershare Recoverit, or Windows File Recovery.
● Stop saving new files, downloading software, or formatting the affected drive immediately, as standard PC activity and SSD TRIM can rapidly overwrite deleted MP4 or MOV footage and render it permanently inaccessible.
● Check File History for previous versions only if the folder was configured for backup prior to deletion, or search the OneDrive web Recycle Bin, which retains synced items for 30 days on personal accounts and 93 days on work or school accounts.
● When using Wondershare Recoverit or the Windows File Recovery command-line tool to scan the original disk, you must install the software and save the recovered videos to a separate healthy physical destination drive to prevent overwriting the lost data.
Ask AI for a summary
 ChatGPT
 Perplexity
 Gemini
 Claude
 Grok
If your deleted video is still in the Windows Recycle Bin, right-click it and choose Restore to return it to its original folder. If you have already emptied the bin, stop saving new files to the original drive. Recovery might still be possible through an existing backup or a scan, but new data and SSD TRIM can make deleted footage permanently inaccessible.
These five methods cover Windows 11 and 10, including Recycle Bin Restore, Wondershare Recoverit, File History, Windows File Recovery, and OneDrive. You will also learn how to check whether a recovered MP4 or MOV file is complete and what to do if it will not play. Start with the option that matches how you deleted the video.
In this article
Part 1. Can You Recover Videos Deleted from the Recycle Bin?
Yes, but your next step depends on where the video was deleted and whether it still exists in the Recycle Bin. Deleting a video normally moves it to the Recycle Bin when the file is stored on a local Windows drive. Emptying the bin or using Shift + Delete skips normal restoration; recovery then depends on a backup or remaining readable data on the original drive.
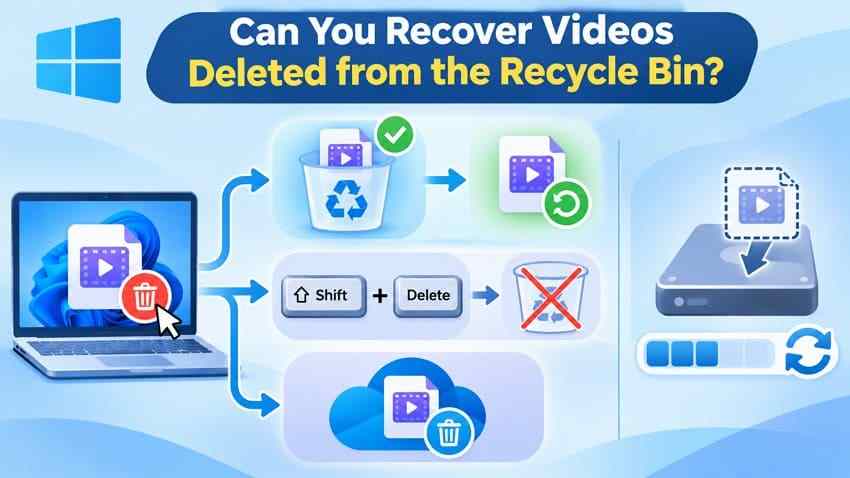
| What happened? | Where to check first | What to do next |
| Regular Delete from a local drive | Windows Recycle Bin | Restore the video directly if it is still listed. |
| Recycle Bin was emptied | File History or another backup | Stop writes to the original drive; scan it only if no usable copy exists. |
| Shift + Delete | Previous backups | The bin was bypassed. Check backups, then consider a drive scan. |
| Deleted from a USB drive or SD card | Original removable device | Many removable-drive deletions skip the bin. Stop using the device and scan it directly if needed. |
| Deleted in a synced OneDrive folder | OneDrive website and Windows Recycle Bin | Look for the cloud copy before attempting local deleted-file recovery. |
Protect the source drive first. Do not record new footage, install recovery software, download large files, format the disk, or run disk-repair commands on the affected drive. Even ordinary PC activity can overwrite deleted data. On SSDs, TRIM may make deleted blocks inaccessible even when nothing obvious was saved afterward. If the drive clicks, disconnects repeatedly, or cannot be detected, stop DIY scans and seek professional assistance.
Part 2. How to Restore Deleted Videos from the Recycle Bin
Use this method only when the video is still visible inside the Windows Recycle Bin. It restores the existing item; it does not scan for permanently deleted footage. Check the video name, size, and original location before restoring it.
Method 1. Restore Deleted Videos Directly from the Recycle Bin
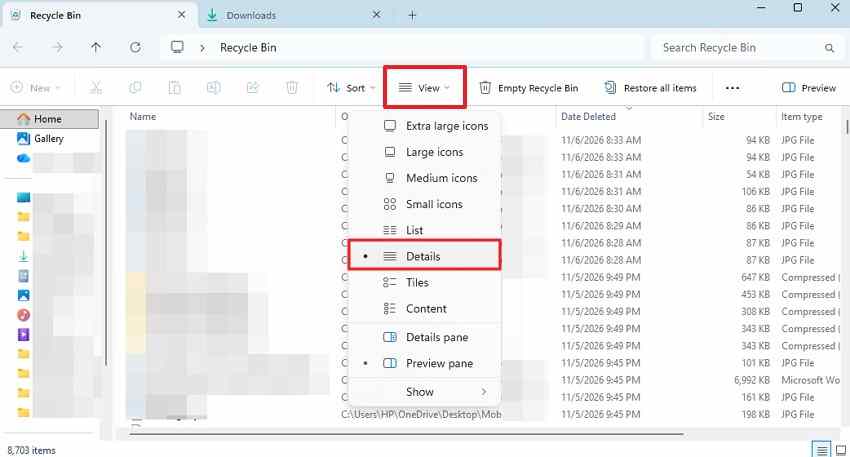
Step 1. Double-click Recycle Bin on the desktop. In Windows 11 or 10, switch to Details view if you need the Original Location and Date Deleted columns. Find the MP4, MOV, AVI, or other video you need.
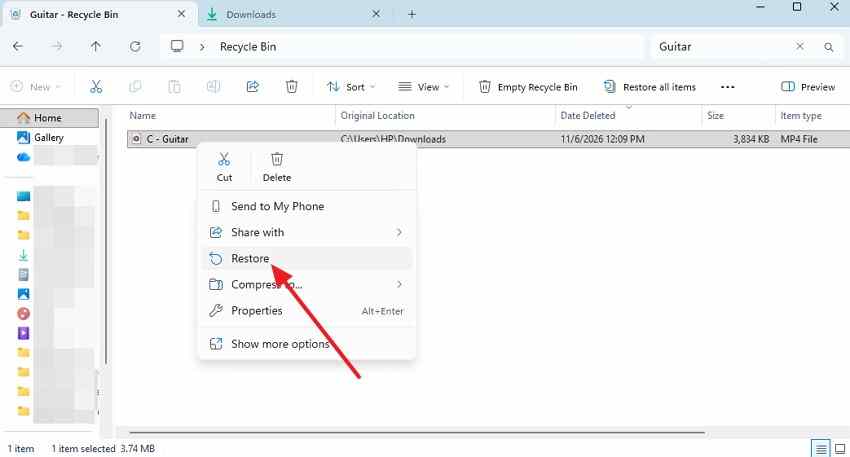
Step 2. Right-click the video and select Restore. Open the folder listed in Original Location, then play the video from beginning to end to confirm both its picture and sound are intact.
Note: If the original folder is gone or you would rather keep the video elsewhere, you can drag an item that is still in the Recycle Bin to another available folder. If the bin is empty, this method cannot help; go to Part 3.
The following official Recoverit video demonstrates basic Windows Recycle Bin restoration from 0:48. It also introduces other recovery options. For permanently deleted videos, use the specific conditions and precautions in Part 3 instead of treating every technique in an older walkthrough as equally suitable.
Watch the Recycle Bin Restore demonstration on YouTube.
Part 3. How to Recover Videos After Emptying the Recycle Bin
If the Recycle Bin no longer contains the file, check whether File History, another backup, or OneDrive has an intact copy. Those options do not depend on finding deleted sectors. When no backup exists, the original drive may still contain recoverable video data, but continued use increases the risk of losing it. Do not create a new partition or install a recovery program on that drive.
Method 2. Recover Permanently Deleted Videos Using Wondershare Recoverit
Use Wondershare Recoverit Recycle Bin Recovery when the video is no longer in the bin, no available backup contains it, and the original storage can still be detected and read. It can scan eligible Windows drives for deleted videos, including supported MP4 and MOV files, and let you preview recoverable results. It cannot recover overwritten data, repair a failing physical drive, or reverse SSD TRIM.
Install or run recovery software from another physical disk where feasible. If the lost videos were on C:, using the same Windows installation to download software may create new writes; consider the importance of the footage before continuing. Connect a separate healthy destination drive before you recover anything.
Step 1. Open Recoverit and choose Recycle Bin from Quick Access for its guided workflow. If your footage was removed by Shift + Delete or you know the original partition, select that drive instead.

Step 2. Allow the scan to search for lost videos. Filter by file type, filename, or supported search controls to narrow the results. If your video does not appear, check whether the original drive and file type were selected correctly before trying a more thorough available scan.
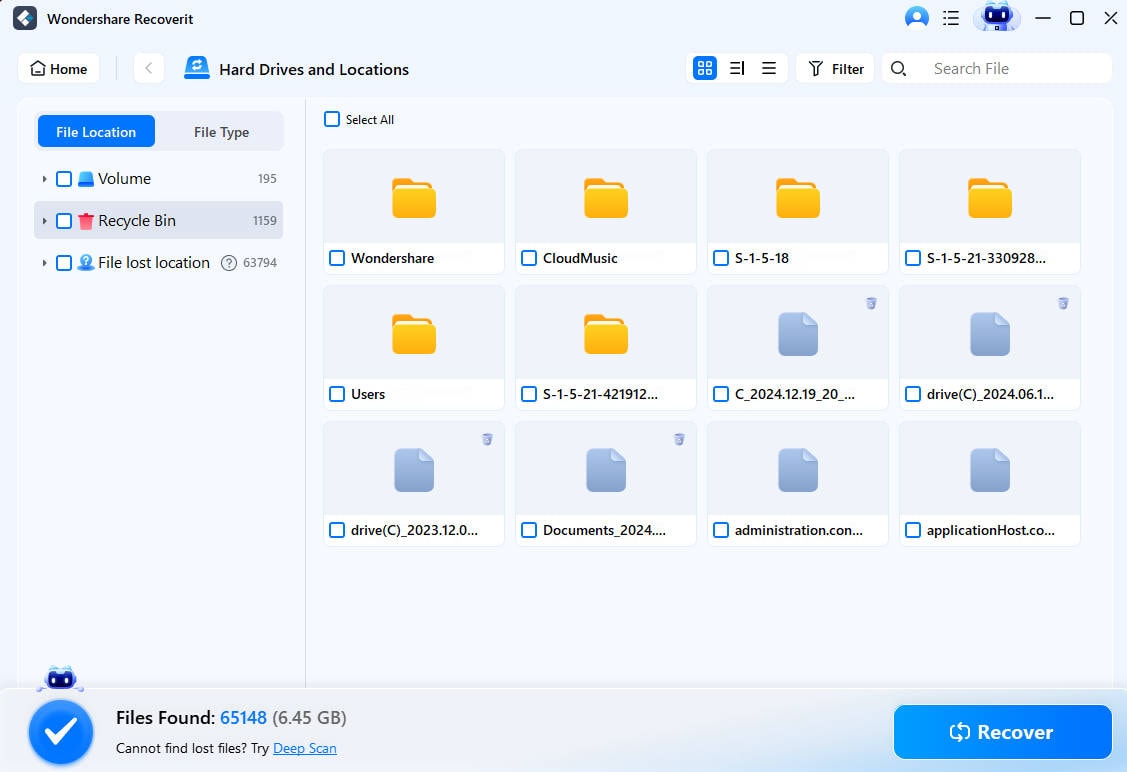
Step 3. Preview any candidate clips, select the files you need, and choose Recover. Save the results to a different healthy physical drive. Verify the recovered videos before closing the project or reusing the original disk.
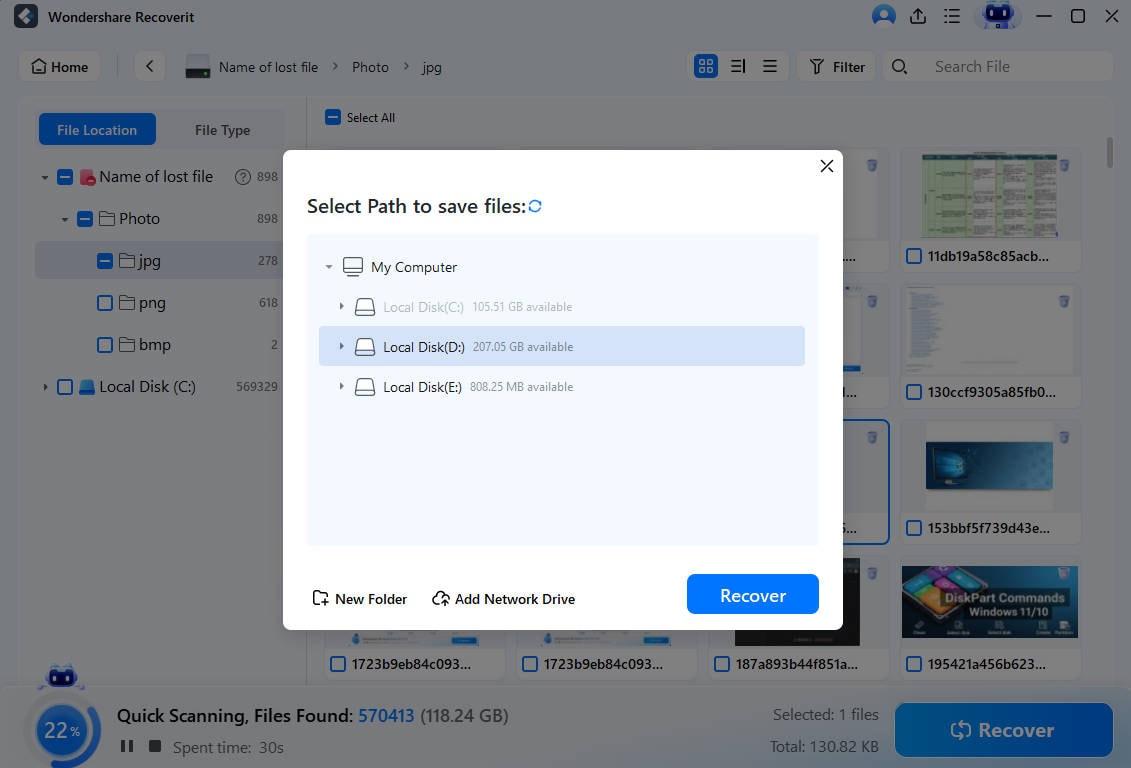
Expected result: You can find and play a recovered copy from the separate destination drive. If the video is absent or incomplete, do not assume more scanning will recreate data already overwritten; try available backups and consider professional recovery if the footage is irreplaceable.
Method 3. Retrieve Deleted Videos Using File History and Previous Versions
File History can restore earlier copies of videos only if it was configured before the deletion and the video folder was included. Windows normally backs up supported libraries such as Videos; arbitrary folders must be included separately. Check whether your File History drive or network backup is available before proceeding.
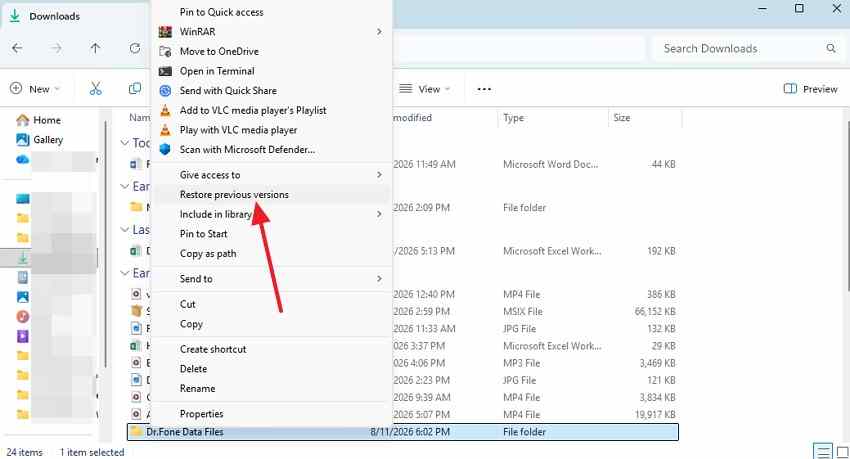
Step 1. Open File Explorer and navigate to the folder that used to contain the video. Right-click the folder. In Windows 11, select Show more options if necessary, then Restore previous versions.
Step 2. Select a version dated before you deleted the video. Use Open or Open in File History to confirm the missing clip is present in that version.
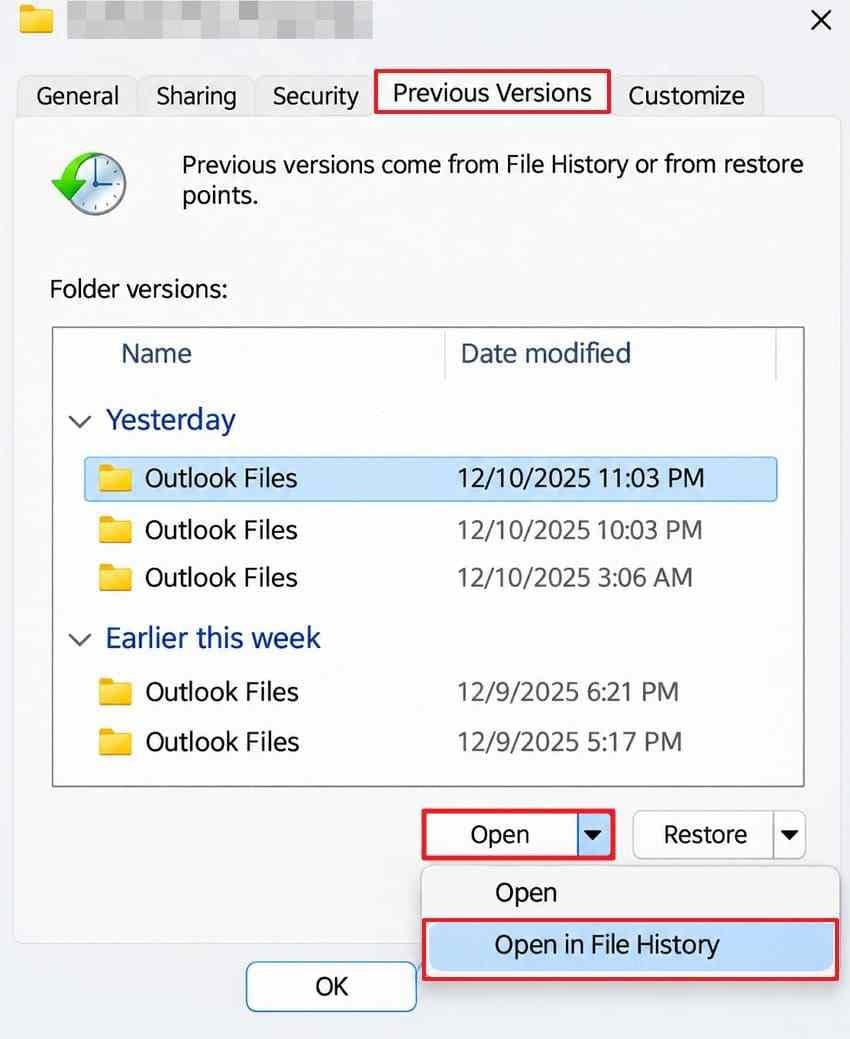
Step 3. Choose Restore to... and select another location so the older version does not replace your current folder contents. Open the restored video and test its playback.
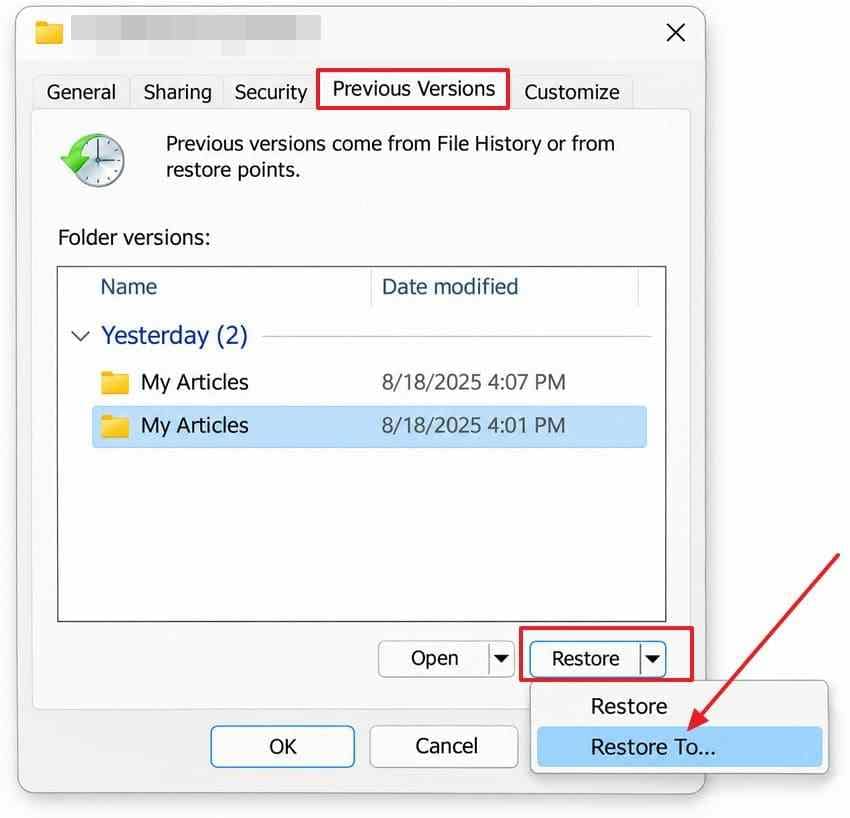
Note: If the Previous Versions list is empty, File History may not have been enabled or may not have covered that folder. The Microsoft File History guide explains the prerequisites. Creating a new backup today cannot restore a video deleted before the first backup.
Method 4. Recover Deleted Videos Using Windows File Recovery
Windows File Recovery is Microsoft's command-line tool for eligible Windows 11 and Windows 10 storage. Use /regular for a recent NTFS deletion and /extensive for older deletions or additional supported scenarios. You need an existing destination volume with a different drive letter; do not create a new partition on the affected disk after data loss.
Step 1. If you can do so without writing to the affected drive, install Windows File Recovery from the Microsoft Store and launch it with administrator permission. Connect a separate destination disk with enough free space. In this example, C: is the source and E: is a separate destination.
Step 2. Run the command below for MP4 and MOV files. Adjust the drive letters to your own setup before pressing Enter:
winfr C: E: /regular /n *.mp4 /n *.mov
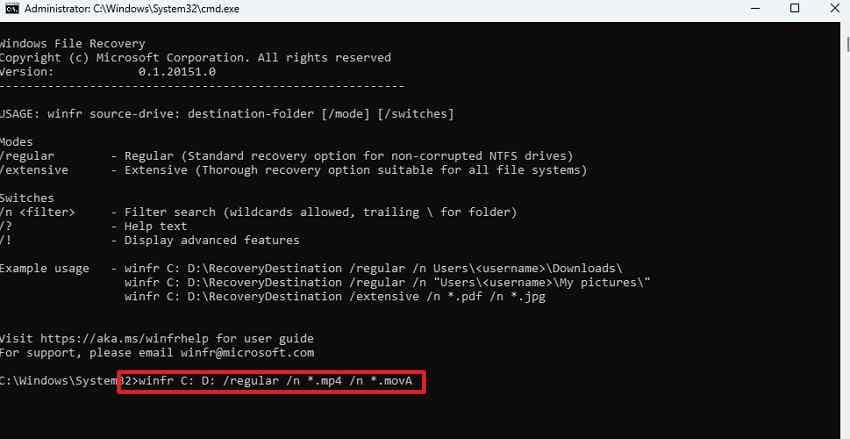
Step 3. Type Y when prompted to start recovery. If the Regular scan finds nothing, and the source disk is still healthy, you can retry with /extensive instead of /regular. Microsoft does not promise a file will be recoverable merely because its extension is selected.

Step 4. Open the new Recovery_<date and time> folder on the destination volume, review the recovered files, and play each video completely. If you see partial files or file fragments, preserve the output and avoid extra writes to the source.
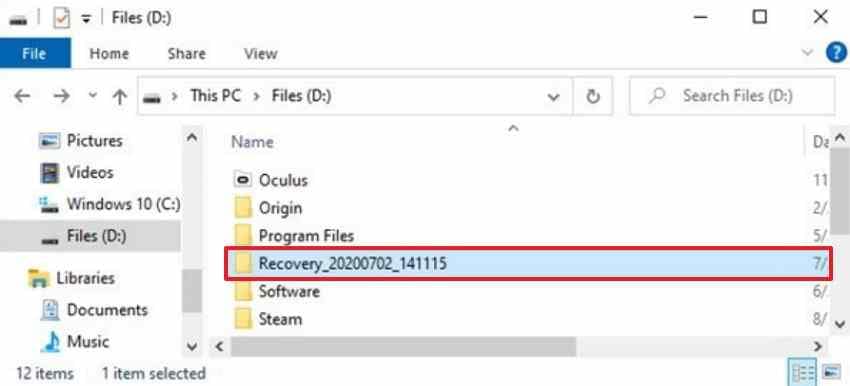
Important: The source and destination must be different volumes. A separate physical drive is safer when practical. Windows File Recovery does not recover files stored only in cloud services or on network shares.
Method 5. Restore Deleted Videos from the OneDrive Recycle Bin
If your video was saved or synchronized to OneDrive, check the cloud Recycle Bin even after emptying the Windows Recycle Bin. Microsoft's OneDrive guidance states that deleted items are generally kept for 30 days on personal accounts and 93 days on work or school accounts, unless the administrator has changed retention settings.
Step 1. Sign in at OneDrive on the web with the account that contained the video. Open Recycle bin in the side navigation and find the missing MP4, MOV, or other clip.
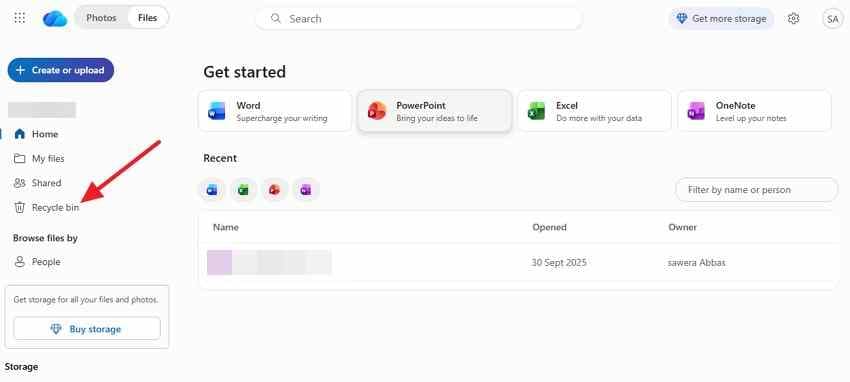
Step 2. Select the video's checkbox and click Restore. Check its original OneDrive folder, then download or play the restored video to confirm the correct item is back.
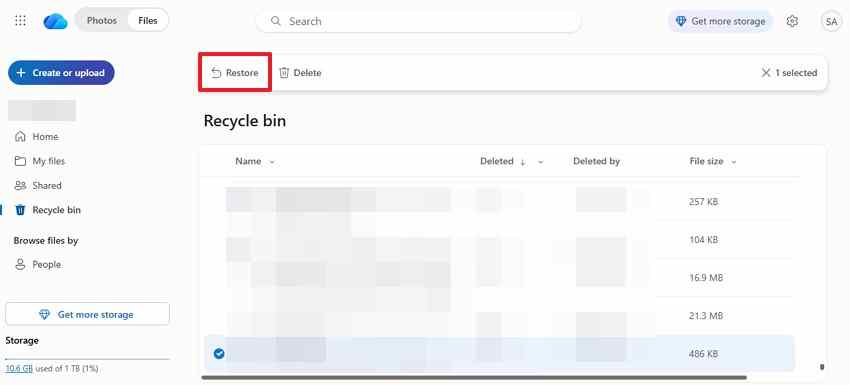
If the video was never uploaded to OneDrive, or it was permanently deleted from the online bin, this method cannot retrieve it. Return to the available local backups or evaluate the original drive instead.
Part 4. How to Repair Recovered Videos That Will Not Play
A video that appears in recovery results may still be incomplete. Before changing the file, make a copy of the recovered output and confirm whether the issue is missing data, a damaged container, or simply a player that lacks the correct codec. A repair tool cannot regenerate footage that was never recovered.
Check the Recovered Video Format and File Integrity
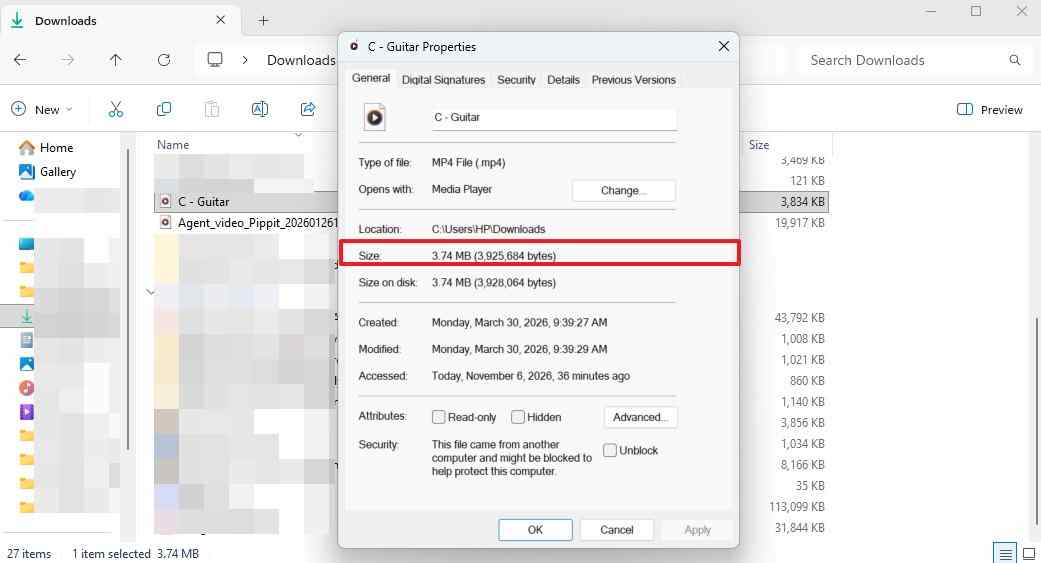
- File size: Right-click the recovered video, open Properties, and compare its size with any known original or backup. A 0-byte file does not contain a video payload.
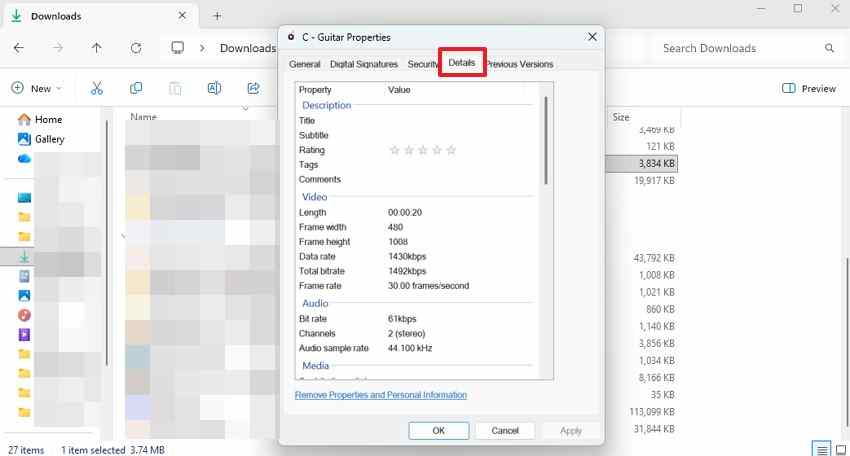
- Metadata: Open Properties > Details. Check the reported duration, frame size, and available media information. Missing fields can indicate corruption, but some codecs expose fewer details than others.
- Full playback: Try the entire clip in a compatible player such as VLC. Check for frozen frames, missing sound, black screens, and abrupt stops rather than relying only on the opening seconds.
- Codec compatibility: If playback fails in one application, try another player before assuming the file is damaged. HEVC/H.265 support can vary by installed extensions and application.
If the video is clearly truncated, reconsider the original recovery result or look for another backup. If it has substantial data but damaged video structure, a separate video repair tool may be appropriate.
Repair Corrupted Recovered Videos Using Wondershare Repairit
Wondershare Repairit Video Repair is a separate product for supported, corrupted video files, not a way to recover deleted files from an empty Recycle Bin. It may repair a damaged file structure when enough original media data remains. Start with a copy; for severe damage, Advanced Repair may request an intact sample recorded by the same device in a matching format.
Step 1. Open Repairit, choose Video Repair, and add the recovered video file that fails to play.
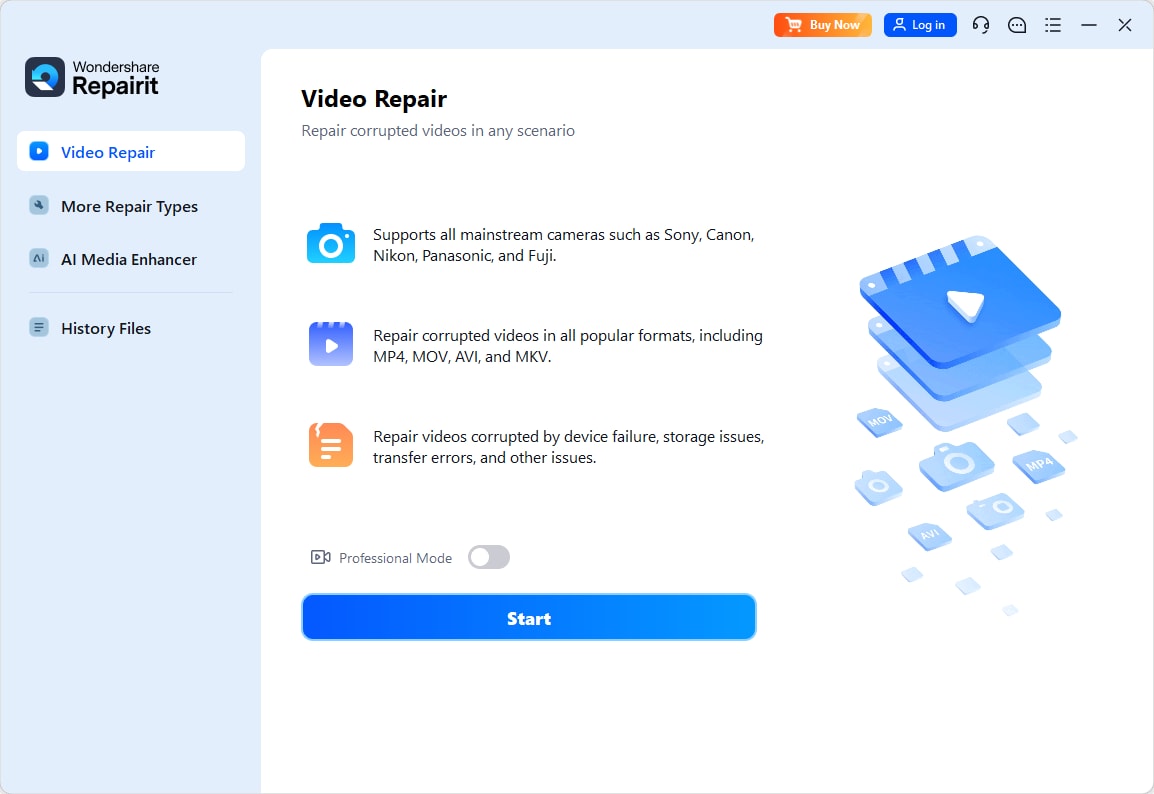
Step 2. Start the repair using the available Repair option. When it finishes, inspect the preview rather than assuming the output is complete.
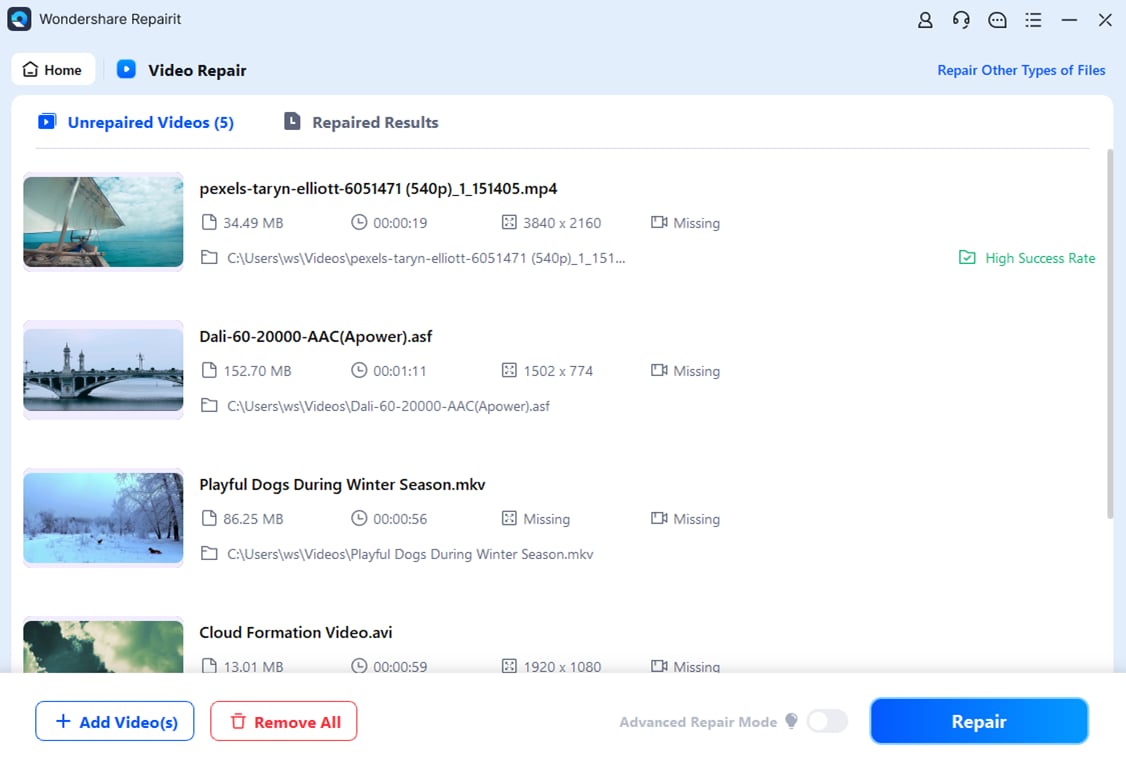
Step 3. If the preview contains the expected footage and sound, choose Save or Save All and write the output to healthy storage. If the file still fails, consider a compatible sample for Advanced Repair or return to an alternate recovered copy.
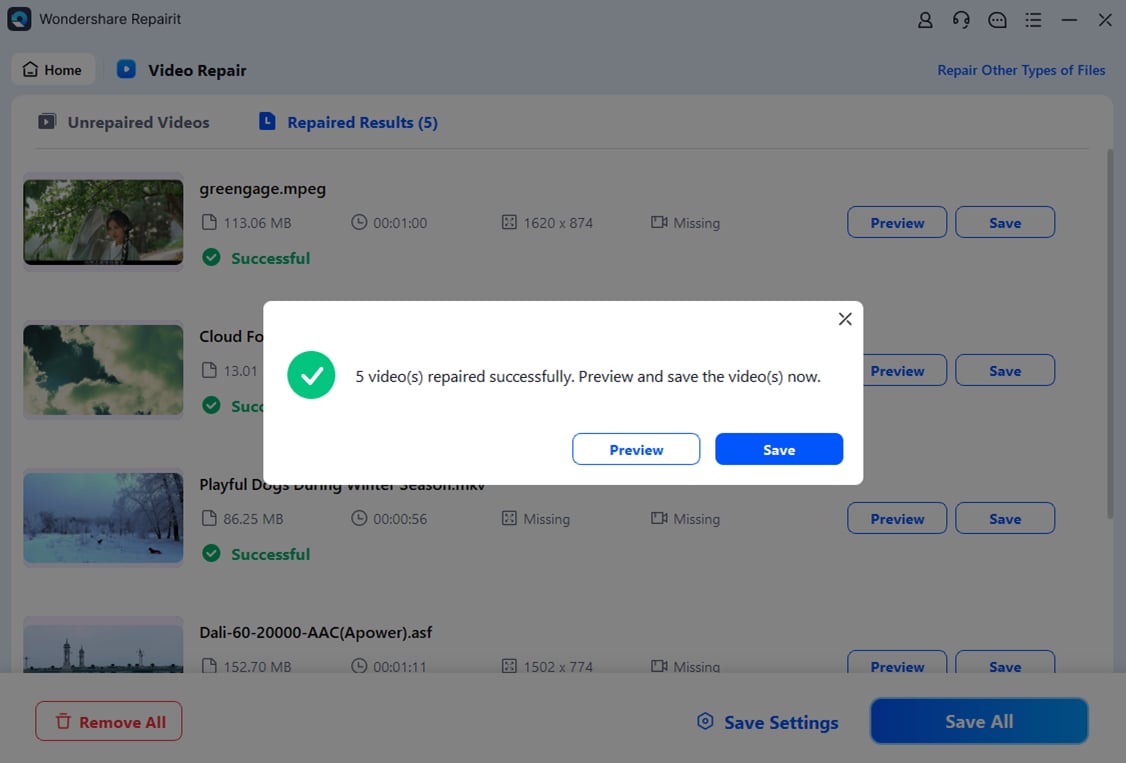
Note: Repairit cannot reconstruct content that was overwritten or never recovered. See the recovered video playback troubleshooting guide for additional integrity checks.
Part 5. How to Prevent Permanent Video Loss on Windows
Reliable backups matter most when an emptied Recycle Bin leaves no usable copy. Protect complete video projects, not just exported MP4 files: missing source clips, editor project files, subtitles, and camera metadata can make a project difficult to rebuild.
- Enable File History: Connect a backup drive, then open Control Panel > System and Security > File History and turn it on. Verify that the folder containing your footage is included.
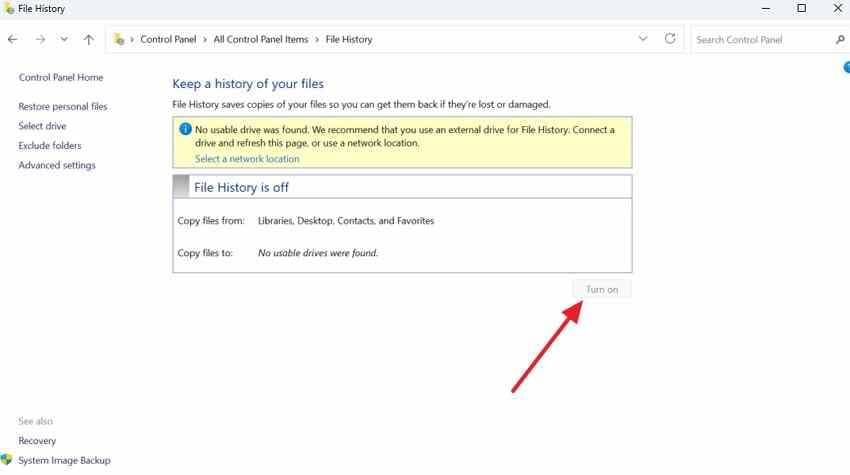
- Test a restore: Once a month, restore a small video into a separate folder and play it completely. A backup that has never been tested may not contain the files you need.
- Keep editing assets together: Include original footage, proxy media, project files, subtitle files such as SRT, and sidecars such as XMP in the same backup plan.
- Review Storage Sense: Open Settings > System > Storage > Storage Sense to review automatic Recycle Bin cleanup. Do not rely on the Recycle Bin as your only backup.
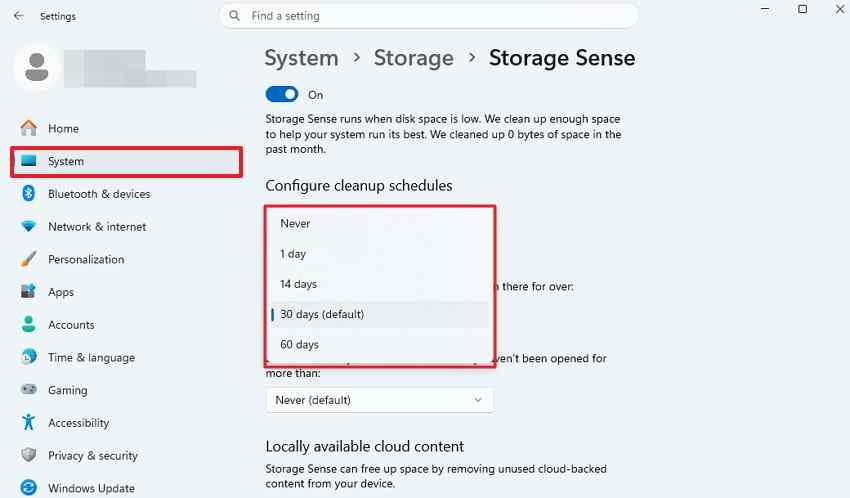
- Use another physical location: Keep at least one backup on a separate drive or trusted cloud destination. Disconnect offline backup drives when not in use to reduce the risk of accidental deletion or malware affecting both copies.
Conclusion
To recover videos deleted from the Recycle Bin, restore the file directly if it is still listed. If the bin has been emptied, stop writing to the source drive and check File History or OneDrive first. When those copies are unavailable, Recoverit or Windows File Recovery may find video data that remains readable. Save recovered clips to another drive and verify complete playback. If a recovered file is damaged, assess its actual data before considering Repairit. Regular, tested backups provide the strongest protection against permanent video loss.
FAQ
-
Can I recover videos after permanently deleting them from the Recycle Bin?
Sometimes. If the footage still exists in a previous backup, restore that copy first. Otherwise, a scan of the original readable drive may find deleted files, but success depends on overwriting, SSD TRIM, file-system condition, and how much data remains. Do not write new files to the affected drive. -
How can I recover deleted videos from the Recycle Bin without software?
If a video is still in the Recycle Bin, right-click it and choose Restore. After the bin is emptied, check an existing File History backup, Previous Versions, or OneDrive's online Recycle Bin. None of these methods can restore a file that was never backed up or synced. -
Why are some deleted videos missing from the Windows Recycle Bin?
Shift + Delete, deletion from many removable drives, and files that exceed the Recycle Bin's configured size may bypass normal storage in the bin. Recycle Bin settings and Storage Sense cleanup can also remove items. Check the original drive and any backups before attempting another scan. -
Can I recover deleted videos from an SSD after emptying the Recycle Bin?
It is sometimes possible, but TRIM and background storage cleanup can make deleted SSD data inaccessible very quickly. Stop using the SSD, check backups, and avoid installing recovery software onto it. A recovery tool cannot retrieve video data that is no longer readable or has been overwritten.


