


 TL;DR:
Determine the exact cause of choppy video playback by testing the footage in an alternative player or device first, applying player tweaks for decoding struggles, and reserving file repair software exclusively for local files that consistently fail at the same timestamp.
● For demanding 4K or HEVC files that stutter on lower-powered Windows 10 or 11 PCs, test hardware-accelerated decoding settings in VLC, or use VLC to convert a separate copy to a lighter H.264 MP4 profile without overwriting the original.
● Treat online streaming buffers by lowering resolution to 720p or 480p, and resolve system-wide local video stuttering by updating display adapters via Device Manager rather than assuming the video source data is broken.
● Utilize Recoverit 15 to repair MP4, MOV, or MKV files only if the identical file glitches at the exact same timecode across multiple compatible players, understanding that repair software cannot restore missing captured frames or fix camera motion judder.
Ask AI for a summary
 ChatGPT
 Perplexity
 Gemini
 Claude
 Grok
Grok
Does your video keep skipping frames, jerking forward, or freezing while the audio continues? Choppy video playback can come from several different places: a slow stream, a player struggling to decode 4K footage, overloaded CPU or GPU resources, a slow external drive, or damage in a particular video file. The fix depends on where the stutter starts.
First, try the same video in another player or on another device. If every video stutters on one computer, investigate the playback setup. If a stream pauses and buffers, investigate the connection or quality setting. If only one local file skips at the same point on multiple devices, preserve a copy and check file integrity before attempting repair.
In This Article
Part 1. Why Is My Video Choppy or Skipping?
Jerky video does not always mean the video file is broken. The symptoms below help identify which layer to test before changing settings or installing software.
| What You Notice | What It Suggests | Best First Check |
| Online video repeatedly pauses with a loading spinner | Insufficient or unstable data delivery, or a temporary streaming service issue | Try a lower quality, another connection, and the service's status |
| All local videos stutter on one computer | Player, graphics driver, CPU/GPU load, or storage performance | Check Task Manager and test another player |
| 4K, 60 fps, or HEVC clips skip, but ordinary HD clips play | Demanding video decoding or an incompatible hardware path | Test VLC's decoding mode; try a separate lower-resolution copy |
| Playback is smooth on the phone but jerky on the PC | PC-specific decoder or display configuration, not necessarily a damaged file | Test the same copied original in a second PC player |
| The same file glitches at the same timestamp in several players and devices | Possibly incomplete, truncated, or damaged content | Preserve the source, compare against another original, then assess file repair |
| The original camera clip is missing, while only a poor copy remains | Actual file loss rather than a simple playback problem | Stop writing to the source card and check recovery options |
Important distinction: Buffering is waiting for enough data to arrive; dropped frames are pictures the player cannot display smoothly; camera judder can be present in the recording itself. Neither a different media player nor file repair can recreate frames that were never captured.
Real-world troubleshooting can be less obvious than it looks. For example, in a Reddit user report about VLC stuttering, the poster linked the issue to disk-heavy background processes rather than a broken video. That is one personal experience, not proof that every case has the same cause.
Part 2. How to Fix Choppy Video Playback
Use these methods in order, starting with reversible checks that do not change the original footage. Each fix specifies the situation it is designed for, so you can skip steps that do not match your symptoms.
Fix 1. Close Resource-Heavy Background Apps
Best for: Videos that stutter only while several applications, browser tabs, cloud sync tools, or games are running. High CPU, memory, disk, or GPU activity can compete with video decoding and file reads.
Step 1. On Windows 11 or 10, press Ctrl + Shift + Esc to open Task Manager. Select Processes and watch the CPU, Memory, Disk, and GPU columns while replaying the problematic video.
Step 2. Sort by a busy resource and identify an app you recognize that is using unusually high resources. Save its work first, then close it normally; use End task only if necessary and safe.
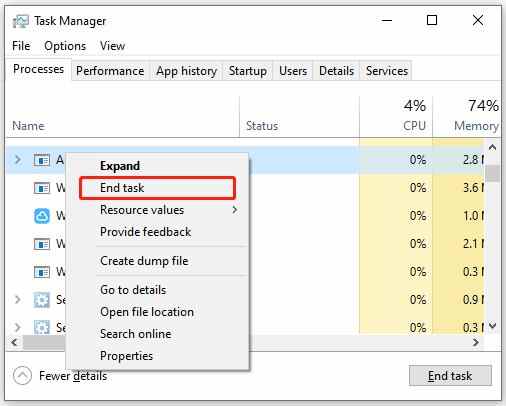
Step 3. Pause large downloads, file transfers, sync jobs, screen recording, or simultaneous 4K streams. Play the same section again. If the stutter disappears only when disk load is lower, also try reading a copy of the video from a healthy internal drive instead of a slow USB device.
Note: Do not end unfamiliar Windows processes, delete the original video, format a drive, or run disk repairs to solve ordinary playback stutter.
Fix 2. Try VLC and Test Hardware Decoding
Best for: A local MP4, MOV, or MKV that stutters in one player but plays normally elsewhere, especially 4K, HEVC, or high-frame-rate videos. A different playback engine can help distinguish the file from the decoder.
Step 1. Keep a copy of the original video, then open it in an up-to-date VLC installation. If it plays smoothly, the earlier player or its codec path is a more likely cause than file damage.
Step 2. If VLC itself is choppy, open Tools > Preferences. VideoLAN's official VLC preferences guide documents this menu.
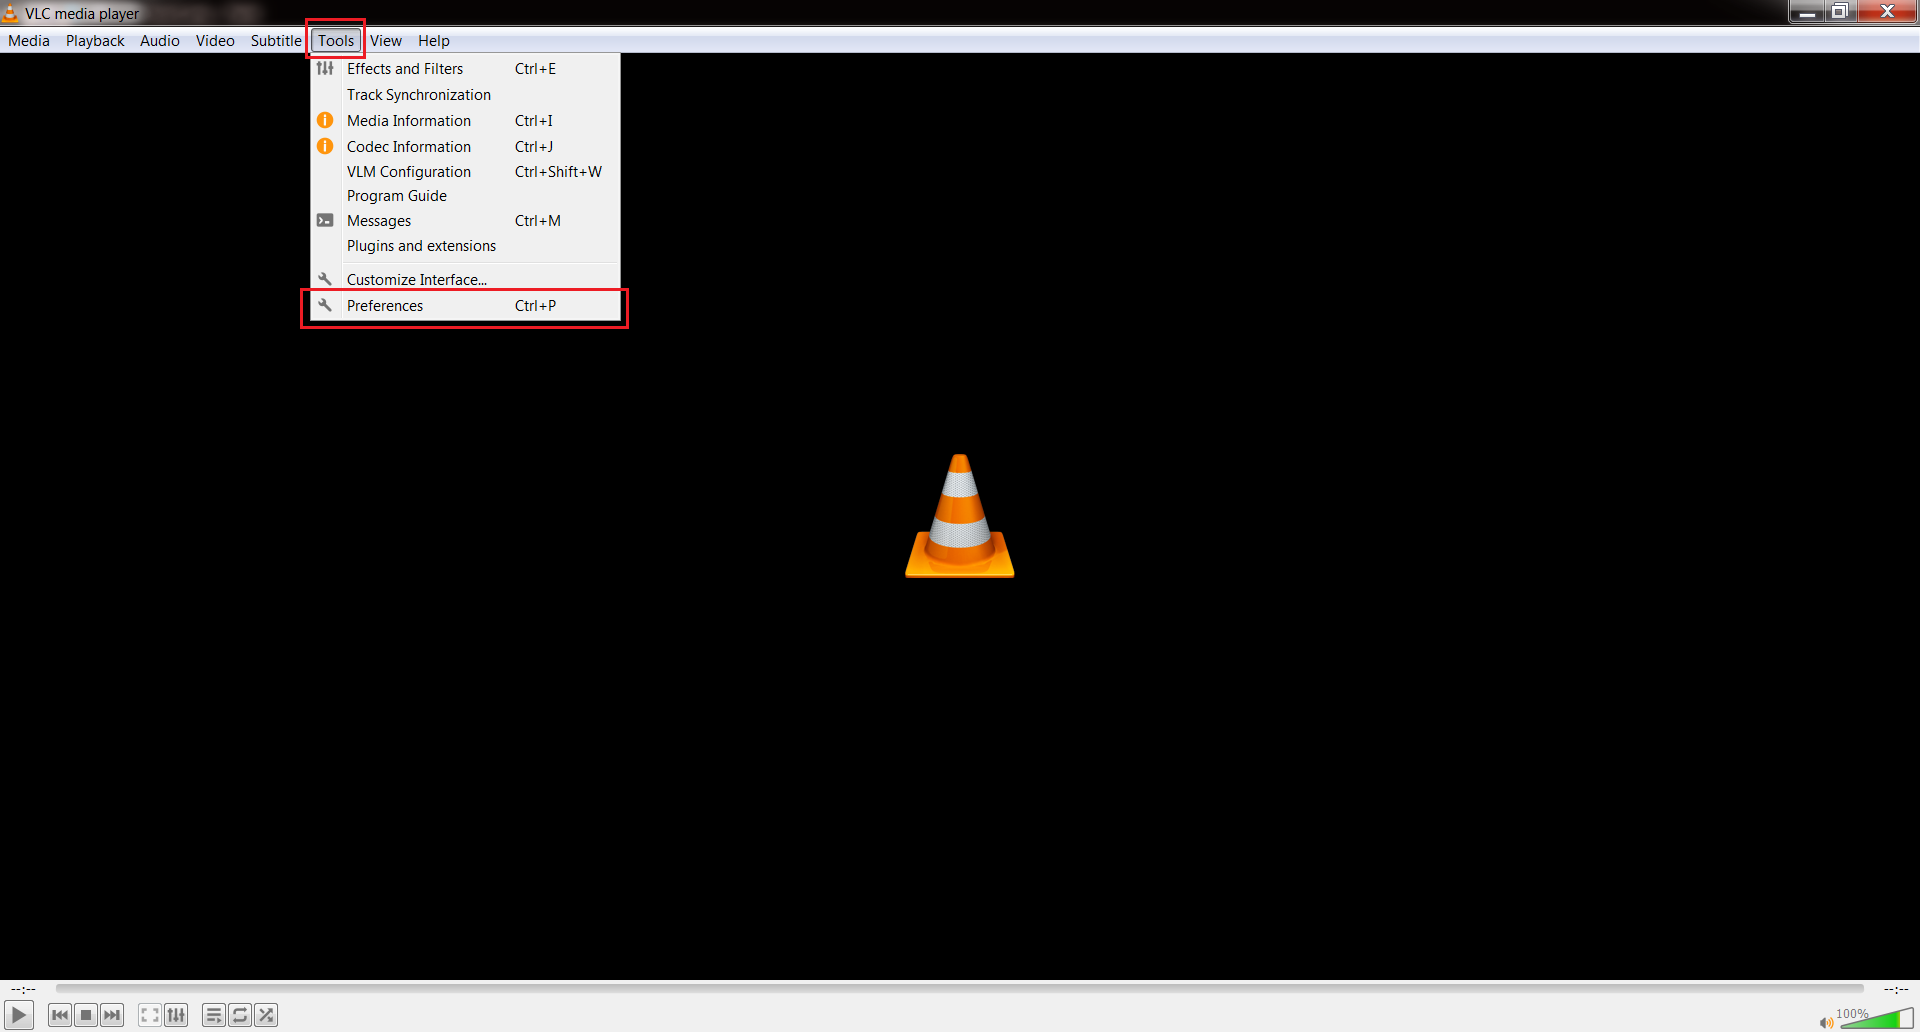
Step 3. Open Input / Codecs and inspect Hardware-accelerated decoding. Start with Automatic on a compatible GPU. If playback remains jerky or shows visual glitches, test Disable as a temporary comparison. Do not assume disabling hardware decoding always helps: software decoding may overload the CPU on demanding footage.
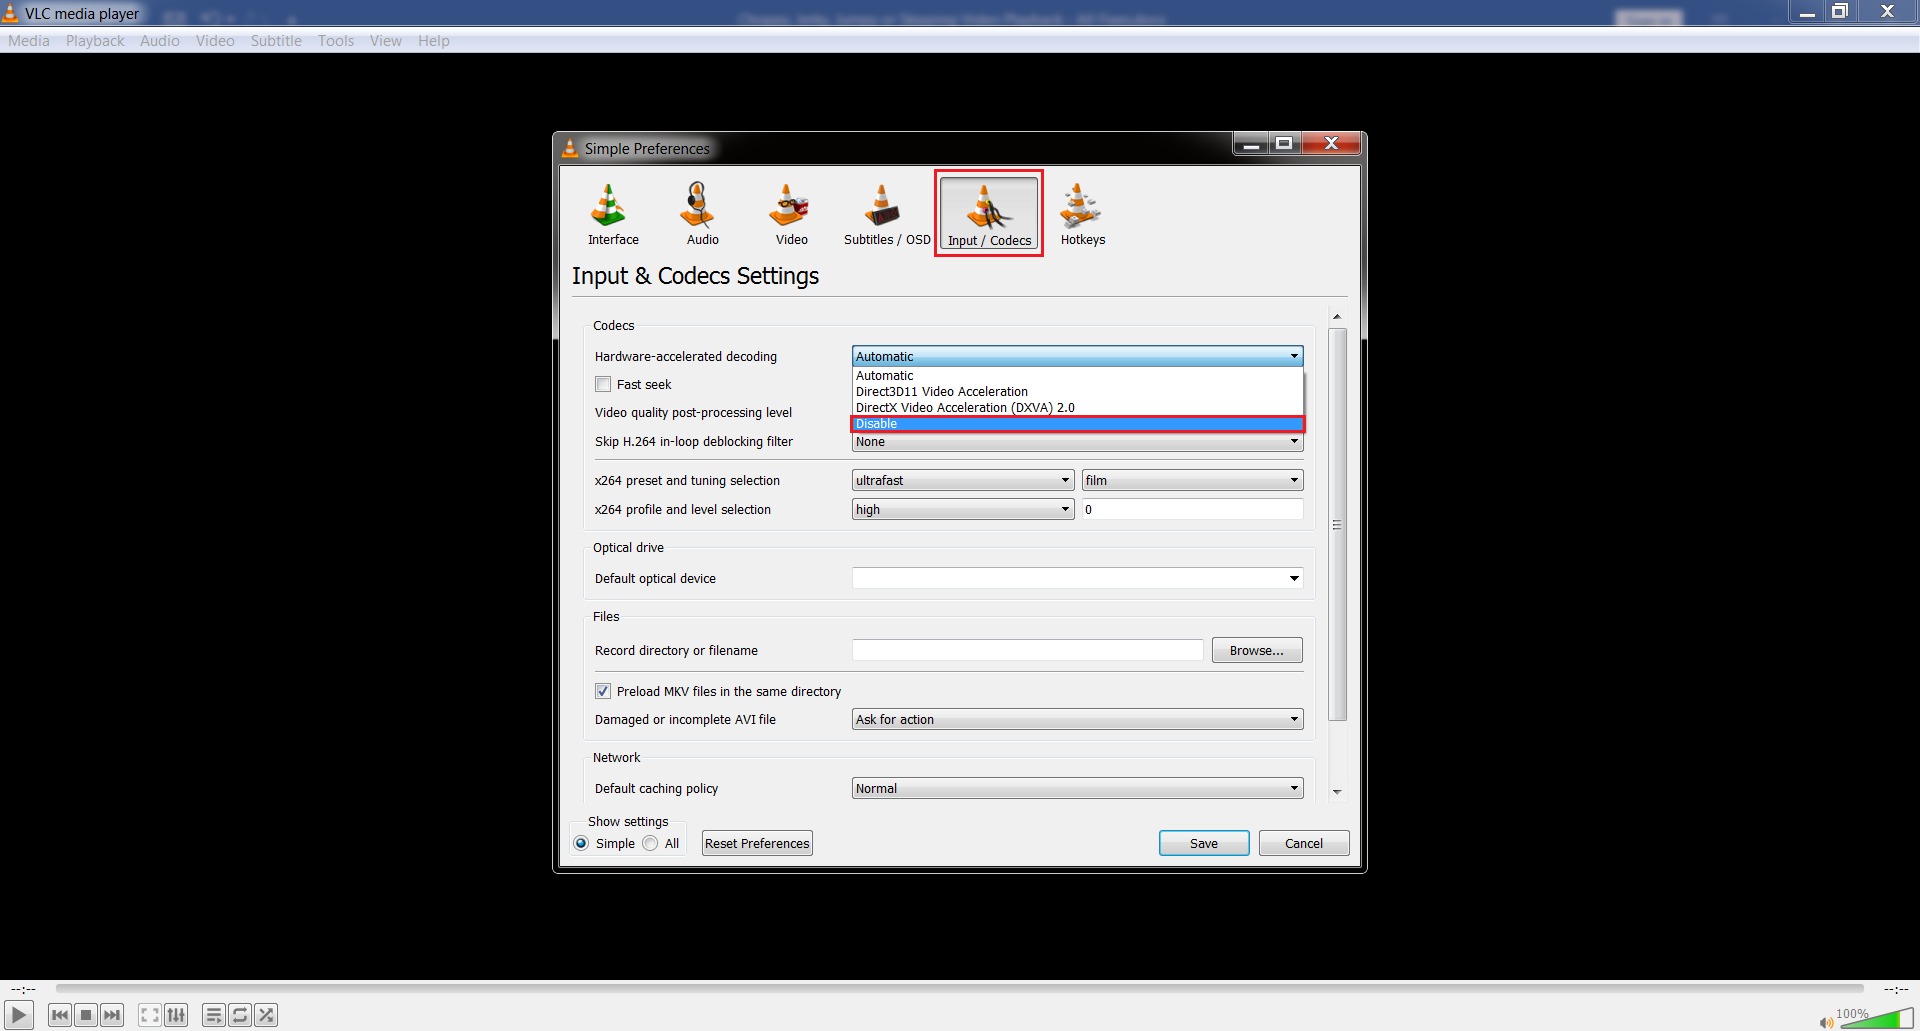
Step 4. Click Save, fully restart VLC, and replay the same timestamp. Restore the previous setting if the issue gets worse. When only one player fails, changing file-repair software is not the first step.
Fix 3. Lower Streaming Quality and Test the Connection
Best for: Choppy video streaming on YouTube or another online platform, particularly when you see buffering circles, sudden pauses, or a stream that struggles at 1080p or 4K. A network issue is different from damage to a locally saved video.
Step 1. Pause the stream for a short test, close other data-heavy tabs, and check whether another video from the same site works. If possible, briefly try another Wi-Fi or mobile connection without disabling device security.
Step 2. On a YouTube computer player, open the Settings gear, choose Quality, and try 720p or 480p. The YouTube Help quality instructions describe these controls; the exact menu varies by device.

Step 3. If lowering quality helps, return to Auto or gradually raise resolution after the connection stabilizes. Update the browser if the issue is browser-specific. If every viewer has the same broken stream, the broadcaster may need to resolve it; local file-repair software will not fix a remote stream.
Note: Streaming can also jerk because of browser graphics rendering despite sufficient bandwidth. If a second browser plays it smoothly, check browser updates and acceleration settings before blaming the video source.
Fix 4. Update the Display Driver When Appropriate
Best for: Stuttering that affects multiple players or began after a Windows, display, or graphics update. A faulty driver may affect video decoding or rendering even when the video files themselves are healthy.
Step 1. Open Settings > Windows Update on Windows 11 and check for compatible updates. If a driver is already working well, updating it solely because one online stream buffered is unnecessary.
Step 2. If problems persist, right-click Start, open Device Manager, expand Display adapters, right-click your active GPU, and choose Update driver. Microsoft's official graphics-driver update instructions explain the available options.
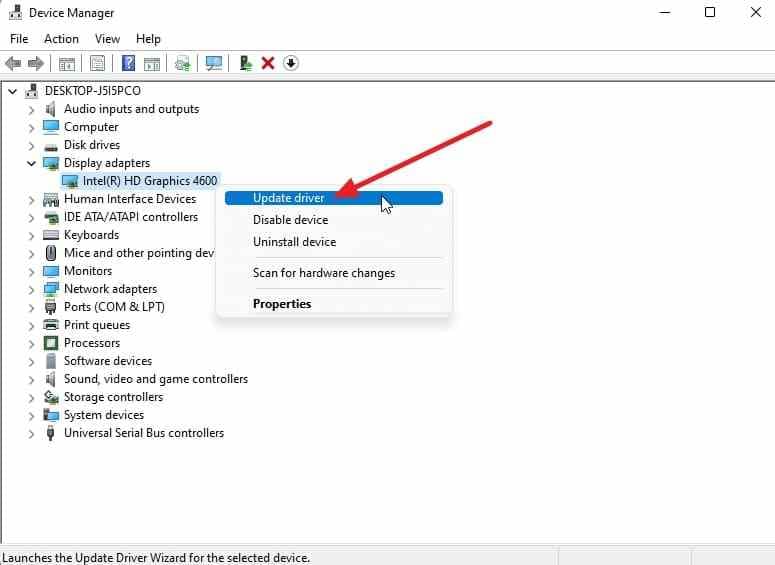
Step 3. Let Windows search for a compatible driver. If it does not find one and the issue is reproducible, use the exact GPU or laptop manufacturer's support page instead of third-party driver packages. Restart if prompted, then compare playback of the same file.
Step 4. If the stutter began immediately after a driver update, consider the Roll Back Driver option only when a previous version is available. For external-monitor stutter, check display refresh-rate mismatches rather than changing media files; Microsoft documents this in Windows video playback settings.
Fix 5. Convert a Playback-Heavy Video to a Lighter Copy
Best for: A healthy 4K or high-bitrate file that always plays smoothly on a more powerful device but skips on a lower-powered computer. Converting a copy to a less demanding format may help the weaker player, but it reduces quality and cannot restore missing frames.
Step 1. Preserve the original file on a healthy drive. Check that it actually plays normally on another compatible device before transcoding it; otherwise, conversion may simply preserve an existing defect.
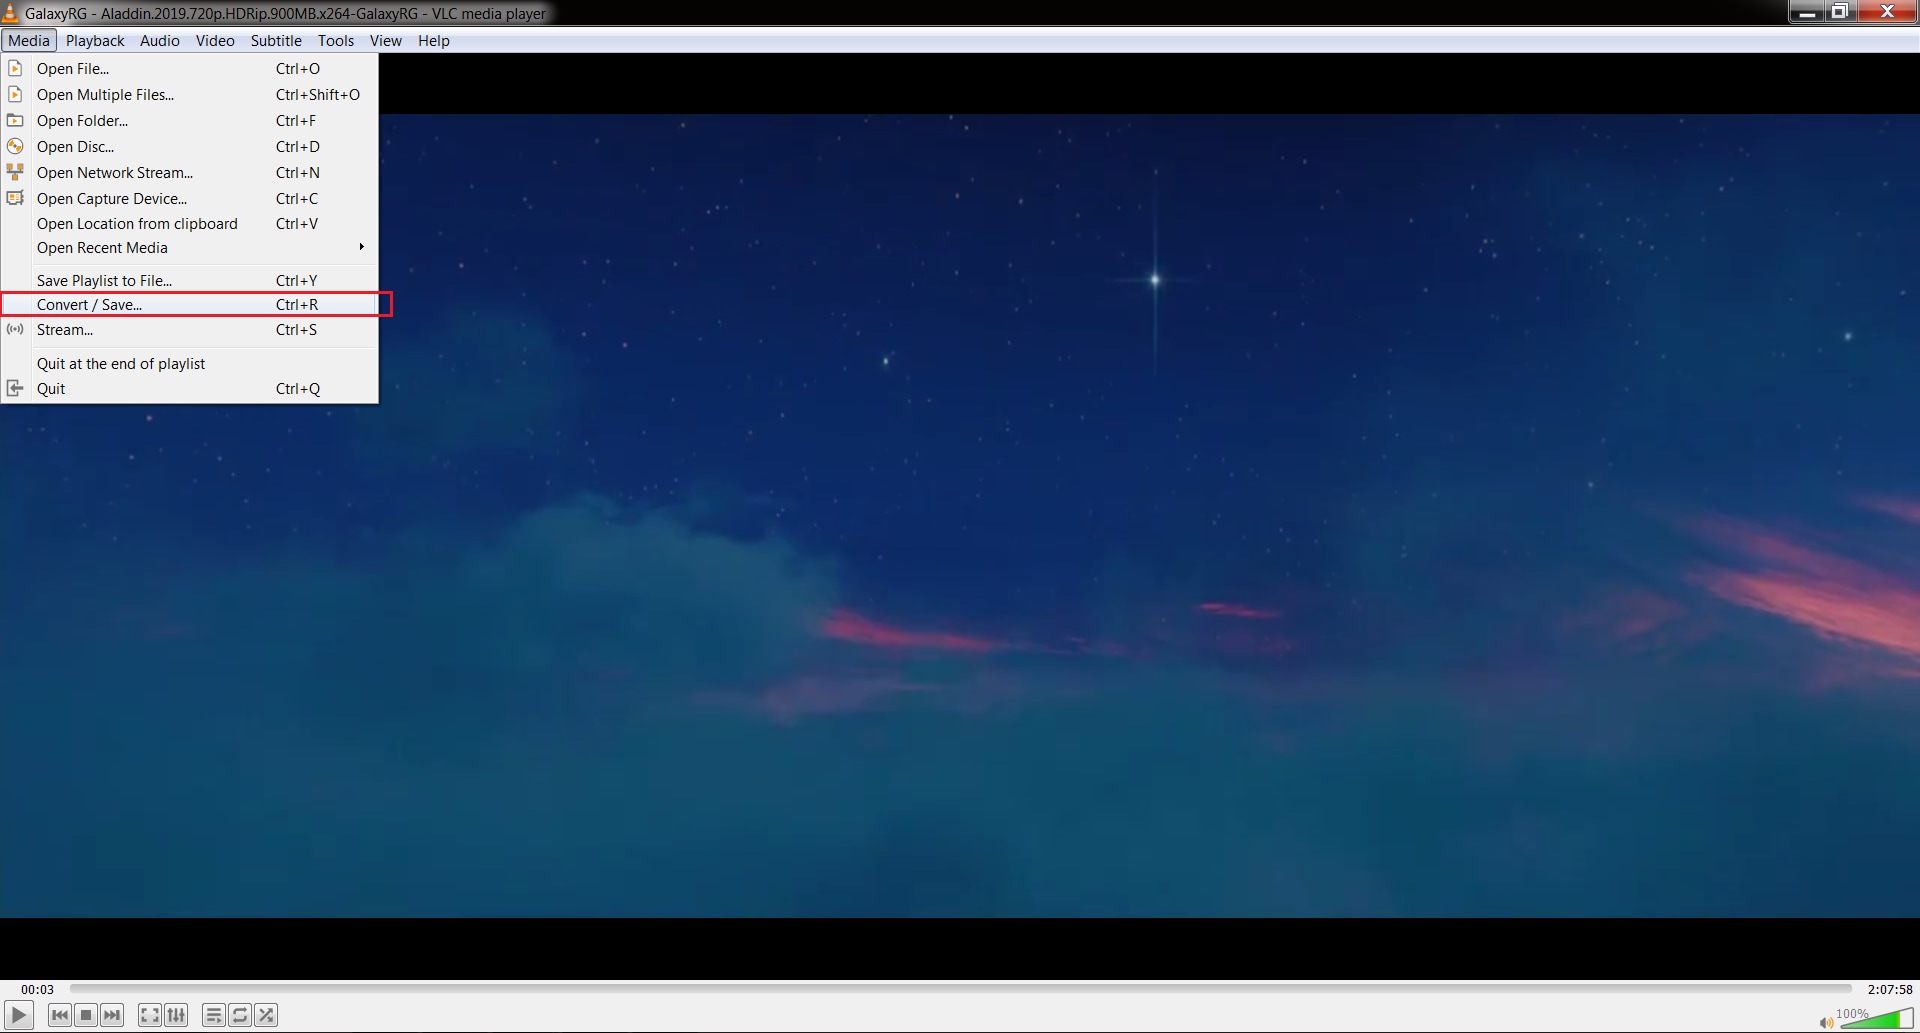
Step 2. In VLC on Windows, open Media > Convert / Save to create a separate playback copy.
Step 3. On the File tab, choose Add, select the healthy source video, and choose Convert / Save.
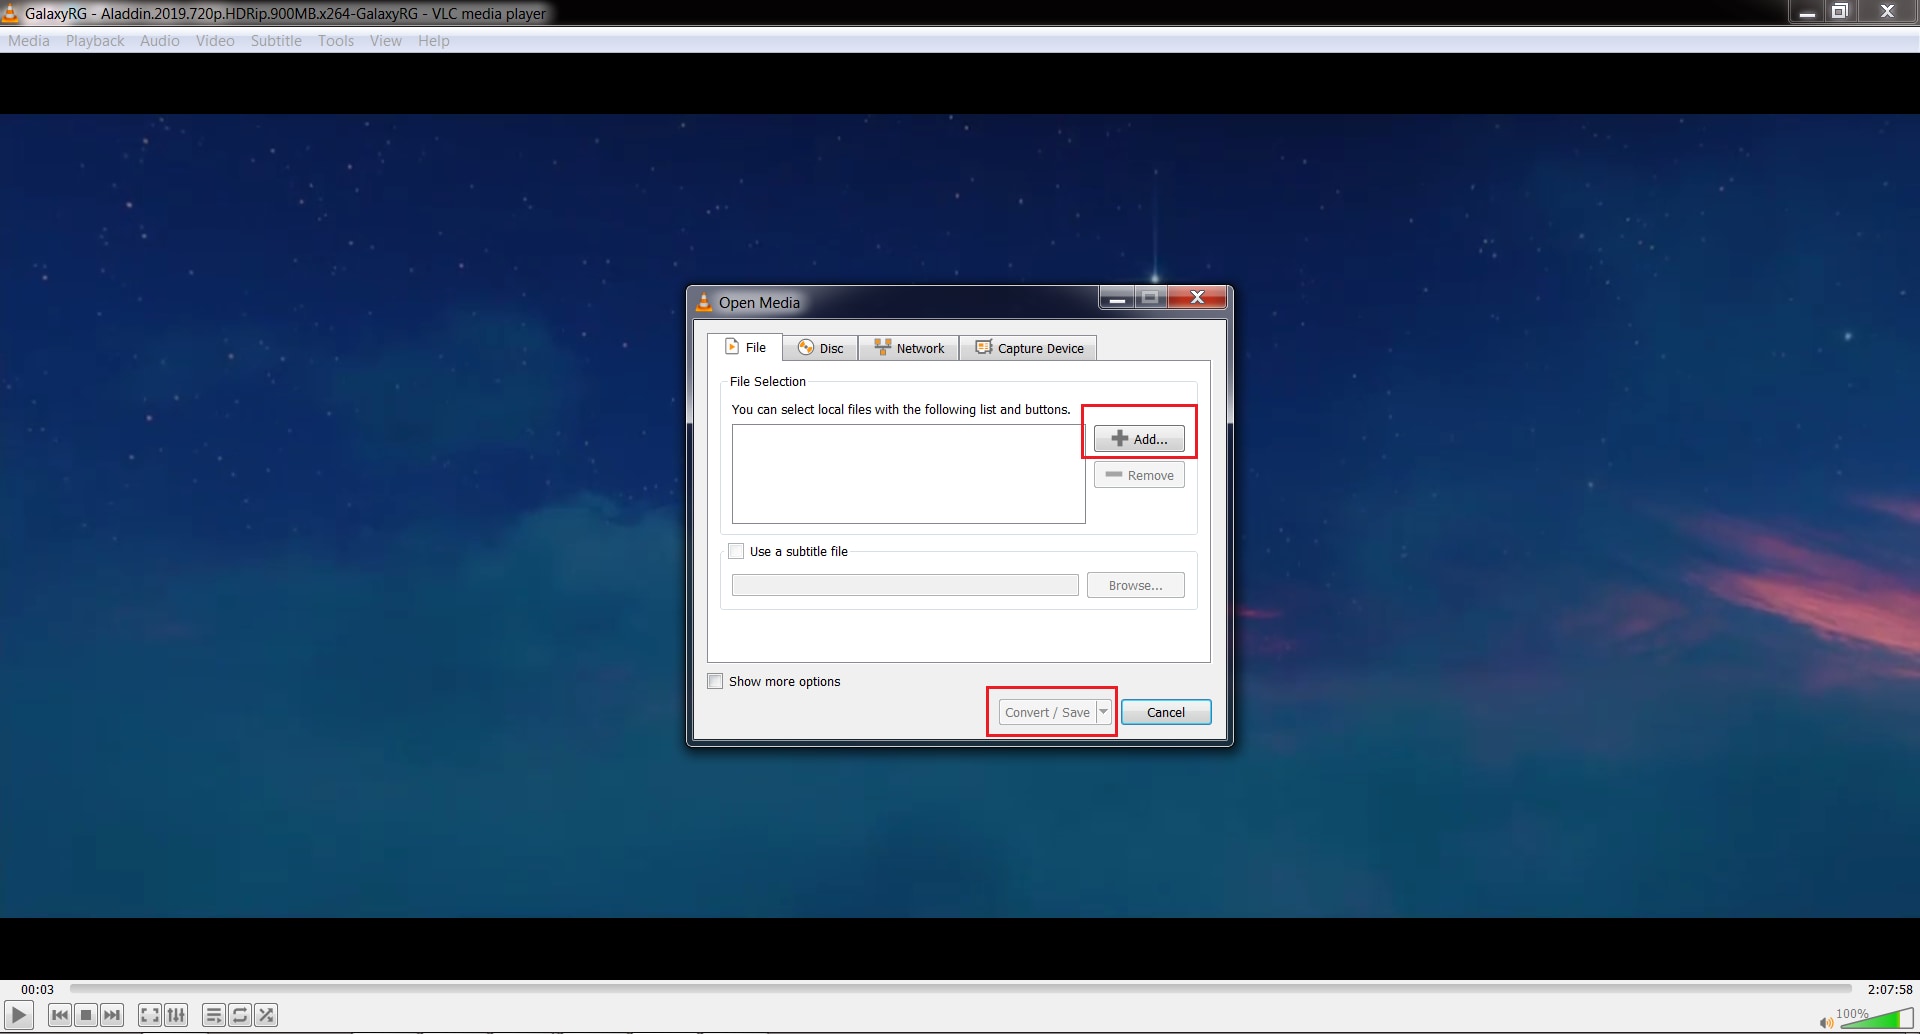
Step 4. Select a compatible H.264 MP4 profile where available. If necessary, edit the profile to reduce the output resolution or frame rate, choose a new destination filename, and start the conversion. Avoid overwriting the original; verify the result before deleting any temporary copies.
Result check: If the lighter copy plays smoothly but the original still skips on that PC, the device's playback capability was likely part of the problem. If both copies fail at the same timecode on every device, move to the file-integrity decision below instead of repeatedly re-encoding.
Part 3. When to Recover or Repair a Video File
Most choppy videos do not require file repair. These last two options matter only when the underlying video data is missing or damaged, which is different from dropped frames caused by a browser, player, GPU, or network connection.
Fix 6. Recover a Missing Original Video

Best for: The original recording was accidentally deleted, lost after a transfer, or formatted from a detectable SD card or external drive, and the remaining low-quality copy is incomplete. Recovery seeks the missing source file; it does not make a healthy but choppy stream run faster.
Step 1. Stop recording, downloading, or writing new data to the source device. Check camera backups and cloud originals first. If the device repeatedly disconnects, makes unusual noises, or has physical damage, do not perform repeated scans; ask a professional recovery service.
Step 2. If the device is detected and physically stable, connect it to a computer and open Recoverit. Select the drive or external device containing the missing original video. The SD card video recovery guide covers the card-specific decision path.

Step 3. Scan the selected storage and review video matches by name, type, date, and preview availability. A scan requires readable or otherwise supported storage; it cannot guarantee recovery of overwritten content.

Step 4. Preview candidate clips where available and recover them to a different healthy drive. Test the newly recovered file in a reliable player before deciding whether it is still damaged. Available recovery and preview functions can depend on the license.
Recoverit is appropriate here because the original file is genuinely missing or inaccessible, not merely because a normal video is laggy.
Fix 7. Repair a Local Video Confirmed to Be Damaged
Best for: A copied or recovered MP4/MOV that glitches at the same timestamp in multiple players, cannot open, or shows reproducible decoding errors that are not present in a healthy source. Repair is not an appropriate response to ordinary streaming buffers or a slow PC.
Step 1. Preserve the original damaged file. If it is on a problematic card, work with a recovered or copied version stored on a healthy drive. Compare it with another original recording and ensure the error is not confined to one player.
Step 2. Open Recoverit 15 and select File Repair > Video. The current Recoverit user guide describes this workflow and its supported scope.
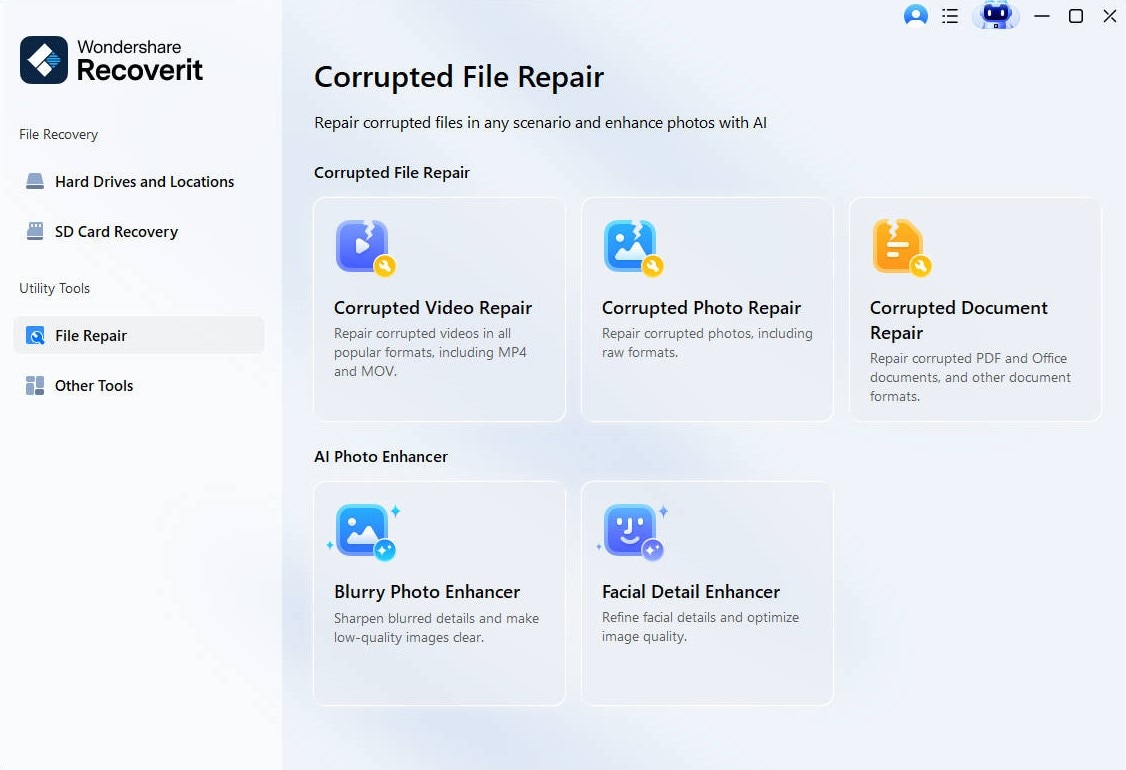
Step 3. Choose Add Video or Add Files, depending on your installed interface, and select the damaged copy.
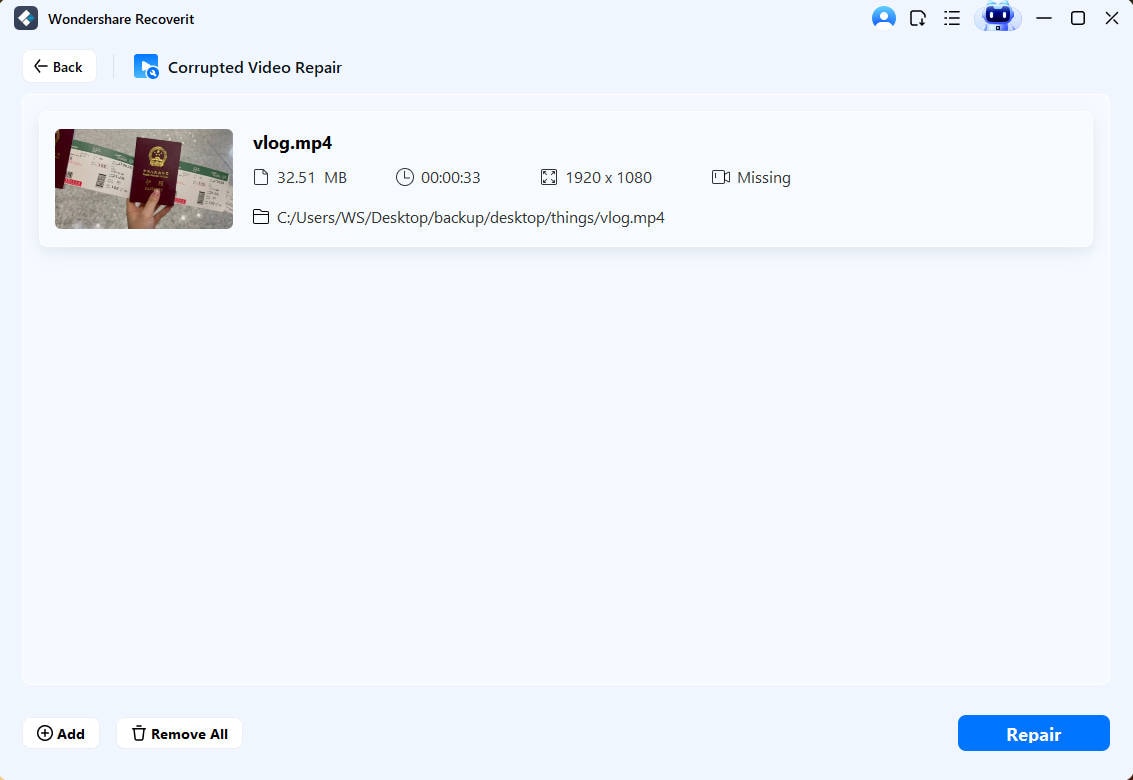
Step 4. Select Repair, wait for processing, then use Preview to compare the repaired clip. For severely damaged files, Advanced Repair may ask for a healthy sample recorded with the same device and format.
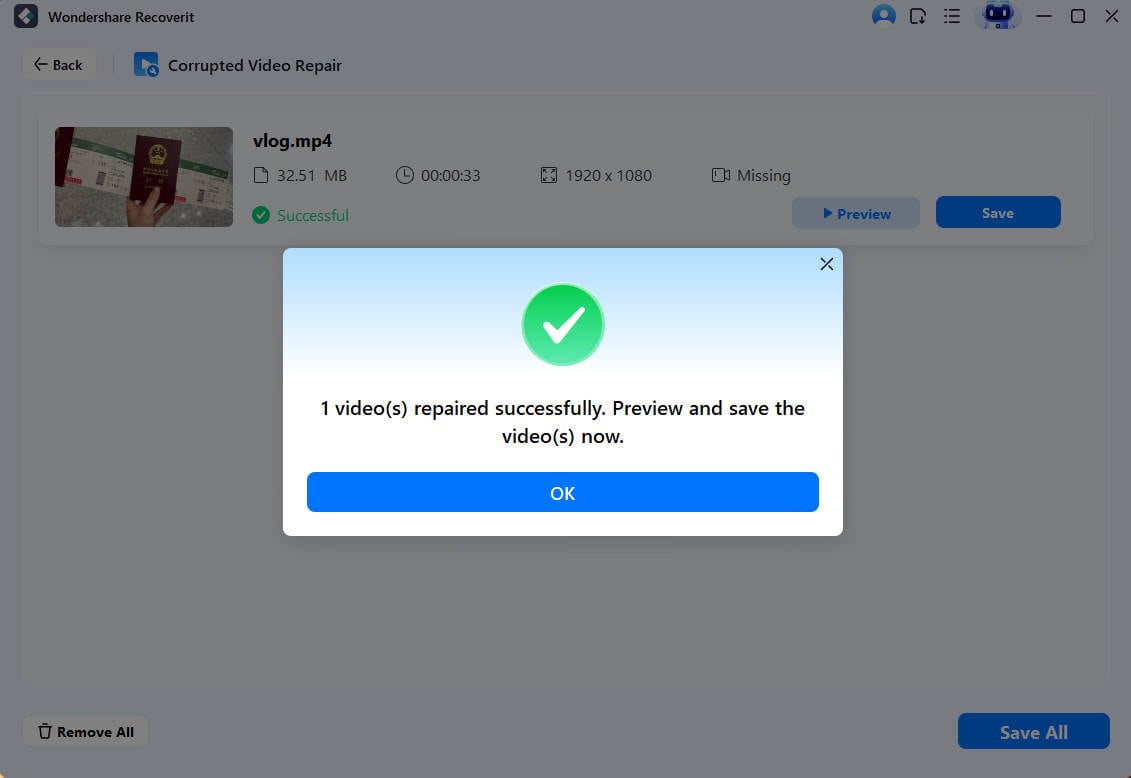
Step 5. Save an acceptable result to a different healthy location. Replay the previously damaged timestamp in two players. If repair does not produce a usable preview, do not assume the footage is recoverable: the required frame data may no longer exist.
Note: A file that is choppy because of camera shutter timing, poor capture frame rate, CPU overload, or unstable online streaming is not necessarily corrupted. Video repair should not be presented as a way to generate missing real frames.
Conclusion
To fix video skipping or jerky playback, first decide whether the problem affects a stream, a particular player, the computer, or the video data itself. For choppy streaming, start with connection and quality settings. For local 4K or high-bitrate videos, test resources, decoding, graphics drivers, and a separate lighter copy. Reserve Recoverit video recovery for genuinely missing original files, and file repair for local footage with reproducible damage after the original is protected.
FAQ
-
Why does my video skip every few seconds but the audio keeps playing?
The player may be dropping video frames because decoding or rendering cannot keep up, while the audio continues normally. Test the same file in another player, check CPU and GPU usage, and compare performance with a lower-resolution clip before assuming corruption. -
How do I fix choppy video streaming on YouTube?
Try a lower resolution from the player's Quality settings, test another connection, and close other data-heavy streams. If only one browser stutters, update the browser and investigate its graphics settings. You do not need file repair for a remote buffering problem. -
Should I turn VLC hardware acceleration off to fix jerky video?
Not automatically. Modern supported GPUs often benefit from hardware decoding. If Automatic is causing glitches, test Disable once, restart VLC, compare the same segment, and revert if CPU load or stutter becomes worse. -
Can a choppy 4K or HEVC video be converted to play more smoothly?
Sometimes. If the original file plays correctly on another capable device, creating a separate lower-resolution H.264 copy can reduce playback demands. Conversion may reduce image quality and cannot recreate missing recorded frames. -
How do I know whether a jerky video file is corrupted?
Corruption is more plausible when the same local file fails at the same position in several compatible players and devices, especially after an incomplete transfer or storage error. A different player or a healthy original should be tested before attempting file repair. -
Can Recoverit fix choppy video playback?
Recoverit is appropriate if the original video is missing and needs recovery, or when a genuinely damaged local video requires its supported File Repair feature. It does not fix network buffering, slow hardware, or camera motion judder. No recovery or repair outcome is guaranteed.


