TL;DR:
To identify and resolve ASUS laptop screen flickering, first boot into the BIOS by holding F2 to determine if the root cause is a physical hardware defect (flicker persists in BIOS) or a solvable software issue like outdated graphics drivers, application conflicts, or normal OLED dimming behaviors (screen remains stable in BIOS).
● Identify the exact software trigger by opening Task Manager and testing an external monitor: if Task Manager flickers, reinstall the exact ASUS-validated graphics driver from the ASUS Support site, but if the external monitor stays stable while the laptop screen blinks or responds to lid movement, the internal display cable or panel requires physical repair.
● Flickering on OLED models at low brightness is typically caused by normal pulse-based dimming, which can be mitigated using the OLED Flicker-Free Dimming controls in MyASUS; if these settings or ASUS Splendid controls disappear after a system restore, you must update Windows or reinstall the model-specific MyASUS Splendid package.
● Updating the BIOS to address deep firmware glitches strictly requires an AC power connection, at least 20% battery capacity, and a FAT32-formatted USB drive, and if Windows is currently inaccessible due to the display issue, you must use a separate computer to create a bootable Recoverit USB drive to retrieve your files before attempting a full system reinstall.
Ask AI for a summary
 ChatGPT
 Perplexity
 Gemini
 Claude
 Grok
Grok
“Hi Everyone, I got my laptop back from Asus after my screen died but now i have a new problem with the screen, it flickers when i'm in fullscreen….” - Alanian10
Brightness-dependent OLED flicker differs from driver faults and can appear at low brightness. OLED panels can use pulsing for dimming, which viewers perceive as flicker. An ASUS laptop's flickering screen can result from drivers, applications, settings, or firmware. Flickering may appear as rapid blinking, intermittent black screens, brightness pulsing, horizontal glitches, or flashing limited to specific apps.
Hardware causes can include the display panel, cable, or related internal connections. BIOS, Task Manager, external monitors, and MyASUS help identify the responsible layer. This guide identifies the cause before applying fixes and explains how to protect files with Recoverit if Windows becomes inaccessible.
In This Article
Part 1. Diagnose the ASUS Screen Flicker First
Diagnosing ASUS laptop flickering starts by checking where the problem appears first. The table below shows what each test can reveal about flickering:
| Where You Look | What Happens | What It Indicates | Continue With |
| BIOS Setup | Flicker visible before Windows | Panel, cable, or firmware | Part 7 |
| BIOS Setup | Display steady throughout | Software layer above it | Part 2 |
| Task Manager | Flickers with the desktop | Graphics driver | Part 3 |
| Task Manager | Stays steady around flicker | Incompatible application | Part 4 |
| External Monitor | External clean, internal poor | Internal panel or its cable | Part 7 |
| Low Brightness Only | Present on an OLED panel | Panel dimming behavior | Part 5 |
Start With the BIOS Check
BIOS runs before Windows loads its drivers, making it a useful diagnostic test. Shut down the laptop, hold “F2,” press the Power button, and release “F2” when the BIOS screen appears. A stable BIOS screen points toward Windows, drivers, applications, or related software settings. ASUS screen flickering visible in BIOS can instead indicate firmware or display hardware problems.
Read Task Manager and an External Display
Microsoft recommends using Task Manager to identify the likely flickering source. If Task Manager also flickers, the display driver may be responsible; otherwise, an incompatible app is more likely. A stable external monitor with a flickering internal screen suggests an internal display-path problem.
Part 2. Try Quick ASUS Screen Flickering Fixes
A stable BIOS screen suggests software may be causing the ASUS monitor flicker. The quick fixes below address common causes without making major system changes:
- Perform a Hard Reset: Shut down the ASUS laptop and remove external devices. Keep the power adapter connected, then hold the Power button using the 20-second or 40-second procedure specified for your model.
- Reset the Graphics Driver: Press “Windows + Ctrl + Shift + B” to restart the graphics driver in Windows. The screen may flash or beep, while files and documents remain unchanged.
- Remove Docks and External Screens: Disconnect docks, adapters, hubs, and external monitors before restarting your ASUS laptop. Restart using only the power adapter to rule out external display interference.
- Restore a Supported Refresh Rate: Open “Settings > System > Display > Advanced display” and review the selected refresh rate. Choose a panel-supported refresh rate to address ASUS laptop display flickering issues.
- Run MyASUS System Diagnosis: Open “MyASUS” > “System Diagnosis.” If the model provides a Display check under Customized Diagnosis, run it and review the result.

Part 3. Fix ASUS Graphics Driver Problems For Screen Flickering
An ASUS laptop flickering screen can point to a graphics driver problem. Driver issues may persist even after the basic display fixes fail. The methods below repair drivers while limiting unnecessary system changes first.
Fix 1. Roll Back a Recent Driver
Use this fix when screen flickering begins after a recent graphics driver update. Windows can restore the previous driver version if it remains available on your system. Look at the steps below to roll back your ASUS graphics driver safely:
Step 1. Open “Device Manager” > Expand “Display adapters” > Right-click your graphics adapter > Select “Properties.”

Step 2. Open the “Driver” tab > Select “Roll Back Driver” > Choose a reason if prompted > Complete the rollback, then restart your ASUS laptop.

Fix 2. Reinstall the Graphics Driver
A reinstall can address an ASUS laptop blinking screen caused by drivers. Windows may reinstall an available driver, but not the ASUS-validated version you need. Here is how to install the intended driver instead:
Step 1. Before uninstalling anything, download the appropriate graphics driver installer for your ASUS laptop and keep the file ready for installation.

Step 2. Open “Device Manager” > Expand “Display adapters” > Choose the affected graphics adapter > Select “Uninstall device” > Confirm the uninstall, then restart your laptop. Windows may install a driver automatically after restarting.

Step 3. Run the downloaded graphics driver installer > Follow the installation prompts > Restart your ASUS laptop again, then check the screen for flickering.

Fix 3. Prefer the ASUS-Validated Package
ASUS graphics drivers match specific laptop models and help prevent compatibility problems. Choose your exact model package, then follow these steps:
Step 1. Open the ASUS Support website > Search for your exact laptop model > Select the matching model from the results.

Step 2. Open “Driver & Tools” > Select your operating system > Find the graphics or VGA section > Download the ASUS-provided graphics driver for your model. Then, follow the clean reinstall method above to install this driver.

Fix 4. Update Both GPUs on Dual-Graphics Models
Dual-GPU ASUS models use integrated and discrete graphics adapters for different processing demands. Outdated GPU drivers can contribute to ASUS laptop display flickering during graphics switching. Here is how to update both graphics drivers:
Step 1. First, select the first GPU in “Display adapters” > Choose “Update device driver” from the top toolbar.

Step 2. Select “Search automatically for drivers” and install any available update. Then repeat the same process for the second GPU and restart your ASUS laptop.

Fix 5. Run MyASUS System Update
MyASUS System Update provides ASUS-supported drivers, firmware, and software updates for compatible devices. These updates can address system components that Windows Update may not provide itself. To check for ASUS updates, use these steps:
Step 1. Open “MyASUS” > Select “System Update.” MyASUS will check your system and display available updates.

Step 2. Select the updates you want to install > Click “Update Selected Items.” MyASUS will download and install the selected packages. Restart your ASUS laptop if prompted.

Note: If “System Update” is unavailable on your model, use the ASUS Support download page instead.
Part 4. How to Check ASUS Apps and Windows Display Settings
A steady Task Manager can indicate an application that causes ASUS laptop flickering. The checks below isolate applications and display features one by one:
Fix 1. Update or Remove Recent Software
Recent software changes can create conflicts that cause screen flickering during normal Windows use. Go to “Settings > Apps > Installed Apps” to check and update recent software. If flickering continues, select the app’s “Three-dots > Uninstall.”

Fix 2. Switch off Hardware Acceleration Per App
Hardware acceleration can cause display conflicts when applications use the GPU for rendering. Here is how to disable this feature for a certain application:
Instructions. In Chrome, open “Settings > System” > Turn off “Use graphics acceleration when available” > Click “Relaunch,” then check whether flickering continues.

Fix 3. Run a Clean Boot
A clean boot helps identify background services or startup applications causing flickering. Microsoft recommends hiding Microsoft services before disabling other services during troubleshooting. Follow these steps to begin:
Step 1. Launch “System Configuration > Services” > Check “Hide all Microsoft services” > Select “Disable all.”

Step 2. Navigate to “Startup > Task Manager” > Disable enabled startup apps > Restart the PC and check for flickering.

Note: After testing, restore the disabled services and startup apps, then restart Windows normally.
Fix 4. Test HDR and Dynamic Refresh Rate
HDR and DRR settings can sometimes affect display behavior and cause flickering. Here is how you can test these features across your ASUS laptop:
Step 1. Open “Settings > System > Display > HDR” > Turn off “HDR,” if available.

Step 2. Go to “Display > Advanced display” > Disable “Dynamic refresh rate” or choose a fixed supported refresh rate > Check for flickering.

Part 5. How to Check ASUS OLED and Splendid Flickering
OLED displays can show different flicker behavior under certain brightness and display conditions. ASUS provides model-specific features that can help manage ASUS screen flickering issues:
Check 1. Understand OLED Dimming Behavior
OLED panels may use pulse-based dimming that appears as flicker. Supported ASUS laptops provide OLED Flicker-Free Dimming through MyASUS. Brightness-linked flicker may result from the OLED panel's dimming method, while blackouts, lines, artifacts, or BIOS flicker suggest another problem.

Check 2. Treat MyASUS as the Source of Truth
ASUS display feature availability varies across different laptop models and generations. ASUS states Tru2Life and OLED Flicker-Free Dimming support selected models only. Some 2026 models may exclude them, with support ending from 2027 generations. Missing controls do not always indicate ASUS laptop monitor flickering or software faults.
Check 3. Restore Missing ASUS Display Files
System recovery may remove color profiles required by ASUS display features, causing Splendid or OLED Flicker-Free Dimming controls to disappear. ASUS recommends Windows Update to restore these files after recovery. Keep your BitLocker recovery key accessible before updating. If the controls remain missing on a supported model, install the model-specific “MyASUS Splendid” package from the ASUS Support page for that exact laptop.

Check 4. Know When Splendid Switches Itself Off
Splendid may become unavailable when certain external display configurations are active on ASUS. This can happen with duplicate mode or when only external displays remain active. Disconnect the external display and check whether Splendid controls become available once more.
Part 6. Reset ASUS BIOS and System Settings
Driver and application fixes may not resolve deeper firmware or system issues. These remaining problems can contribute to persistent ASUS notebook screen flickering cases. The methods below address firmware and Windows settings through different approaches.
Method 1. Restore BIOS Defaults for Your Model
BIOS settings can change after firmware updates or adjustments made during system setup. Restoring defaults returns firmware settings to their standard values without affecting personal files. Here is how to restore your BIOS defaults:
Step 1. Shut down your ASUS laptop > Hold “F2” > Press the “Power” button while holding “F2” > Release “F2” when the ASUS BIOS Utility appears > Select “Default (F9).”

Step 2. When the “Load Optimized Defaults” window appears, select “OK” to restore the default BIOS settings.

Step 3. Select “Save & Exit (F10)” > Confirm the changes when prompted, then allow your ASUS laptop to restart.

Method 2. Update BIOS, Windows, and ASUS Drivers
Keeping Windows, ASUS drivers, and BIOS current can resolve compatibility and system issues. Before updating the BIOS, make sure your BitLocker recovery key is accessible if encryption is enabled, since a firmware change may trigger a recovery prompt. ASUS warns that a BIOS update may require entering the BitLocker recovery key afterward. Use the simple instructions below to update each system component:
Note: Back up important personal files before beginning the BIOS update.
Update Windows
Open “Settings” > “Windows Update” > Select “Check for updates” > Install all applicable updates, then restart your ASUS laptop if prompted.

Update ASUS Drivers
Refer to Part 3 to check and install the appropriate ASUS driver updates.
Update the BIOS
Step 1. Go to ASUS Support > Search for your exact laptop model > Open "Driver & Tools” > “BIOS & Firmware” > Download the latest BIOS file, extract it if required, and copy the BIOS file to a FAT32-formatted USB drive.

Step 2. Connect the laptop to AC power > Insert the USB drive > Enter BIOS by holding “F2” while powering on > Open “Advanced Mode (F7).”

Step 3. In “Advanced,” open “ASUS Firmware Update or ASUS EZ Flash 3 Utility” > Select the USB drive > Choose the downloaded BIOS file > Verify it and confirm the update.

Note: ASUS requires a battery of at least 20% while keeping AC power connected throughout BIOS updates performed with Firmware Update or EZ Flash.
Method 3. Use System Restore for a Recent Change
According to Microsoft Support, System Restore can reverse system changes without affecting personal files. It can help address recent system changes linked to ASUS laptop flickering problems. If you have a suitable restore point, follow the steps below:
Instructions. Search for and open “Create a restore point” > Select “System Restore” > Choose a restore point created before the screen flickering began > Follow the on-screen instructions to complete the restoration.

Method 4. Reinstall Windows as the Final Software Option
Reinstalling Windows removes software and system settings that may cause persistent display flickering. A “Remove everything” option also removes personal files stored on the Windows drive. Use this option only after other software troubleshooting methods have failed to help. Complete Part 8 first to protect important files before reinstalling Windows from scratch.

Part 7. Check for ASUS Display Hardware Problems
Hardware signs can cause laptop screen glitching that ASUS users report beyond software fixes. Let’s examine the warning signs that may indicate your laptop needs service:
- Flicker or Artifacts Visible in BIOS: Flickering, lines, distortion, or visual artifacts visible before Windows loads strongly suggest a hardware or firmware issue. At this stage, Windows drivers and applications are unlikely to be responsible.
- Flicker Responding to Lid Movement: Slowly move the laptop lid while watching the display. If the flicker starts, stops, or changes with the lid angle, the display cable or connector may be loose or damaged.
- A Stable External Monitor: If an external monitor works normally while the built-in screen continues flickering, the problem is more likely within the laptop’s internal display path, including the panel, cable, or related connection.
- Contact an ASUS Authorized Repair Center: Seek professional service if the flicker appears in BIOS, changes with lid movement, or continues while an external monitor remains stable. Tell the technician exactly when the problem appears and whether brightness or lid position affects it.

Part 8. Recover Files Before ASUS Laptop Repair
An ASUS laptop screen blinking problem does not normally damage the files stored on the device. If Windows is still usable, copy important files to external storage before attempting resets, reinstalls, or hardware repair.
If Windows becomes inaccessible but the internal drive is still readable, Recoverit can help retrieve important files. It can also create bootable recovery media when Windows will not start normally. If the drive has suffered physical failure or is no longer detected, professional data recovery may be required instead.

Key Features
- AI Search: Uses natural-language search and file-type filters to help locate specific recovered files more quickly after a scan.
- Enhanced Scan Result Preview: Improves the preview interface so users can inspect recovered content with less visual obstruction before saving files.
- Bootable Recovery Media: Creates bootable recovery media to access and recover files when Windows cannot start normally.
- exFAT Recovery Improvements: Improves recovery handling for exFAT storage, including fixes related to path loss after recovery.
- Recovery File Integrity Improvements: Addresses cases where recovered videos could not play properly, helping improve the usability of restored media files.
How to Recover Files When Windows is Inaccessible
Now, follow these steps to recover files when Windows becomes inaccessible using Recoverit:
Step 1. Access the Bootable Recovery Tool
Install and open Recoverit on another working computer. Go to “Other Tools” > “Computer Not Bootable” > Click “Start.”
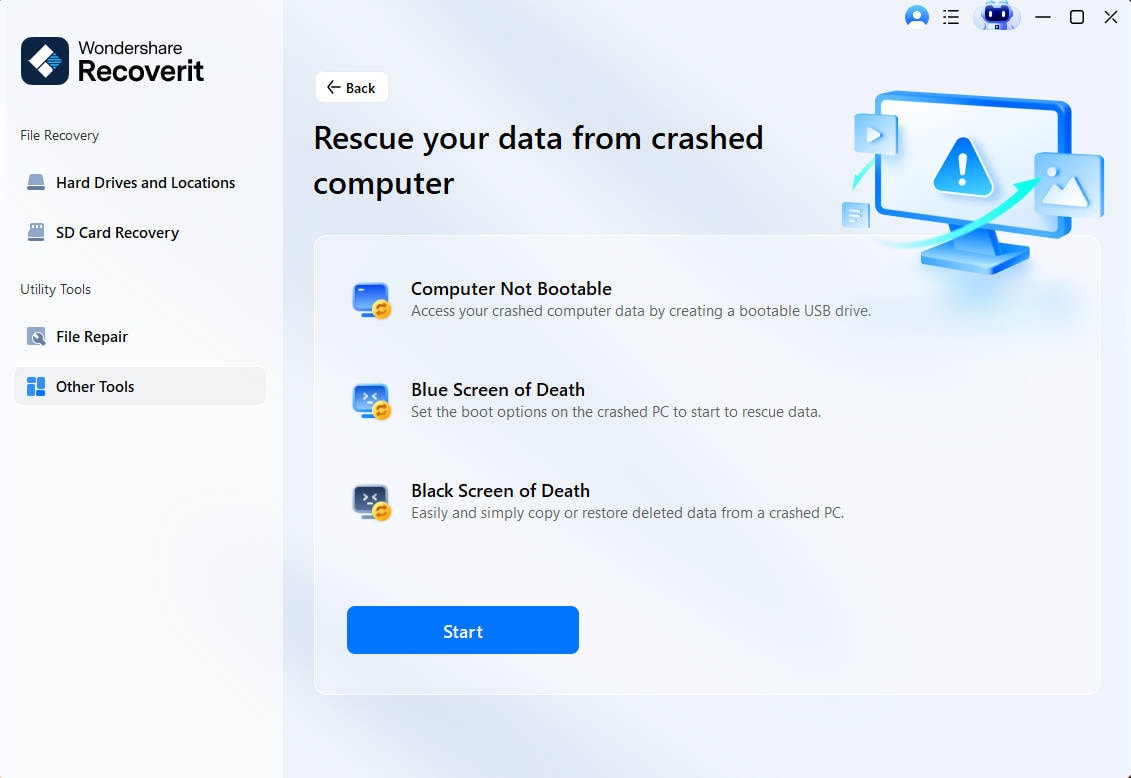
Step 2. Prepare a Recovery USB Drive
Insert a USB drive with more than 4GB of available space. Select the connected USB from the menu > Click “Start” to create the bootable media.
Step 3. Retrieve Files From the Problem Laptop
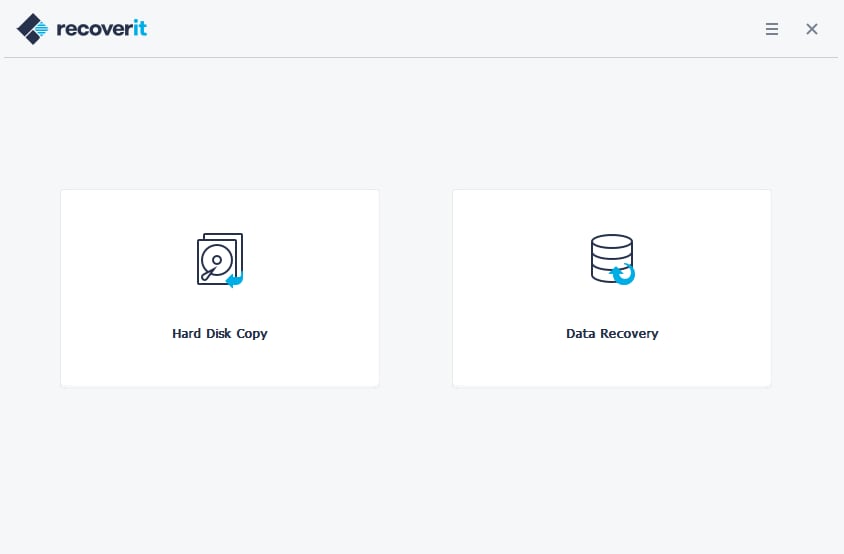
Start the affected laptop using the created Recoverit USB. Choose “Data Recovery” > Scan the required storage drive > Select your files and save them onto a separate physical drive.
Try Recoverit to Recover Files Before ASUS Laptop Repair
 Security Verified. Over 7,302,189 people have downloaded it.
Conclusion
In conclusion, diagnose the cause of persistent screen flickering before attempting major repairs. Use BIOS, Task Manager, external-display, and brightness checks to separate software, OLED, and hardware-related issues. Seek ASUS service if ASUS laptop monitor flickering appears in BIOS or shows clear hardware symptoms. If Windows becomes inaccessible but the storage remains readable, Recoverit can help retrieve important files before reset or repair.
FAQ
-
Why is my ASUS laptop screen flickering suddenly?
Sudden screen flickering often follows driver updates, software changes, or display settings. Check the BIOS to determine whether the ASUS monitor flicker also appears outside Windows. -
Why does my ASUS laptop screen flicker only at certain refresh rates?
Certain refresh rates can expose driver, panel-mode, VRR, or resolution compatibility issues. Use a supported rate and an ASUS-validated graphics driver, then test again. -
Why does my ASUS laptop screen blink but an external monitor works normally?
A stable external monitor can point toward the laptop's internal display path. The panel, cable, or connector may need inspection if flickering continues there. -
Why does my ASUS OLED laptop screen flicker at low brightness?
OLED panels can use pulse-based dimming, which some users perceive as flicker. Supported ASUS models offer Flicker-Free Dimming controls in MyASUS for this behavior.