How to Format a Xbox One External Hard Drive?
Feb 05, 2026 • Filed to: Answer Hard Drive Problems • Proven solutions
Imagine a user just invested in an external storage device to upgrade his Xbox One's storage capacity but no longer need it for Xbox One. He unplugs it from his Xbox console and decides to use it for his Windows-based PC to store large files or backup your important files like pictures, videos, documents, and other data. However, his PC does not recognize the external drive. The solution to this problem is Xbox one external hard drive format.
As you may know, external hard drives are formatted to the exFAT system to match the file format of most game consoles. Thus, they are not suitable for PC usage until re-formatted to NTFS to suit PC usage. This article will walk you through an easy tutorial on how to format Xbox one hard drive on pc, while you will also learn about an Xbox one internal hard drive format tool.
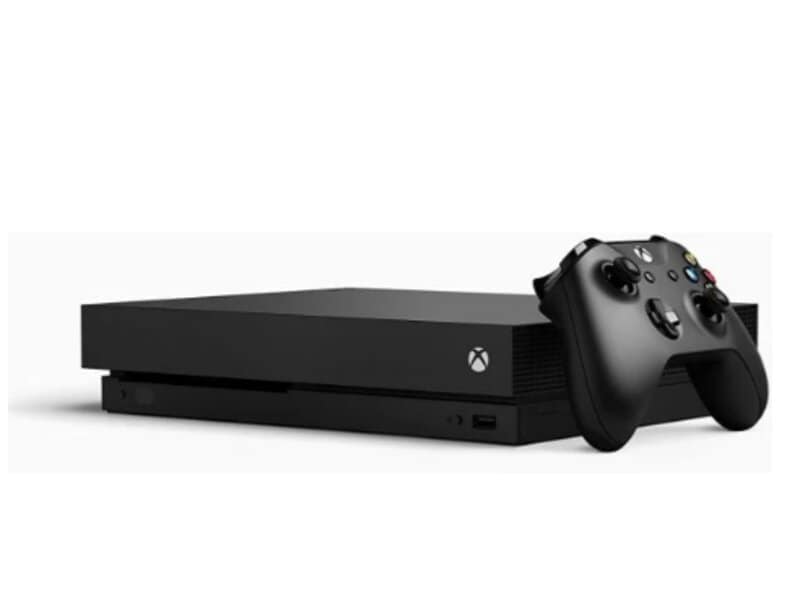
Why People Want to Format Their Xbox One Hard Drive?
Running out of storage on Xbox One hard drive is no surprise to regular gamers. Although the in-built storage of Xbox One has a capacity of 500 GB or 1/2 TB depending on the console, it falls short to most users. Thanks to the huge sizes of modern games. Fortunately, Xbox One accepts external hard drives allowing extra storage space. Many users are taking advantage of this smart choice to upgrade their Xbox One storage capacity and enjoy many next-gen titles seamlessly.
While there are many reasons people might want to format a hard drive for their Xbox One, it is also a wise move. Being a gamer, one might know the hassles of redownloading an Xbox game every time. Good thing, you can now format your Xbox One hard drive and store your favorite games to play on the go. Another benefit to formatting an external hard drive for one's Xbox console is transferring the existing Xbox one content while upgrading.
Format Tool for Xbox One Internal Hard Drive
Formatting the Xbox One internal or external hard drives was once a sophisticated task. However, with the development of some intuitive formatting tools, the process has been simplified. One such tool we find very easy-to-use and helpful is "AOMEI Partition Assistant."
AOMEI Partition Assistant is a free comprehensive disk partition management software. Being compatible with Windows 10, Windows 8.1, Windows 7, Vista, and even XP, it has earned a reputation worldwide. Alongside a user-friendly interface, assistive features allow the flexible management of hard drives and disk partitions. Using AOMEI PA, you can merge, resize, split, move, extend partition, as well as convert files from exFAT to NTFS. All in all, if you want to format your external or internal hard drive safely and quickly, AOMEI Partition Assistant is an excellent choice.
To help you better understand this powerful software, here we bring you a brief tutorial on how to format the Xbox One hard drive on pc.
Step 1 Install AOMEI Partition Assistant
To begin with, download the AOMEI Partition Assistant tool from any third-party source like CNET, etc. Launch the installer and follow the prompts to install the software. Once installed, open AOMEI Partition Assistant.
Step 2 Connect Xbox One hard drive to your PC
Make sure to connect your Xbox One hard drive to your PC correctly.
Step 3 Format Partition
On the main screen of the AOMEI PA window, you can see the list of drives connected to your PC. Find your Xbox One hard drive from the list. Right-click on the device name and select Format Partition from the drop-down menu. This will open a new window with format partition options.
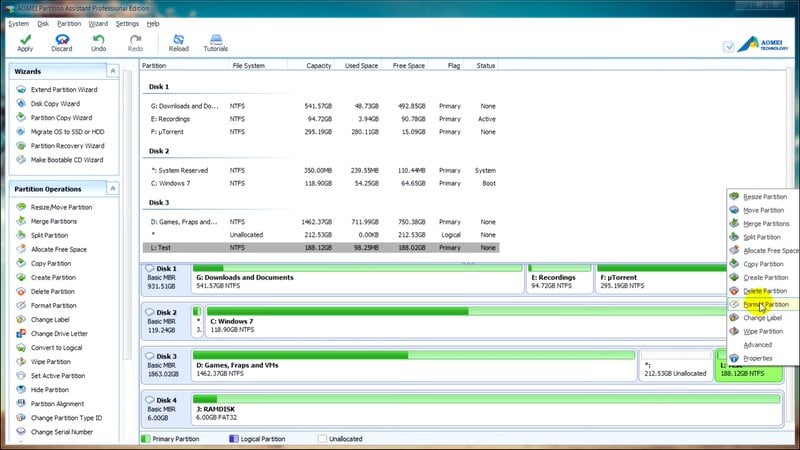
Step 4 Select File System
From the File System drop-down, select your required format that is exFAT. You can also assign a label to the partition and set a cluster size as per your requirement. After all the settings, click OK.
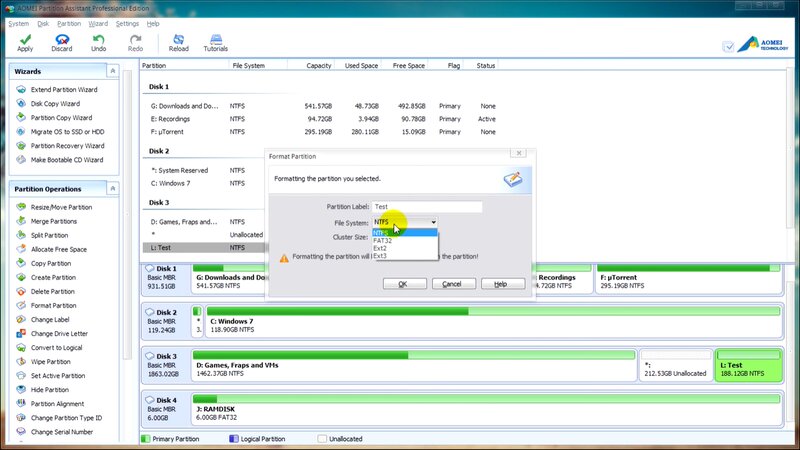
Step 5 Apply Format Partition
You will be taken back to the main interface, where you can see the F partition is marked as exFAT. Finally, click Apply at the left side of the toolbar. Now, your Xbox One hard drive is formatted and ready.
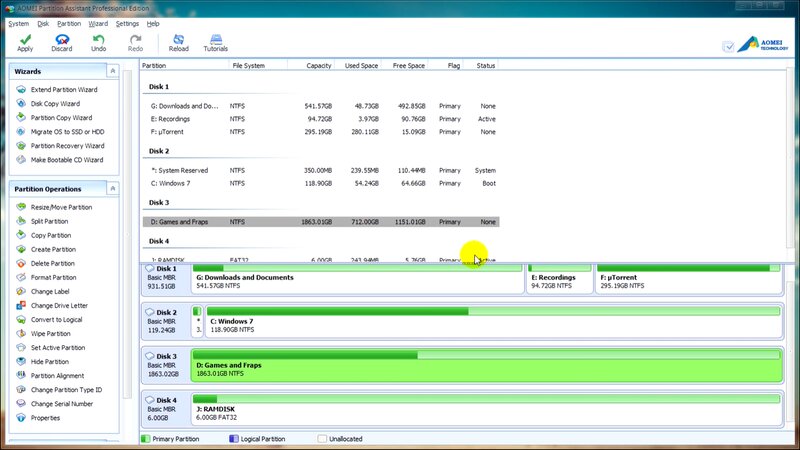
Accidentally formatted the wrong hard drive and lost all important data? If your answer is YES, don't worry, you can recover your data in 3 simple steps. For easy data recovery from a formatted hard disk, follow the steps below.
1. Launch Wondershare Recoverit data recovery program
To help us recover the deleted data, we will use the best data recovery program called Wondershare Recoverit. Download Recoverit from its official website and launch the program.

2. Select and scan the hard drive
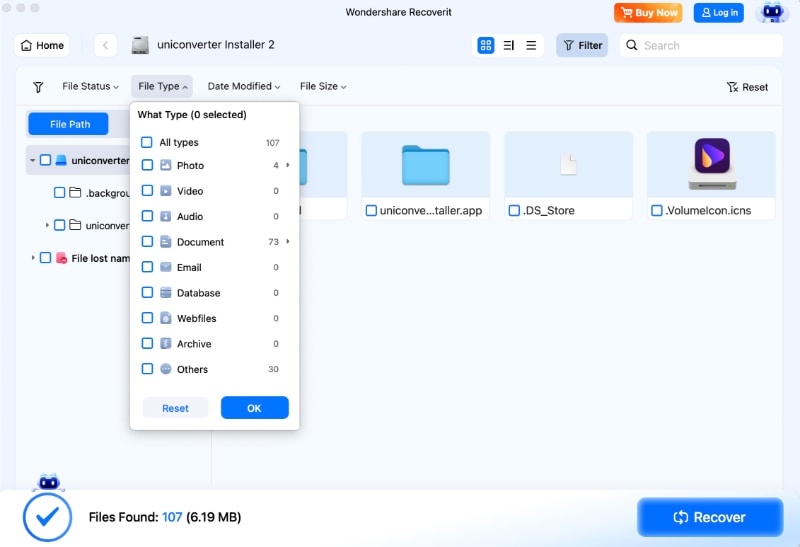
From the main screen of Recoverit, select the formatted hard drive you wish to recover data from. Then, click Start.
3. Recover data
After clicking start, the program will scan the hard drive for the deleted data. This may take a few minutes, depending on the amount of data on your drive. Once the scan is completed, preview your files and select the items you want to recover. Finally, press Recover.

How to Format Xbox One External Hard Drive for PC?
Once you have formatted an external storage device for use on your Xbox One, it can not be used directly on a Windows-based computer. Even if you plug it on your PC, Windows will not recognize the external device until you fix it. To be clear, by fix, we mean Xbox one external hard drive format to suit PC usage.
Read on and follow these basic steps to format your Xbox one external hard drive for PC.
One thing you will want to do before disconnecting your external drive from your Xbox One is to transfer all the game data back to your console. Because once the drive is formatted, any data on it will be destroyed. To migrate your data, press the big Xbox logo on your controller to get the Xbox Guide Menu and head to the Settings tab. Now move to the System tab and press Storage. This will bring you to the system storage panel, where you can view your device's internal drive and your external drive. Move to Manage storage and select the external drive. Press A on your controller, scroll down the pop-up menu, and hit Transfer. Manually select the item you want to move, or press Select ALL if you choose to move every game. Finally, press Move Selected to start the transfer process. Once your data is moved, your drive is ready to be formatted.
Step 1 Plug your external hard drive into the Windows PC
Plug your USB hard drive into the computer correctly. Unlike formatting an external hard drive for use on Xbox One, where Xbox notified an external device's connection, Windows will not. This is because Windows cannot read and communicate with this external device due to its file format.
Step 2 Launch Disk Management
To help you format an external hard drive, use the free Windows utility called Disk Management. Press the Windows key on your keyboard or simply click on the Windows button on the taskbar to open the start menu. Type "Disk Management" in the search bar. This will instantly bring up search results displaying "Create and format hard disk partition." Click on it to open the Disk Management Window.
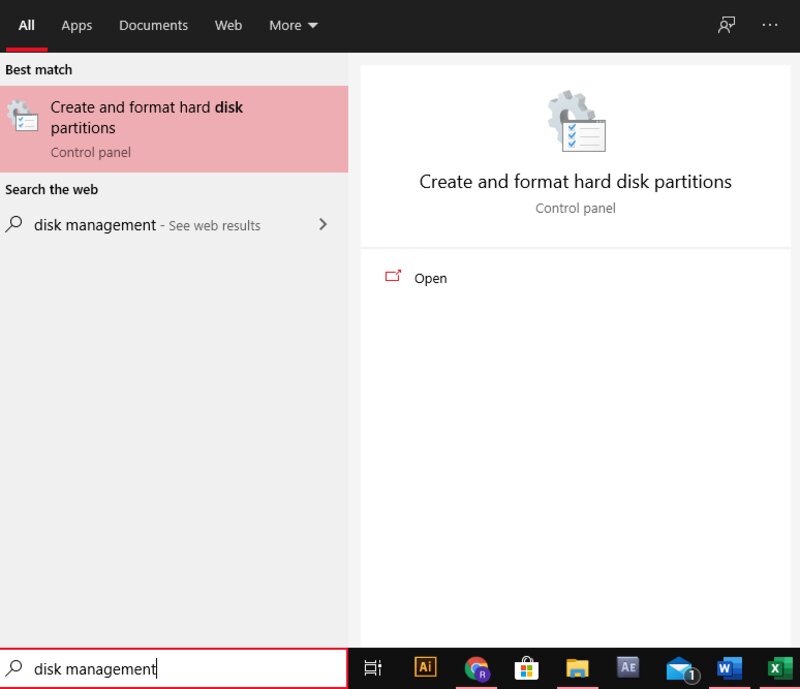
Optionally, you can also open it via Control Panel. Go ahead to Computer Management and click on Disk Management Feature.
Step 3 Initialize The External Hard Drive
Once the Disk Management Window is open, you can see a screen with two subsections. This screen allows you to format and fix hard drives connected to your PC. From the bottom section of the screen, navigate the list of installed drives (external or internal), and find your external drive. Since you are using the disk for the first time, your drive will be unrecognized with unallocated space within the tool.
Right-click on the device name and select Initialize Disk from the pop-up menu.
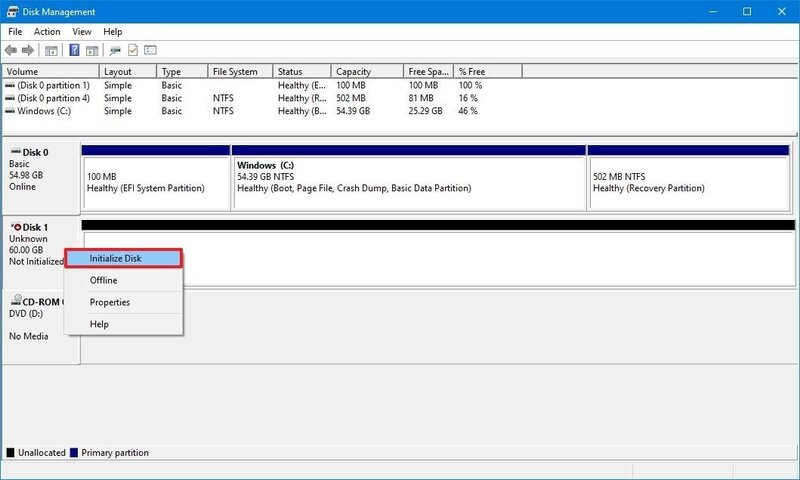
A pop-up will present two Master Boot Record (MBR) and GUID Partition Table (GPT) options for you to choose from on the next screen. In a Windows 10 system, GPT will be selected by default, and we recommend you leave it that way because GPT has benefits over MBR. Click OK.
Step 4 Create A Volume
Now that your drive is initiated, you can create a volume that is readable by Windows. To do just that, right-click on the drive in the menu, and select New Simple Volume from the menu that appears.
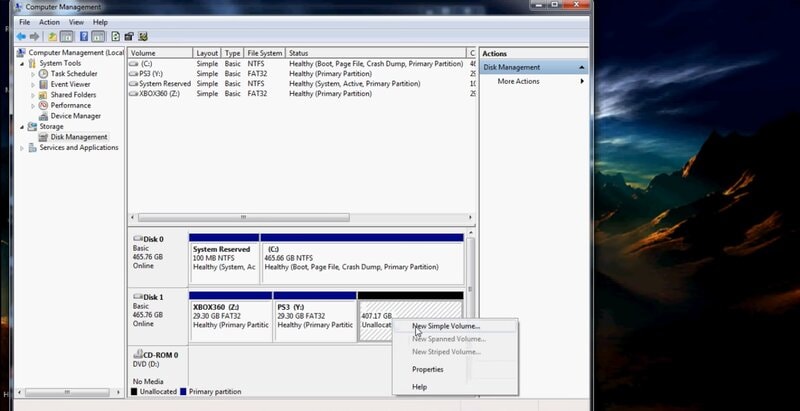
A "New Simple Volume Wizard" will be launched shortly.
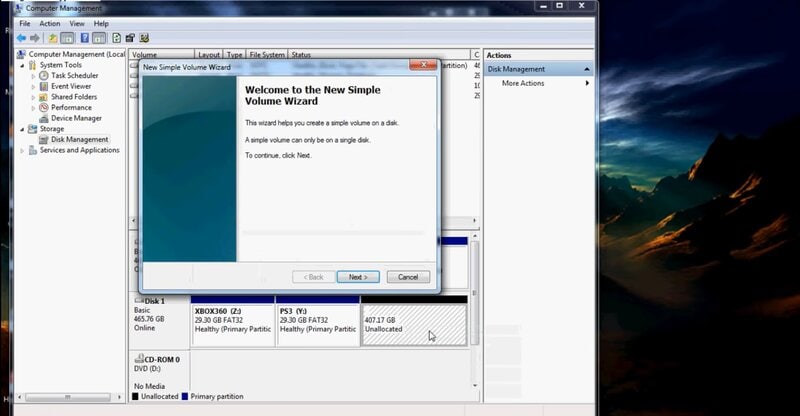
Step 5 Fomat The Drive
The new simple volume wizard will format your hard drive in the file system of your choice. Click Next. From the "File System" drop-down, select NTFS and also choose the partition size.
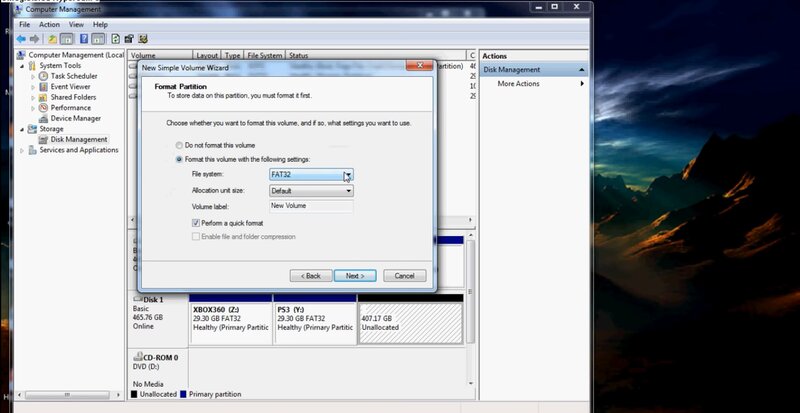
Again, click Next and follow the prompts ahead. Finally, hit Finish to complete the formatting process.
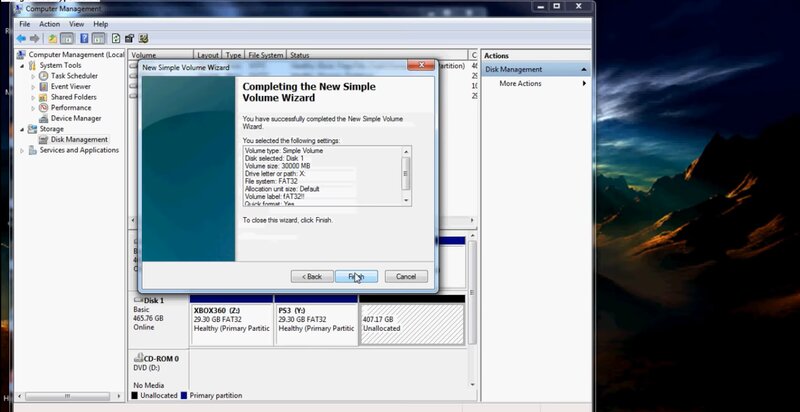
You will be immediately notified that an external hard drive is connected to your Windows PC.
Conclusion
If you think you can use your game console drives on your PC without formatting, you are wrong. After you add an external drive to your Xbox One to store games, it cannot directly work on a PC. This is because all of the Xbox game data is stored on its hard disk. Thus, Xbox formats it and changes how it works to assure users don't pirate the Xbox One's software or access important data on a PC. So, take advantage of our Xbox one external hard drive format tutorial.
While if you are looking for a formatting tool to help you format your Xbox One internal drive, AOMEI Partition Assistant is the tool for you.
What's Wrong with Drive
- Recover Your Drive
- Restore formatted drive
- Recover undetected drive
- Retrieve WD drive data
- Get files from external drive
- Wiped data can be recovered
- Recover data from dropped hard drive
- Fix Your Drive
- What if drive not showing up?
- Hard drive won't boot? Fix it
- What if a disk unallocated?
- Deal with hard drive crash
- Repair disk & recover data
- Fix Toshiba external drive not working
- Fix a broken hard drive
- Format/Wipe Drive
- Know Your Drive

 ChatGPT
 Perplexity
 Google AI Mode
 Grok
Grok


Theo Lucia
chief Editor