Managing partitions in Linux is a crucial skill for system administrators and power users alike. Whether you're setting up a new system, optimizing storage space, or troubleshooting disk issues, understanding how to manage partitions Linux effectively can make the difference between a well-organized system and a chaotic one. This comprehensive guide will walk you through everything you need to know about Linux disk partition management, from basic concepts to advanced techniques.
As systems become more complex and storage needs change, understanding how to manage partitions in Linux is more important than ever. Whether you're using a partition manager on an Ubuntu system or another Linux distribution, the concepts and tools we'll cover will help you keep your system running smoothly and your data well-organized.
Try Wondershare Recoverit to Recover Lost Linux Data

We'll look at different Linux tools and methods for managing disk partitions, including logical volume management, so you can have full control over your storage setup.
In this article
Part 1: Overview of Partitions Linux
Partitions in Linux are essential for organizing and managing data efficiently. They allow for better performance, enhanced security, and easier system maintenance, making them a crucial aspect of Linux system administration.
Primary Partitions
- Maximum of four per disk
- Can be bootable
- Used for operating system installation
- Essential for system startup
Extended Partitions
- Acts as a container for logical partitions
- Only one extended partition per disk
- Cannot store data directly
- Helps overcome the four-partition limit
Logical Partitions
- Created within extended partitions
- Commonly used for data storage
- Flexible for organizing different types of data
LVM (Logical Volume Management) Partitions
- Dynamic volume management
- Allows for flexible storage allocation
- Can create logical volume in Linux easily
- Supports online resizing of volumes
Part 2: Why Is It Important to Manage Partitions In Linux?
Here are a few reasons why it's important to manage partitions in Linux:
- Optimal Performance: Proper partition management can enhance the speed and efficiency of your system. By segregating operating system files from user data, or placing frequently accessed data on faster sections of a disk, you can ensure smoother and faster operations.
- Data Organization: Partitioning allows users to categorize data based on type, purpose, or importance. This makes it easier to manage, locate, and organize files, leading to a more streamlined and efficient workflow.
- Data Security: Separating sensitive data into different partitions can significantly enhance security. It allows for better control over access permissions and can help protect critical information from unauthorized access or accidental deletion.
- Backup and Recovery: Managing partitions simplifies the process of backing up and recovering data. You can focus on specific partitions, ensuring that essential data is protected without having to back up the entire disk.
- Dual Booting and System Upgrades: Partitioning is essential for running multiple operating systems on the same machine (dual booting). It also facilitates system upgrades, as you can install new versions of an OS on a separate partition without affecting your data.
- Ease of Use: Proper partition management makes system administration tasks easier. Whether you're recovering a corrupted file system, reinstalling an operating system, or organizing your files, having well-managed partitions can save time and reduce complexity.
Managing partitions in Linux is crucial for maintaining a healthy, efficient, and secure system, making daily operations smoother and more reliable.
Part 3: Methods for Managing Partitions In Linux
Effectively managing partitions in Linux is key to optimizing system performance, ensuring data security, and simplifying system maintenance. Here's how you can do it.
Method 1. Via FDisk
FDisk is a classic tool of disk management for Linux that offers robust partition management capabilities through a text-based interface. It allows users to create, modify, delete, and organize disk partitions effectively. With FDisk, administrators can manage the layout of storage devices, ensuring optimal use of disk space and maintaining a well-organized file system.
Despite its powerful features, FDisk remains user-friendly, providing a straightforward approach to managing disk partitions on Linux systems.
Here's a step-by-step guide:
Step 1: To view the current partition table, use the command:
sudo fdisk -l

Step 2: To start managing partitions, open fdisk for a specific disk (replace /dev/sdX with your disk identifier):
sudo fdisk
Step 3: To create a new partition, use the n command:
n
You will be prompted to choose the partition type (primary or extended), the partition number, and the start and end sectors.
Here are some additional commands you can try:
Delete a Partition: To delete an existing partition, use the d command and select the partition number you want to delete.

Change Partition Type: To change the type of partition, use the t command, select the partition number, and then enter the new type code.
Write Changes: After making changes, use the w command to write the changes to the disk and exit fdisk.
Quit Without Saving: If you want to exit without saving changes, use the q command.
By following these steps, you can effectively manage your disk partitions using fdisk in Linux.
Method 2. Via Parted Command
Parted is a modern partition manager supported by Ubuntu and other Linux distributions. It offers advanced features, including support for GPT (GUID Partition Table), making it suitable for managing large disks and complex partition layouts. Parted allows users to create, resize, and manipulate partitions with ease, providing a powerful tool for efficient disk management.
Managing partitions in Linux using the parted command is straightforward and efficient. Here are the steps:
Step 1: List Available Disks: Start by listing all available disks:
sudo parted -l

Step 2: Start Parted: Select the disk you want to manage (replace /dev/sdX with your disk identifier):
sudo parted
Step 3: View Partition Table: Within parted, you can view the current partition table:
(parted) print
Step 4: Create a New Partition: To create a new partition, use the mkpart command followed by the partition type (primary, extended), file system type, and start and end points:
(parted) mkpart primary ext4 0% 50%
Step 5: Set Partition Flags: Set flags on the partition if needed (e.g., boot, lvm):
(parted) set 1 boot on
Step 6: Resize a Partition: To resize an existing partition, use the resizepart command:
(parted) resizepart 1 100%
Step 7: Quit Parted: Once done, exit parted by typing:
(parted)
These steps should help you manage your partitions effectively using parted in Linux.
Part 4: How to Recover Data From Lost Partitions on Linux?
When disaster strikes and partitions become corrupted or accidentally deleted, Recoverit provides a reliable solution for data recovery. This powerful tool is designed to restore lost files, photos, videos, and other important data from various storage devices, including hard drives, SSDs, USB flash drives, and memory cards.
Whether you're dealing with accidental deletion, virus attacks, or system crashes, Recoverit offers a dependable way to recover your critical data and restore peace of mind.
Here are the simple steps to recover data from lost partitions on Linux:
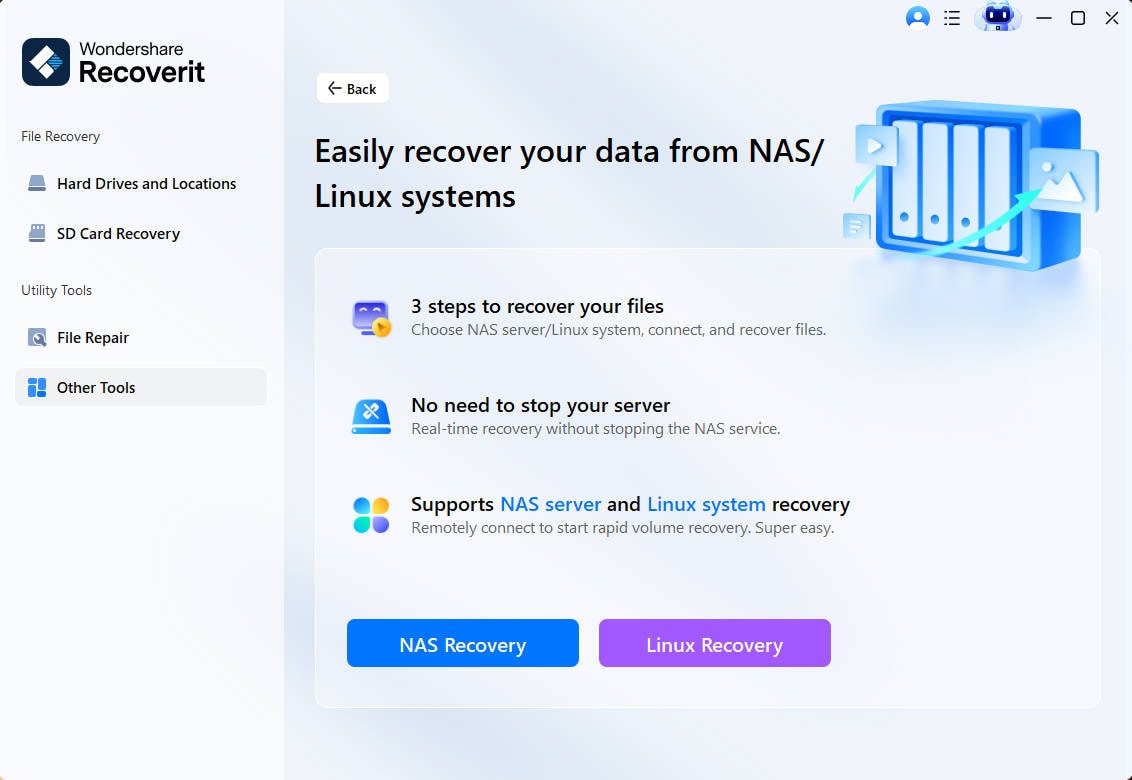
Step 1: First, install Recoverit on your PC. Open the program and select the "NAS and Linux" option from the left side of the main interface. Click on "Linux Recovery" to proceed.

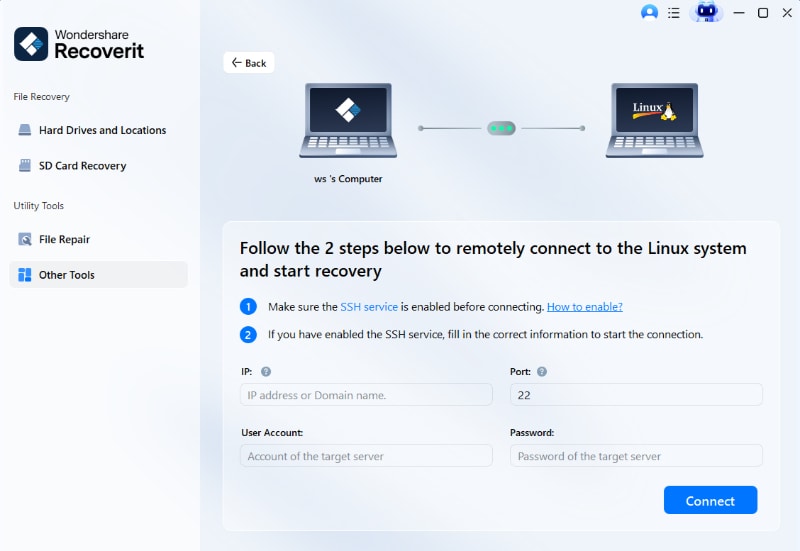
Step 2: A new window will appear. Enter the necessary information to establish a remote connection. Once you’ve entered the details, click on the blue "Connect" button. Wait for the connection to be established. Once connected, Recoverit will automatically scan for lost files on your Linux computer.

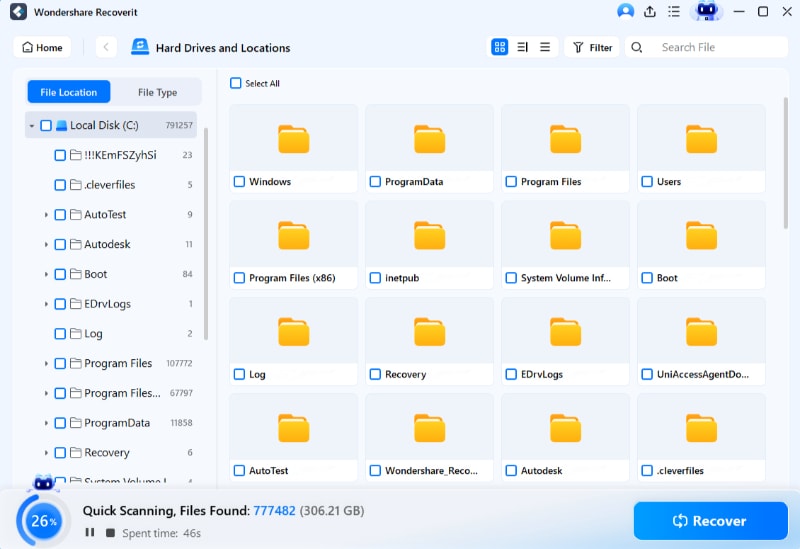
Step 3: The scanning process may take some time depending on the data size. The progress will be shown at the bottom of the screen. You can stop the scan anytime once you find the files you want to recover.

Step 4: After the scan is complete, preview the files to confirm they are the ones you want. Click on the "Recover" button to save the files on your Linux computer. The software will prompt you to choose a save location. Make sure to select a different path than where the original files were lost. Click "Recover" to save your restored data.

Part 5: Tips for Successful Disk Management for Linux
Here are some tips for successful disk management in Linux:
- Plan Your Partitions: Before you start, plan how you will partition your disk. Consider creating separate partitions for the operating system, user data, and swap space to optimize performance and organization.
- Use the Right Tools: Utilize reliable disk management tools like GParted, fdisk, or parted. These tools offer a range of functionalities to help you create, modify, and manage partitions efficiently.
- Regular Backups: Always back up your data before making any changes to disk partitions. This ensures you can recover your data in case something goes wrong during the partitioning process.
- Monitor Disk Usage: Keep an eye on your disk usage to avoid running out of space. Use tools like df and du to check disk space and manage it effectively.
- Optimize Swap Space: Ensure you have adequate swap space to improve system performance. The recommended swap space is typically 1.5 to 2 times your RAM, but this can vary based on your needs.
- Maintain File Systems: Regularly check and maintain your file systems using tools like fsck. This helps prevent data corruption and ensures the integrity of your partitions.
- Secure Sensitive Data: Use encryption for partitions that store sensitive data. This adds an extra layer of security and protects your data from unauthorized access.
- Stay Updated: Keep your disk management tools and Linux distribution up to date. Regular updates often include performance improvements and security patches.
By following these tips, you can ensure efficient and effective disk management in your Linux system, leading to improved performance and data organization.
Conclusion
Managing partitions in Linux is a fundamental skill that can significantly impact system performance, security, and reliability. From basic partition management to advanced logical volume management, the tools and techniques covered in this guide provide a solid foundation for maintaining a well-organized storage system. Whether you're using a partition manager Ubuntu-based system or working with other distributions, these principles remain consistent and valuable.
Remember that successful disk management for Linux requires regular maintenance, careful planning, and a good understanding of your system's needs. By following the guidelines and best practices outlined in this guide, you'll be well-equipped to handle any partition-related tasks that come your way.
FAQ
-
Q: What is the best Linux disk partition tool for beginners?
GParted is widely considered the most user-friendly Linux disk partition tool for beginners. It provides a graphical interface that makes it easy to visualize and modify partitions while offering powerful features like partition resizing, formatting, and file system checks. It's particularly popular as a partition manager Ubuntu users rely on for its intuitive interface and comprehensive functionality. -
Q: How do I create logical volume in Linux?
To create logical volume in Linux, first install LVM2 package, then initialize physical volumes using pvcreate, create a volume group with vgcreate, and finally create logical volumes using lvcreate. This process allows for flexible storage management and easy expansion of storage space as needed. The logical volume management system provides powerful tools for managing storage in enterprise environments. -
Q: How often should I check and maintain my Linux partitions?
Regular partition maintenance should be performed monthly for optimal system health. This includes checking disk usage, running file system checks (fsck), monitoring SMART data, and reviewing system logs for potential issues. For systems with heavy usage or critical data, more frequent checks may be necessary. Remember to backup important data before performing any maintenance tasks.


 ChatGPT
 Perplexity
 Google AI Mode
 Grok
Grok


