
 TL;DR:
PhotoRec is a free, command-line Linux utility that recovers lost files from severely damaged or reformatted drives by targeting underlying data blocks instead of the file system, whereas Wondershare Recoverit serves as an alternative for users needing to restore encrypted data or access crashed computers.
● You must install the "testdisk" package (e.g., executing sudo apt-get install testdisk for Debian/Ubuntu or sudo dnf install testdisk for Fedora) to obtain PhotoRec, and initialize the recovery process using the sudo photorec command.
● By bypassing the file system structure, PhotoRec can safely extract data from corrupted ext2/ext3/ext4 or HFS+ partitions using read-only access, but it lacks the ability to search for specific items and will automatically recover all detected files into a single folder.
● Wondershare Recoverit is the recommended alternative if you require a point-and-click graphical interface, need to retrieve compressed or encrypted files, or must establish a remote connection to salvage data from a crashed Linux device.
Ask AI for a summary
 ChatGPT
 Perplexity
 Gemini
 Claude
 Grok
Grok
Have you ever accidentally deleted files or photos on your Linux computer? This tutorial will look at how to use PhotoRec to recover deleted files in Linux. We previously discussed how to recover deleted files using TestDisk for Linux, and the same company developed the PhotoRec utility.
PhotoRec is well-known for its effectiveness in recovering data from other devices, such as a digital camera, and its compatibility with common file systems. Continue reading this post to understand better how to install PhotoRec on Linux. This article also introduces the best alternative to Photorec that can help you recover any data.
Part 1. What Is PhotoRec for Linux and What Can It Do?
PhotoRec is a Linux file data recovery program that recovers lost files such as video, archives, and documents from hard disks, CD-ROMs, and lost photos (hence Photo Recovery) from digital camera memory. Because PhotoRec ignores the file system and goes after the underlying data, it will still work even if the file system on your media has been severely damaged or reformatted.
PhotoRec for Linux is a free multi-platform open-source application distributed under the GNU General Public License. PhotoRec is a companion application to TestDisk, which is used to recover lost partitions on a wide range of file systems and to make non-bootable disks bootable again. PhotoRec uses read-only access to the drive or memory card from which you are about to recover lost data for added security.
Functions of PhotoRec for Linux
Files are stored in data blocks, also called clusters, under Windows. After being initialized during file system formatting, the cluster or block size remains constant at various sectors. Most operating systems attempt to store data contiguously to minimize data fragmentation. Because the seek time of mechanical drives is essential for writing and reading data to/from a hard disk, it is critical to keep fragmentation to a minimum.
In an ext3/ext4 file system, for example, the names of deleted files remain, but the place of the first data block has vanished. When a file is deleted, the metadata associated with that file is erased. It indicates that the information is still on the file system until some or all of it is replaced by new file information.
PhotoRec for Linux first tries to determine the data block size to recover these deleted files. If the file system is not damaged, this value can be read from the superblock or volume boot record. Otherwise, PhotoRec scans the media sector by sector while looking for the first ten files, using the locations of those files to determine the block/cluster size. After determining the block size, PhotoRec reads the media block by block. Each block is compared to a signature database included with the program and has expanded throughout PhotoRec's development regarding the types of files it can recover.
Compatibility of PhotoRec
PhotoRec is compatible with the following Linux operating systems:
- Linux
- FreeBSD
- NetBSD
- OpenBSD
- Sun Solaris
PhotoRec for Linux works even when the file system is severely damaged since it overlooks the file system. It can at least restore deleted files from:
- ext2/ext3/ext4 filesystem
- HFS+
Part 2. How To Install PhotoRec on Linux
Execute the appropriate command listed below for your version to install Testdisk:
Install PhotoRec on Debian/Ubuntu/Linux Mint
$ sudo apt-get install testdisk
Install PhotoRec on RHEL/CentOS/Fedora
$ sudo yum install testdisk
Install PhotoRec on Fedora 22+
$ sudo dnf install testdisk
Install PhotoRec on Arch Linux
$ pacman -S testdisk
Once the installation process is completed, you can download and run Photorec with the following command:
sudo photorec
Part 3. How To Recover Deleted Photos and Files on Linux Using PhotoRec
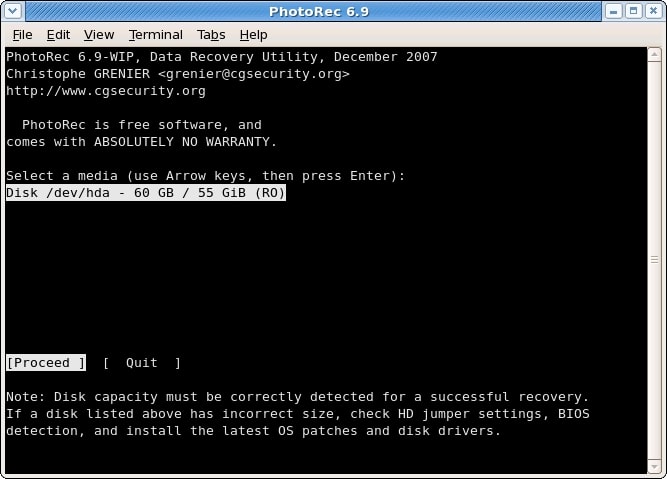
Step 1. Select Storage Disk
Running the Photorec will list the available storage media on your Linux computer. To select the disk containing the lost files, use the Up/Down arrow keys. Then press Enter to continue.
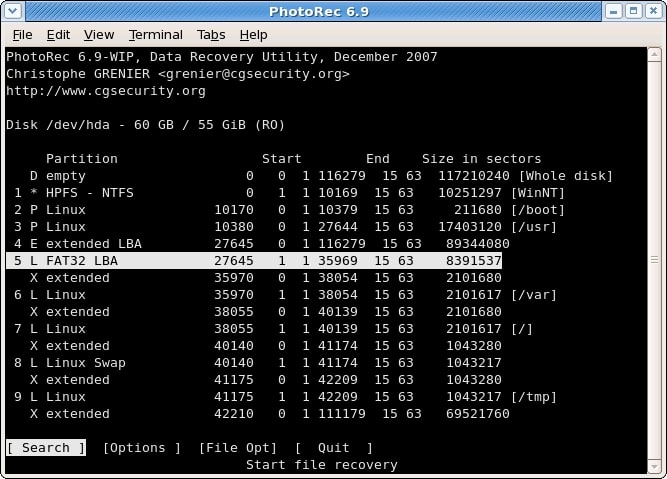
Step 2. Select Source Partition
In the next screen, you will be asked to select the partition on which you lost your files. Use the Up/Down arrow keys to choose the partition and then click Search to begin the recovery process. You can also use the Left/Right arrow keys to go through Options for changing the options (Step 3), and File Opt to list the file types recovered by PhotoRec (Step 4).
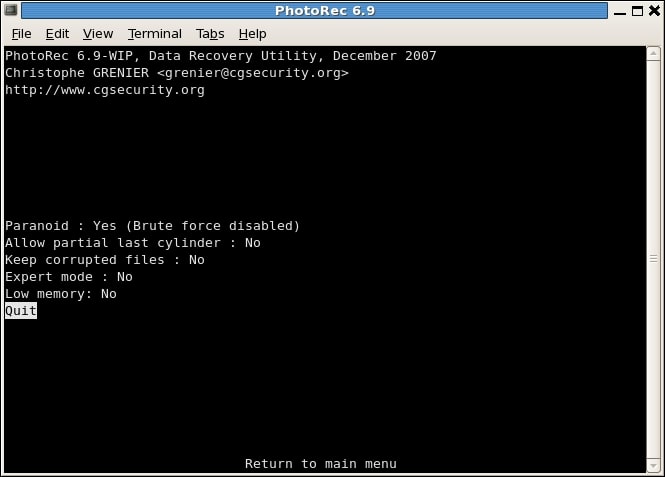
Step 3. PhotoRec Options
The PhotoRec options include the following:
- Paranoid: By default, recovered files are verified, while invalid files are rejected.
- Allow partial last cylinder: It changes how the disk geometry is determined; this should affect only non-partitioned media.
- Expert mode: The user can force the file system block size and offset.
- Keep corrupted files: This option keeps files even if they are invalid or damaged.
- Low memory: If your device does not have enough memory and crashes during recovery, select this option.
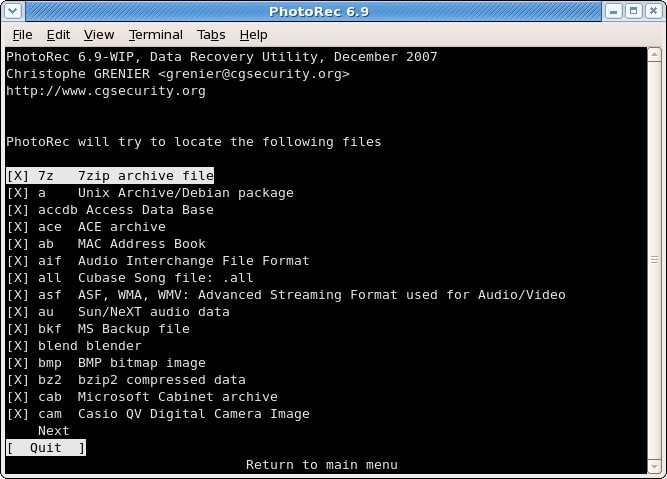
Step 4. Select the File Type to Recover
Enable or disable the recovery of specific file types in File Opt.
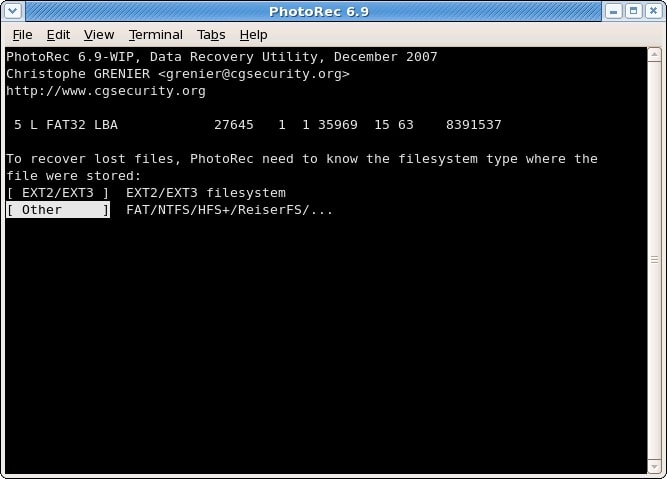
Step 5. Select File System Type
PhotoRec comprehends the data block distribution after a partition has been identified and confirmed with Search. Choose Other unless it is a Linux ext2/ext3/ext4 filesystem.
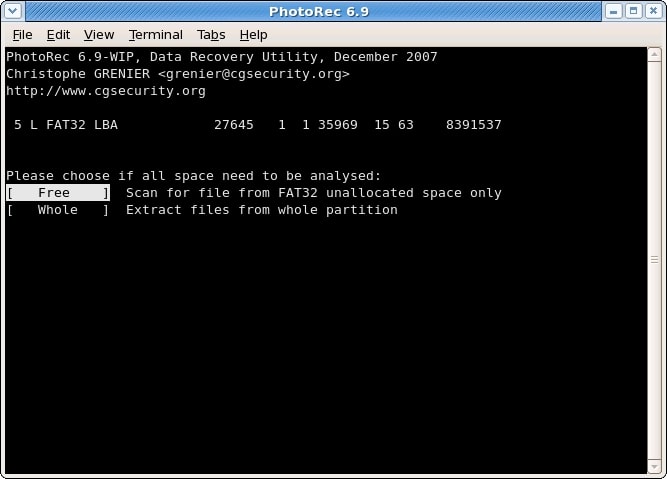
Step 6. Carve the Partition or Unallocated Space Only
PhotoRec for Linux can search for files in various locations: from the entire partition or a specific partition. Choose the option per your need.
Step 7. Select Where Recovered Files Should be Written
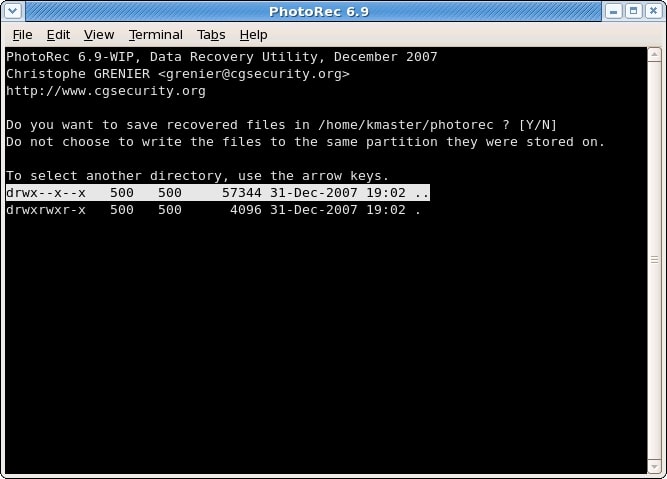
Now select where you want to store the recovered files. To access the drive list, use the arrow keys to select. Then, press Enter to choose the drive of your choice. When you get the anticipated location, verify with Yes.
Step 8. Recovery in Progress
PhotoRec is ready to restore deleted files from your Linux device, which may take a while, depending on the number of file types you've chosen. The number of recovered files is constantly updated. You can access the files even if the recovery is not complete.

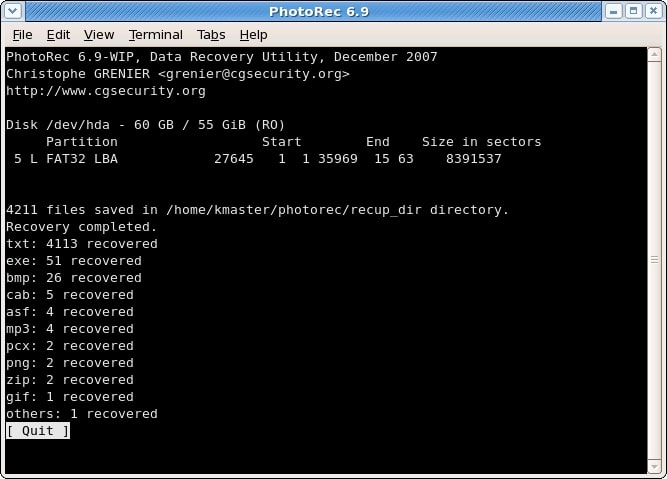
Step 9. Recovery Is Completed
A summary is displayed once the recovery is complete. If you interfere with the recovery, you will be prompted to resume it the next time PhotoRec is launched.
Part 4. The Best Alternative to PhotoRec for Linux Data Recovery
PhotoRec is a powerful Linux data recovery tool that can recover lost or deleted files from various storage devices. However, it has some limitations, such as its inability to recover files from a crashed Linux computer or encrypted storage.
In light of these limitations, an alternative data recovery tool that is highly recommended is the Wondershare Recoverit Linux Recovery. This tool offers a broader range of recovery options and can recover a wider variety of file types, including compressed or encrypted ones. Furthermore, it has a user-friendly interface, which makes it easy to use even for those who need to be tech-savvy.

Wondershare Recoverit - Your Safe and Reliable Linux Recovery Software
5,481,435 people have downloaded it.
Recovers lost or deleted documents, photos, videos, music, emails, and other 1000+ file types effectively, safely, and completely.
Compatible with all mainstream Linux distros, including Ubuntu, Linux Mint, Debian, Fedora, Solus, Opensuse, Manjaro, etc.
Assists in 500+ data loss scenarios, such as deletion, disk formatting, OS crash, power outage, virus attack, lost partition, and many more.
The simple point-and-click interface allows you to recover data from Linux hard drives in just a few clicks.
Works through a remote connection. You can recover lost data even when your Linux device is crashed.
Follow these three simple steps to recover any data with Wondershare Recoverit Linux Recovery.
Step 1. Choose Linux Recovery From the Menu
Startup Wondershare Recoverit. Then, select NAS and Linux as the primary option and click Linux Recovery.

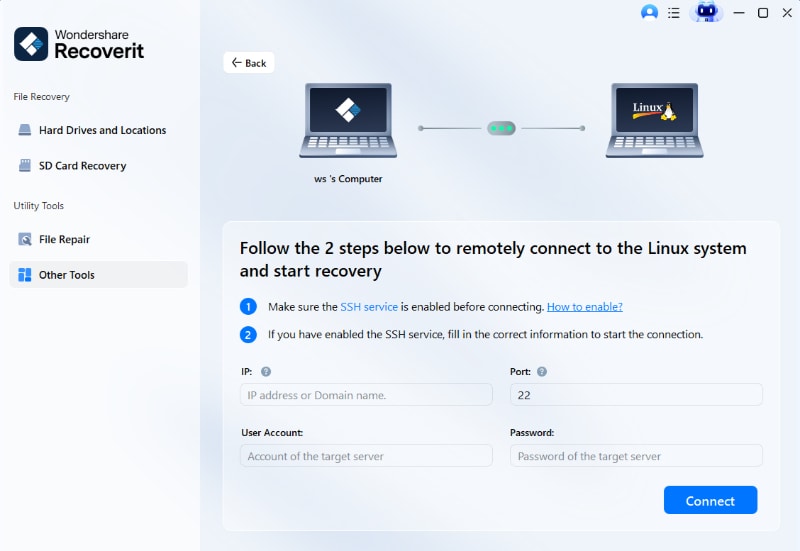
Step 2. Establish a Remote Connection
Fill out the necessary information to establish a remote connection between the Linux data recovery software and your device. When you're finished, click Connect.
Recoverit will then run an automatic scan to look for lost files.
Step 3. Preview and Recover Files
The length of the scanning process will depend on how much data is being scanned. The status of the scanning is shown on the bottom bar. Once you've found the file you wish to recover, you can stop scanning.

When the scanning is complete, Recoverit lets you preview the files to ensure they are the ones you want to recover. Tap Recover to start the recovery process with Wondershare Recoverit.

The software will direct you to choose a location to save the recovered files. Click Recover to get the restored data. Pick a different file path than the one where you previously lost it.

For Windows Vista/7/8/10/11
For macOS X 10.10 or later
Part 5. Bonus Tips - How Does Data Recovery Work?
Why Can Deleted Files Be Recovered?
Have you ever noticed that saving a file to a hard drive takes time while removing it is instantaneous? Let's start by understanding that.
Data is kept in blocks when it is stored on a hard drive. Each block has a portion of the data in it. Typically, the metadata for the file in question is contained in the first block. The hard drive's writing speed is used to write each data block one at a time. Nevertheless, the first block of a file (which contains the metadata) is removed when it is erased. As a result of the file's missing metadata, the operating system no longer recognizes it and views the blocks as available for writing new data.
The role of recovery tools is at play here. The tools' task is to make the metadata accessible for the operating system to read since only the metadata is lost. They locate associated blocks by reading the hard drive sectors and blocks one at a time. The recovery tools recreate the metadata once all the linked blocks have been located.
And that's how you can get a deleted file back.
How Does PhotoRec Work?
PhotoRec analyzes data sectors on the hard disk, similar to other file recovery programs, to determine the extent of the data. PhotoRec starts the data recovery process by seeking neighboring data blocks and reconstructing the meta once it determines the data size and confirms that the hard disk and data are intact (not defragmented or overwritten).
The tool will return all detected files and save them in a folder because it cannot search for a specific file. The necessary file can then be restored after sorting through the files. You can restore all of the files still on your hard disk once the process is complete.
The Bottom Line
That's all! You now understand how to use PhotoRec to recover deleted files or data from your computer or external hard drive. However, if you only want the best outcomes, you can also employ Wondershare Recoverit Linux Data Recovery. It is much more convenient to use and more effective.


