

 TL;DR:
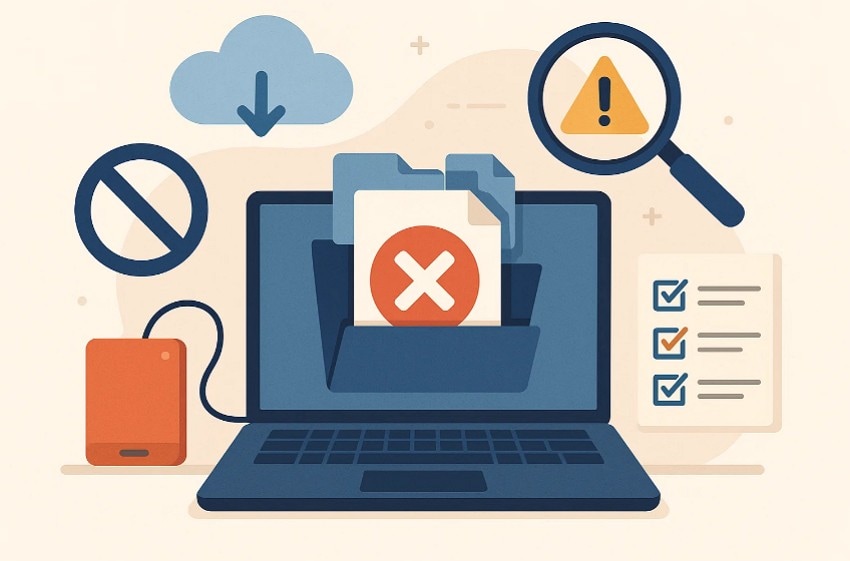
Recovering files deleted by the Linux rm command is possible only if you immediately stop all disk writes to prevent data overwriting and scan the unallocated space using specialized recovery tools.
● Immediately unmount the affected partition or shut down the system, and never save recovered data back to the same drive to prevent permanent destruction of the deleted blocks.
● For command-line operations, use Extundelete to restore data via ext3 and ext4 journal records, or use PhotoRec and Foremost to scan raw disk sectors for file signatures when filesystem metadata is damaged.
● Users avoiding command-line operations can use Wondershare Recoverit, a commercial GUI tool that connects to the Ubuntu system via SSH to provide file filtering and visual previews.
Ask AI for a summary
 ChatGPT
 Perplexity
 Gemini
 Claude
 Grok
Grok
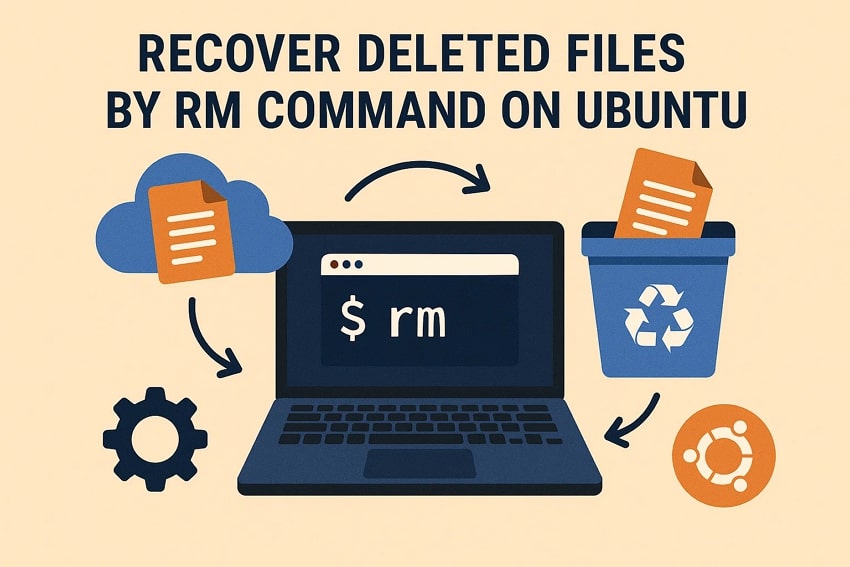
The most frequent problem Ubuntu users face is the accidental loss of valuable information using the RM command. As the RM command does not transfer files to a trash folder but permanently destroys files, recovery is not an easy task and can be time sensitive. The first step in avoiding a further loss of data is to learn how the command operates.
This guide explains how to recover deleted files in Linux using rm through practical, command-line methods. You will learn what happens during deletion, which tools can scan your disk, and how to restore removed data safely on Ubuntu systems.
Try Recoverit to Perform RM File Recovery
 Security Verified. 3,591,664 people have downloaded it.
In this article

Part 1. What Is the RM Command? How To Use the RM Command?
The RM command deletes files by removing them directly from the filesystem. It clears the file entry fast, which can cause trouble when users slip. The command supports simple actions, but some options delete whole folders and their contents. Most users run RM to remove one or several files quickly.
How to Use the RM Command?
- Apply the command "rm file.txt" to remove a single targeted file safely and directly.
- Run the "rm file1 file2" when needing to delete multiple selected files in one action.
- Execute "rm -r folder/" to eliminate an entire directory along with every contained item.
- Employ "rm -f file" when deletion must proceed without confirmation or system warnings.
- Utilize "rm -i file" to request user confirmation before any file removal occurs.
Where Do Files Go When Running the RM Command
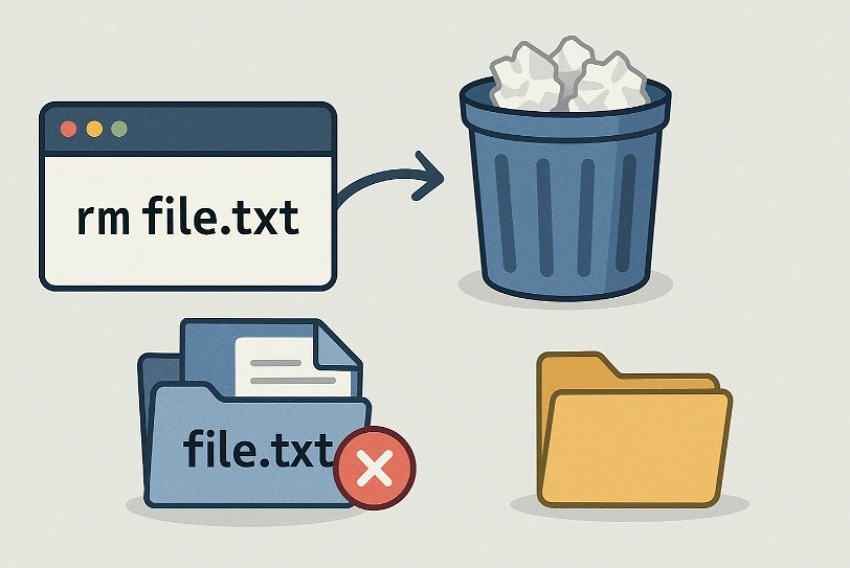
When the RM command deletes a file, it removes the link that points to stored data. Therefore, the system marks the space as free, but the data still sits there briefly. Users cannot see the file because its entry no longer exists in the folder. This makes recovery difficult on systems that write new data often.

Moreover, some tools scan the disk to find pieces of old data before overwriting. These attempts work only when users stop writing new files after deletion occurs. Timing becomes key when performing urgent linux rm recover efforts on busy machines. Above all, knowing this behavior helps users act faster during accidental removals.
Does RM Permanently Delete Files on Linux?
Yes, using the RM command usually removes a file for good because Linux does not place deleted items in a trash folder. Once RM runs, the system erases the file's entry from the filesystem, making normal recovery methods useless. This is why this command is considered permanent and demands careful handling.
However, some deleted data can still be restored in special cases. When RM command removes a file, Linux only marks its space as free and leaves the data untouched for a short time. If the blocks remain unwritten, tools made for linux undelete rm tasks may recover the file. When new data replaces those blocks, recovery fails and becomes completely impossible.
Why RM Command Deletion Is Permanent by Default
The RM command was built for speed and had no safety system when it was created. It removes files at the filesystem level instead of placing them in a trash area. This older design supports scripts, automation, and fast cleanup in many Linux setups. The command does not warn users unless special options are enabled beforehand.
After deleting entries, it frees space so the system can reuse it quickly. This simple approach helps performance but increases risk for new command-line users. Understanding RM's design helps users avoid sudden data loss on important projects. Safer habits reduce mistakes and limit future linux recover rm file cases.
Part 2. 5 Immediate Steps to Take After Accidental Deletion
Yes, deleted files can sometimes be recovered in Linux, even after running the command. When a file is deleted with RM, Linux removes its reference but may leave its data on disk briefly. This allows certain tools to attempt linux restore rm file operations by scanning free space. Recovery succeeds only if the blocks stay untouched, as TRIM or heavy disk activity can overwrite data and prevent restoration.
Key Rules Before You Try Recovery
- Stop all writes immediately, because saving new files or running heavy processes can overwrite the deleted data and destroy recovery chances.
- Avoid using the affected partition and prevent any applications from writing logs or temporary files to it.
- Unmount the filesystem or shut down the system if possible, then continue recovery from a live USB or another machine.
- Never save recovered files back onto the same partition, as this can overwrite remaining recoverable data.
Before starting recovery, you need the right tool because each method works differently with deleted data. The following options guide you through reliable ways to restore files removed with rm:
1. Recover RM Files Using Wondershare Recoverit (GUI Tool)
Recoverit is a commercial graphical recovery tool that scans Linux disks and NAS locations to restore deleted data, including files removed with rm. It offers a clear point-and-click interface, file previews, and deep scanning modes that guide users through each step. Moreover, it avoids complex commands, making recovery accessible for beginners working on Linux systems.
Furthermore, Recoverit supports selective restoration, allowing users to save recovered items to another drive safely. This protects remaining data and reduces overwrite risks during recovery. Its design suits those who want to recover rm files in ubuntu tasks without dealing with low-level filesystem operations. Consequently, Recoverit becomes an ideal starting tool for non-experts seeking reliable results.
Key Features
- File Filtering: Helps users narrow huge scan results by type or size, making deleted items easier to locate.
- Partition Recovery: Restores data from damaged, formatted, or corrupted partitions, supporting cases far beyond simple rm deletions.
- Session Resume: Saves long scan sessions for later continuation, reducing time and effort during large recovery tasks.
Guide to Recover Deleted Files by RM Command on Ubuntu with Recoverit
Let's walk through the step-by-step guide below to recover files removed with rm:
- Access the Linux Recovery Mode
First, navigate to "Other Tools" to further choose "Linux Recovery" to start the recovery process.
- Connect to the Ubuntu System via SSH
Next, enter the "IP address," "Port (22)," "Linux username," and "Password" of the target Ubuntu machine. After filling in the details, click "Connect" to allow Recoverit to access the disk for scanning.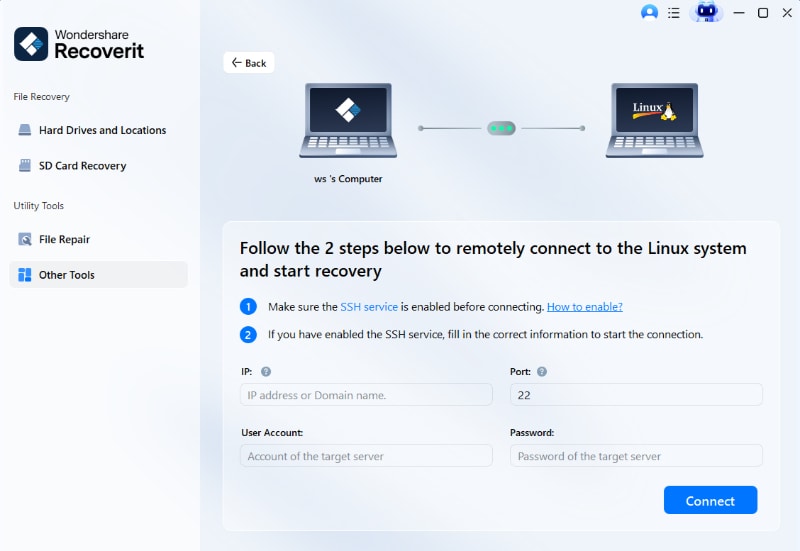
- Preview and Restore RM-Deleted Files
Lastly, preview photos, videos, documents, or other items, select what you want to recover, and press the "Recover" button.
2. Recover RM Files in Linux Using TestDisk (CLI Tool)
This tool is a powerful command-line utility designed for repairing partitions. It also includes undelete features for supported formats, making it effective to recover files removed with RM. Moreover, its forensic-level capabilities help users handle complex recovery cases beyond standard tools. Therefore, it becomes ideal for linux restore rm file situations requiring advanced repair. Now, let's move into the steps below for using TestDisk for Linux:
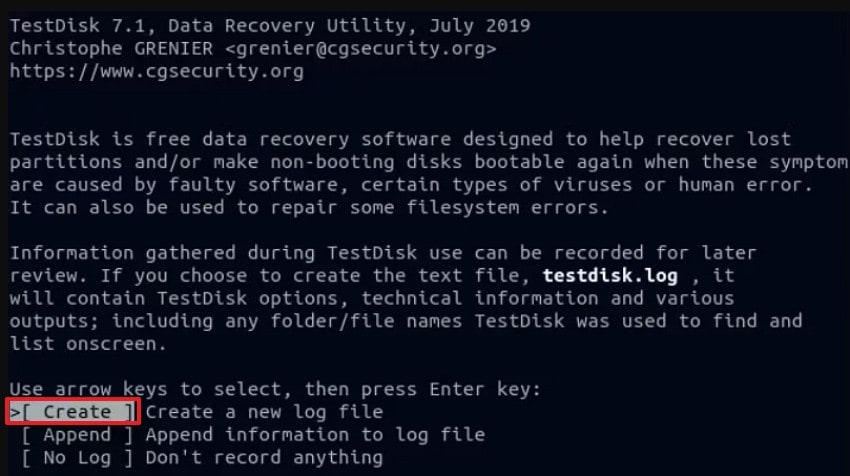
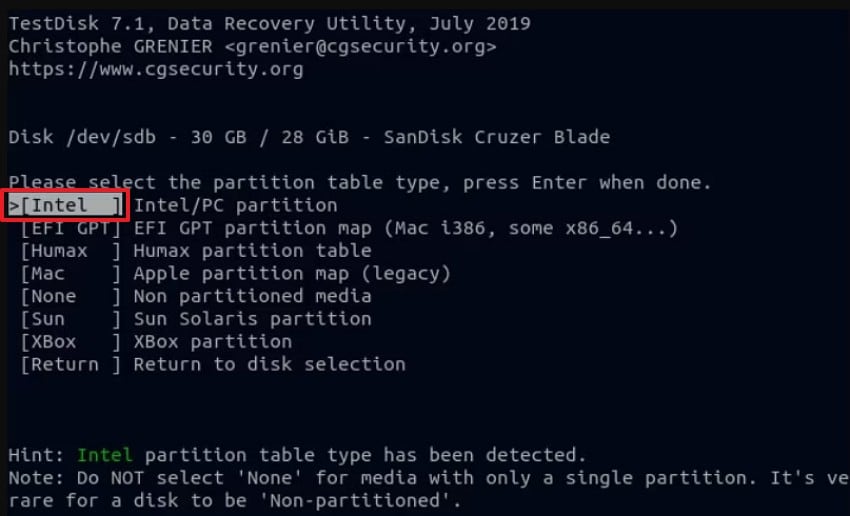
- First, open TestDisk using the terminal and run "sudo testdisk." Next, on the first screen, select "Create" to generate a new log file and press "Enter."
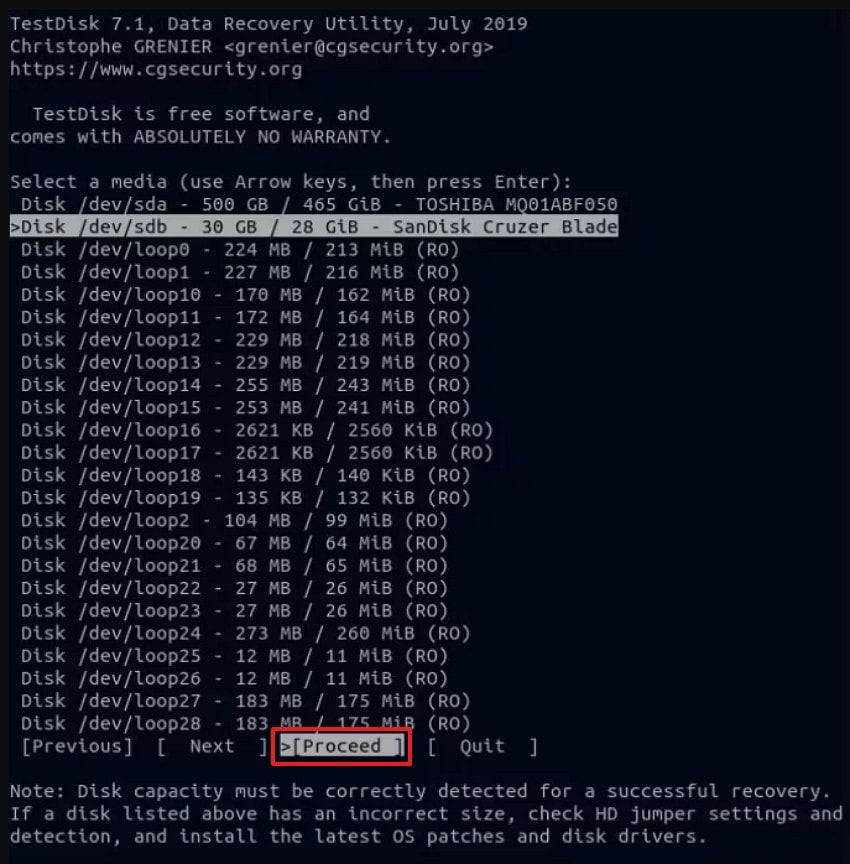
- After that, TestDisk will show all available drives, where you have to choose the disk containing the deleted files using the arrow keys. Upon selecting a disk, navigate to the "Proceed" option and press "Enter."
- Once TestDisk automatically detects the partition table, select "Intel" (or the appropriate option for your system) and press "Enter" to continue.
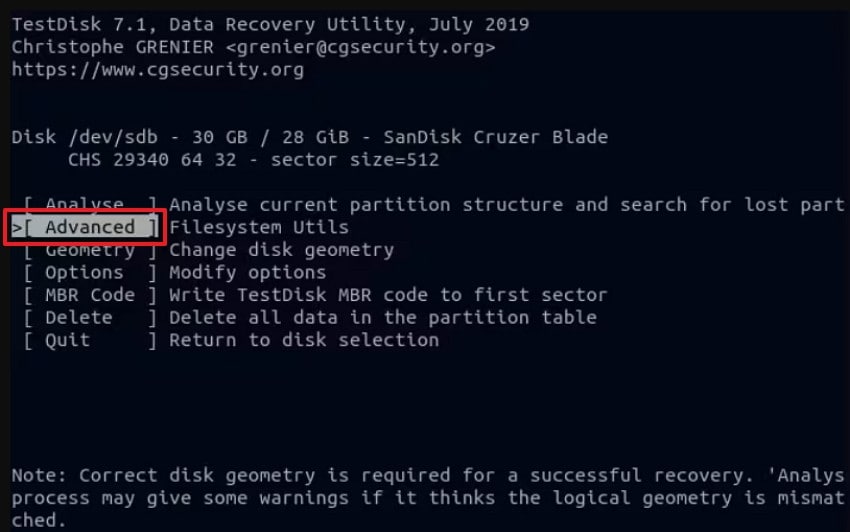
- After that, navigate to "Advanced" to access filesystem utilities and press "Enter." This section allows you to run file undelete operations on the selected partition.
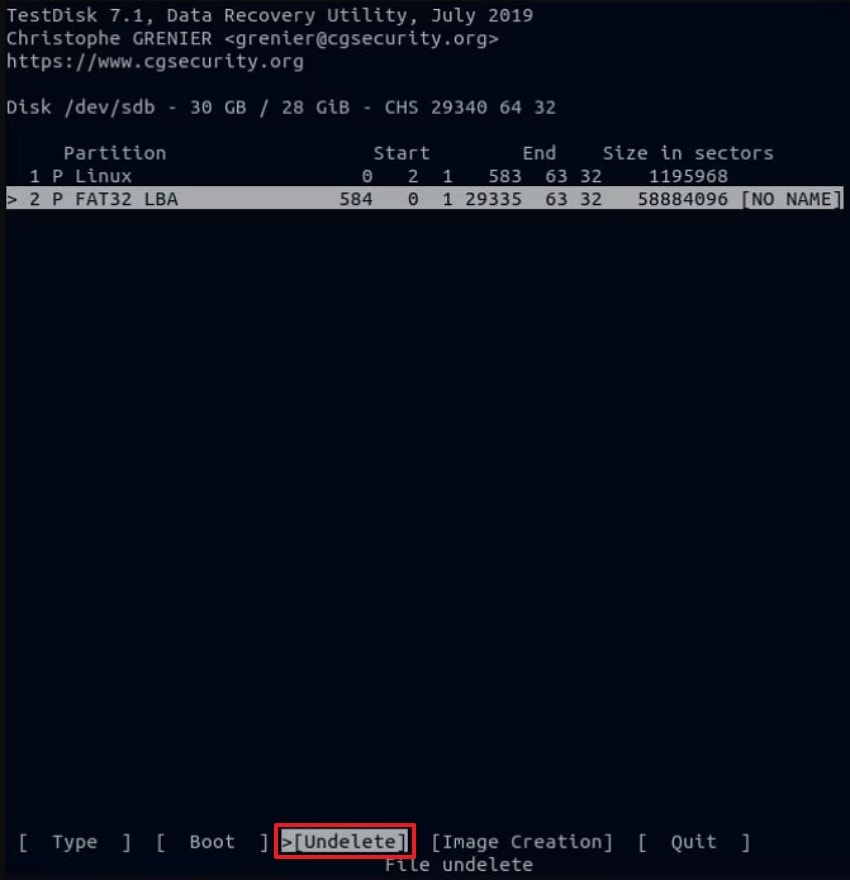
- Next, choose the correct partition and select "Undelete" from the bottom menu. Then, press "Enter" to load all recoverable deleted files on that partition.
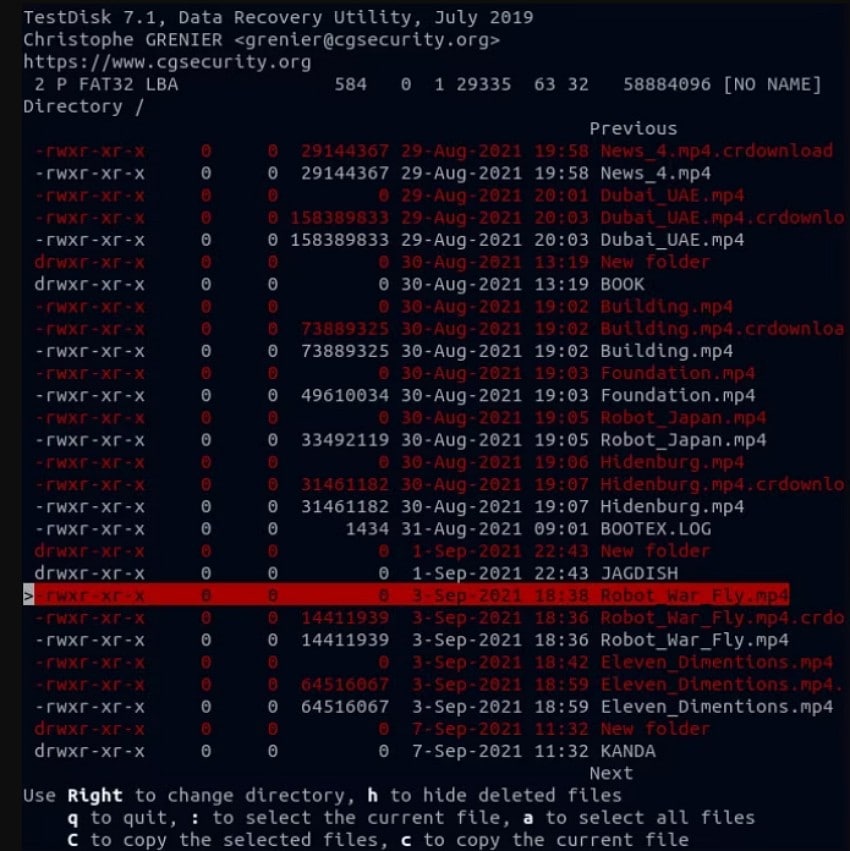
- Afterward, TestDisk will display a list of deleted files highlighted in red. Use the arrow keys to select items, then press "c" to copy the chosen files to a safe recovery location.
3. Recover RM Files in Linux Using Extundelete (ext3grep Successor)
Extundelete recovers deleted data from ext3 and ext4 filesystems using journal records. In addition, it restores single files or full directories from an unmounted Linux partition safely. This makes it useful for undoing recent rm commands when journal data remains. Its focused method helps with linux recover rm file tasks on journaled filesystems. Consider following the steps below to use Extundelete for practical recovery:
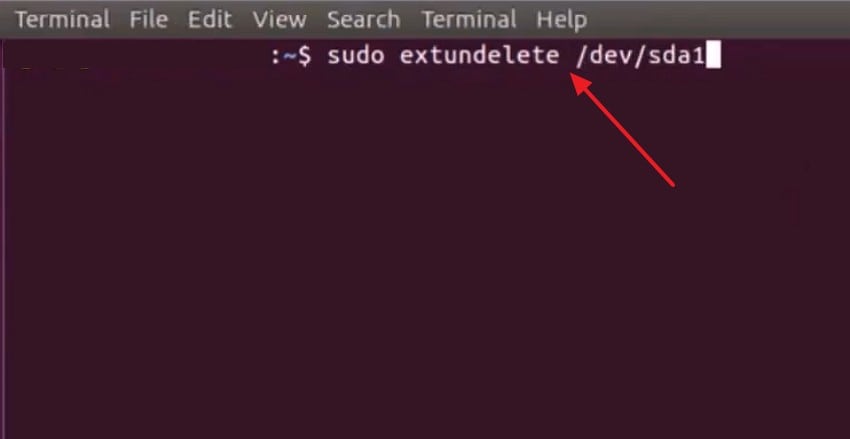
- First, open the terminal and run "sudo extundelete /dev/sda1." This command tells Extundelete which partition you want to scan for deleted files.
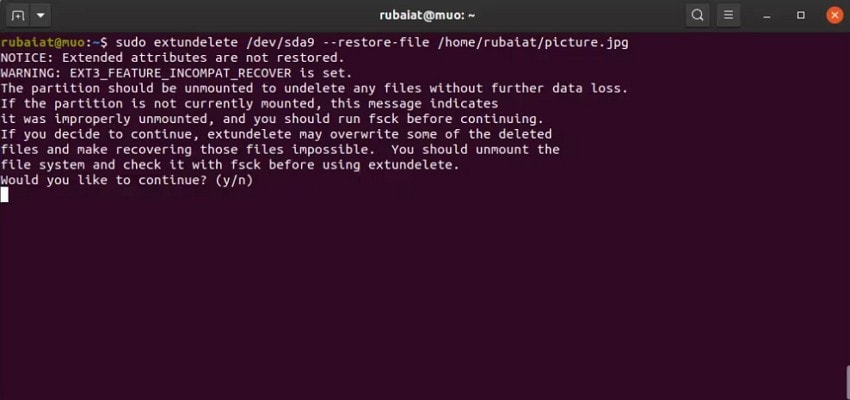
- Next, run the restore command with the full file path: "sudo extundelete /dev/sda9 --restore-file /home/rubaiat/picture.jpg" to recover one file from the partition.
4. Recover Permanently Deleted Ubuntu Files With PhotoRec
This software is a simple file-carving tool that scans raw disk sectors for file signatures. Moreover, it works even when the file system is damaged because it ignores normal metadata. This deep scan helps linux rm recover cases where other undelete tools cannot find files. Let's proceed to the guide below for recovering files using PhotoRec:
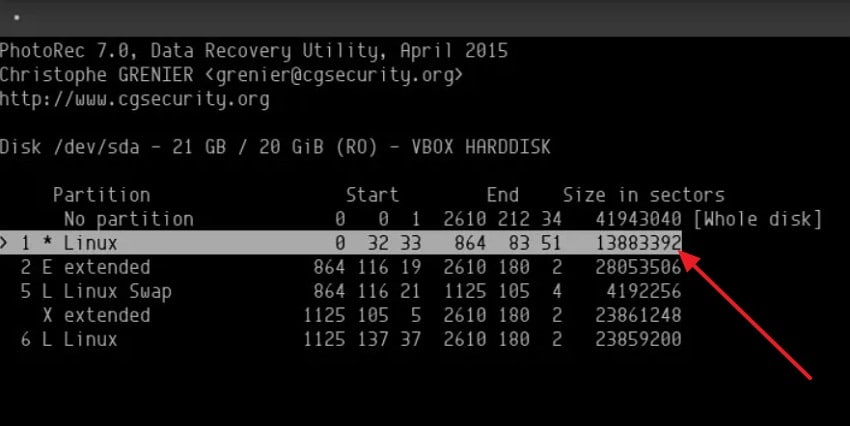
- First, open PhotoRec in the terminal with "sudo photorec" to continue. Next, choose the target disk where the RM-deleted files existed and highlight "Linux" in the partition list.
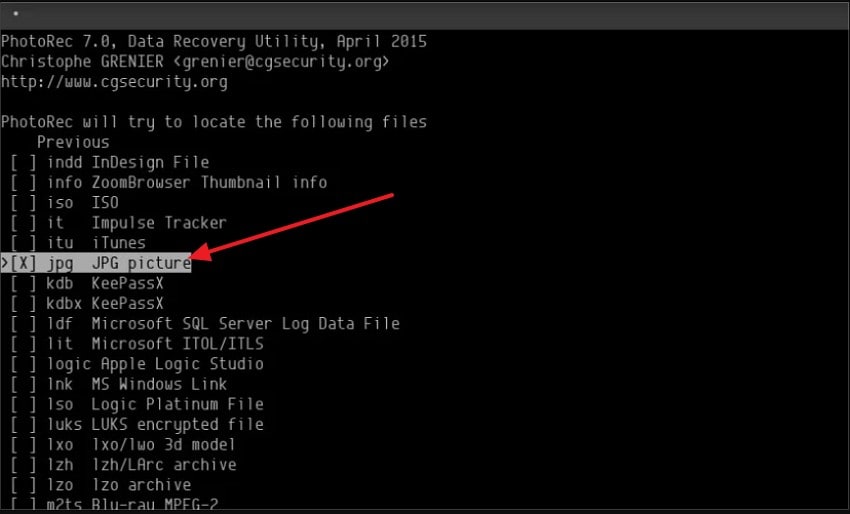
- After that, select the file types you want, such as "jpg," and confirm your choices before continuing.
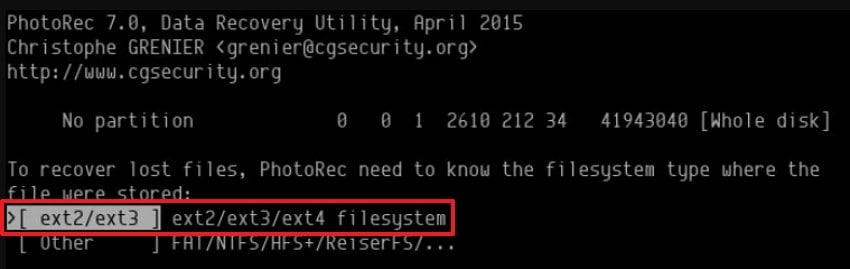
- Later, PhotoRec will ask for the filesystem type; select "ext2/ext3/ext4" because these are the most common Linux filesystems for deleted files.
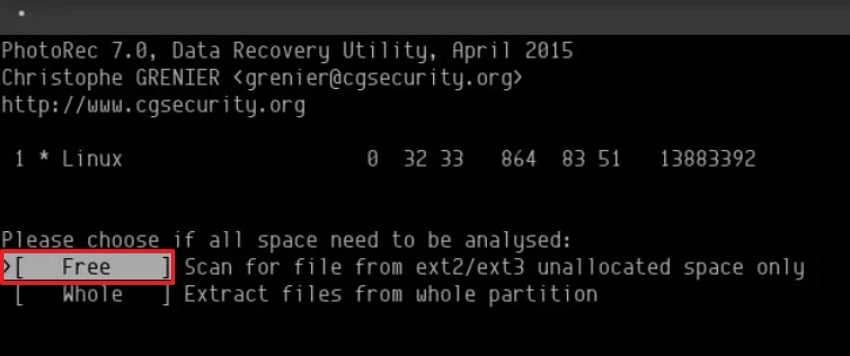
- Next, choose "Free" so PhotoRec scans only unallocated space where RM-deleted data still exists.
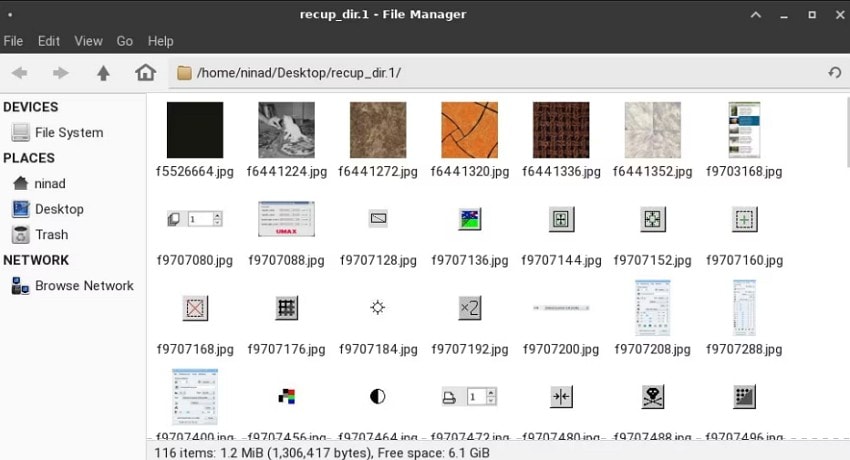
- Afterward, PhotoRec will begin scanning and automatically recover files. Recovered items will be placed inside folders like "recup_dir.xx," which you can open to view all restored files.
5. Undelete Linux Files Using Foremost
Foremost is a small recovery tool that finds deleted data by reading file headers and footers. Additionally, it can scan a disk based on chosen file types and then save recovered items into clear, organized folders. Therefore, this simple design helps with linux undelete rm cases when filesystem metadata is broken or missing. Now, follow the steps below to recover files with Foremost:
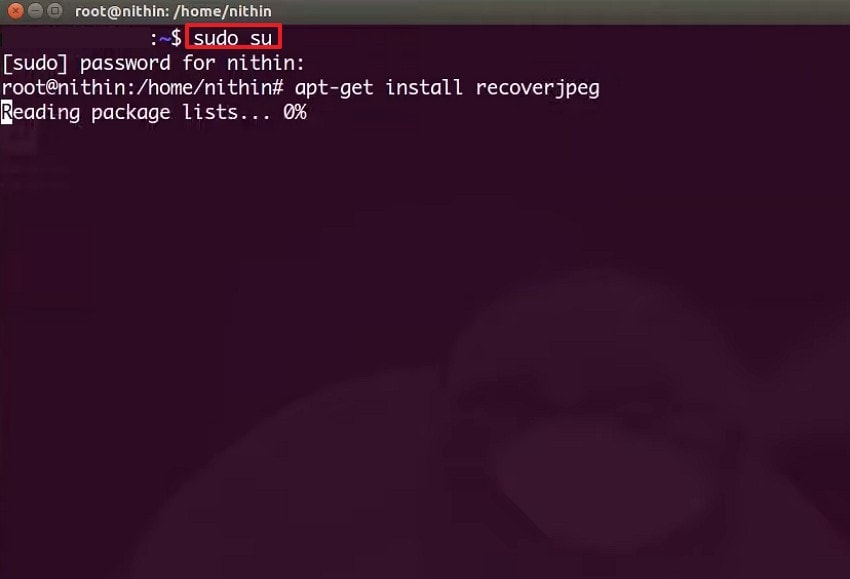
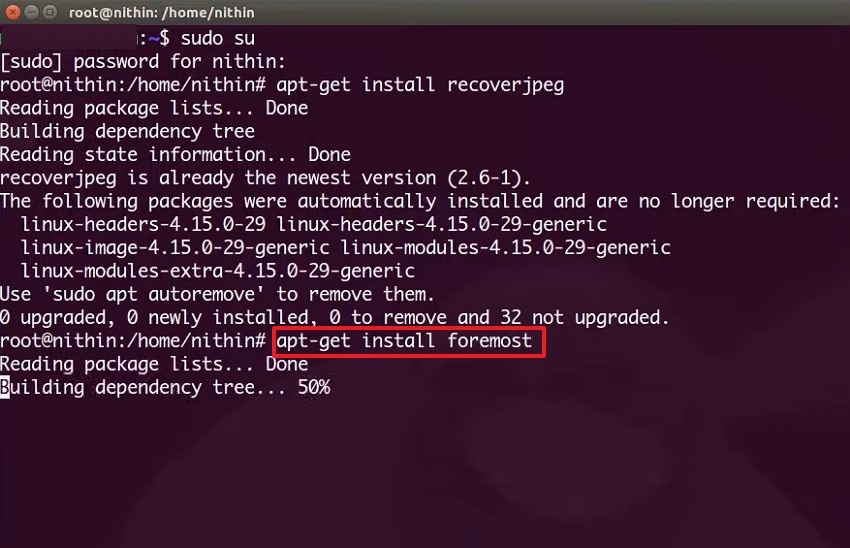
- First, open the terminal and enter "sudo su" to switch to the root user. Next, install the required recovery tools by running "sudo apt-get install foremost" if needed.
- Later, install Foremost using the command "apt-get install foremost". After installation, Foremost becomes ready to scan and extract deleted file types from your Linux partition.
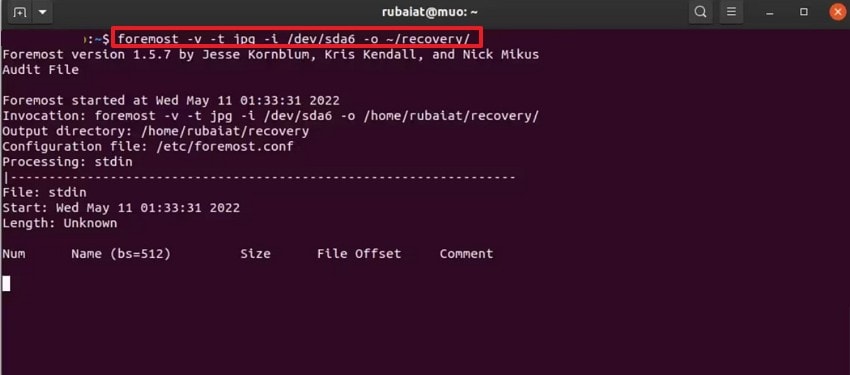
- After that, execute Foremost with proper options, such as: "foremost -v -t jpg -i /dev/sda6 -o ~/recovery/." This command scans the selected partition, recovers JPG files, and stores them safely in your ~/recovery directory.
Conclusion
To conclude, recovering rm-deleted files on Ubuntu becomes easier when you know how deletion works and how to protect remaining data. This article explained why RM removal is permanent, what happens to file blocks, and which steps prevent overwrite. It also showed recovery methods using TestDisk, Extundelete, PhotoRec, and Foremost. For tougher "linux rm recover" cases, Recoverit remains a dependable choice.
FAQ
1. Can RM-deleted files be recovered on Ubuntu?
Yes, RM-deleted files sometimes recover if untouched disk blocks remain temporarily available today. Successful recovery depends heavily on timing and low disk activity after deletion events.2. What should I do immediately after an accidental rm deletion?
Stop all writes immediately because new data can overwrite deleted file blocks quickly. Unmount the affected partition and begin recovery using external tools or environments safely.3. How does Recoverit help restore rm-deleted files on Ubuntu?
Recoverit provides guided scanning and previews that simplify restoring rm-deleted files for beginners. Its interface avoids complex commands, enabling safer recovery attempts across many Linux systems.4. Why is RM deletion considered permanent on Linux?
RM deletion appears permanent because Linux removes file references instead of wiping data. Recovery fails once new writes replace remaining blocks containing earlier deleted information permanently.


