
 TL;DR:
GNU Ddrescue is a Linux command-line utility that recovers data from failing storage media by copying raw storage blocks and utilizing a map file to safely resume interrupted transfers without overwriting previously saved data.
● To avoid permanent data loss, never attempt to recover a read/write mounted partition or repair a filesystem on a drive with I/O errors, and strictly verify target device names since destination data will be completely overwritten.
● For optimal recovery on Ubuntu, install the gddrescue package and execute the command using the -d option to bypass the kernel cache for direct disk access, followed by a second pass using the -r option to specify retry attempts for bad sectors.
● Users who are unfamiliar with command-line operations can alternatively utilize Wondershare Recoverit Linux Data Recovery, a graphical interface tool that restores files from crashed Linux systems through a remote connection.
Ask AI for a summary
 ChatGPT
 Perplexity
 Gemini
 Claude
 Grok
Grok
On a Linux system, GNU ddrescue is a utility that may be used to fix and copy drives. It applies to flash drives, DVDs, hard drives, partitions, and any storage medium. By replicating data in chunks, it carries out data recovery. Here is a tutorial on installing and using GNU Ddrescue to recover data on Ubuntu.
In this article
Part 1. What Is GNU Ddrescue?
GNU ddrescue is a data recovery tool for hard drives, DVDs, CDs, and other digital storage media. It copies raw storage blocks, such as disk sectors, from one device or files to another while intelligently handling read errors to reduce data loss by removing good sectors from partially read blocks.
Ddrescue's basic operation is completely automated. You do not need to wait for an error, stop the program, restart it from a different position, and so on. The data is recovered when you use Ddrescue's map file feature (only the blocks needed are read). When it recognizes bad sectors in the input, Ddrescue does not write zeros to the output and does not truncate the output file unless asked to. As a result, each time you run it on the same output file, it attempts to fill in the gaps without erasing the previously saved data.
If you have two or more damaged copies of a file, cdrom, etc., and run Ddrescue on all of them, one at a time, with the same output file, you should get a complete and error-free file. It is because the likelihood of the same area being damaged in all copies is low (if the errors are randomly located).
Features
- Ddrescue only works on seekable (random access) input and output files because it needs to read and write at random locations.
- If your system supports it, Ddrescue can read the input file directly from the disk, bypassing the kernel cache.
- Ddrescue also includes a 'fill mode' that allows you to selectively overwrite parts of the output file, which can be useful for wiping data, marking bad areas, or even "repairing" damaged sectors in some cases.
- One of Ddrescue's strengths is that it is interface-agnostic so that it can be used with any device supported by your kernel (ATA, SATA, SCSI, old MFM drives, floppy discs, or even flash media cards like SD).
Download Options
GNU Ddrescue works in Unix-like operating systems, and here are the years and versions of the GNU ddrescue when it was released.
- 2014: GPL-2.0-or-later
- 2007: GPL-3.0-or-later
- 2004: GPL-2.0-or-later
History of GNU Ddrescue
GNU ddrescue is open-source software written in the C++ programming language that was first released on August 12, 2004 (18 years ago). It is also available as a binary component in most Linux distributions.
Part 2. Tips to Use Ddrescue Safely
- GNU Ddrescue is a power tool, just like any other. To use it safely, you must first comprehend what it does, followed by some information about the devices to which it does those things.
- NEVER attempt to recover an r/w mounted partition. The resulting copy may need to be more effective. It is preferable if the partition to be rescued is not mounted, even if it is read-only.
- DO NOT repair a file system on a drive with I/O errors; you will almost certainly lose more data.
- Any data stored on a device or partition will be overwritten if you use it as a destination.
- On reboot, some systems may change the names of devices. Check the device names before restarting the Ddrescue if you reboot.
- If you interfere with the rescue and then reboot, any partially copied partitions should be hidden before any operating system that tries to mount and "fix" the partitions it sees can touch them.
Part 3. How To Install Ddrescue on Ubuntu
Before you begin, you must install Ddrescue on your system. The tool is not usually installed by default, but it is simple to install from your distribution's online software repositories.
Execute the following command below to install ddrescue with your system's package manager. Follow these steps to install on any major Linux distros:
- To install ddrescue on Ubuntu, Debian, or Linux Mint.
$ sudo apt install gddrescue
- To install ddrescue on Fedora, CentOS, AlmaLinux, and Red Hat.:
$ sudo dnf install ddrescue
- To install ddrescue on Arch Linux and Manjaro.
$ sudo pacman -S ddrescue
Part 4. Small Ddrescue Tutorial With Examples
This tutorial is intended for people already familiar with the dd command. If you are unfamiliar with dd, you should first search the internet for some introductory material on dd and GNU Ddrescue.
As time passes, a failing drive develops more and more errors. Thus, you should save data from a drive immediately as you see the first error. Be cautious because every time a damaged drive powers up and can output data.
It would be best if you used Ddrescue to make a copy of the failing drive and then attempt to repair the copy. If your data is important, use the first copy as a master for a second copy and attempt to repair the second copy. If something goes wrong, you still have the master to fall back on.
If you are attempting to recover a whole partition, repair the copy first with e2fsck or another tool appropriate for the type of partition you are attempting to recover, then mount the repaired copy somewhere and attempt to recover the files within it.
If the partition table is damaged, save the whole disc before repairing the partition table and the partitions on the copy. And if the damaged drive is not listed in /dev, it cannot be recovered. Not with ddrescue, at any rate.
Example 1: Completely automatic rescue of an entire disc with two ext2 partitions in /dev/sda to /dev/sdb. You are not required to partition /dev/sdb beforehand, but if the partition table on /dev/sda is damaged, you must recreate it on /dev/sdb.
ddrescue -f -r3 /dev/sda /dev/sdb mapfile
fdisk /dev/sdb
e2fsck -v -f /dev/sdb1
e2fsck -v -f /dev/sdb2
Example 2: Move an ext2 partition from /dev/sda2 to /dev/sdb2. You must first use fdisk to create the sdb2 partition with the proper type and size.
ddrescue -f -n /dev/sda2 /dev/sdb2 mapfile
ddrescue -d -f -r3 /dev/sda2 /dev/sdb2 mapfile
e2fsck -v -f /dev/sdb2
mount -t ext2 -o ro /dev/sdb2 /mnt(read rescued files from /mnt)
Example 3: While attempting to rescue the entire drive /dev/sda to /dev/sdb, /dev/sda freezes at position 12345678.
ddrescue -f /dev/sda /dev/sdb mapfile # /dev/sda freezes here
(restart /dev/sda or reboot computer)
(restart copy at a safe distance from the troubled sector)
ddrescue -f -i 12350000 /dev/sda /dev/sdb mapfile
(then copy backwards down to the troubled sector)
ddrescue -f -R /dev/sda /dev/sdb mapfile
Example 4: While transferring data from /dev/sda to /dev/sdb, /dev/sdb fails, and you must transfer data to a third drive, /dev/sdc.
ddrescue -f -n /dev/sda /dev/sdb mapfile1 # /dev/sdb fails here
ddrescue -f -m mapfile1 /dev/sdb /dev/sdc mapfile2
ddrescue -f -n /dev/sda /dev/sdc mapfile2
ddrescue -d -f -r3 /dev/sda /dev/sdc mapfile2
Example 5: While rescuing a partition in /dev/sda1 to the file hdimage, /dev/sda1 ceases to respond and starts responding read errors, allowing ddrescue to record the rest of the partition as unscraped.
ddrescue -n /dev/sda1 hdimage mapfile # /dev/sda1 fails here
(restart /dev/sda or reboot computer)
ddrescue -n -A -i<pos> -O /dev/sda1 hdimage mapfile
(if /dev/sda1 fails again, restart /dev/sda or reboot computer and
then repeat the above command as many times as needed until it
succeeds. <pos> is the position where the drive stopped responding)
ddrescue -d -r3 /dev/sda1 hdimage mapfile
Example 6: After rescuing a partition from /dev/sda1 to the file hdimage, sda1 vanishes from /dev.
ddrescue -n /dev/sda1 hdimage mapfile # /dev/sda1 fails here
(restart /dev/sda or reboot computer and then repeat the above
command as many times as needed until it succeeds)
ddrescue -d -r3 /dev/sda1 hdimage mapfile
Example 7: While rescuing a partition from /dev/sda1 to the file hdimage, the partition table of /dev/sda becomes unreadable, and the OS no longer recognizes sda1 in /dev. The solution is to move the map file and read the remaining partition sda1 from /dev/sda. You must know the offset of the partition sda1 in the drive sda and the size of sda1.
ddrescue /dev/sda1 hdimage mapfile # partition table fails here
ddrescuelog --shift -o<offset> mapfile > shifted_mapfile
ddrescue -i<offset> -o0 -s<size> /dev/sda hdimage shifted_mapfile
Example 8: After saving a partition in /dev/sda1 to the file hdimage, expand hdimage to copy the entire drive in /dev/sda without recopying the previously copied partition /dev/sda1. The solution is to rename the map file, copy the data from sda1 to its final location in hdimage, and then read the remaining data from /dev/sda. You must know the offset of the partition sda1 in the drive sda and the size of sda1.
ddrescue /dev/sda1 hdimage mapfile # rescue partition
ddrescuelog --shift -o<offset> mapfile > shifted_mapfile
ddrescue --same-file -o<offset> -s<size> --reverse hdimage hdimage
ddrescue /dev/sda hdimage shifted_mapfile # rescue rest of drive
Part 5. Using Ddrescue to Recover Data on Ubuntu - Full Guide
Step 1. Launch a command line terminal and identify the device path to the hard drive or partition you want to clone. You can do this with tools like lsblk, fdisk, etc.
$ lsblk
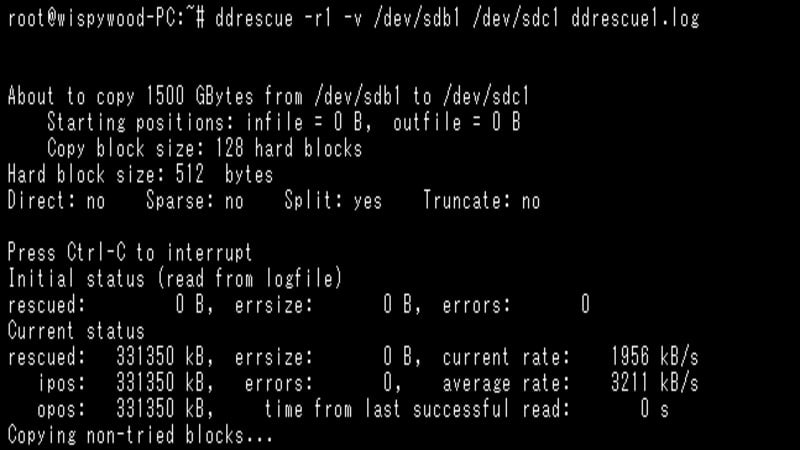
Step 2. The partition will then be copied to an image file using the following command syntax. In the example below, we're using /dev/sdX, but you could easily replace it with your partition or device. The contents will be saved to a backup.img file.
$ sudo ddrescue -d /dev/sdX backup.img backup.logfile
Note: The -d option instructs ddrescue to bypass the kernel's cache and instead access the disk directly.
Step 3. If you attempt to recover data from a corrupted disk, add the -r option after the first try described above. It tells ddrescue to retry bad sectors to recover as much data as possible. After the option, you can specify the number of retries.
$ sudo ddrescue -d -r3 /dev/sdX backup.img backup.logfile
Step 4. The new image file will then be copied to a different disk or partition. For this, we can use the dd command.
$ sudo dd if=backup.img of=/dev/sdX
Alternatively, use the ddrescue command.
$ sudo ddrescue -f backup.img /dev/sdX clone.logfile
The -f option indicates that our output is being sent to a block device rather than a file.
Step 5. If you like to clone a disk or partition directly to another without using an image file, use the following syntax. In this example, we are cloning partition /dev/sdX1 to /dev/sdX2.
$ sudo ddrescue -d -f /dev/sdX1 /dev/sdX2 clone.logfile
After completing the preceding steps, you should be able to access the cloned storage and see all of your files as ddrescue successfully recovered them.
Part 6. Removing/Uninstalling Ddresuce From Ubuntu
After recovering your data on Ubuntu using Ddrescue, you can uninstall it to free space. Here’s how to uninstall ddrescue from Ubuntu 12.04 LTS. Using the apt command, you can easily uninstall this package from the Linux operating system.
Step 1. The following command is executed to remove ddrescue:
sudo apt-get remove ddrescue
Step 2. To remove the ddrescue package and its dependencies, use the following command:
sudo apt-get remove --auto-remove ddrescue
Running this command will uninstall ddrescue and all its dependencies, which are no longer required in the system.
Remove ddrescue and all configuration files completely:
Step 3. Because it deletes all configuration files and data, the following command should be used with caution:
sudo apt-get purge ddrescue
Step 4. Alternatively, execute this command to delete all configuration files and data associated with the ddrescue package. You cannot recover deleted data, so use this command with caution.
sudo apt-get purge --auto-remove ddrescue
Part 7. [Optional] Instaling Recoverit - A GUI Tool for Linux Data Recovery
Using GNU ddrescue for Linux may be a bit overwhelming for users with little knowledge of the command line; fortunately, there’s a great alternative – Wondershare Recoverit Linux Data Recovery. It is a data recovery solution for Linux operating systems with graphical interface. You can use it to recover deleted or lost files from Linux devices in just a few clicks.

Wondershare Recoverit - Your Safe and Reliable Linux Recovery Software
5,481,435 people have downloaded it.
Recovers lost or deleted documents, photos, videos, music, emails, and other 1000+ file types effectively, safely, and completely.
Compatible with all mainstream Linux distros, including Ubuntu, Linux Mint, Debian, Fedora, Solus, Opensuse, Manjaro, etc.
Assists in 500+ data loss scenarios, such as deletion, disk formatting, OS crash, power outage, virus attack, lost partition, and many more.
The simple point-and-click interface allows you to recover data from Linux hard drives in just a few clicks.
Works through a remote connection. You can recover lost data even when your Linux device is crashed.
Here's a step-by-step guide to using Wondershare Recoverit Linux Recovery to perform data recovery so you can get your important files back as soon as possible.
Step 1. Select the Linux Recovery
Install Wondershare Recoverit after downloading it. Then, please open it and select NAS and Linux as the first option, followed by Linux Recovery.

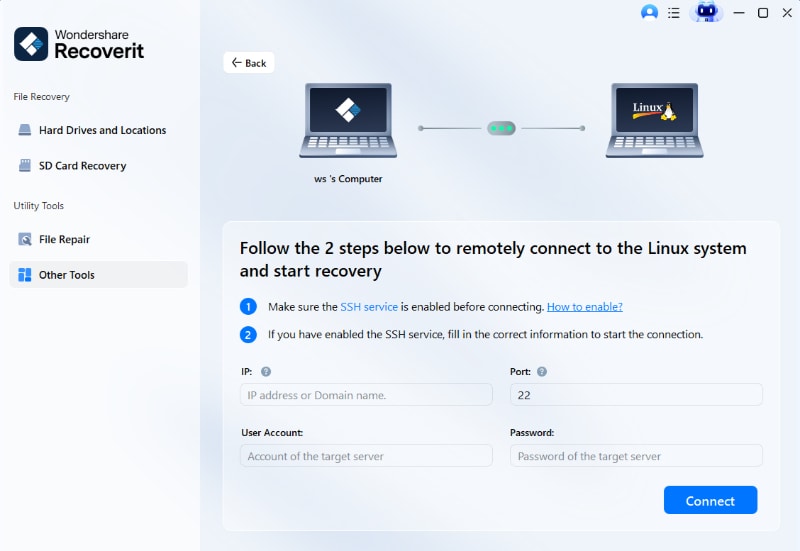
Step 2. Connect to a Linux Device Remotely
Fill out the necessary fields to establish a remote connection. When you're done, press the Connect button. After that, Recoverit will run an automated search for missing files.
Step 3. File Recovery and Saving Data
The amount of data being scanned determines the length of the scanning process, which can be seen in the bottom bar. You can stop searching when you've found the file you want to recover.

Following the scan, you can examine the files to ensure they contain the data you want to recover. Then choose Recover.

Following the software's instructions, you can save the recovered files. Click Recover to get the restored data. Please select a different file path than the most recently lost one.

For Windows Vista/7/8/10/11
For macOS X 10.10 or later
Summing Up
This tutorial introduces the GNU ddrescue for Linux. Additionally, you learn how to install the GNU ddrescue tool on all major Linux distributions and use it for recovery. Furthermore, we also provide the best alternative to GNU ddrescue, which is the Wondershare Recoverit Linux Recovery for easier and less hassle recovery operations.


