
 TL;DR:
TestDisk is a free, command-line utility for repairing lost partition tables and undeleting files on Linux, whereas Wondershare Recoverit Linux Recovery provides a graphical interface and remote access for data retrieval on crashed or inaccessible systems.
● TestDisk installs directly through default package managers using apt, yum with the EPEL repository, dnf, or pacman, and supports partition recovery for ext2/3/4, btrfs, LUKS, LVM, and Linux RAID.
● Restoring a corrupted partition table with TestDisk requires writing the probed partition structure to the disk and executing a mandatory system reboot for the changes to take effect.
● Wondershare Recoverit Linux Recovery bypasses local OS dependencies by establishing a remote network connection, making it the required option when the host Linux operating system has crashed and cannot execute local commands.
Ask AI for a summary
 ChatGPT
 Perplexity
 Gemini
 Claude
 Grok
Grok
Running the rm command without checking may lead to the permanent loss of essential files. Don't worry! Because practically all data recovery scenarios can be successfully handled using top-notch do-it-yourself data recovery tools, such as TestDisk for Linux. This page explains how to install TestDisk Data Recovery to recover deleted files from Linux and focuses on the top TestDisk for Linux alternative.
Part 1. What Is TestDisk for Linux and What Can It Do?
TestDisk is a free and open-source command-line data recovery program that can be used to recover data from lost or deleted Linux partitions. Moreover, you can use it to rescue non-bootable partitions, which can be triggered by unintentional deletion of partition tables and cyberattacks. Christophe Granier wrote the command-line software in C programming languages, distributed under the GNU/GPLv2 license.
Functions of TestDisk for Linux
TestDisk for Linux is an effective and flexible tool that offers numerous data recovery applications, which are listed below:
- Repair the partition table and recover the deleted partition.
- Find the Backup SuperBlock ext2/ext3/ext4.
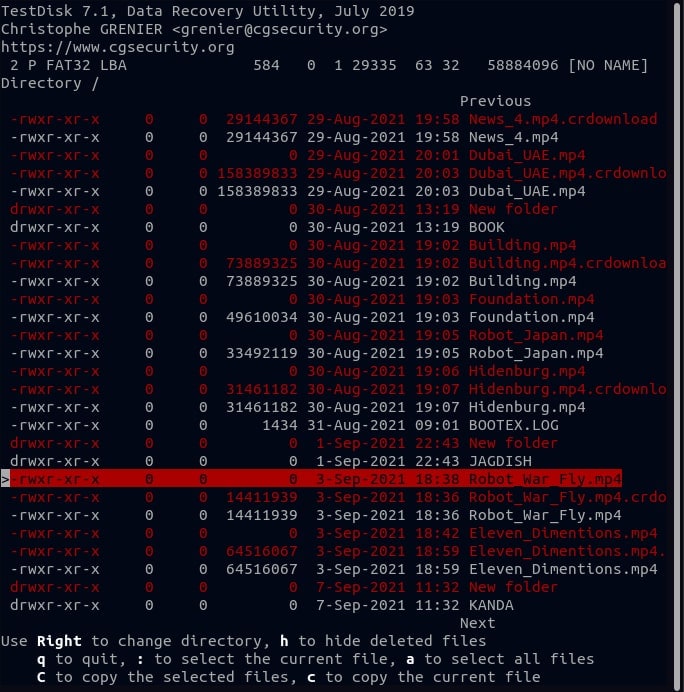
- Undelete files from the FAT, exFAT, NTFS, and ext2/3/4 filesystems.
- Copy files from deleted ext2/ext3/ext4 partitions.
TestDisk for Linux includes features for both beginners and experts. TestDisk can be utilized by those who know little or nothing about data recovery techniques to collect specific information about a non-booting drive that can be sent to a technician for further evaluation. Those more knowledgeable about this procedure will find TestDisk for Linux useful in conducting onsite recovery.
Compatibility of TestDisk for Linux
TestDisk can recover lost partitions for all the following Linux file systems:
Part 2. How To Install TestDisk on Linux
Most Linux distributions have the package TestDisk available for installation from the default system repositories using the default package manager, as seen below.
Install TestDisk on Debian and Ubuntu
Step 1. To begin, update the system packages and install TestDisk as directed.
$ sudo apt update
$ sudo apt install testdisk
Step 2. Execute the dpkg command to verify that Testdisk is installed and to show more details.
$ sudo dpkg -l testdisk
Install TestDisk on RHEL and CentOS
Step 1. To install TestDisk, enable the EPEL repository and follow the installation instructions.
------------ On RHEL/CentOS 7 ------------
# yum install epel-release
# yum update
# yum install testdisk
------------ On RHEL/CentOS 8 ------------
# yum install https://dl.fedoraproject.org/pub/epel/epel-release-latest-8.noarch.rpm
# yum update
# yum install testdisk
Step 2. Run the following rpm command to confirm that Testdisk is installed and to reveal more data about the TestDisk tool.
# rpm -qi testdisk
Install TestDisk on Fedora and Arch Linux
Step 1. To allow Fedora systems to run:
$ sudo dnf install testdisk
Step 2. To run Arch Linux:
$ sudo pacman -S testdisk
Note: If no suitable package for your Linux distribution is found, get TestDisk from its official website.
Part 3. How To Recover Deleted Files on Linux Using TestDisk
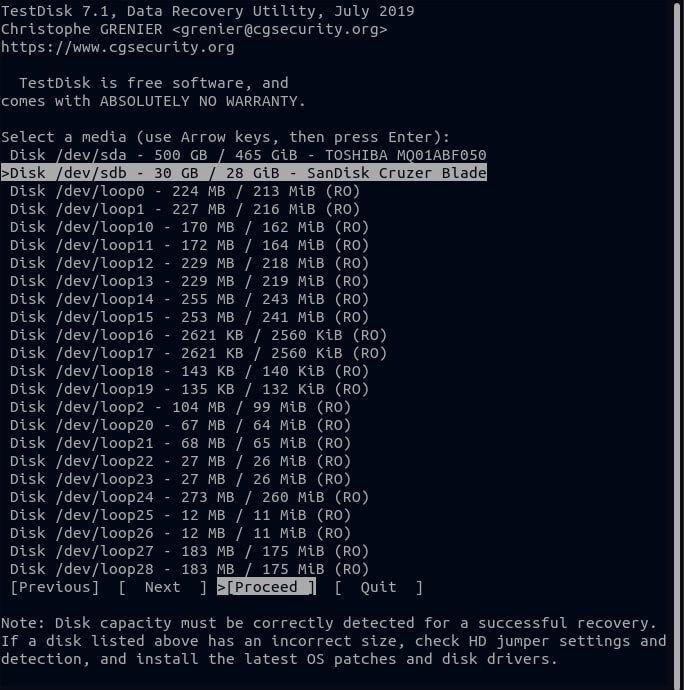
Step 1. Use the command below to view the partitions on your system.
# testdisk /list

Step 2. Assume your Linux partition table is missing or corrupted. To begin restoring the Linux partition, launch TestDisk.
# testdisk
Step 3. Choose Create and press ENTER. It will display a list of partitions from which to choose.
Step 4. At the bottom, click Proceed to move on to the next options.
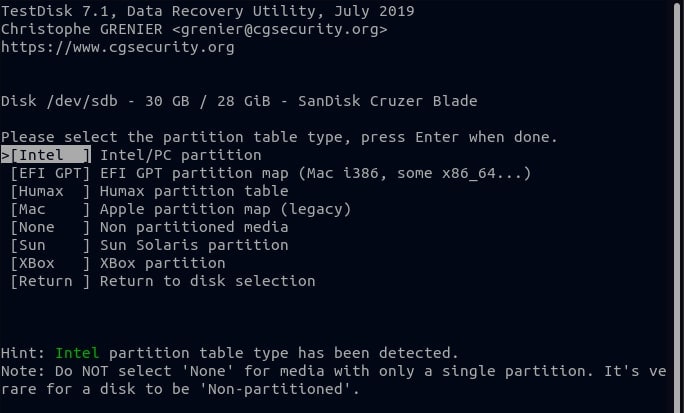
Step 5. Your system will detect the partition table type you are using automatically. It is Intel in the following example. To proceed, press ENTER.
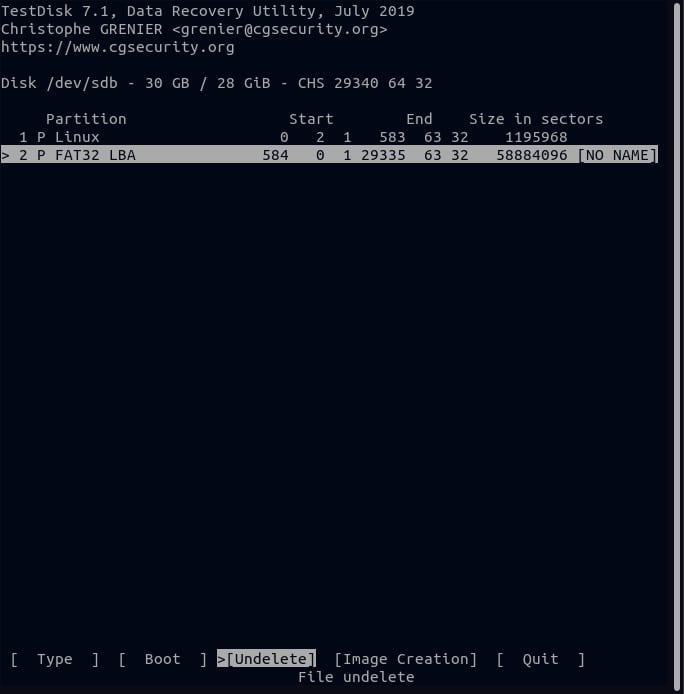
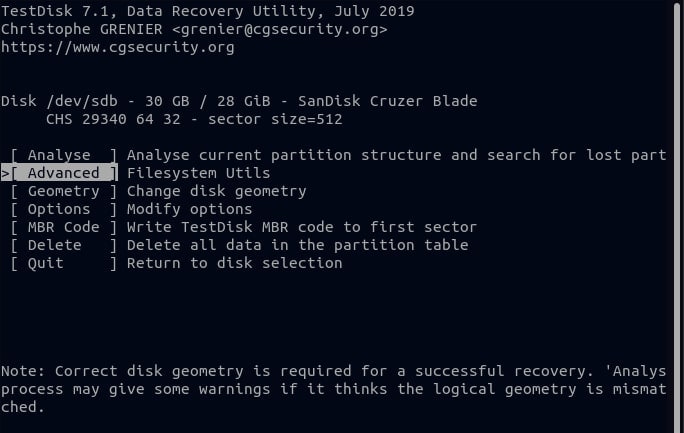
Step 6. Select the Analyze option to have the TestDisk utility probe your partition structure.
Step 7. The error message will be displayed if no bootable partitions are found on the disk.
Partition Start End Size in sectors
No partition is bootable
*=Primary bootable P=Primary L=Logical E=Extended D=Deleted
[Proceed ]
Step 8. Choose the Proceed button to see a list of available partitions and press ENTER. Click the write option for the Testdisk to write the partition table.
Write partition table, confirm ? (Y/N)
Press Y to confirm.
Step 9. For the changes to take effect, TestDisk will prompt you to reboot your system. Select OK.
You must reboot for the change to take effect.
On the next screen, click Quit to exit the menu, then click Quit again to exit the TestDisk program.
All that remains is for you to restart your computer. If everything goes well, the new partition table should enable the system to boot normally.
Part 4. The Best Alternative to TestDisk for Linux Data Recovery
Regarding data recovery, TestDisk is a popular and widely used tool that can help recover lost or deleted files. However, it inevitably has some drawbacks. One of the most significant limitations is that it cannot recover files from a Linux operating system if the Linux OS has crashed. It can be a considerable issue for Linux users who have lost important data and need to recover it.
Fortunately, there is an alternative solution available - Wondershare Recoverit Linux Recovery. This powerful software is specifically designed to recover data from Linux systems, even when the Linux OS is inaccessible. Wondershare Recoverit Linux Recovery works through a remote connection, making it possible to recover data from a crashed Linux operating system.

Wondershare Recoverit - Your Safe and Reliable Linux Recovery Software
5,481,435 people have downloaded it.
Recovers lost or deleted documents, photos, videos, music, emails, and other 1000+ file types effectively, safely, and completely.
Compatible with all mainstream Linux distros, including Ubuntu, Linux Mint, Debian, Fedora, Solus, Opensuse, Manjaro, etc.
Assists in 500+ data loss scenarios, such as deletion, disk formatting, OS crash, power outage, virus attack, lost partition, and many more.
The simple point-and-click interface allows you to recover data from Linux hard drives in just a few clicks.
Follow these three straightforward steps to recover any data with Wondershare Recoverit Linux Recovery.
Step 1. Select the Linux Recovery
Launch Wondershare Recoverit on your computer after installation. Then, select NAS and Linux as the primary option and click Linux Recovery under it.

For Windows Vista/7/8/10/11
For macOS X 10.10 or later
Step 2. Connect the Linux Computer
Fill out the required data to establish a remote connection—once finished, press Connect.
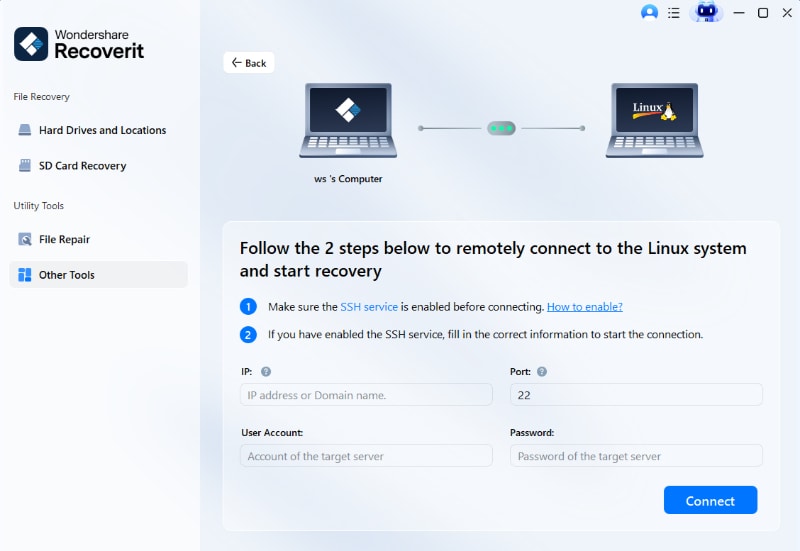
Recoverit will then perform scanning automatically to look for lost files.
Step 3. Preview, Recover, and Save Files
The scanning process takes some time, depending on the amount of data being scanned. The scanning status is displayed on the bottom bar. You can also stop scanning when you find the file you want to restore.

Recoverit lets you preview the files when scanning is finished to ensure they are the ones you want to recover. To save the file to your computer, click Recover.

The software will ask you to select the location where you want to save the recovered files. To obtain the restored data, click Recover. Be sure to take a different file path than the one where you lost it before.

For Windows Vista/7/8/10/11
For macOS X 10.10 or later
The Bottom Line
TestDisk is an open-source data recovery utility. It can recover some files, but it has drawbacks. For example, it lacks a graphical user interface and may fail to recover certain file types. Luckily, there’s an alternative solution offered to you – the Wondershare Recoverit Linux Recovery software. Download it now and explore its wonders!


