

 TL;DR:
Since Raspberry Pi Imager only writes images and cannot extract them, you must use a separate raw-disk tool to capture a full sector-level backup IMG file from your existing SD card, which can later be flashed back using Imager's Use custom option.
● To safely create the backup without data corruption, cleanly shut down the Raspberry Pi before removing the card, use Win32 Disk Imager on Windows or the dd command on macOS and Linux, and allow all cached writes to complete before disconnecting the storage media.
● A raw IMG backup duplicates the complete card capacity including unused sectors, meaning the backup destination drive cannot use a FAT32 file system due to its 4GB file limit, and any replacement SD card used for restoration must contain an equal or greater number of usable sectors than the original.
● Restoring the IMG file permanently overwrites all existing partitions on the target SD card, making it critical to verify the destination device identity in Raspberry Pi Imager and allow its automated verification cycle to complete before removing the card to ensure a successful boot.
Ask AI for a summary
 ChatGPT
 Perplexity
 Gemini
 Claude
 Grok
Grok
“Hey guys, I'm having trouble finding a guide on how to create an image of my Raspberry Pi SD card.”-15feet
Raspberry Pi Imager does not create backup images from an existing SD card. It is primarily designed to write existing images to storage and verify the completed write. Creating a backup Raspberry Pi image therefore requires a separate disk-imaging tool, while Imager is mainly used to write and verify existing images on storage.
This guide covers capturing an IMG file, verifying and compressing it, then flashing it back with Imager. If the SD card becomes corrupted or inaccessible, Recoverit can help recover files from detectable cards or supported disk images.
In This Article
Part 1. What a Raspberry Pi IMG Backup Captures
A raw IMG file is a sector-level copy, meaning it duplicates the entire card rather than only visible files. Partition tables, the boot partition, root filesystem, and unused sectors are included. A full-card raw image includes the entire device only when the imaging tool is configured to read the complete card rather than allocated partitions alone.
For a Raspberry image backup, that completeness has a cost. A 32GB card produces roughly a 32GB file whether it stores 4GB or 30GB. That is why compression appears later in the workflow.
IMG Backup vs. File Backup vs. Spare-Card Clone
These 3 approaches are available, and the best choice depends on what you need when the original card fails:
| Approach | Captures | Restores By | Suits |
| IMG Image | Complete disk layout and sectors | Flashing the image to a card | Archiving and off-site backups |
| File Backup | Selected files and folders | Reinstalling, then restoring files | Frequent or incremental backups |
| Spare-Card Clone | A bootable copy on another card | Swapping in the cloned card | Fast hardware replacement |
Raspberry Pi’s official backup guidance also distinguishes full SD card images from file-level backups, noting that an entire card can be copied to an image file and restored later. A Raspberry image backup therefore works well for dated system snapshots that can be compressed, stored, and moved off-site. The trade-off is restore time because the image must be flashed to suitable storage before the system can boot.
Why Imager Writes but Does Not Read
Raspberry Pi Imager is built to put an operating system onto storage, and its workflow reflects that purpose. It downloads or accepts an image, writes it to the card, then verifies the written data.
Capturing an installed card into a new IMG is the reverse operation, and Imager does not offer it. Use a raw-disk tool for that part, then return to Imager as your Raspberry Pi image flasher when it is time to restore.
When to Use the General Raspberry Pi Backup Guide Instead
A full Raspberry Pi image backup is best for complete system snapshots. File-level backups are better when you only need regularly changing files, folders, or settings. Use a general Raspberry Pi backup method for:
- Frequent or incremental backups of changing files.
- Backups of selected project folders, documents, or configuration files.
- Faster backups that do not copy unused SD card sectors.
- Easier restoration of files without flashing an entire image.
Note: For major system changes, migrations, or disaster recovery, keep a full Raspberry Pi SD card image as a separate system snapshot.
Part 2. Prepare the SD Card and Destination
Before creating a Raspberry Pi SD card image, prepare both the source card and backup destination carefully. This helps prevent incomplete images, device-selection mistakes, and storage-related failures.
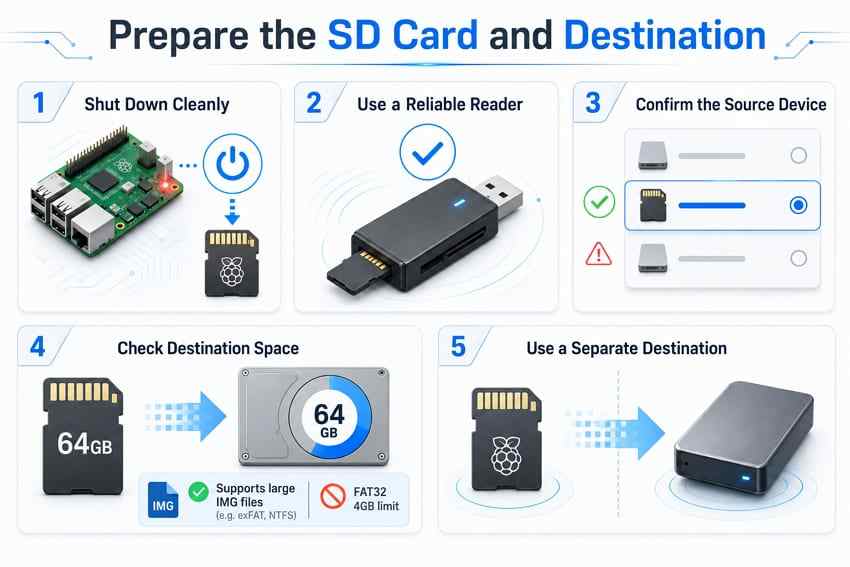
- Shut Down Cleanly: Shut down the Raspberry Pi from the desktop or run sudo poweroff before removing the card. This allows pending writes to finish safely.
- Use a Reliable Reader: Connect the card through a stable built-in slot or trusted USB card reader. Reader disconnects or read errors can interrupt the imaging process.
- Confirm the Source Device: Raw tools such as dd use the exact device path you specify. Verify the SD card name and capacity before running any command.
- Check Destination Space: A full raw Raspberry image backup is usually close to the card’s total capacity. Ensure the destination has enough free space before starting.
- Check File System Limits: Make sure the destination file system supports large IMG files. FAT32 cannot store a single file larger than 4GB.
- Use a Separate Destination: Save the IMG to another internal or external drive. Do not store the backup image on the SD card being copied.
Part 3. Create a Raspberry Pi SD Card Image
Once the SD card is ready, create the Raspberry Pi SD card image using the appropriate platform-specific method below for Windows, macOS, or Linux:
Windows: Read the Card With a Raw-Disk Tool
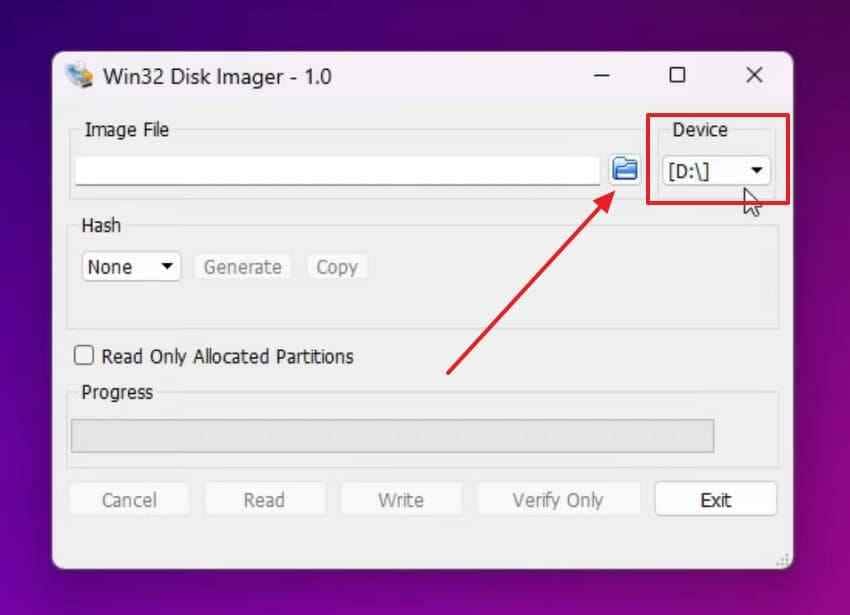
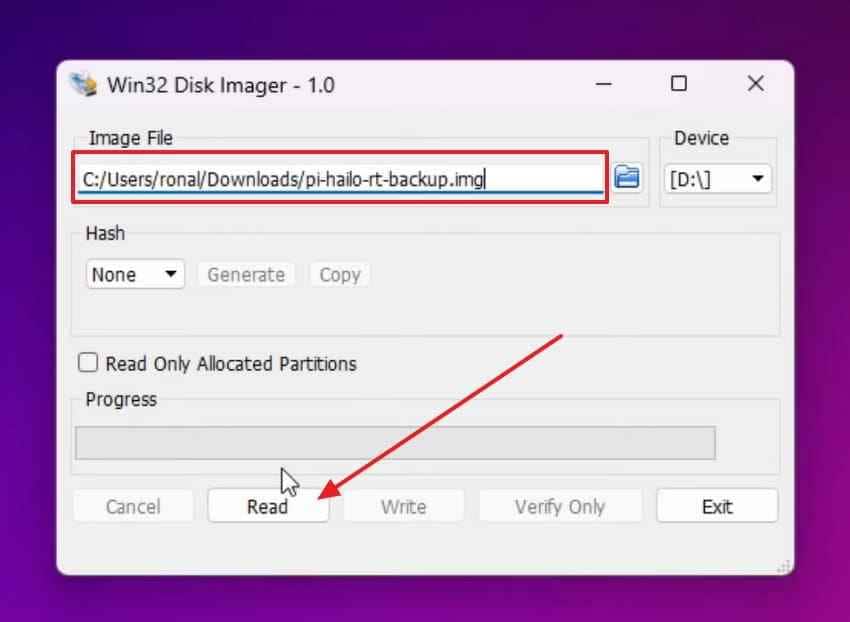
Win32 Disk Imager is a common Windows tool for creating raw SD card images. Its Read and Write buttons sit close together, so choose carefully. Write overwrites the selected card with the chosen image. Read time varies with card size and reader speed, while the progress bar shows status. Follow the steps below to create the image safely:
Step 1. Insert the Raspberry Pi SD card, open Win32 Disk Imager, and choose the correct drive letter from the “Device” menu. Leave “Read Only Allocated Partitions” unchecked when you want a complete sector-level card image.
Step 2. Enter the destination path and filename in the “Image File” field, using the “.img” extension. Confirm the device again, then click “Read” to copy the SD card into the image file.
macOS: Identify With diskutil, Capture With dd
On macOS, diskutil identifies and unmounts the SD card, while dd creates the raw Raspberry Pi SD card image. Using /dev/rdiskN can improve sequential read performance compared with /dev/diskN. Here are the steps to identify the correct device and capture the card:
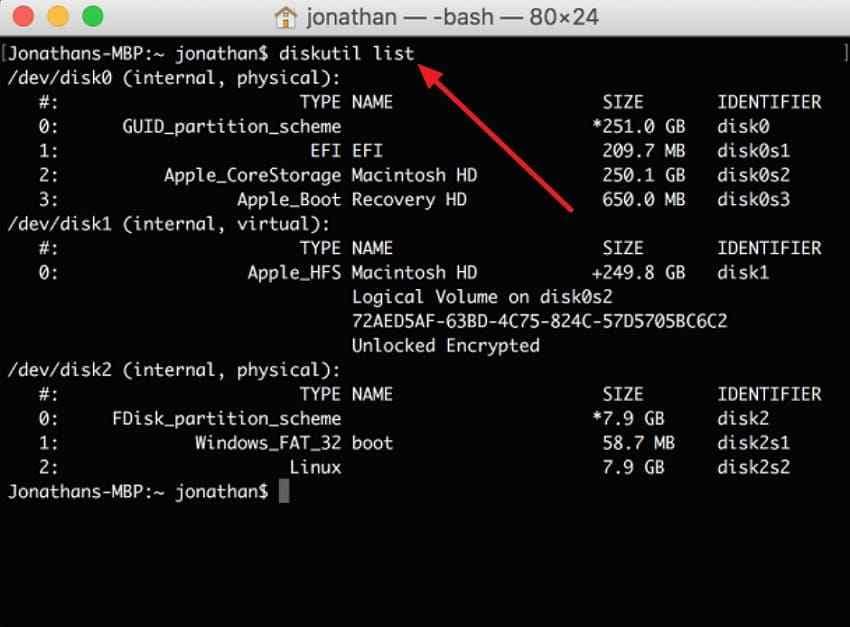
Step 1. Navigate to “Finder > Applications > Utilities > Terminal,” then run diskutil list. Identify the whole Raspberry Pi SD card, such as /dev/disk2, by checking its size. Next, run diskutil unmountDisk /dev/disk2 to unmount its volumes without ejecting the card.
Note: Replace disk2 with the actual identifier shown for your SD card.
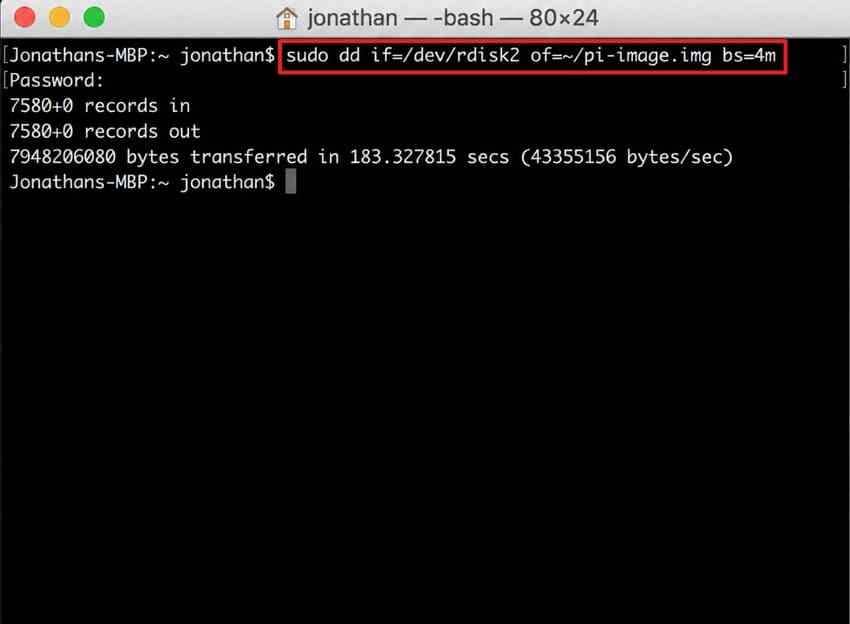
Step 2. Run sudo dd if=/dev/rdisk2 of=~/pi-image.img bs=4m and enter your Mac password when prompted. This reads the entire card into pi-image.img in your Home folder. While dd is running, press “Control + T” to display its current progress without stopping the copy.
Linux: Identify With lsblk, Capture With dd
Linux provides lsblk for identifying the SD card and dd for creating a raw backup when you image a Raspberry Pi SD card. Device names vary by system, so confirm the card carefully before proceeding. The following steps guide you through how to unmount it and create the image:
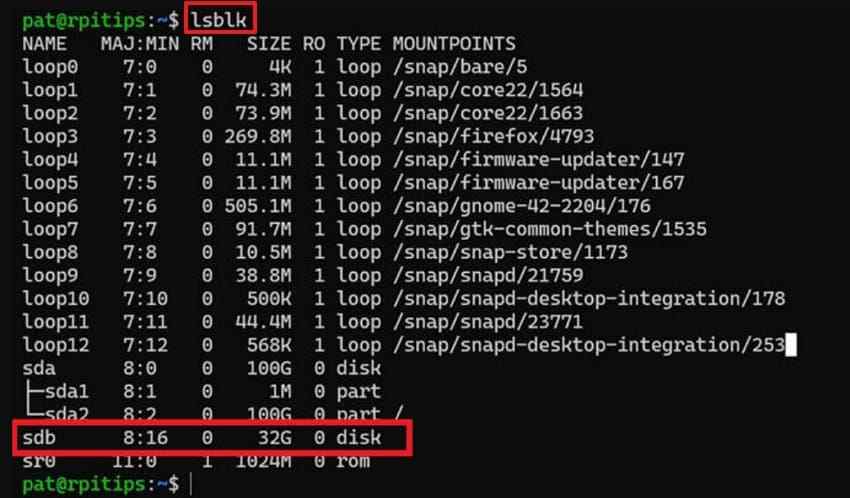
Step 1. Insert the SD card > open “Terminal” > run lsblk > locate the full device, such as /dev/sdb, by checking its size, removable flag, and listed partitions.
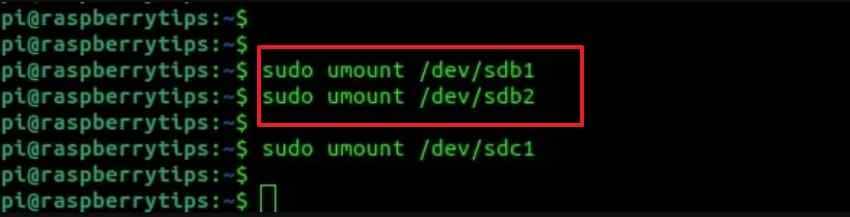
Step 2. Unmount its mounted partitions with commands such as sudo umount /dev/sdb1 and sudo umount /dev/sdb2. Leave the card inserted, then run sudo dd if=/dev/sdb of=~/pi-image.img bs=4M status=progress. Use the whole device path, not a partition like /dev/sdb1, and wait for dd to complete.
Wait for Cached Writes to Finish Before Disconnecting Media
After creating the Raspberry Pi SD card image, wait for all buffered data to finish writing before removing any connected storage. On Linux, run sync after dd completes to flush pending writes.
If the IMG is saved to an external drive, keep that destination connected until the write process finishes completely. Disconnecting media too early can leave the backup incomplete or corrupted.
Note: Keep the completed Raspberry Pi SD card image as an untouched master backup. Set it to read-only where practical and use copies for compression or testing.
Part 4. Verify, Compress, and Version the Image
Linux tools can verify, compress, and organize captured image files after backup creation. A Raspberry image backup gains checksum verification before compression and safer long-term storage. After creating the image backup, generate a SHA-256 checksum as an integrity baseline. You can use it later to detect corruption or unexpected changes.
The following Linux commands provide a simple way to checksum and compress a Raspberry Pi image backup. Windows and macOS users can use equivalent SHA-256 and compression tools. Start by creating an integrity baseline for the IMG:
Step 1. First, run “sha256sum pi-image.img > pi-image.img.sha256” to create a checksum file for the original IMG.
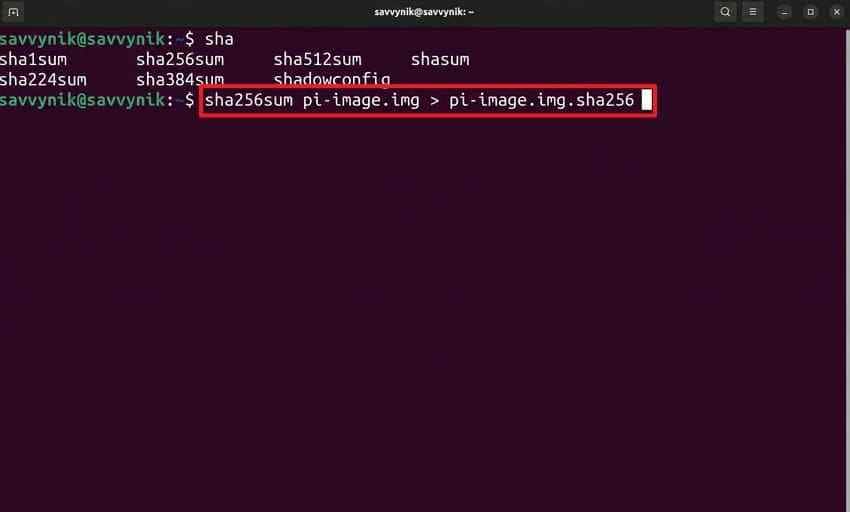
Step 2. Run “sha256sum -c pi-image.img.sha256.” An “OK” result confirms the IMG still matches its stored checksum.
Note: This verifies file integrity against the stored checksum. It does not compare the IMG with the original SD card.
Step 3. Run “gzip -k pi-image.img” for faster compression or “xz -k -T0 pi-image.img” for stronger compression.
Step 4. Rename by including the Raspberry Pi model, OS release, date, and compression format, such as “pi4-bookworm-2026-03-14.img.xz.”
GNU Coreutils confirms that sha256sum computes SHA-256 digests and checks files against stored checksums. The filename identifies the backup and compression format. Record any important compression options separately if you may need to reproduce the workflow later.
Note: Keep more than one generation of important Raspberry Pi image backups. Dated versions protect you if corruption or unwanted changes appear in the newest backup.
Part 5. Restore the IMG to a New SD Card
Use Raspberry Pi Imager to restore a saved IMG or supported compressed image to a new SD card. Verify the target carefully because the write process erases its existing contents.
1. Use the Custom Image Option
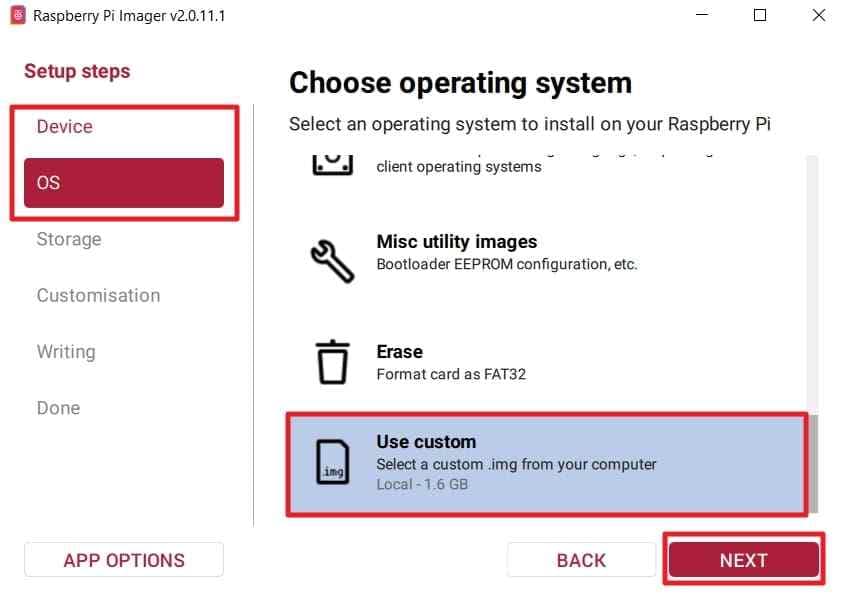
Raspberry Pi Imager can load your own IMG through “Use custom.” It also supports selected compressed image formats, allowing compatible backups to be restored without manual extraction.
Step 1. Open “Raspberry Pi Imager” > Choose “Device” and select your Raspberry Pi model > Select “OS” > Pick “Use custom” > Choose your IMG file.
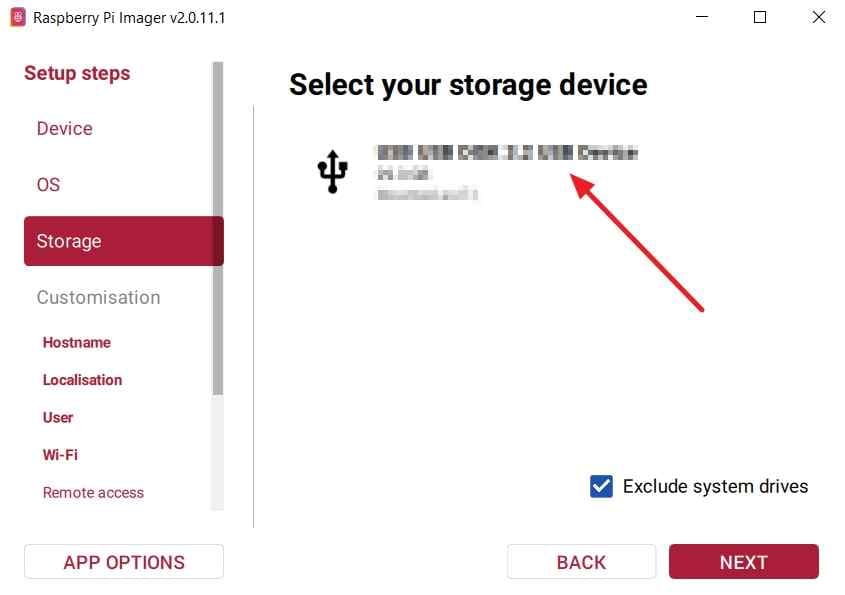
Step 2. Next, access “Storage” > Select the target SD card. If Imager offers OS customization, skip it when restoring the backup unchanged.
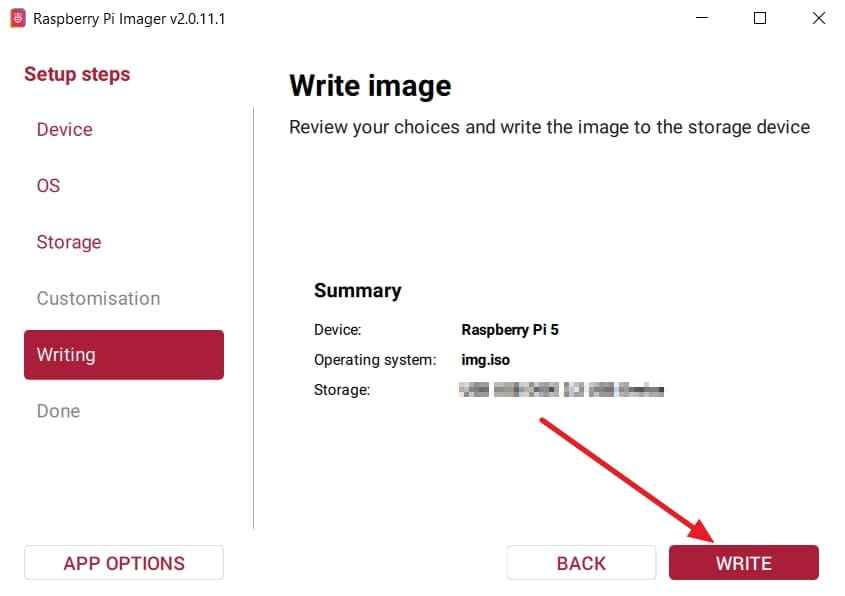
Step 3. Then, press “Write” and confirm the warning to restore the IMG to the selected SD card.
2. Select the Target Carefully
Check the target card name, capacity, and device identity before starting the write. Disconnect unused external drives to reduce the chance of selecting another storage device. Choose the intended card because writing to another drive destroys its stored data.
3. Understand That Writing Erases the Target
Writing the image overwrites existing data and partitions on the selected destination card. Back up any needed files before restoring a Raspberry Pi SD card image. Once writing begins, previous contents cannot be restored through Raspberry Pi Imager itself.
4. Let the Verification Cycle Complete
Raspberry Pi Imager verifies written data after the image transfer finishes without errors. This check helps detect write failures, damaged cards, and unreliable storage media problems. Allow verification to finish before removing the card from your computer or reader. Raspberry Pi recommends completing Imager verification after writing images to selected storage devices.
5. Boot-Test the Result
Insert the restored card into the Raspberry Pi and start the computer system. A successful boot confirms the image was written into a usable card state. Check important services, applications, settings, and files before retiring the original card backup.
Part 6. Handle Images That Will Not Fit a Smaller Card
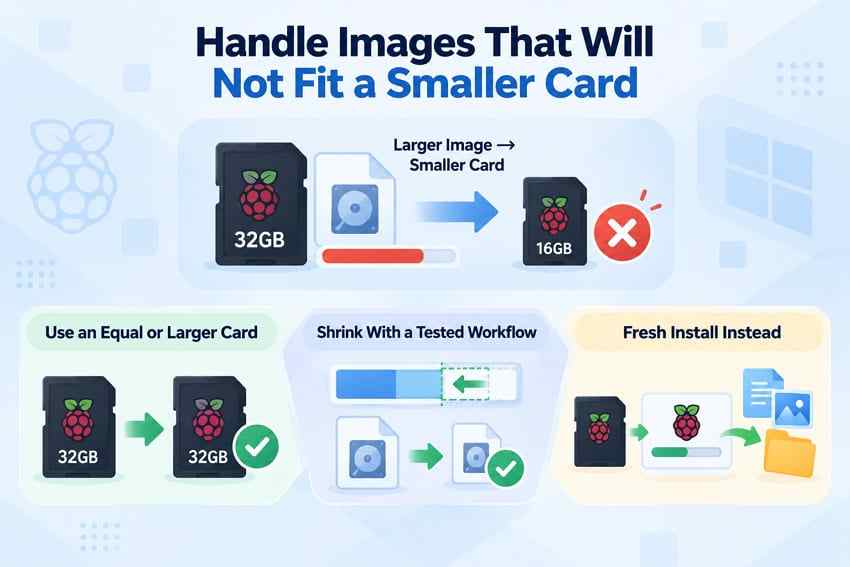
A Raspberry Pi SD card image may fail to restore when the target card has fewer usable sectors than the original card. Even cards with the same labeled capacity can differ slightly in actual size. Use these options when the image does not fit:
- Use an Equal or Larger Card: Choose a target card with at least as many usable sectors as the source card. This is the safest restore method.
- Shrink Only With a Tested Workflow: Shrinking requires a filesystem-specific offline process before creating a smaller image. Keep a verified original backup before attempting it.
- Consider a Fresh Install Instead: Install a current Raspberry Pi OS release, then restore your files and settings. This avoids image-size mismatches and can provide a cleaner setup.
Part 7. Recover Files From a Card or IMG Backup
Failed or corrupted Raspberry Pi SD cards can make projects, settings, applications, and important files inaccessible. A damaged Raspberry Pi image backup can create the same problem when stored data can no longer be opened.
Recoverit Memory Card Recovery can scan detectable SD cards and supported IMG files for recoverable data. It can search for deleted, formatted, corrupted, or inaccessible files. Save recovered files to a different drive to avoid overwriting recoverable data. Recovery may be limited by encryption, overwritten sectors, or physical damage to the card.

Note: Stop using the original Raspberry Pi SD card after deletion, formatting, or corruption. Continued writes can overwrite recoverable data and reduce recovery chances.
Key Features
- Disk Image Scanning: Opens supported IMG files so recovery can proceed without repeatedly reading the original SD card.
- Damaged Card Support: Detects lost partitions on SD cards and recovers files through the updated lost partition recovery workflow.
- Formatted Card Recovery: Searches formatted Raspberry Pi SD cards for recoverable files when the data has not been overwritten.
- AI Search: Uses natural-language search with filter criteria to find specific files faster within scan results.
- 4K/8K Video Preview: Previews high-bitrate 4K and 8K videos before recovery, helping users confirm important media files.
How to Recover Files From a Card Using Recoverit
Now, follow these steps to recover lost files using Recoverit without altering sources:
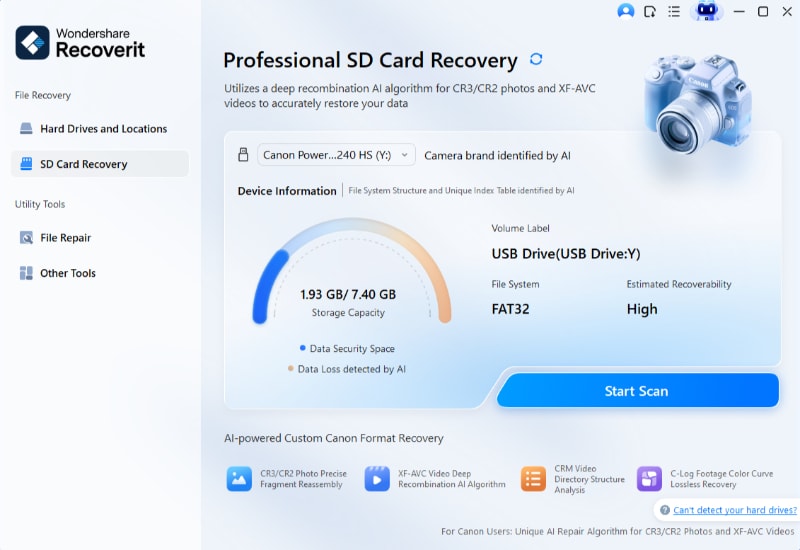
Step 1. Choose the Card
Insert your card into your PC and open Recoverit. Select “SD Card Recovery” > Choose your card > Click “Start Scan.”
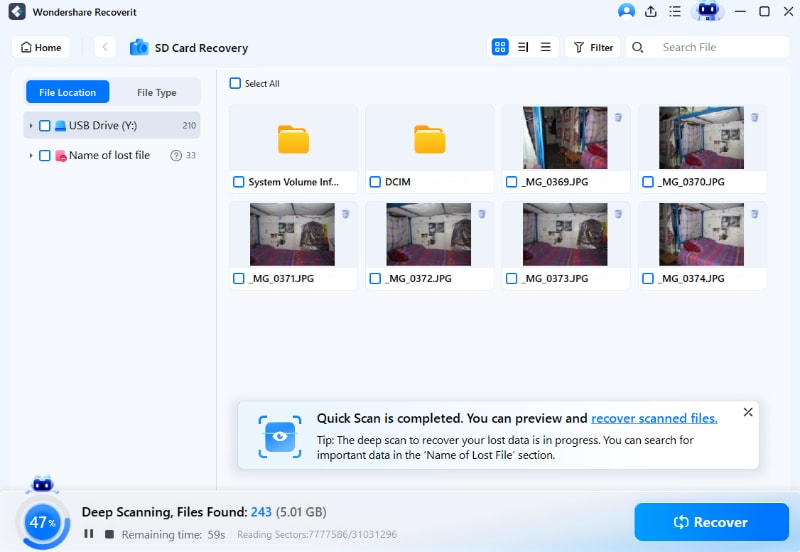
Step 2. Let Recoverit Scan for Card Files
Recoverit begins a quick scan, with found files appearing under the “File Location” tab. Press “Filter” to narrow down the scan process.
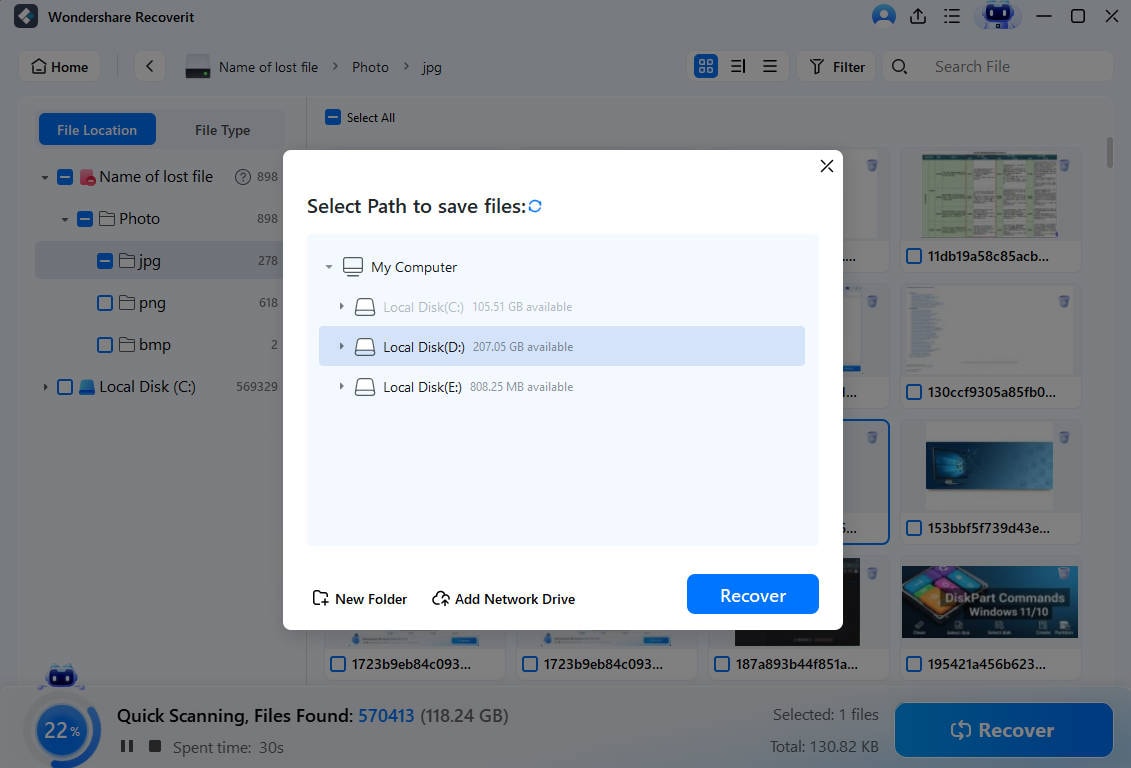
Step 3. Preview Your Files and Recover Them
Once you find your missing card files > Preview them > Press “Recover” to save them.
Recover Files From a Card Using Recoverit
 Security Verified. Over 7,302,189 people have downloaded it.
Conclusion
To summarize, creating and restoring a Raspberry Pi SD card image requires separate backup and flashing workflows. Use a raw-disk tool to create the IMG, then generate a checksum and compress a copy for storage. Raspberry Pi Imager restores the saved image to a suitable SD card and verifies the write. If files become inaccessible, Recoverit can scan detectable cards and supported IMG backups for recovery.
FAQ
-
Does Raspberry Pi Imager create a backup of an existing SD card?
No, Raspberry Pi Imager writes images to cards instead of creating backups. Use a raw-disk imaging tool to capture existing cards into IMG files. -
What is the difference between a Raspberry Pi image backup and a clone?
An image stores every card sector inside one reusable disk backup file. A clone duplicates the card directly onto another bootable storage device instead. -
Can I flash my own Raspberry Pi SD card image with Raspberry Pi Imager?
Yes. Raspberry Pi Imager can load your own image through “Use Custom” and write it to supported storage. Choose the custom image option, then write and verify the selected image. -
Can I restore a Raspberry Pi image to a different size SD card?
A target card can restore the image when its usable capacity is at least as large as the image requires. Smaller cards may fail because sector-level images require enough destination sectors.


