

 TL;DR:
To successfully rescue deleted or corrupted memory card files on a Mac, you must immediately stop using the card to prevent data overwriting and apply the appropriate recovery method—ranging from built-in macOS utilities to third-party software—based on the specific cause of your data loss.
● Before attempting any recovery, do not format the card even if macOS prompts you to do so, and verify that your Mac has free storage space equal to at least twice the memory card's capacity to safely house the retrieved files.
● For accidentally deleted files or minor file system errors, utilize native macOS solutions by restoring from the Trash, extracting from a pre-enabled Time Machine backup, or running Disk Utility First Aid to repair corrupted directories non-destructively.
● For severe scenarios involving formatted cards or complex corruption, use advanced Terminal commands like diskutil repairDisk or dedicated recovery software such as Recoverit, making strictly sure to save all recovered files directly to your Mac rather than back onto the damaged memory card.
Ask AI for a summary
 ChatGPT
 Perplexity
 Gemini
 Claude
 Grok
Grok
Memory card file loss can cause panic. Your photos, videos, and documents might vanish unexpectedly. Accidental deletion, formatting mistakes, or corruption are common causes. Stay calm though. The right tools and methods help you rescue data from memory card on your Mac successfully.
Many Mac users face this problem daily. Memory cards fail. Files get deleted by mistake. The good news? Several ways exist to rescue SD card data successfully. This guide will show you how to rescue memory card files on mac using simple steps. You'll learn about different recovery methods. We'll cover everything from basic tricks to advanced tools. Let's get your precious files back.
Table of Contents
Part 1: Pre-Recovery Checklist: Before You Begin Recovering Files
Before you start trying to rescue SD card data, preparation is key. Taking the right steps initially increases your chances of successful recovery. Here's what you need to check first:
- Stop using the memory card immediately: Don't take more photos or save new files. New data can overwrite deleted files. Remove the card from your camera or device right away.
- Do not format the card: Formatting erases the file structure. Even if your Mac asks you to format, click cancel. Wait until you try recovery methods first.
- Check the card's physical condition: Look for visible damage. Check for cracks, bent pins, or water damage. Physical damage may require professional help.
- Ensure proper connection to Mac: Use a reliable card reader. Make sure it's properly connected via USB. Try different USB ports if needed.
- Verify card is recognized by Mac: Open Finder and check if the card appears. Go to Disk Utility to see if Mac detects it.
- Close unnecessary applications: Shut down programs you don't need. This frees up system resources. Recovery software works better with more available memory.
- Have adequate storage space: Check your Mac's free space. You'll need room to save recovered files. Make sure you have at least twice the card's capacity available.
- Keep the card's original data intact: Don't attempt DIY fixes that modify the card. Each failed attempt can reduce recovery chances.
Part 2: How to Rescue Memory Card Files on Mac
Now that you're prepared, let's explore effective methods. Each approach works for different situations. Choose the method that fits your situation best.
Method 1: Use the Recoverit Tool
SD card recovery software Mac tools offer the best results for most users. Recoverit is a powerful memory card recovery software on Mac that works exceptionally well. It's designed specifically for situations like yours.
This memory card file rescue software on Mac uses advanced scanning technology. It can find files even after formatting or corruption. The interface is user-friendly. You don't need technical
Try Recoverit to Recover Permanently Deleted Files
![]() Security Verified. Over 7,302,189 people have downloaded it.
Security Verified. Over 7,302,189 people have downloaded it.
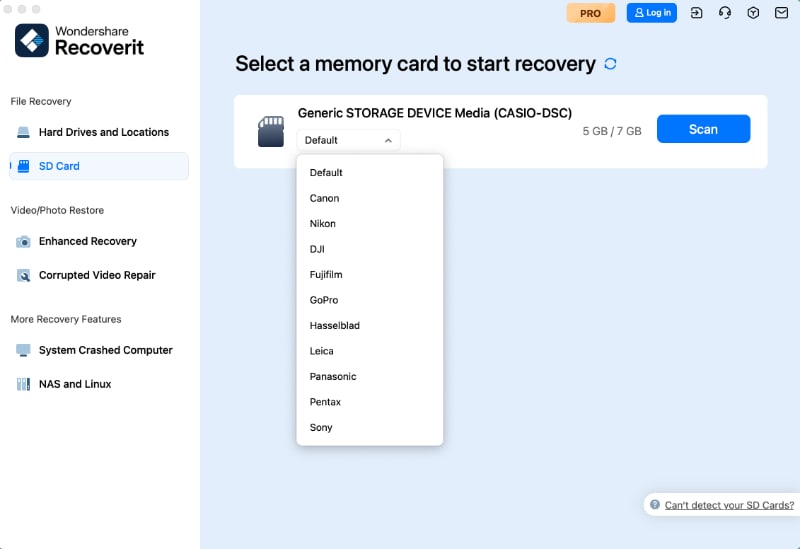
- Download and install Recoverit on your Mac. Launch the application. Connect your memory card to the Mac using a card reader. Select the memory card from the list of drives shown.
- Click the "Start Scan" button to begin scanning.
- Wait for the scan to complete. Browse through recovered files in the preview window.

- Select the files you want to recover. Choose a location on your Mac to save them. Never save recovered files back to the same memory card. Click "Recover" to complete the process.

Method 2: Use Time Machine (If Backups Exist)
Time Machine is Mac's built-in backup solution. If you've been backing up regularly, this method is quick and easy. It's perfect when you need to rescue data from memory cards on Mac that were previously backed up.
This method only works if you had Time Machine enabled before data loss. The beauty of Time Machine is its simplicity. It lets you browse backup history like browsing folders.
How to Use Time Machine to recover memory card data:
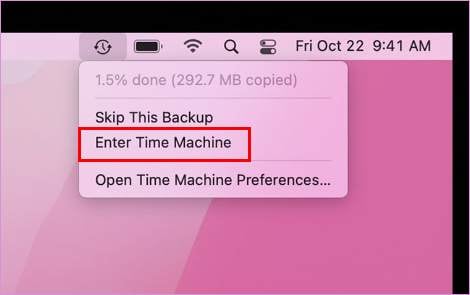
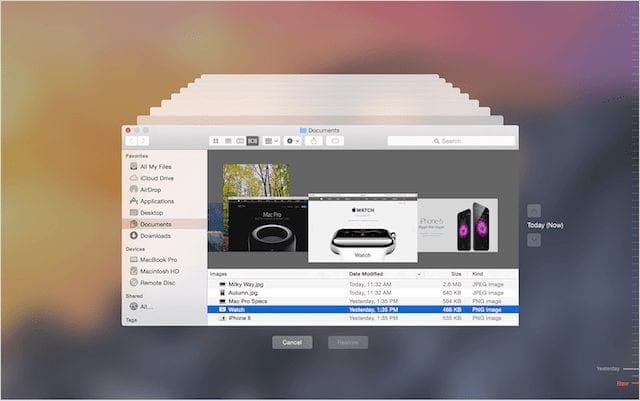
- Connect the external drive containing your Time Machine backups. Open Time Machine from System Preferences or the menu bar. Click "Enter Time Machine." Use the timeline arrows to navigate to a date when your files existed.
- Browse to the memory card location. Select the files or folders you want to recover. Click the "Restore" button. Time Machine will copy the files to their original location.
Method 3: Check Trash and Recently Deleted Folders
Sometimes solutions are simpler than expected. Files might be in your Mac's Trash. This happens when you delete files after copying them from the card. It's the easiest way to rescue SD card data that was recently deleted.
For photo applications like Photos app, there's a Recently Deleted folder. This folder keeps deleted photos for 30 days. Checking here takes only seconds.
How to Check Trash and Recently Deleted Folders to recover memory card data:
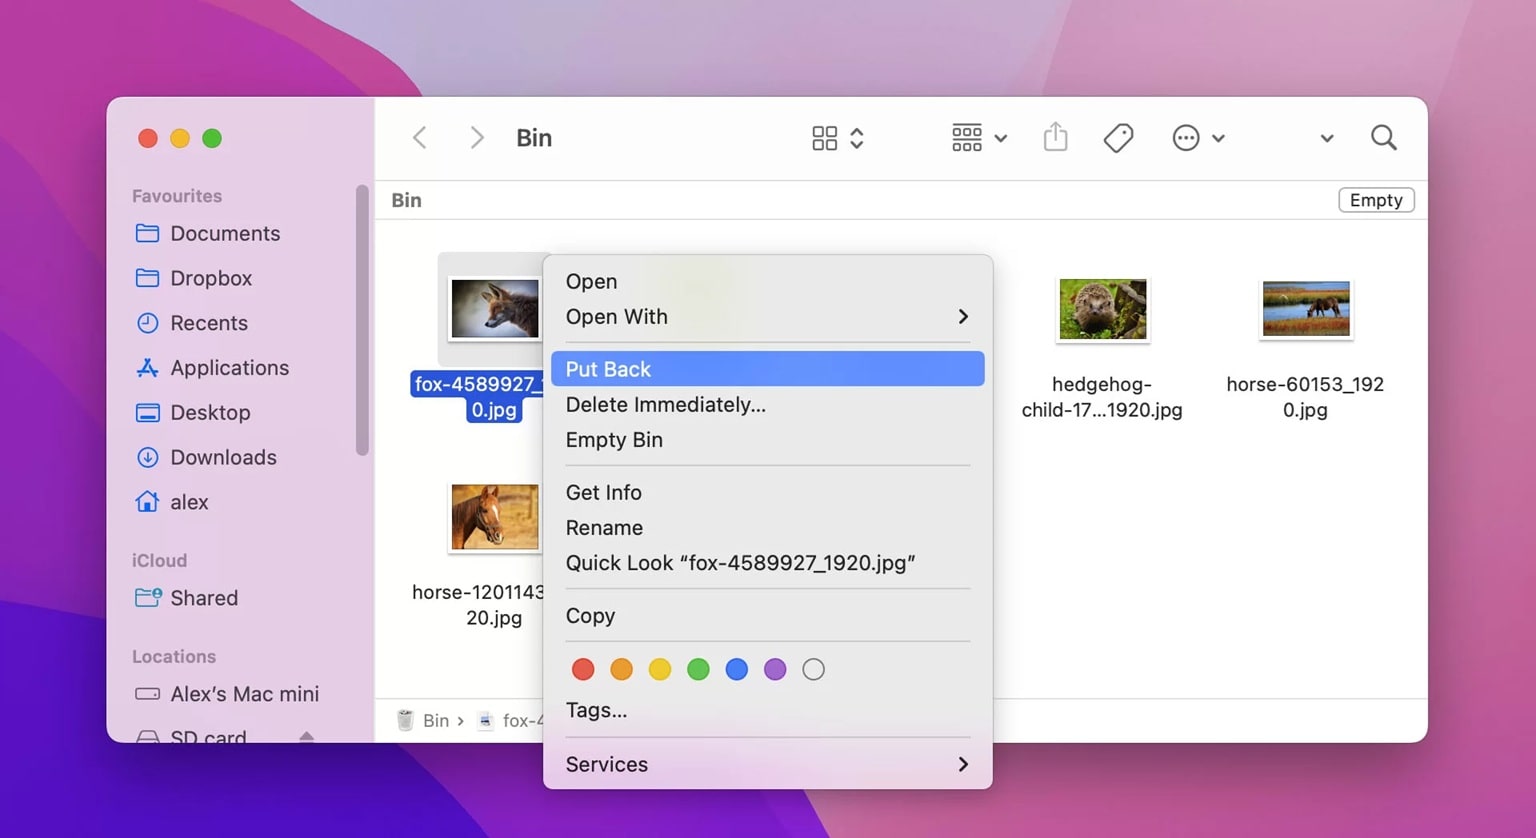
- Click the Trash icon in your Dock. Browse through deleted files. Look for files from your memory card. You can use the search function to find specific filenames.
- Right-click on the files you want to recover. Select "Put Back" to restore them.
Method 4: Use MacOS Terminal (Command Line Recovery)
Terminal offers advanced recovery options for tech-savvy users. Command-line tools can access areas that graphical interfaces cannot. Use this as a memory card file rescue software on Mac alternative when other methods fail.
Terminal commands interact directly with the file system. They can bypass certain restrictions. However, this method works best for recent deletions or minor corruption issues.
How to Use MacOS Terminal to recover memory card data:
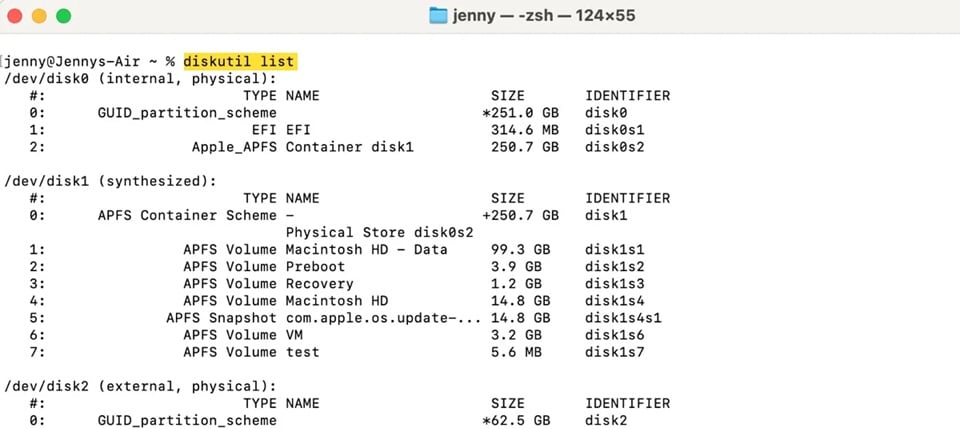
Step 1: Open Terminal from Applications > Utilities. Connect your memory card to the Mac. Type diskutil list and press Enter. Find your memory card in the list. Note the disk identifier (like disk2 or disk3).
Step 2: Type diskutil repairDisk /dev/diskX (replace X with your disk number) and press Enter. Wait for the process to complete. After repairs, check if your files are visible.
Method 5: Try Disk Utility First Aid
Disk Utility is Mac's built-in disk management tool. First Aid can fix file system errors automatically. Running First Aid might restore access to your files. Consider this before using memory card recovery software on Mac.
This tool is particularly effective for corruption issues. When a memory card isn't ejected properly, errors occur. The process is automatic and user-friendly.
How to Try Disk Utility First Aid to Recover Data:
- Fixes file system errors: Repairs corrupted directories. Restores proper file indexing that helps rescue SD card files.
- Non-destructive process: Doesn't delete or overwrite data. Safe to run without risk of further loss.
- Quick diagnostics: Tells you if the card is repairable. Identifies specific problems.
- Built-in and free: Every Mac has Disk Utility. Easy enough for beginners to use when trying to rescue data from a memory card.
- Connect your memory card to your Mac. Open Disk Utility from Applications > Utilities. Select your memory card from the sidebar on the left.
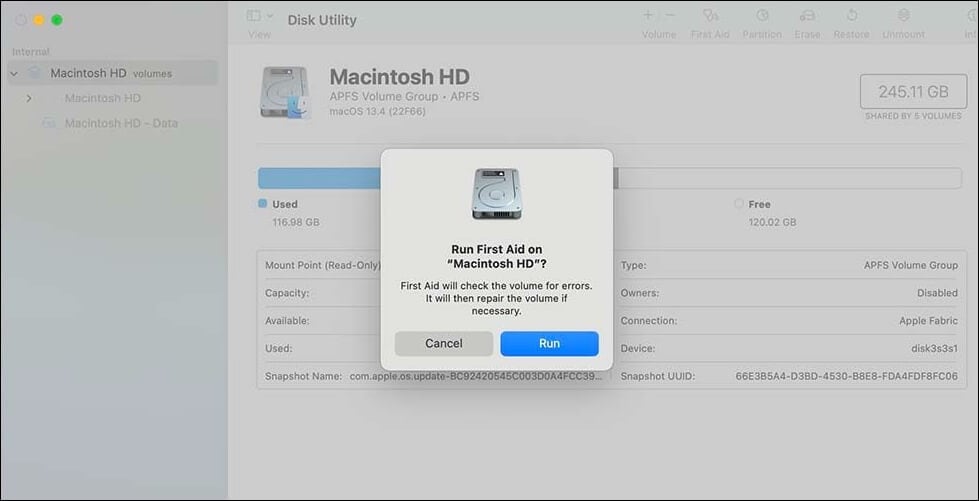
- Click the "First Aid" button at the top. Click "Run" in the dialog box. Wait while Disk Utility scans and repairs the card. When complete, check if your files are now accessible.
Method 6: Contact Professional Data Recovery Services
When all else fails, professionals can help. Data recovery services have specialized equipment and expertise. This option costs more but offers the highest success rate. Professional services are the last resort to rescue SD card data.
How it helps:
- Expert knowledge: Trained technicians understand complex issues. Years of experience with various card types.
- Highest success rate: Can recover data that other methods cannot. Work with physically damaged cards.
- Handles severe cases: Water damage, fire damage, and electrical damage. Situations where DIY how to rescue memory card files methods fail completely.
- Research reputable data recovery services. Read reviews and compare prices. Contact them for an evaluation. Most offer free assessments.
- Ship or bring your memory card to the service. Wait for their assessment report. Review the quote and success probability. If you approve, they'll proceed with recovery.
Part 3: Pro Tips to Prevent Future Data Loss
Prevention is better than recovery. These tips will protect your files going forward. Most data loss is preventable with proper care.
- Regular backup practices: Copy files immediately after shoots or events. Use multiple backup locations. This ensures you can always rescue data from memory cards on Mac because copies exist elsewhere.
- Safe ejection procedures: Always eject memory cards properly. Use the "Eject" button in Finder. Never pull the card out while files are transferring.
- Card maintenance tips: Keep memory cards clean and dry. Store in protective cases when not in use. Avoid extreme temperatures.
- Storage recommendations: Don't fill cards to 100% capacity. Leave at least 10% free space. Format cards periodically in the device you use them with.
- Software updates: Keep your Mac OS updated. Update card reader drivers regularly. Use the latest versions of SD card recovery software and Mac tools.
- Multiple backup locations: Follow the 3-2-1 rule: three copies, two different media types, one offsite. Use cloud storage for important files.
- Quality card selection: Buy memory cards from reputable brands. Higher-quality cards last longer and fail less often. Avoid using a Sony memory card file rescue tool download by buying quality cards initially.
- Regular health checks: Monitor card performance. If a card starts acting strange, retire it. Replace cards every few years.
Conclusion
Losing memory card files doesn't mean they're gone forever. You now know how to rescue memory card files using multiple methods. Start with simple solutions like checking the Trash. Move to more advanced options if needed. Memory card recovery software on Mac like Recoverit, offers excellent results.
Prevention is your best defense. Back up files regularly. Handle memory cards with care. Use proper ejection methods. Remember to stop using a card immediately when files disappear. Quick action improves recovery chances. You're now equipped to handle memory card data loss confidently.
FAQs
-
Q1: Can I rescue data from a formatted memory card on Mac?
Yes, you can often rescue SD card files even after formatting. Formatting doesn't immediately erase data permanently. Use SD card recovery software Mac tools like Recoverit immediately. Don't add new files to the card. The sooner you act, the better your chances. -
Q2: How long does memory card file rescue software on Mac take to recover files?
Recovery time varies based on several factors. Card size is the main factor. Small cards (8-16GB) take 10-30 minutes. Larger cards (64-256GB) may take 1-3 hours. Deep scans take longer than quick scans. Your Mac's processing speed affects duration. Faster computers complete scans quickly. The condition of the card also plays a role. Plan accordingly and don't interrupt the scan process. -
Q3: Is the Sony memory card file rescue tool download necessary for Sony cards specifically?
No, you don't need brand-specific tools. Sony memory cards work with standard memory card file rescue software on Mac. Tools like Recoverit handle all major brands equally well.


